background image

5 — English

App images may vary.

WARNING: 

Do not use this device if it is not completely assembled 
or if any parts appear to be missing or damaged. Use of 
a device that is not properly and completely assembled 
or with damaged or missing parts could result in serious 
personal injury.

WARNING:

Do not attempt to modify this device or create acces-
sories not recommended for use with this device. Any 
such alteration or modification is misuse and could result 
in a hazardous condition leading to possible serious 
personal injury.

If any parts are damaged or missing, please call 

1-877-578-6736

 for assistance.

ASSEMBLY

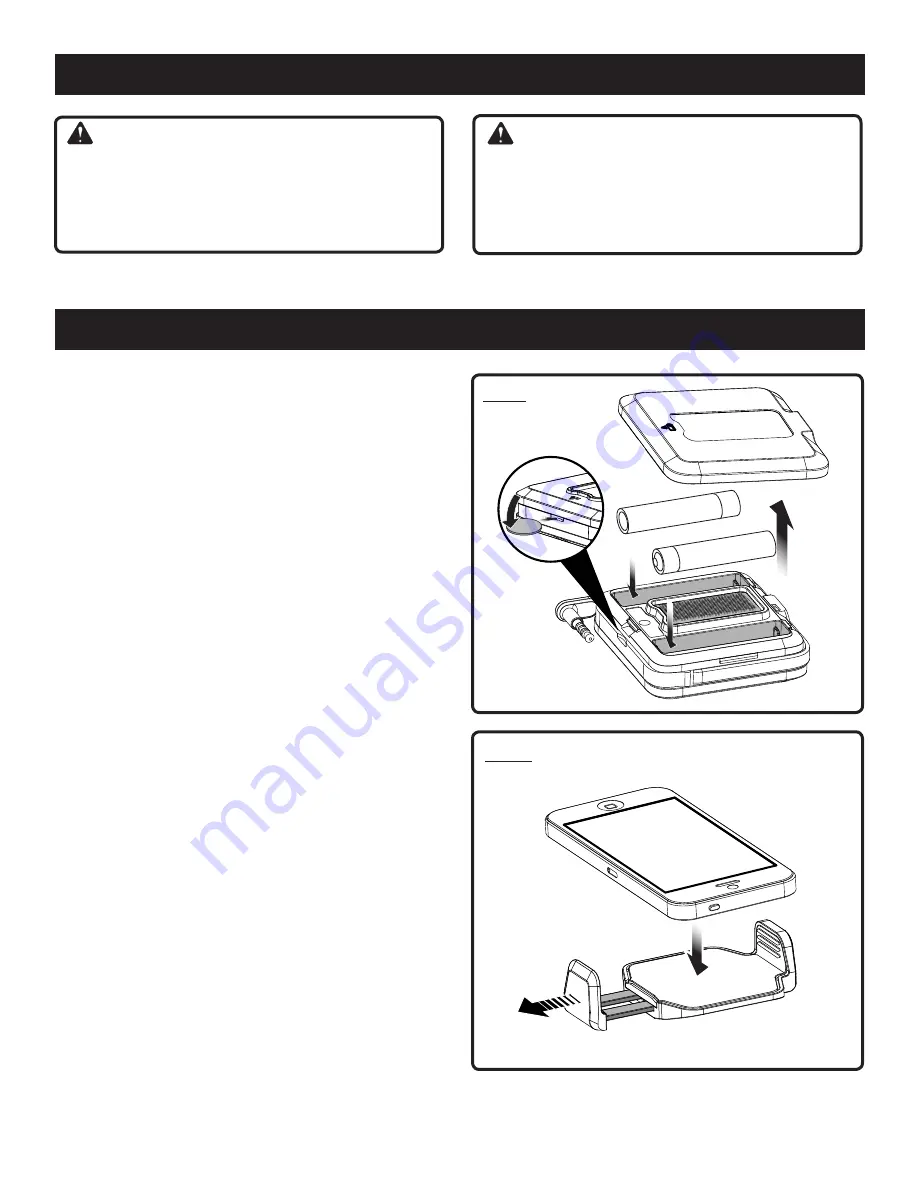
INSTALLING/REPLACING THE BATTERIES 

See Figure 1.

Two AAA batteries are preinstalled in the device. Before 
first use, remove the red pull tab to activate the batteries.

  Disconnect the device from your smartphone.

  Remove the battery cover by inserting the edge of a coin 

into the slot and twisting.

  Install the batteries according to the polarity indicators.

  Align the two sections of the device and snap together 

to close.

  Make sure the device is securely closed before attaching 

to the clip.

NOTE: 

Remove the battery for storage when device will not 

be used for long periods of time.

ATTACHING THE PHONE CLIP 

See Figure 2.

The phone clip expands to fit most smartphones. Always 
install the clip before attaching your smartphone.

  Align the hook-and-loop sections of the device to the 

matching portion of the clip.

  Make sure the two notches match and line up.

  With both thumbs, press the clip in the middle until you 

hear a “click”.

  Make sure the clip is securely attached to the device.

Fig. 1

Fig. 2 

OPERATION

Summary of Contents for Phone Works ES1000

Page 1: ...s may increase the risk of electric shock or cause damage to the device Do not use on a ladder or unstable support Stable footing on a solid surface enables better control of the device in unexpected...

Page 2: ...rious injury to the user could result IMPORTANT SAFETY INSTRUCTIONS Ensure the device is disconnected and turned off before inserting or changing batteries Do not mix old and new batteries or differen...

Page 3: ...property damage SYMBOLS Some of the following symbols may be used on this device Please study them and learn their meaning Proper interpretation of these symbols will allow you to operate the device...

Page 4: ...t Pythagorean method Add to previous measurement Subtract from previous measurement Delete ICON DESCRIPTION FUNCTION Main RYOBI Phone Works app home screen Laser is ON Laser is OFF Take a picture Capt...

Page 5: ...device Before first use remove the red pull tab to activate the batteries Disconnect the device from your smartphone Remove the battery cover by inserting the edge of a coin into the slot and twisting...

Page 6: ...pen the LASER DISTANCE MEASURER app segment The user must read the Laser Radiation DANGER that appears on the screen The app will not become active until the user taps OK at the bottom right of the sc...

Page 7: ...e most accurate measurements Limit the range of measurement to 90 ft Measurements are calculated from the bottom of the device Aiming at glossy surfaces may deflect the laser beam and affect accuracy...

Page 8: ...EASUREMENT See Figure 7 Select the Area icon Position the device to take a width measurement NOTE The icon will flash to show which measurement you are taking Turn the laser On When the laser is turne...

Page 9: ...icon The dotted line indicating the base a will begin flashing Position the device for a horizontal measurement which will be calculated from the bottom of the device Tap the Laser button The measurem...

Page 10: ...has a dotted line that aligns with a solid line when the device is level Both will indicate 0 Fig 12 Fig 11 DRAWING MEASUREMENTS ON A PHOTO See Figures 11 16 Choose the type of measurement you want to...

Page 11: ...asure ment Touch a point to indicate the start and end for all measure ments taken 2 for area length and width 3 for volume length width height Tap SAVE to save the photo with measurement to the proje...

Page 12: ...e for your project Use Existing Scroll through the list of project names and select the one you wish to access Tap Done to load the project OPERATION Fig 17 CREATING NOTES Tap the notes icon in the to...

Page 13: ...home screen will dis play all projects and icons representing the app segments used for each project PROJECT SUMMARY See Figures 19 Accessing the file cabinet from within a project will display the ap...

Page 14: ...sh can ap pears next to each item you have selected to delete Tap DELETE to select the item Tap DELETE again to delete the project view To delete an entire project across multiple devices return to th...

Page 15: ...122 F such as on a dashboard or vehicle interior BATTERY RECYCLING Consult the Earth 911 website www earth911 com or your local waste authority for information regarding available re cycling and or d...

Reviews: