38
Deploying the Access Point
Step 3: Connect the Access Point to the Network
WARNING:
Do not apply power to the AP at this point. You should connect the AP to a
power source only after you finish connecting all other components in
“Step 3: Connect
the Access Point to the Network”
on
page 38
.
You have completed setting up the PoE power connection.
Step 3: Connect the Access Point to the Network
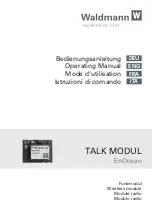
In this step, you will connect the AP from its mounting location to the network. The
connections required for your installation depend on the power sources that you are using.
Figure 23
shows an example of the connections required for a typical installation.
NOTE:
The AP only requires one power source (either AC or PoE). The diagram below
shows both power sources to illustrate how each power source is typically connected if
used in the deployment.
Figure 23.
Typical installation components
WARNING:
Do not apply power to the AP until you finish connecting all the other
components.
INDOOR
OUTDOOR
AC power
source
Router or switch
PoE injector
ZoneFlex 7762 AC
Outdoor AP
CA
T5 Etherne
t
ca
b
le
PoE po
w
e
r ca
ble
D
rip loop
Outdoor
-rate
d
Ca
t5
e F
TP c
able
AC cable
Gr
o
u
nd r
o
d
Ground
screw
18 AWG min
green-and-yellow
wire
Su
rg
e pr
ote
ctor
D
rip l
oop