background image

37

Operating instructions for PODOLOG NOVA 3s | REV. 0

5.8 

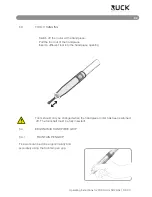
   Exchange of alternate chuck 

If the function of the alternate chuck is no longer satisfactory, simply exchange the chuck 
with the interchangeable chuck for PODOLOG NOVA 3s (art. No. 11067)


   To prevent damage to the handpiece motor, follow the exchange procedure


   of the chuck of the enclosed instruction manual

6. 

 MAINTENANCE, CLEANING AND DISINFECTION

6.1          MAINTENANCE BY RUCK SERVICE

6.2 

   CLEANING AND DISINFECTION

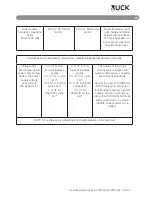
After every treatment

 the outer surfaces of the handpiece and front panel of the controller are 

wiped with a suitable surface disinfectant. 

When work is completed

 the handpiece sleeve is removed (5.7.1) and all accessible surfaces 

(inside of handpiece, inside and outside of sleeve) are cleaned and wiped with disinfectant. 
The suction hose is also wiped with disin-fectant and visually inspected for cracks or damage. 
Also check the housing and in particular the glass front for damage. 

To disinfect all parts of the controller and handpiece, use RUCK alcohol-free disinfection wipes 
(art. no. 2942801). These can be found in our main cata-logue or at www.hellmut-ruck.de.

To ensure continued safe and correct operation of the medical prod-uct, the PO-
DOLOG NOVA 3s must be maintained by RUCK SERVICE every 900 operating 
hours or after 24 months at the latest. During maintenance an electrical safety 
inspection is carried out in accord-ance with DIN EN 62353.

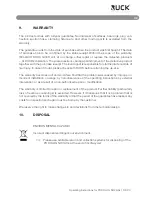
IF THIS REQUIREMENT IS NOT SATISFIED, THE GUARANTEE WILL LAPSE 
AND WE CANNOT ACCEPT LIABILITY! 

Risk of disease transmission. Insufficient disinfection can result in transmission of 
disease. Always comply with the requirements of the re-sponsible national body 
for hygiene and disinfection. Use the RUCK® disinfection cloths – alcohol-free 
(art. no. 2942801) – do not use any spray disinfectants. It must be possible to ef-
fectively evaporate surface disinfectants before the next treatment; allow surface 
disinfectants to thoroughly dry as specified by the manufacturer, but do not wipe 
surfaces dry. 

Summary of Contents for PODOLOG NOVA 3s

Page 1: ...Operating instructions for PODOLOG NOVA 3s REV 0 Operating Instructions REV 0 Print I REF 8011042 GB 0483...

Page 2: ...the following link to download the manual or request it on the phone Questo manuale disponibile anche in altre lingua Lo si pu scaricare utilizzando il seguente link o richiederlo per telefono Navodil...

Page 3: ...moulds to the shape of your hand The capacitive glass operating panel offers simple and intuitive handling The magnetic speed controller can be removed making the front panel very easy to disinfect Th...

Page 4: ...ctions 10 1 5 Scope of delivery 10 1 6 Packaging 11 1 7 Recycling 11 2 INTENDED USAGE 11 3 STAFF AND PATIENT SAFETY 12 3 1 Operator requirements 12 3 2 Staff and patient safety 12 3 3 Possible patient...

Page 5: ...nd direction of rotation 26 5 2 4 Modifying the rotation direction 27 5 2 5 Selecting the extraction level 27 5 2 6 Storing settings 28 5 3 Tool changing 29 5 4 Ergonomic handpiece grip 29 5 4 1 Fount...

Page 6: ...AND AREA OF ACTIVITY 38 7 1 Tools 38 7 2 Dust filter bags 38 8 TECHNICAL DATA INCL EMC TEST RESULTS 40 8 1 Environmental conditions 41 8 2 Information regarding electromagnetic compatibility 42 9 WARR...

Page 7: ...ctions for PODOLOG NOVA 3s REV 0 1 DEVICE DESCRIPTION 1 1 FRONT VIEW 01 Controller 02 Display 03 Dust filter bag drawer 04 Handpiece 05 Magnetic speed control knob 06 Hose connection M1 M2 M3 i 10 M1...

Page 8: ...W 01 Power cable 02 Power switch On Off OFF power switch off ON power switch on If the power cable is damaged the device must be disconnected from the mains and may not be used any more A damaged powe...

Page 9: ...igit Protection against contact Protection against foreign bodies Second digit Protection against water 0 No special protection 0 No special protection 1 Against large areas of the body Large foreign...

Page 10: ...or mistakes in these operating instructions or consequen tial damage resulting from the provision of these operating instructions or their application when using the product These operating instructio...

Page 11: ...be taken into account 2 INTENDED USAGE The PODOLOG NOVA 3s Footcare System activates rotating tools which can be used to re move hard skin calluses or nails for example The device is intend ed for us...

Page 12: ...To protect users patients and third parties the following must be observed Only high quality rotary tools in accordance with DIN EN ISO 1797 1 which have a standardised shaft diameter of 2 35 mm cylin...

Page 13: ...use there is a sufficient distance from the treatment area The efficient suction technology of the PODOLOG NOVA 3s minimises the risk of inhaling dust which may potentially contain pathogens The risk...

Page 14: ...e sent a hazard due to their proximity to the treatment area To minimise the risk the user must wear goggles and mouth and nose protec tion during the treatment 3 4 2 ALLERGY RISKS It is possible but...

Page 15: ...ere is damp ness in the device Switch the device off before maintenance and cleaning and unplug it from the mains power Never immerse the device in water or other fluids You must remove the plug from...

Page 16: ...tance of 30cm from the PODOLOG NOVA 3s and its parts Otherwise the possibility of device performance impairments cannot be excluded Please also refer to 8 2 Specifications referring to electromagnetic...

Page 17: ...hen using the device in domestic premises there can be a risk that the device may be tampered with by children Keep children away from the device Protect the device against pest infestation through re...

Page 18: ...18 Operating instructions for PODOLOG NOVA 3s REV 0 5 OPERATION M1 M2 M3 i 10 M1 01 04 06 03 05 02 M1 07 08...

Page 19: ...tings e g language 04 Buttons for storing Three different combinations of rotational speed rotati on direction and extraction power can be stored The memory is shown in the display 04 1 M1 M2 are nee...

Page 20: ...g Open the dust filter bag drawer by pulling on the hose connector Please check if the supplied filter bag has been inserted Close the drawer by sliding it in Switch to stand by mode using the power s...

Page 21: ...be fully inserted The cutters used must not have any imbalance or other defects Failure to observe this requirement may result in patient injury and damage to the handpiece bearing Always work with a...

Page 22: ...e first time it is switched on you must set the PODOLOG NOVA 3s to your language and your area of activity Additionally you can activate the service reminder function so that you are reminded in time...

Page 23: ...future press and hold the i button for 5 seconds 10 LANGUAGE SELECTION M1 Deutsch M3 Spanish M1 DEUTSCH M2 PYCCKN FRANCAIS M3 POLSKA ENGLISH MY FIELD OF ACTIVITY IS M1 FOOT CARE PODIATRY M2 NAIL DESI...

Page 24: ...ndpiece in your hand and press lightly on the switch at the back end Switch The motor runs at the set speed and you can start your work The speed setting may not exceed the permitted maximum speed of...

Page 25: ...eed that corresponds to the tool being used is set using the rotational speed knob Clockwise Speed is increased Max speed rotation 40 000 rpm Counter clockwise Speed is decreased Min speed rotation 5...

Page 26: ...ending on which tool you are using and on whether you are right handed or left handed The arrow shows the direction of rotation RIGHTHAND DIRECTION In order to be able to set the speed directly via th...

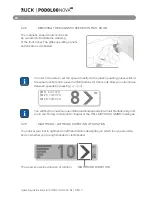
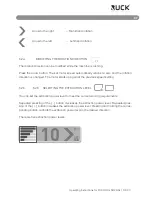
Page 27: ...nd the rotation direction is changed The motor starts up again at the previous speed setting 5 2 5 5 2 5 SELECTING THE EXTRACTION LEVEL You can set the extraction power level to meet the current worki...

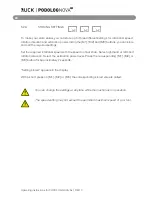
Page 28: ...et the required rotational speed with the speed control knob Select righthand or lefthand rotation direction Select the extraction power level Press the corresponding M1 M2 or M3 button for approximat...

Page 29: ...l out of the handpiece Insert a different tool into the handpiece opening Tools should only be changed when the handpiece motor has been switched off The tool shaft must be fully inserted 5 4 ERGONOMI...

Page 30: ...t surface work gripping the handpiece from above and supporting it with the thumb makes for accurate and relaxed working 5 5 INFO MENU The Info menu offers you the option of calling up the following i...

Page 31: ...descrip tion under Point 5 6 1 CHANGING THE FILTER BAG 5 5 2 DISPLAY NEXT SERVICE DATE This practical display lets you know when the next service is due for your PODOLOG NOVA 3s This is either after 9...

Page 32: ...LOG NOVA 3s will let you know when the next service is due You can activate deactivate this func tion through the INFO MENU After 900 operating hours the maintenance symbol appears on the display 10 M...

Page 33: ...NOW LATER If you select LATER the device displays a reminder every 5 hours until the filter change has been carried out 5 6 1 CHANGING THE DUST FILTER BAG Hose connector Dust filter bag drawer The de...

Page 34: ...er the hose sleeve Close the dust bag drawer Now switch the device back on The device asks whether the dust filter bag has been successfully inserted Confirm that the change has been made by pressing...

Page 35: ...ficial nails please do not for get to protect your eyes mouth and nose by using a face mask and goggles Once a week you should check that the dust filter bag drawer is cor rectly seat ed and at the sa...

Page 36: ...ssing against the metal cover of the chuck at the same time The specifications and instructions from the manufacturer referring to cleaning and disinfectant materials and those referring to the corre...

Page 37: ...and in particular the glass front for damage To disinfect all parts of the controller and handpiece use RUCK alcohol free disinfection wipes art no 2942801 These can be found in our main cata logue o...

Page 38: ...er or other fluids as this creates a risk of an electric shock Switch the device off before cleaning and unplug it from the mains power Do not use disinfecting sprays Dampness could penetrate and lead...

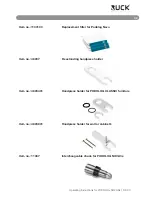
Page 39: ...1100103 Replacement filter for Podolog Nova Item no 48237 Freestanding handpiece holder Item no 4823401 Handpiece holder for PODOLOG CLASSIC furniture Item no 4823801 Handpiece holder for wall or cabi...

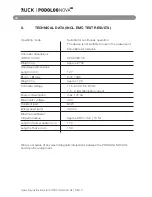
Page 40: ...approx 2700 Handpiece dimensions Length in mm 127 min max 24 5 18 5 Weight in g approx 120 Controller voltage 115 240 V 50 60 Hz 1 5 0 8 A alternating current Power consumption max 175 VA Micromotor...

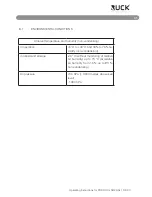
Page 41: ...ature and humidity non condensing in operation 5 C to 40 C and 30 to 75 hu midity non condensing in transit and storage 25 C without monitoring of relative air humidity up to 70 C at relative air humi...

Page 42: ...ill be caused to nearby electronic devices HF emissions according to CISPR 11 Class B The PODOLOG NOVA 3s is suit able for usage on all premises which are directly connected to the public power supply...

Page 43: ...is used in the prescribed environment Interference immu nity test IEC 60601 test level Conformance level Electromagnetic en vironment guidelines Discharging of static electricity ESD accord ing to IEC...

Page 44: ...10 870 930 MHz Pulse Modulation 18 Hz 28 V m 1720 1845 1970 MHz Pulse Modu lation 217 Hz 28 V m 2450 MHz Pulse Modulation 217 Hz 28 V m 5240 5500 5785 MHz Pulse Modula tion 217 Hz 9 V m Radiated RF EM...

Page 45: ...0 UT for 250 300 cycles at 0 The quality of the supply current shall correspond to typical commercial or hospital environment standards Should the user of PODOLOG NOVA 3s require continued functional...

Page 46: ...IEC 61000 4 6 Beamed HF interfe rence variables accord ing to IEC 61000 4 3 3 Veff 150 kHz to 80 MHz 3 V m 80 MHz to 2 5 GHz 3 Veff 150 kHz to 80 MHz 3 V m 80 MHz to 2 5 GHz Portable and mobile radio...

Page 47: ...he equipment in order to prove functioning for the intended pur pose Should unusual performance features become apparent additional mea sures may become necessary e g a shift or a complete change of p...

Page 48: ...learance range depending on the transmitting frequency expressed in metres m 0 01 0 1 1 10 100 150 kHz to 80 MHz d 1 20 P 0 12 0 38 1 20 3 80 12 00 80 MHz to 800 MHz d 1 20 P 0 12 0 38 1 20 3 80 12 00...

Page 49: ...heck with RUCK before returning the de vice The warranty becomes null and void if we find that the problem was caused by improper or incorrect installation or usage by non observance of the operating...

Page 50: ...s been fitted but the device has suddenly stopped re sponding to commands e g the glass operating panel is not reacting or the display remains dark when the standby switch is switched on Please switch...

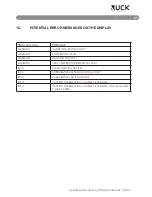
Page 51: ...NG HANDPIECE MOTOR FAULT WARNING PUMP MOTOR FAULT WARNING DEVICE IS TOO HOT WARNING LIMIT TEMPERATURE REDUCE LOAD INFO AFTER COOLING ACTIVE INFO OVERHEATING AFTER COOLING ACTIVE INFO OVERHEATING SWITC...

Page 52: ...you experienced this It s very hard to remove the fine fissure cutter from the hand piece Help is at hand These cutter forceps ensures that you have a good grip on all rotary instru ments Videotip In...

Page 53: ...g instructions for PODOLOG NOVA 3s REV 0 NOTES You will find the safety operating and hygiene recommendations from Busch on our website at www hellmut ruck de downloadbereich SuH_D pdf Or simply scan...

Page 54: ...54 Operating instructions for PODOLOG NOVA 3s REV 0...

Page 55: ...55 Operating instructions for PODOLOG NOVA 3s REV 0...

Page 56: ...Operating instructions for PODOLOG NOVA 3s REV 0 HELLMUT RUCK GmbH Daimlerstra e 23 D 75305 Neuenb rg fon 49 0 7082 944 20 fax 49 0 7082 944 22 22 e Mail kontakt hellmut ruck de web www hellmut ruck...

Reviews:

Related manuals for PODOLOG NOVA 3s