background image

23

It’s Under Control

®

BATTERY

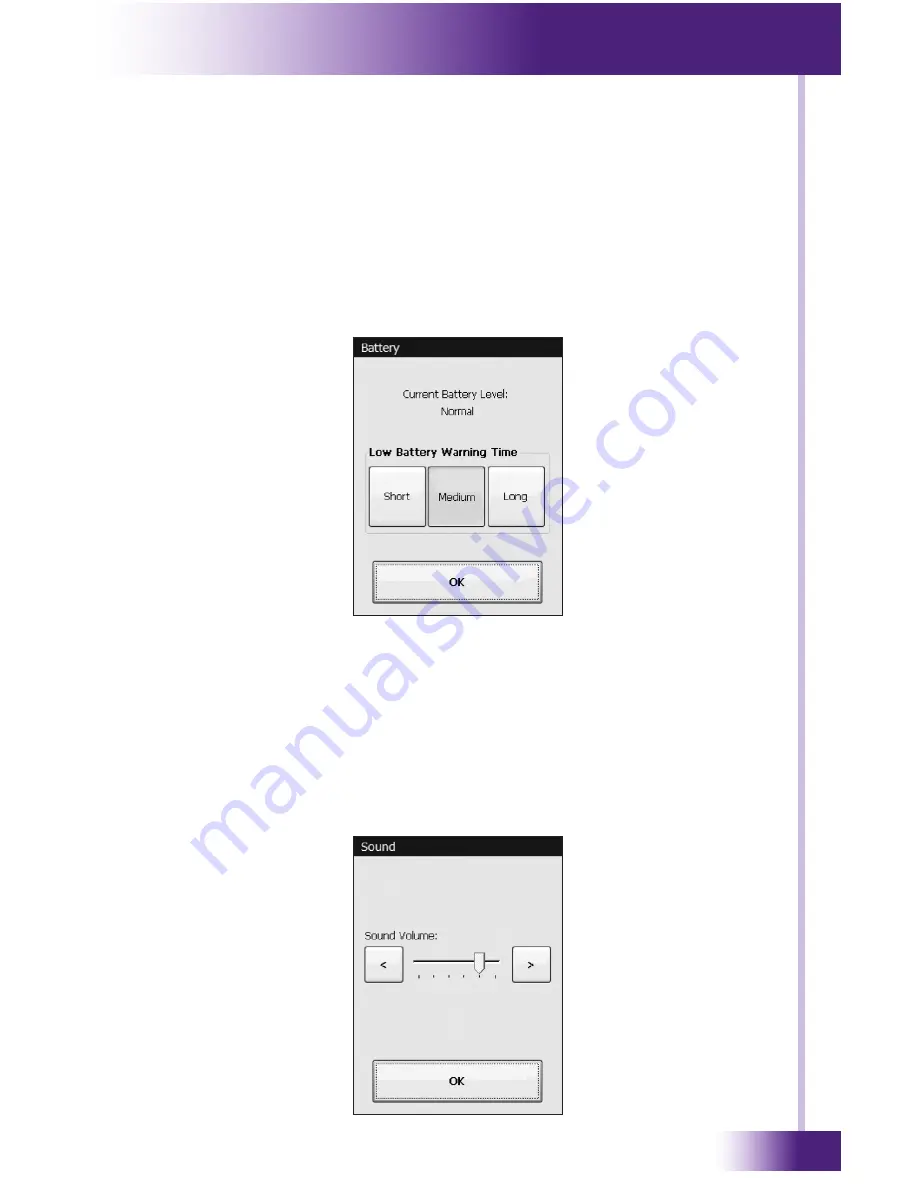
This button displays a window that allows you to adjust the relative 

amount of time that the low battery icon appears on the display.
This setting will determine how much time you have between the 

appearance of the low battery warning and the battery becoming 

completely depleted. The default warning time is Medium. Depending upon 

the age of the battery and your daily usage habits, it may be beneficial to 

adjust this time. Press the OK button when finished.

SOUND

This button displays a window that allows you to adjust the volume of the 

audible speaker. The speaker sound provides feedback that a button was 

pressed. Press the arrows to the left or right to adjust the volume. Press 

the OK button when finished. There are six discrete volume settings. The 

lowest setting disables the speaker.

CHAPTER 

3 | OPERATION

Summary of Contents for T2-Cs+

Page 1: ...1 It s Under Control T2 Cs Universal System Controller It s Under Control Operation Guide 70 210091 20 V1 0...

Page 2: ...Universal System Controller T2 Cs 2 Copyright 2011 Remote Technologies Incorporated All rights reserved...

Page 3: ...levision reception which can be determined by turning the equipment off and on the user is encouraged to try to correct the interference by one or more of the following measures Reorient or relocate t...

Page 4: ...ems placed on or against them paying particular attention to the cord plugs at power receptacles and at the point at which they exit from the unit Water and Moisture Do not use the unit near water for...

Page 5: ...IT AND INFERIOR QUALITY BATTERY WARNING Counterfeit and or inferior quality lithium batteries are known to develop internal defects that can lead to fire and or explosion This can result in damage to...

Page 6: ...iodic maintenance 5 Causes other than product defects including lack of skill competence or experience of user 6 Shipment of this product claims must be made to the carrier 7 Being altered or which th...

Page 7: ...or omissions contained herein or for consequential damages in connection with the furnishing performance or use of this guide Microsoft Windows Windows XP Windows Vista and Windows 7 are registered tr...

Page 8: ...Universal System Controller T2 Cs 8...

Page 9: ...ntents 12 Chapter 2 Introduction 13 Important Notes 13 Cleaning 13 Battery and Docking Station 14 Getting Started 15 Remote Reference 16 Docking Station Reference 18 Chapter 3 Operation 19 Programming...

Page 10: ...Universal System Controller T2 Cs 10...

Page 11: ...trol products are sold only through professional installers programmers and never directly to consumers it is our philosophy to not incorporate programming capability directly into our products Instea...

Page 12: ...Vista Windows 7 or later version Microsoft operating system UNPACKING AND INSPECTION After unpacking your new T2 Cs Universal System Controller save all of the packing materials in case you ever have...

Page 13: ...power supply that is provided with the T2 Cs Using the wrong type of power supply may result in damage to the battery or electronic components Do not disassemble the unit Service of the T2 Cs should b...

Page 14: ...ted to a wall using the mounting holes on the back of the unit If the T2 Cs battery capacity is reduced to approximately 25 percent a low battery icon will appear in the top center of the display The...

Page 15: ...o insert it Next turn the unit on by sliding the power switch into the ON position toward the battery After power is applied the T2 Cs will take approximately ten seconds to load the operating system...

Page 16: ...em Controller T2 Cs 16 CHAPTER 2 INTRODUCTION REMOTE REFERENCE FRONT LIGHT SENSOR HOME PAGE BUTTON IR TRANSMISSION WINDOW KEYPAD BUTTONS 3 WAY ROCKER SWITCH FRAME SCROLL BUTTONS TOUCHSCREEN DISPLAY BA...

Page 17: ...17 It s Under Control BACK CHAPTER 2 INTRODUCTION AUDIO SPEAKER USB PROGRAMMING PORT DOCKING STATION CONTACTS POWER SWITCH LITHIUM ION BATTERY PACK...

Page 18: ...Universal System Controller T2 Cs 18 DOCKING STATION REFERENCE CHAPTER 2 INTRODUCTION TOP BACK CHARGE CONTACTS CHARGE LED POWER JACK WIRE GUIDE WALL MOUNT HOLES 2 3 8 in 60 mm...

Page 19: ...page are programmed to contain objects buttons text graphics etc that are related in some way For instance they may all display information necessary for controlling a DVD player or a list of favorit...

Page 20: ...setting the T2 Cs power switch to the off position and then pressing and holding the Home button while sliding the power switch to the On position You can also access the Control Panel page by assigni...

Page 21: ...st With the light sensor disabled the backlight brightness will always stay at the same level whenever the T2 Cs is turned on Press the OK button when finished If the light sensor is enabled there are...

Page 22: ...when it is moved Off means the tilt switch is inactive TIME OUT This button displays a window that allows you to adjust the amount of time the unit stays awake after the last button press The time is...

Page 23: ...ult warning time is Medium Depending upon the age of the battery and your daily usage habits it may be beneficial to adjust this time Press the OK button when finished SOUND This button displays a win...

Page 24: ...touchscreen this routine is included as a precaution only Press the Calibrate button to continue Follow the directions on the display to complete the calibration process WARNING DO NOT ATTEMPT TO CAL...

Page 25: ...ated high resolution touchscreen Display Size 2 4 in 61mm diagonal Backlights White LED display Blue Red White LED keypad Nominal Run Time on Full Charge 2 5 hours minimum continuous use 5 to 7 days o...

Page 26: ...Universal System Controller T2 Cs 26...

Page 27: ...oftware however Make sure you are using a USB 2 0 compliant programming cable and that both ends are connected securely Verify that the T2 Cs USB driver was installed the first time the T2 Cs was conn...

Page 28: ...Universal System Controller T2 Cs 28...

Page 29: ...al number if applicable If you are having a problem with hardware please note the equipment in your system a description of the problem and any troubleshooting you have already tried If you are having...

Page 30: ...al System Controller for service Please pack it securely we suggest that it be insured Do not include accessories such as power cords or manuals unless instructed to do so You must pay any shipping ch...

Page 31: ...ed 15 Remote Reference 16 Limited Warranty 6 Operation 19 Backlight Level 21 Battery Display 23 Calibrate Touchscreen 24 Control Panel Page 20 Programming 19 Sound 23 Tilt Switch 22 Time Out 22 Touch...

Page 32: ...T2 Cs 32 Remote Technologies Incorporated 5775 12th Avenue East Suite 180 Shakopee MN 55379 Tel 952 253 3100 Fax 952 253 3131 www rticorp com 2011 Remote Technologies Inc All rights reserved Printed i...

Reviews: