background image

FOCUS 320 SBR Owner's Manual 

22 

RSF Woodburning Fireplaces 

COVERING THE FIREPLACE FACING  

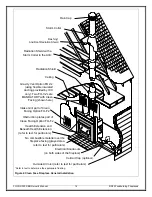
Facing materials (see Figure 3 and Figure 4) MUST BE NON-COMBUSTIBLE such as metal, brick, slate or ceramic 
tile. Gypsum board is NOT an acceptable facing material. Gypsum board cannot get closer to the fireplace than the 
side and top standoffs. 

Facing this fireplace can be as simple as using cement boards that will be painted or gluing ceramic tiles with high 
temperature silicone sealant.  

MANDATORY OPTIONS WITH THE CLEAN FACE 

When installing a Clean Face (FO-F2) on your FOCUS 320 SBR, you MUST install the intake duct (part of FO-F2) 
to provide sufficient air to the unit along with two Gravity Vent Kits (FO-V2 or FO-V3, sold separately) to provide an 
evacuation path for the heat. Neglecting to install either one of these will result in overheating of the unit and may 
put your safety at risk. Refer to each option's installation instructions for particular details. 

Use only genuine RSF parts. The use of any substitutes will void the warranty and may put your safety at risk. 

HEARTH EXTENSION 

The area immediately in front of the fireplace must be protected by a non-combustible material such as brick, tile, 
stone, or slate. Refer to Table 1 (G-H) for the depth and width that the hearth protection should extend beyond the 
front and both sides of the door opening (see Figure  1). There  is no minimum thickness required for the hearth 
extension. 

BENEATH HEARTH EXTENSION 

If  your  fireplace  is  installed  on  a  non-combustible 
floor, the spark guard specified below is not required. 

Install  the  spark  guard  provided  (5"  x  36"  piece  of 
sheet metal) halfway under the fireplace and halfway 
under the hearth extension and centered on the door 
opening.  The  spark  guard  will  extend  2½"  beneath 
the  fireplace.  This  will  make  certain  that  sparks 
cannot lodge in this area and start a fire. If necessary, 
the provided spark guard can be cut to the minimum 
width specified in Table 1 (I). 

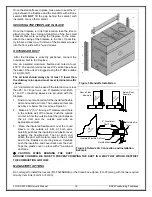
If you are preparing a raised installation, you will need a custom made spark guard, either a "Z" shaped spark guard 
or a right angle spark guard (see Figure 13). The Z-shaped spark guard must be used if the height between the 
bottom of the fireplace and the top of the non-combustible flooring of the hearth extension is less than or equal to 
2 ½". The height of the Z-shaped spark guard must equal the distance between the floor and the base of the unit 
and go under the hearth extension and the fireplace by at least 2½". If the unit is installed higher than 2 ½" from the 
top of the flooring, a right-angle spark guard is necessary. The sides of the right-angle spark guard should be at 
least 2½" x 2½" and must be covered with non-combustible material. Any custom made spark guard must have the 
minimum width specified in Table 1 (I), and be installed centered on the door opening. 

 NOTE

: Custom-made spark guards are site built.  

MANTEL 

Masonry  and  other  non-combustible  mantels  (shelf  and  posts)  can  be  placed  anywhere  around  the  fireplace 
opening, without blocking any of the bottom and top louvers. If the non-combustible mantel is located between the 
top of the fireplace facing and the specified height for a combustible mantel, then the wall portion between the top 
of the fireplace facing and the mantel must be covered in non-combustible material. If the non-combustible mantel 
is located at the same height allowed for a combustible mantel, or higher, then no special wall covering is required 
below the mantel. 

For combustible mantels shelves, please  see Table 1 (J-K) for the maximum depth of the mantel shelf and their 
clearance requirements. See Figure 1 for an example. 

Vertical mantel posts on the sides of the fireplace opening must be non-combustible. Combustible mantel posts are 
not permitted unless they meet the clearance required to a perpendicular sidewall (see Table 1 (B)). 


Figure 13 Special Custom-made Spark Guard 

Non-
Combustible
Flooring

Right Angle

Spark Guard
(not provided)

More than 2 1/2"

Non-
Combustible
Flooring

Z-Shaped Spark

Guard (not
provided)

2 1/2" or less

RSF

Fireplace

Summary of Contents for FOCUS 320 SBR

Page 1: ... Residential Factory Built Fireplace Operation Maintenance Installation FOCUS 320 SBR Keep these instructions for future use Industrial Chimney Company Inc 400 J F Kennedy St Jerome QC Canada J7Y 4B7 Telephone 450 565 6336 www icc rsf com ...

Page 2: ...L 3 GENERAL SPECIFICATIONS 4 THE COMBUSTION CONTROL SYSTEM 4 OPTIONS 4 UNIT DIMENSIONS AND CLEARANCES 6 OPERATION 8 AIR CONTROLS 8 IMPROVING EFFICIENCY 8 IMPORTANCE OF DRAFT 8 BURN TIME VS HEAT OUTPUT 8 FUEL 9 FIRST FIRES 9 LIGHTING 9 REFUELING 9 TROUBLESHOOTING PROBLEMS 10 MAINTENANCE 10 CHIMNEY CLEANING 10 DISPOSAL OF ASHES 11 GENERAL CLEANING 11 GLASS CLEANING 11 PAINT 11 DOOR ADJUSTMENT 11 LOU...

Page 3: ... not specified for use with this fireplace 11 The burn rate is set by the automatic air control at the factory DO NOT tamper with the air control DO NOT install a flue damper that would allow you to reduce the chimney draft and thus slow the minimum burn rate 12 To avoid damaging the fireplace DO NOT operate it in a manner inconsistent with the operating instructions in this manual NOTE We strongl...

Page 4: ...r control Control the fire as you would any normal fireplace using one or two logs at a time for a smaller fire or more logs for more heat Remember when the fireplace is hot the automatic air control will reduce the combustion air inlet since the bi metallic coil will shut the air control damper part way OPTIONS Louver Options There are different ways you can finish your fireplace1 You can choose ...

Page 5: ...o circulate a moderate amount of warm air from the fireplace to another room we offer the Heat Dump Kit FO HD It includes a 180 cfm blower and is most often used to provide supplemental heating to a basement room when the fireplace is on the main floor but it can also be used to send the warm air to an adjacent room or upstairs The duct maximum length is 8 for the FO HD General Options To simplify...

Page 6: ...4 5 18 1 2 efer to able 1 for minimum depth of hearth extension efer to able 1 for minimum width of hearth extension on combustible hearth extension and spark guard refer to able1 and text for particulars efer to able 1 for maximum mantel shelf depth efer to able 1 for minimum mantel shelf height above the door opening efer to able 1 for minimum distance of side wall to the firebox opening ...

Page 7: ...antel shelf depth see Table 2 for other mantel sizes 12 305 mm K Minimum height of a combustible mantel shelf above the top of the firebox opening to the bottom of the combustible mantel refer to the Installation Mantel section for particulars See Table 2 Table 2 Various Mantel Shelf Depths and Corresponding Installation Heights Maximum Mantel Shelf Depth Minimum Installation Height 0 to 6 20 12 2...

Page 8: ...t from the main floor to the basement This allows you to efficiently heat your primary space while also heating the basement as a secondary space The efficiency will also be influenced by the draft in the chimney which will be influenced by various factors refer to Importance of draft below and by the amount of wood burning at any point see Burn Time vs Heat Output below The efficiency will also b...

Page 9: ...or Open the doors and windows to allow the room to properly ventilate LIGHTING Start by laying your fire starter and kindling Traditional fire starter is crumpled newspaper make sure to use enough to light the kindling 5 6 pieces should do Next lay 3 or 4 layers of kindling crisscrossed over the newspaper Using plenty of kindling ensures that the chimney will heat up quickly and establish a strong...

Page 10: ...unning particularly a kitchen range hood or bathroom exhaust fan This can affect the pressure in the home Try opening a window near the fireplace a little this will equalize the pressure in the home and should correct a draft problem Once proper draft is established the window can be closed Make sure you ve used enough kindling to establish a hot fire quickly The most likely time that smoke will e...

Page 11: ... dealers Follow the directions outlined on the spray can DO NOT attempt to paint the fireplace while it is still warm Keep the spray can away from any source of heat or open flame Ensure that there is adequate ventilation in the room from the time you start painting until the paint is dry Stove Bright is available in a wide range of colors if you want to change the color of your fireplace We recom...

Page 12: ...g with clearances are shown in Figure 1 and Table 1 WARNING IF THIS FIREPLACE IS NOT PROPERLY INSTALLED A HOUSE FIRE CAN RESULT FOR YOUR SAFETY FOLLOW THE INSTALLATION INSTRUCTIONS AND CLEARANCES DO NOT PACK REQUIRED AIR SPACES WITH INSULATION OR OTHER MATERIALS 1 Note the location of roof and floor joists Try to choose a location that does not require cutting them 2 If possible run the chimney up...

Page 13: ...ireplace facing grayed area refer to text for particulars Cold air trap optional Rain Cap Storm Collar Flashing Radiation Shield with a Storm Collar in the Attic Ceiling Radiation Shield Hearth Extension and Beneath Hearth Extension refer to text for particulars Electrical Knock outs on both sides of the fireplace Outside Air Inlet refer to text for particulars Flashing And Roof Radiation Shield ...

Page 14: ...terial over the fireplace facing grayed area refer to text for particulars Cold air trap optional Obstruction plates part of Clean Facing Option FO F2 Rain Cap Storm Collar Flashing Radiation Shield with a Storm Collar in the Attic Ceiling Radiation Shield Hearth Extension and Beneath Hearth Extension refer to text for particulars Electrical Knock outs on both sides of the fireplace Outside Air In...

Page 15: ... and the chimney MUST always be respected A radiation shield must be installed as usual at each floor where the chimney passes through The ICC part is long enough to extend to the outermost plane of the roof which it must also protect CAUTION THE STRUCTURAL INTEGRITY OF THE MANUFACTURED HOME FLOOR WALLS AND CEILING ROOF MUST BE MAINTAINED CEILING CLEARANCE Ceiling clearance is the distance from th...

Page 16: ...e provided with the fireplace 1 Find a convenient location for the insulated flexible duct and outside air inlet The outside air inlet can be above or below floor level see Figure 6 2 Make a 4 5 if using a 5 diameter duct hole in the outside wall of the house Push the outside air inlet in from the outside Seal the joint between the air inlet and the outside wall with an appropriate sealant 3 Place...

Page 17: ...6 17 18 6 20 24 21 26 6 9001 10000 16 6 17 6 19 20 6 24 6 22 27 Flue height is measured from the top of the fireplace to the top of the chimney before installing the rain cap If you have two different offsets two pairs of different elbows simply use the column for two offsets of the biggest pair of elbows at your elevation to get your Minimum Flue Height CHIMNEY INSTALLATION Make sure to read the ...

Page 18: ...e sealer DO NOT use roofing tar 8 Fit the rain cap on the chimney Secure it tightly in place OFFSET CHIMNEY An elbow may be installed directly on top of the fireplace if required See the detailed offset charts in the EXCEL chimney installation manual Use the offset option if you need to clear a joist or pass around a cupboard See Figure 8 and Figure 9 for examples Maximum offset angle In USA 30 In...

Page 19: ...RE If the chimney runs up the outside of the house we recommend that it be enclosed in a chase structure The chase should be constructed in such a way that it is an extension of the home see Figure 10 It should be well insulated between the footings and the floor of the home to prevent heat loss If the climate in your area is mild insulate the chase at least to the first firestop If the climate in...

Page 20: ...st part of the EXCEL chimney where it enters the masonry chimney must be a minimum of 12 from the ceiling NOTE If the ceiling is high enough you can install one or more EXCEL chimney lengths directly on the fireplace before the elbow If you use a flexible liner make sure to be careful when cleaning to ensure that the stainless steel flexible liner is not dislodged in any way Using an Existing Maso...

Page 21: ...end that you position your fireplace install the EXCEL chimney on it and connect to the first length of liner before building the chimney as explained above and shown in Figure 11 The liner sections can easily be installed as the layers of brick are being placed Since this is a new chimney we recommend that you build it to the right size so you do not have to ovalize the liner Remember The stainle...

Page 22: ...minimum width specified in Table 1 I If you are preparing a raised installation you will need a custom made spark guard either a Z shaped spark guard or a right angle spark guard see Figure 13 The Z shaped spark guard must be used if the height between the bottom of the fireplace and the top of the non combustible flooring of the hearth extension is less than or equal to 2 The height of the Z shap...

Page 23: ...erials Each is required for proper operation of the fireplace If the baffle needs to be replaced proceed with care The following steps are to install a new baffle 1 First the refractory bricks should be removed from the firebox as well as the front secondary air tube at the top front of the firebox by removing the cutter pin located on the left side of the front tube 2 Then gently slide the rigid ...

Page 24: ...OCUS 320 SBR Owner s Manual 24 RSF Woodburning Fireplaces LISTING LABEL The listing label is glued to the bottom of the fireplace Just remove the bottom louver the listing label is below the floor shield ...

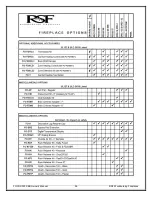
Page 25: ...FOCUS 320 SBR Owner s Manual 25 RSF Woodburning Fireplaces COMPLETE OPTIONS LIST ...

Page 26: ...FOCUS 320 SBR Owner s Manual 26 RSF Woodburning Fireplaces ...

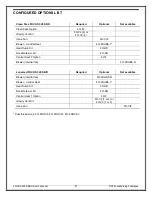
Page 27: ...r Central Heat FO FDHB6 1 Heat Dump Kit FO HD Rock Retainer Kit FO KN Central Heat T Option FO T Blower internal fan FO FDHB5 N Louvered FOCUS 320 SBR Required Optional Not available Blower internal fan FO FDHB5 N Blower Central Heat FO FDHB6 1 Heat Dump Kit FO HD Rock Retainer Kit FO KN Central Heat T Option FO T Gravity Vent Kit FO V2 1 or 2 or FO V3 1 or 2 Inline Fan FO CIF Possible add ons FO ...

Page 28: ...8 RSF Woodburning Fireplaces REPLACEMENT PARTS Use only genuine RSF parts The use of any substitutes will void the warranty and may put your safety at risk Will be available soon Please contact your RSF dealer if you need assitance ...

Page 29: ...cracked refractory components Repairs or replacements necessitated by vandalism neglect abuse over firing improper fuel or fuel loads or failure to adequately service the unit as stated in the owner s manual Repairs or replacements particularly charges for travel and labor not authorized by RSF Woodburning Fireplaces in advance LIMITATIONS All items found to be defective will be replaced or repair...

Reviews: