background image

2-2 

2.1 

UNPACKING THE SYSTEM 

 
The  System  610  is  shipped  in  a  wooden  crate  that  has  been  specifically  designed  to 
prevent damage to the system. Re-use the shipping crate when transporting the system. 
Accessories  and  optional  equipment  are  packed  in  a  separate  double-wall  corrugated 
cardboard carton. 
  
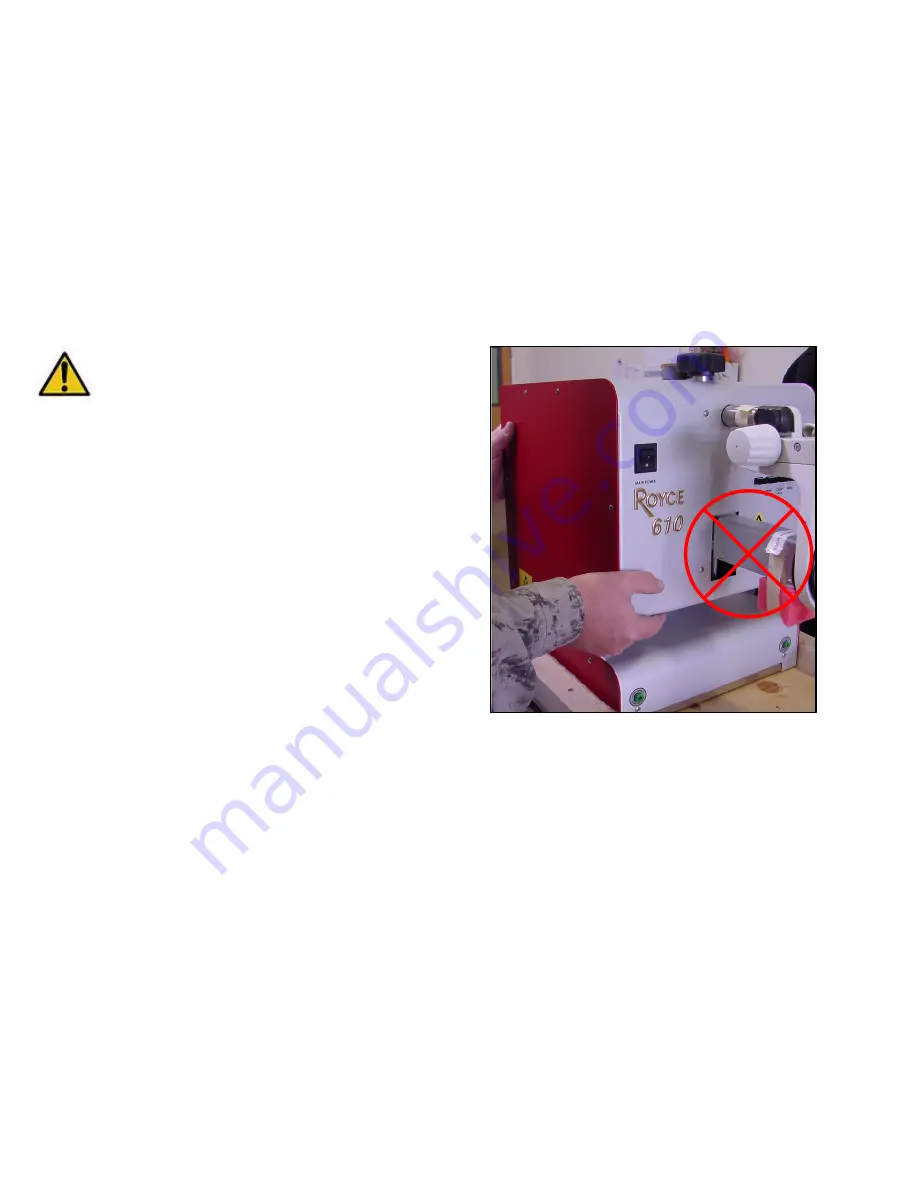
Be  careful  when  unpacking  the  shipping  containers,  the  System  610  is  a  precision 
instrument and may be affected by bumping, dropping, or excessive contact.


WARNING:  BE CAREFUL WHEN 
UNPACKING THE SHIPPING CONTAINERS. 
THE ROYCE 610 IS A PRECISION 
INSTRUMENT AND MAY BE DAMAGED BY 
BUMPING, GRABBING, LIFTING, OR 
PRESSING ON THE TEST HEAD! DO NOT 
LIGT THE MACHINE BY THE Z-ARM 
SENSOR; DAMAGE WILL OCCUR! 


Additional separate boxes contain the Royce 610 system accessories. As you unpack 
the boxes, check the items against the packing list shipped with your system to ensure all 
parts were received.  If any items are missing, contact Royce Customer Service 
immediately (707) 255-9078 or email: [email protected]

Summary of Contents for 610

Page 1: ...Royce Instruments System 610 User Guide ROYCE INSTRUMENTS LLC 831 Latour Court Suite C Napa CA 94558 PH 707 255 9078 FX 707 255 9079 www royceinstruments com ...

Page 2: ......

Page 3: ...ou suspect a gas leak Report the leak immediately Do not use the machine near water or when you are wet If the machine comes in contact with any liquids unplug the power and line cords immediately Do not plug the machine back in until it has been dried thoroughly The machine must be serviced by qualified service personnel when o The power supply cord or the plug has been damaged o Objects have fal...

Page 4: ...accuracy and completeness thereof are not guaranteed or warranted and they are not intended to be nor should they be understood to be representation or warranties concerning the products described Trademarks Royce Instruments is a registered trademark of Royce Instruments LLC Microsoft and Windows are registered trademarks of Microsoft Corporation All other trademarks mentioned in this guide are t...

Page 5: ... Help from Royce Instruments Before you contact us please record the following information System serial number located on the back of the machine Installed software revision number displayed upon start up ...

Page 6: ...idual attention on a special issue contact our knowledgeable technical support representatives Process Consumables Many consumable items are can be purchased directly from our website http www royceinstruments com consumables html Extended Warranty Royce Instruments Extended Warranty is a cost effective service and support program For more information visit the Royce Instruments website ...

Page 7: ...2 GETTING STARTED 2 1 3 SETTING UP THE SYSTEM 3 1 4 OPERATING THE SYSTEM 4 1 5 READING TEST RESULTS 5 1 6 CALIBRATION 6 1 7 MENU STRUCTURE 7 1 8 TECHNICAL SPECIFICATIONS 8 1 9 LIMITED WARRANTY 9 1 10 PROBLEM REPORT FORM 10 1 11 INDEX 11 1 ...

Page 8: ...ter Model 610 referred to by this declaration is in conformity with the following standards or normative documents 73 23 EEC Low Voltage Directive LVD EN 61010 1 1993 Safety Requirements for Electrical Equipment A2 1995 89 336 EEC Electromagnetic Compatibility EMC EN 50081 2 1993 EMC Part 2 Emission standard Industrial environment EN 50082 1 1992 EMC Part 1 Immunity standard Residential commercial...

Page 9: ...1 1 1 INTRODUCTION 1 1 MAINFRAME 1 2 1 2 OPTICS 1 3 1 3 WIRE PULL HOOKS 1 3 1 4 SAMPLE HOLDERS 1 4 1 6 OPTIONS 1 6 ...

Page 10: ...use LCD parallel printer port and RS232 serial port Standard features include pull hook rotation conventional semi auto test mode and collision sensing The System 610 wire pull tester is capable of 100 gram testing force with a 0 1 gram resolution System 610 Mainframe ...

Page 11: ... 3x 40x magnification Leica S6 Microscope 1 3 WIRE PULL HOOKS Standard wire pull hooks are available in diameters from 0 002 to 0 010 Generally hook diameter should be at least 2X the diameter of the bonding wire Custom hooks built to user specified dimensions are also available Wire Pull Hook ...

Page 12: ...e holders built to user specified dimensions are also available Please contact the factory for further information MPS 12 Manipulator The MP 12 manipulator connects to any Royce Instruments test piece holder TPS to hold samples on the System 610 Please contact the factory for information on standard or custom test piece holders MPS 14 Manipulator The MPS 14 Manipulator uses a 4 1 pantograph linkag...

Page 13: ...universal sample holder test piece holder that is suitable for many types of samples Clamping force of the stepped jawset is adjustable by precision leadscrew Please contact the factory for information on standard or custom test piece holders ...

Page 14: ...The 40 column thermal printer allows test results and statistical reports to be printed on paper tape Keypad The optional Keypad enables convenient entry of bond test grade codes operator information etc Printer The optional thermal printer quickly prints test reports onto thermal paper Clean room compatible thermal paper is available ...

Page 15: ...E SYSTEM 2 5 2 3 1 SUPPLIES 2 5 2 3 2 ENVIRONMENTAL REQUIREMENTS 2 5 2 3 3 MICROSCOPE 2 6 2 3 4 SAMPLE HOLDER 2 6 2 3 5 PULL HOOKS 2 6 2 3 6 MOUSE 2 6 2 3 7 OPTIONS 2 6 2 3 8 INITIAL CALIBRATION 2 6 2 4 USING THE CONTROLS 2 7 2 4 1 FRONT PANEL CONTROL BUTTONS 2 7 2 4 2 MOUSE 2 8 2 4 3 KEYPAD 2 9 ...

Page 16: ...fected by bumping dropping or excessive contact WARNING BE CAREFUL WHEN UNPACKING THE SHIPPING CONTAINERS THE ROYCE 610 IS A PRECISION INSTRUMENT AND MAY BE DAMAGED BY BUMPING GRABBING LIFTING OR PRESSING ON THE TEST HEAD DO NOT LIGT THE MACHINE BY THE Z ARM SENSOR DAMAGE WILL OCCUR Additional separate boxes contain the Royce 610 system accessories As you unpack the boxes check the items against t...

Page 17: ... contact with any liquids unplug the power and line cords immediately Do not plug the machine back in until it has been dried thoroughly 7 Damage Requiring Service The machine must be serviced by qualified service personnel when The power supply cord or the plug has been damaged or Objects have fallen or liquid has been spilled into the machine or The machine has been exposed to rain or The machin...

Page 18: ...grounded plug Such plugs are designed for your safety Do not attempt to defeat this purpose If you cannot insert the plug easily your outlet should be replaced by an electrician COVER PANELS No user serviceable parts are included within this enclosure All service related issues must be referred to qualified service personnel MOVING OR LIFTING THE SYSTEM 610 The System 610 mainframe weighs 20 4 kg ...

Page 19: ...lled in a facility meeting the following environmental requirements unless otherwise specified in a particular section i Indoor use ii Altitude up to 2000 meters iii 60 to 80 degrees Fahrenheit iv Relative humidity of 10 to 90 percent non saturating v Main supply voltage fluctuations not to exceed 10 of nominal voltage vi Transient over voltages according to installation categories Overvoltage Cat...

Page 20: ...he cap and tube apart gently Pull hooks are fragile and can easily be damaged by contact handle the hook by the aluminum body ONLY Loosen the set screw and remove the hook from the cap Carefully slide the hook onto the pull rod and tighten the set screw 2 3 6 Mouse Attach the mouse cable to the connector labeled MOUSE on the back panel Place the mouse on a mouse pad Keep the mouse pad clean to ens...

Page 21: ...ft corner of the display 2 4 1 2 The PRINT REPORT Button Pressing the PRINT REPORT button sends report data to the printer port If the printer is not connected or has not been switched ON the display shows PRINTER NOT ON OR NOT CONNECTED Switch the printer on and or check the connection then press PRINT REPORT again The printout format can be modified in the TEST SETUP menu 2 4 1 3 The CLEAR DATA ...

Page 22: ...ither the left or right button increases the movement speed The slow movement controlled by the left and right buttons can be adjusted The fast movement is set at 500 mils per second and cannot be adjusted Rotation of the pull hook is controlled by moving the mouse to the left or right The sensitivity of hook movement to mouse movement can be adjusted in the TEST SETUP menu 2 4 2 2 Menu Functions ...

Page 23: ...T SETUP menu To void a test press the star key Voided tests are removed from all statistical analysis 2 4 3 2 Sub menu Keypad Functions Several sub menu selections allow alphanumeric data entry through the use of the keypad The keypad includes an overlay that illustrates the characters that may be entered with each key When a key is pressed it will display a character at the cursor location To dis...

Page 24: ...3 1 3 SETTING UP THE SYSTEM 3 1 HOLDING THE SAMPLE 3 2 3 2 INSTALLING THE TEST HOOK 3 2 3 3 USING THE TEST SETUP MENU 3 2 ...

Page 25: ... operator A description of all Test Setup menu choices follows NDT LIMIT This selection allows the operator to set the force limit for non destruct testing To set the limit use the left and right mouse buttons to increase or decrease the limit value then press the center mouse button to accept the value PRINTER This selection allows the operator to switch the printer ON or OFF When ON the printer ...

Page 26: ... value and can be set to any time from 00 00 to 23 59 An audible double beep sounds at the alarm time SPEED This selection allows the operator to set the Z axis speed of the test hook as controlled by the system during testing The speed can be adjusted from a minimum of 4 mils per second to a maximum of 240 mils per second with a default value of 100 mils per second The default setting is edited b...

Page 27: ...se button to accept the value HOOK θ θ θ θ SPEED This selection allows the operator to set the rotational speed of the test hook as controlled by positional movement of the mouse The default setting is edited by pressing the left or right mouse buttons to increase or decrease the value then press the center mouse button to accept the value CODE 1 This selection allows the operator use the keypad t...

Page 28: ... can be set to any time from 00 00 00 to 23 59 59 The left and right mouse buttons change each digit The center button sets the value and advances the cursor PARK TIME This selection allows the operator to set the number of minutes that the system may remain idle before it returns to the reset position COLLISION This selection allows the operator to select the force at which the test head stops mo...

Page 29: ...center mouse button to toggle the setting PRINT STYLE A choice of two printout styles is available Style A is brief style B includes more in depth data analysis Press the center mouse button to toggle the setting PRINT SPACING Printouts can be single or double spaced Press the center mouse button to toggle the setting UP RIGHT DOWN LEFT This selection allows the operator to define the test head po...

Page 30: ...4 1 4 OPERATING THE SYSTEM 4 1 READING THE DISPLAY 4 2 4 2 RUNNING TESTS 4 2 4 3 STOPPING A TEST 4 4 ...

Page 31: ...wer middle of the display AUT or MAN Test status is indicated in the lower right corner of the display READY or PULLING READY indicates that the system is ready to begin a test and PULLING indicates that a test is in progress 4 2 Running tests The System 610 is capable of manual or semi automatic pull testing 4 2 1 Manual Testing After completion of setup procedures testing may begin Position the ...

Page 32: ...y the operator after inspection of the failure Codes 10 thru 13 are automatically assigned by the system Failure codes are assigned to a test with the optional keypad or the mouse To assign a fail code with the keypad press the numeric key that corresponds to the failure The keypad is also required to edit the text that is assigned to fail codes 1 thru 9 or to void a completed test The mouse can b...

Page 33: ...TEST At any time during a test the test may be stopped by the operator Press the center mouse button to stop a test before completion Aborted tests results are stored but are not used when the system calculates statistics ...

Page 34: ...5 1 5 READING TEST RESULTS 5 1 READING LCD DATA 5 2 5 2 USING THE STATISTICS MENU 5 3 5 3 PRINTING TEST DATA 5 5 5 4 RS232 DATA OUTPUT 5 7 ...

Page 35: ...pull force in grams and the fail code number are shown across the top row of the display Destruct or non destruct test mode is indicated in the lower left corner of the display DESTRUCT or NDT When the system is set to non destruct mode the NDT limit value is displayed next to NDT Manual or semi automatic test mode is indicated in the lower middle of the display AUT or MAN Test status is indicated...

Page 36: ...urrent group σ σ σ σ STD DEV This selection displays the standard deviation of all tests in the current group Cpk This selection displays the group Cpk value Cpl This selection displays the group Cpl value Cpu This selection displays the group Cpu value UPPER SPEC This selection allows the operator to enter the upper specification limit for test statistics Press the left or right mouse buttons to ...

Page 37: ...ing the center mouse button REPORT TO RS232 This selection allows the operator to send a report to the RS232 port by pressing the center mouse button DATA ONLY TO RS232 This selection allows the operator to send the test data to the RS232 port by pressing the center mouse button ...

Page 38: ...out as they are completed by selecting PRINTER from the TEST SETUP menu then set printer to ON 5 3 2 Printing a Report A statistical report can be printed by pressing the PRINT REPORT button on the front panel of the system 5 3 3 Printing from the STATISTICS menu The PRINT REPORT selection allows the operator to print a report by pressing the center mouse button ...

Page 39: ...T HOLD TIME 0 0 sec USER SET LOWER SPEC LIMIT 0 0 gf USER SET UPPER SPEC LIMIT 100 0 gf SYSTEM 610 DATA ANALYSIS DATE 11 05 1998 TIME 17 12 33 0 304 Cpk 0 304 Cpl 0 428 Cpu 0 0 gf LOWER SPEC SUMMARY SECTION 100 0 gf UPPER SPEC 41 55 gf MEAN LOAD 45 95 gf STD DEV n 1 94 92 gf MEAN 3 STD DEV 97 60 gf MAX LOAD 95 10 gf MIN LOAD 2 50 gf RANGE 22 DESTRUCT TESTS 0 TESTS 100 0 gf 0 TESTS 0 1 gf 22 WITHIN...

Page 40: ...mat will contain the same elements as the selected printout format The following describes the RS 232 output format from System 610 Baud 9600 Bit 7 Parity Even Stop 1 Flow none 1 2 3 4 1234567890123456789012345678901234567890 nnnnn fff f ssssssssssssssssss ccCL nnnn accumulative test number fff f test force result in grams sss sss failure mode description in quotes cc failure mode code C carriage ...

Page 41: ...6 1 6 CALIBRATION 6 1 OVERVIEW 6 2 6 2 USING THE SERVICE MENU 6 2 6 3 CHECKING CALIBRATION 6 3 6 4 CALIBRATING THE SYSTEM 6 3 ...

Page 42: ...oices follows CALIBRATE This selection allows the operator to calibrate the system Press the center mouse button and follow the procedure indicated on the LCD CHECK CALIBRATION This selection allows the operator to confirm the calibration status of the system Press the center mouse button and hang a weight of known value on test hook Compare the displayed value to the known weight to determine cal...

Page 43: ... weight Check displayed weight value 50 0 gm accurate calibration If any of the displayed weight values differ significantly from the actual value of the hanging weight calibration is required 6 4 Calibrating THE SYSTEM Install a calibration hook to the test head Access the SERVICE menu Select CALIBRATE 1 Follow the directions on the display Hang and stabilize weight carefully as in calibration ch...

Page 44: ...7 1 7 MENU STRUCTURE 7 1 OVERVIEW 7 2 7 2 THE TEST SETUP MENU 7 3 7 3 THE STATISTICS MENU 7 8 7 4 THE SERVICE MENU 7 10 ...

Page 45: ...enu item To enter the Main Menu from the Test Screen press the MENU key on right side of front panel or press and hold the center mouse button for 3 seconds Use the mouse to scroll through the sub menu choices TEST SETUP STATISTICS or SERVICE The left and right mouse buttons move the cursor up and down and the center mouse button selects the item next to the cursor Left and right mouse buttons are...

Page 46: ...s use the center mouse button to select a number of your choice If the keypad is installed the default ID designations may be edited When the selection is completed press the center mouse button to set selection PART This selection allows the operator to enter or select a part identification designation Use the left and right mouse buttons to scroll through the default part ID numbers use the cent...

Page 47: ...to increase or decrease the value then press the center mouse button to accept the value SEMI AUTO This selection allows the operator to toggle the semi automatic testing mode on or off Press the center mouse button to toggle the setting MUST FAIL CODE This selection allows the operator to set the system to prompt for a fail code and wait until the code is entered before resuming test mode Press t...

Page 48: ...keypad to edit the description of fail code 3 CODE 4 This selection allows the operator use the keypad to edit the description of fail code 4 CODE 5 This selection allows the operator use the keypad to edit the description of fail code 5 CODE 6 This selection allows the operator use the keypad to edit the description of fail code 6 CODE 7 This selection allows the operator use the keypad to edit t...

Page 49: ...on to toggle the setting RS232 EA TEST This selection allows the operator to select whether or not each test will be sent to the RS232 port Press the center mouse button to toggle the setting PRINT HEADER This selection allows the operator to select whether or not the printout will include a header section Press the center mouse button to toggle the setting PRINT SUMMARY This selection allows the ...

Page 50: ...lows the operator to define the test head positioning and menu scrolling functions of the left and right mouse buttons Press the center mouse button to toggle the setting MOUSE SCROLL This selection allows the operator to toggle the ability to scroll the menus by front back movement of the mouse Press the center mouse button to toggle the setting ...

Page 51: ...range of all tests in the current group σ σ σ σ STD DEV This selection displays the standard deviation of all tests in the current group Cpk This selection displays the group Cpk value Cpl This selection displays the group Cpl value Cpu This selection displays the group Cpu value UPPER SPEC This selection allows the operator to enter the upper specification limit for test statistics Press the left...

Page 52: ...ing the center mouse button REPORT TO RS232 This selection allows the operator to send a report to the RS232 port by pressing the center mouse button DATA ONLY TO RS232 This selection allows the operator to send the test data to the RS232 port by pressing the center mouse button ...

Page 53: ...llow the procedure indicated on the LCD CHECK CALIBRATION This selection allows the operator to confirm the calibration status of the system Press the center mouse button and hang a weight of known value on test hook Compare the displayed value to the known weight to determine calibration accuracy TEST ANALOG This selection displays the analog sensor value LIGHT ON OFF Press the center mouse butto...

Page 54: ...CAL SPECIFICATIONS Size 12 in W 16 in H 20 in D Weight 45 lbs Range 100gm Accuracy 0 25 Resolution 0 1 Repeatability 0 25 Z Motion Range 2 0 in 50mm Machine Throat Depth 12 5 in 317mm Maximum Leadframe 12 in 305mm ...

Page 55: ...ty or reliability 2 has been subject to misuse negligence or accident 3 has been connected installed or adjusted in a manner other than in accordance with Royce Instruments LLC s written instructions Royce Instruments LLC does not represent or warrant that the equipment supplied hereunder complies with any local laws or ordinances and Buyer will assume complete responsibility for compliance with l...

Page 56: ...el in the diagnosis of any problems that may occur with your System 610 please use this form to document the problem System 610 serial number Software revision number Description of Symptom s Sequence of Events leading to the Problem What happened after the problem ...

Page 57: ...9 FORMAT 3 5 7 5 GROUP NUMBER 3 3 7 3 hook 1 2 1 3 2 6 2 8 3 2 4 2 4 3 6 2 6 3 7 10 HOOK θ SPEED 2 8 3 4 7 5 HOOK Z SPEED 3 4 7 4 keypad 1 6 2 6 2 8 2 9 5 5 LCD 1 2 2 7 2 8 LIGHT 6 2 7 10 LOWER HT 3 3 7 3 LOWER SPEC 5 3 5 6 7 8 MAN 4 2 5 2 manipulator 1 4 MAX 5 3 5 6 7 8 MEAN 5 3 5 6 7 8 Menu 2 7 2 8 7 2 microscope 2 6 MIN 5 3 5 6 7 8 mouse 1 2 2 6 2 8 2 9 4 2 4 3 4 4 7 2 MOUSE SCROLL 3 6 7 7 MP 1...

Page 58: ... 1 5 4 5 7 7 6 7 9 sample holder 1 4 2 6 4 3 SEARCH HT 3 3 7 3 7 4 semi auto 1 2 SEMI AUTO 3 3 4 3 7 4 Semi automatic 4 2 SERVICE 6 2 6 3 7 2 7 10 Size 8 1 speed 2 8 SPEED 2 8 3 3 3 4 5 6 7 4 7 5 Standard Deviation 5 3 7 8 star key 2 9 STATISTICS 7 2 STD DEV 5 3 5 6 7 8 stop 4 4 TEST ANALOG 6 2 7 10 test piece holder 1 4 Test Screen 2 9 4 2 5 2 7 2 TEST SETUP 4 3 5 5 7 2 TEST STOPS AT 3 4 7 4 TIME...

Reviews: