background image

Accura 2350-TEMP User Guide 

Chapter 3 Accura 2350-TEMP Operation/Setup 


  2020 Rootech Inc. All Rights Reserved 

Page  33 


EVENT Mode 


Screen Composition 

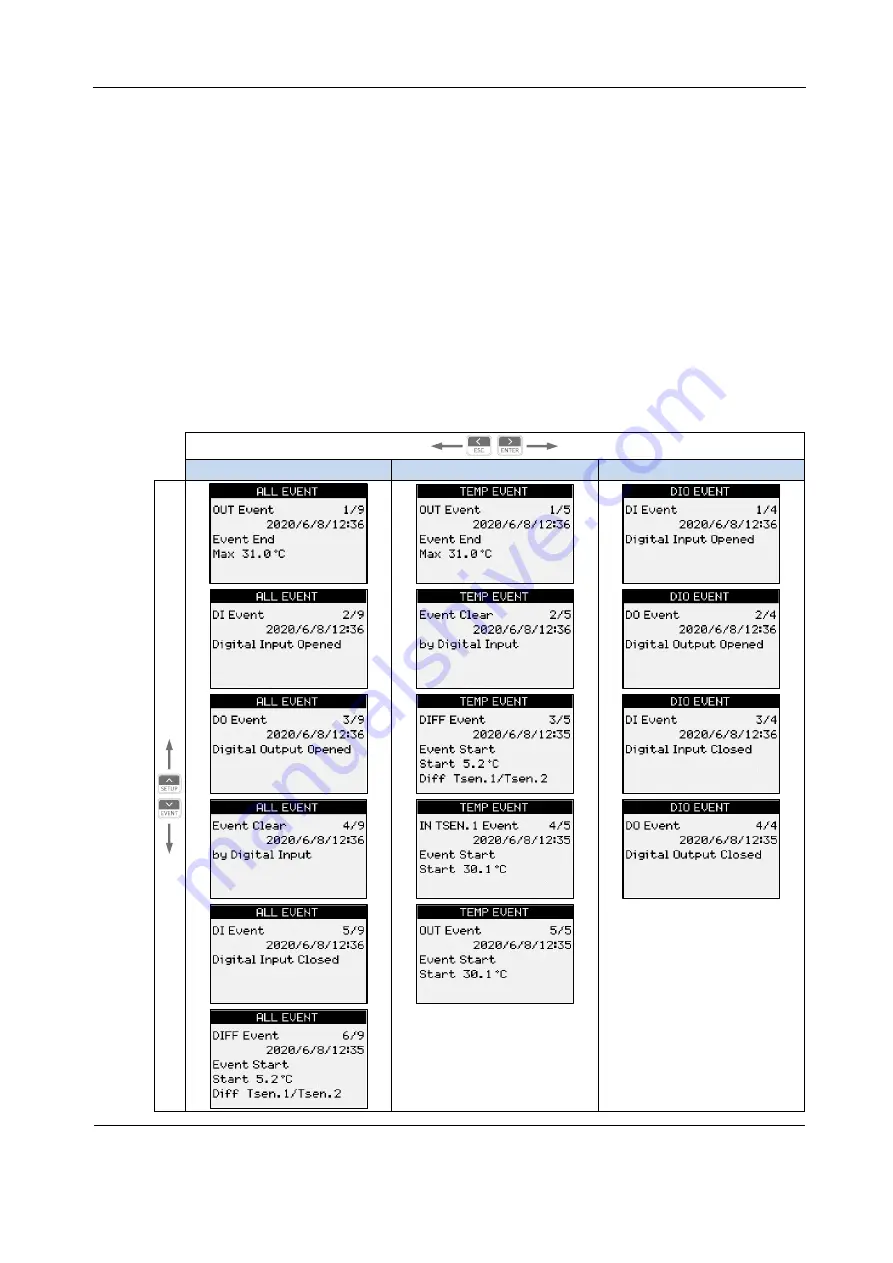
The  Column  1(ALL  EVENT)  screen  displays  all  events  in  the  order  of  occurrence.  The  Column  2(TEMP 

EVENT)  screen  displays  event  log  data  on  temperatures,  and  the  Column  3(DIO  EVENT)  screen  shows 

event log data on the DI/DO. 

Temperature events include start and end events. The end event on temperatures provides data on the 

highest  temperature  in  the  relevant  event  interval.  If  the  event  alarm  function  is  disabled,  events  are 

recorded in the event log. Digital inputs/output events provide data on the status of the contact point. 


Entire Screen 


Column 1 (ALL EVENT) 

Column 2 (TEMP EVENT) 

Column 3 (DIO EVENT) 


Summary of Contents for ACUURA 2350-TEMP

Page 1: ......

Page 2: ...lity for assistance with product applications and the system design created by customers or legal issues including infringement of intellectual property arising from the use of devices described herei...

Page 3: ...for the product Rootech will decide at its discretion whether to repair or replace it or give a refund for the product for when the warranty period for the product expired or issues related to the pro...

Page 4: ...e deemed to be a suggestion The original purchaser is responsible for determining the feasibility of such suggestions and should conduct tests to prove their feasibility It is the original purchaser s...

Page 5: ...MP User Guide Revision History 2020 Rootech Inc All Rights Reserved Page 5 Revision History The revision history of the Accura 2350 TEMP user guide is as follows Revision Date Description 1 10 2020 9...

Page 6: ...with Accura TSEN using the Communication Cable 15 Chapter 2 Accura TSEN Operation Setup 16 Power Supply 16 ID Setup 16 RESET Button 17 Communication 17 LED Status Indicators 17 Temperature Measuremen...

Page 7: ...mn 26 SETUP Mode 27 Screen Composition 27 EVENT Setup 29 DIO Setup 30 INTERFACE Setup 31 SYSTEM Setup 32 EVENT Mode 33 Screen Composition 33 Chapter 4 Accura 2300S Operation Setup 35 Accura 2300S Disp...

Page 8: ...a 2350 TEMP Panel Installation 12 Fig 1 10 Mounting Accura 2350 TEMP to the Panel through Holes 12 Fig 1 11 Connection between Accura 2350 TEMP and Accura 2300S using the Communication Cable 13 Fig 1...

Page 9: ...age 9 Chapter 1 Installation and Wiring Before Installation Product Appearance Fig 1 1 Accura 2350 TEMP Accura 2350 TEMP Front Accura 2350 TEMP Rear Accura 2350 TEMP Side Fig 1 2 Accura TSEN Component...

Page 10: ...Accura 2350 TEMP User Guide Page 10 2020 Rootech Inc All Rights Reserved Fig 1 4 Accura TSEN Components Accura TSEN device Fixing wings screws Dimensions Fig 1 5 Accura 2350 TEMP Front Fig 1 6 Accura...

Page 11: ...rement in the distribution panel Accura 2300S and Accura 2350 TEMP devices are installed at the front of the distribution panel and multiple Accura TSEN devices are installed inside the distribution p...

Page 12: ...Accura 2350 TEMP module into the panel cutout Fit the fixing wheel into the screw thread at the back of Accura 2350 TEMP Turn the fixing wheel to the right and fix Accura 2350 TEMP to the panel You c...

Page 13: ...e 13 Connection with Accura 2300S using the Communication Cable Connect the RJ12 6C communication cable to RJ12A RJ12B ports Accura 2350 TEMP receives power from Accura 2300S via the RJ12 6C communica...

Page 14: ...he screw holes of the device s fixing wings into the mounting holes of the panel Fix Accura TSEN to the panel using the screws Fig 1 12 Accura TSEN Panel Mounting DIN Rail Mounting Fit the bottom port...

Page 15: ...ge 15 Connection with Accura TSEN using the Communication Cable Connect the Ethernet communication cable to RJ45A RJ45B ports Accura 2350 TEMP supplies power to Accura TSEN via the RJ45 Ethernet commu...

Page 16: ...temperature measurement allowing for the overall temperature monitoring in the distribution panel For details about how to connect Accura TSEN devices using the daisy chain method refer to Chapter 1 I...

Page 17: ...AT 5e FTP F UTP 1 Communication cable length Up to 25m 1 FTP F UTP Foiled Shield Twisted Pair LED Status Indicators In normal operation the LED on the Accura TSEN device blinks green When an event occ...

Page 18: ...of the distribution panel It allows for the overall temperature control of the distribution panel Users can check data on the measured temperature and set up events related to the temperature on the A...

Page 19: ...plays measured values SETUP mode Enables to check setup items and change it EVENT mode Displays detailed event data LED Status Indicators Item Color Description POWER Green It is turned on when the de...

Page 20: ...o Accura TSEN Item Description Connector type RJ45 connector Protocol RS 485 based internal dedicated protocol RESET Button It is used to reset external temperature events on the Accura 2350 TEMP modu...

Page 21: ...O The Accura 2350 TEMP module supports 1 insulated mechanical relay type DO channel Form A It gives users alarms through the DO when an event occurs Item Description Port name DO DOG Mechanical Relay...

Page 22: ...Accura TSEN devices can be connected to the Accura 2350 TEMP module with the daisy chain method using the communication cable Temperature Events Event Occurrence Users can set up events on external t...

Page 23: ...t events on external temperature with the RESET button at the back of the Accura 2350 TEMP module Users can also reset events with the Digital Input and the EVENT button on the Accura 2350 TEMP module...

Page 24: ...N TSEN 1 1 IN TSEN 2 1 OUT DIGITAL IO SYSTEM 1 The IN TSEN column is added as the number of the Accura TSEN device increases Button Operation Users can move between columns with the left and right but...

Page 25: ...lled appears on the screen IN TSEN Column Detailed Temperature Data Screen Description Now Current temperature for each Accura TSEN device in the distribution panel Avg Average temperature after reset...

Page 26: ...scription Digital Input Indicates DI status Open The contact point of the Digital Input is open Closed The contact point of the Digital Input is closed Digital Output Indicates DO status Open The cont...

Page 27: ...e Screen Composition Each column supports EVENT DIO INTERFACE SYSTEM settings Entire Screen Column 1 Column 2 Column 3 Column 4 EVENT SETUP DIO SETUP INTERFACE SETUP SYSTEM Button Operation Button Des...

Page 28: ...setup of numbers 6 Long press 6 Save the changed values of the setup item temporarily blinking stops and return to the Selection mode If there is another setup item go back to the step 3 and repeat th...

Page 29: ...distribution panel Screen Setup item Range Default Function Disable Enable Disable Threshold 0 100 32 0 212 0 40 Time Delay 0 10 sec 0 sec DO Disable Enable Disable DIFF It indicates the setup for eve...

Page 30: ...he reset function is disabled Event LED the function to reset the Event LED is enabled DO the function to reset the DO is enabled Both the function to reset the Event LED and DO is enabled Disable EVE...

Page 31: ...losed Reverse mode 0 The contact point remains closed 1 Pulse occurs when the DO point is open Normal Pulse Period Pulse cycle time for Pulse Type 0 2 9 9 secs 1 0 sec Pulse On time 1 Pulse On time fo...

Page 32: ...r than the cycle the device gives users intermittent beeping sound However when the Buzzer On time is same as or longer than the cycle it provides users with continuous sound Setup Exit Screen Setup i...

Page 33: ...log data on temperatures and the Column 3 DIO EVENT screen shows event log data on the DI DO Temperature events include start and end events The end event on temperatures provides data on the highest...

Page 34: ...reen with the up down and left right buttons Long press 2 Enter EVENT mode EVENT Mode Short press Select the Event column with the left right buttons Short press Select the Event screen with the left...

Page 35: ...ion Display mode Displays measured values for each Accura 2350 device selected module ID Setup mode Accura 2300S 2350 setup network wiring PT communication event etc 1 Event log mode Displays the even...

Page 36: ...350 TEMP module by pressing the right or left button on the Accura 2300S screen and moving to the MODULE column When multiple Accura 2350 TEMP modules are connected to the Accura 2300S device users ca...

Page 37: ...2300S device and entering the event log mode However users cannot reset settings for event alarms on the Accura 2350 TEMP module with the button on the Accura 2300S device Accura 2300S Setup Mode Accu...

Page 38: ...mber of the event Range 000 999 Second row M tMP Module where the event occurred TEMP module Third row In d 1 S Accura TSEN d Start event on the internal temperature In d 1 E Accura TSEN d End event o...

Page 39: ...me minute second and millisecond for each event by pressing the down button on each event screen Fig 4 3 DI Events Screen Event on Closed Contact Point Event on Open Contact Point The DI DO events scr...

Page 40: ...nd the DO is enabled 1 RJ45 Port Connects Accura 2350 TEMP with Accura TSEN Connector type RJ45 connector RJ45 Ethernet cable Protocol RS 485 based internal dedicated protocol Connection with Accura T...

Page 41: ...ol Communication cable Ethernet cable CAT 5e FTP F UTP 1 Cable length Up to 25m Accura TSEN ID ID that enables communication 1 5 Standby ID 0 factory default value Communication unavailable Control Po...

Page 42: ...APPENDIX B Ordering Information Accura 2350 TEMP User Guide Page 42 2020 Rootech Inc All Rights Reserved APPENDIX B Ordering Information Model Name Accura 2350 TEMP Accura TSEN...

Page 43: ...cura 3300S 3300 Accura 3500S 3500 Accura 3550S 3550 Accura 3700 Accura 5500 Accura 7500 are trademarks of Rootech Inc Contact Rootech for detailed specifications and order information Rootech 102 611...

Reviews: