background image

8

using Your Ronson Food Processor

Correct Placement of the 

Processor Bowl

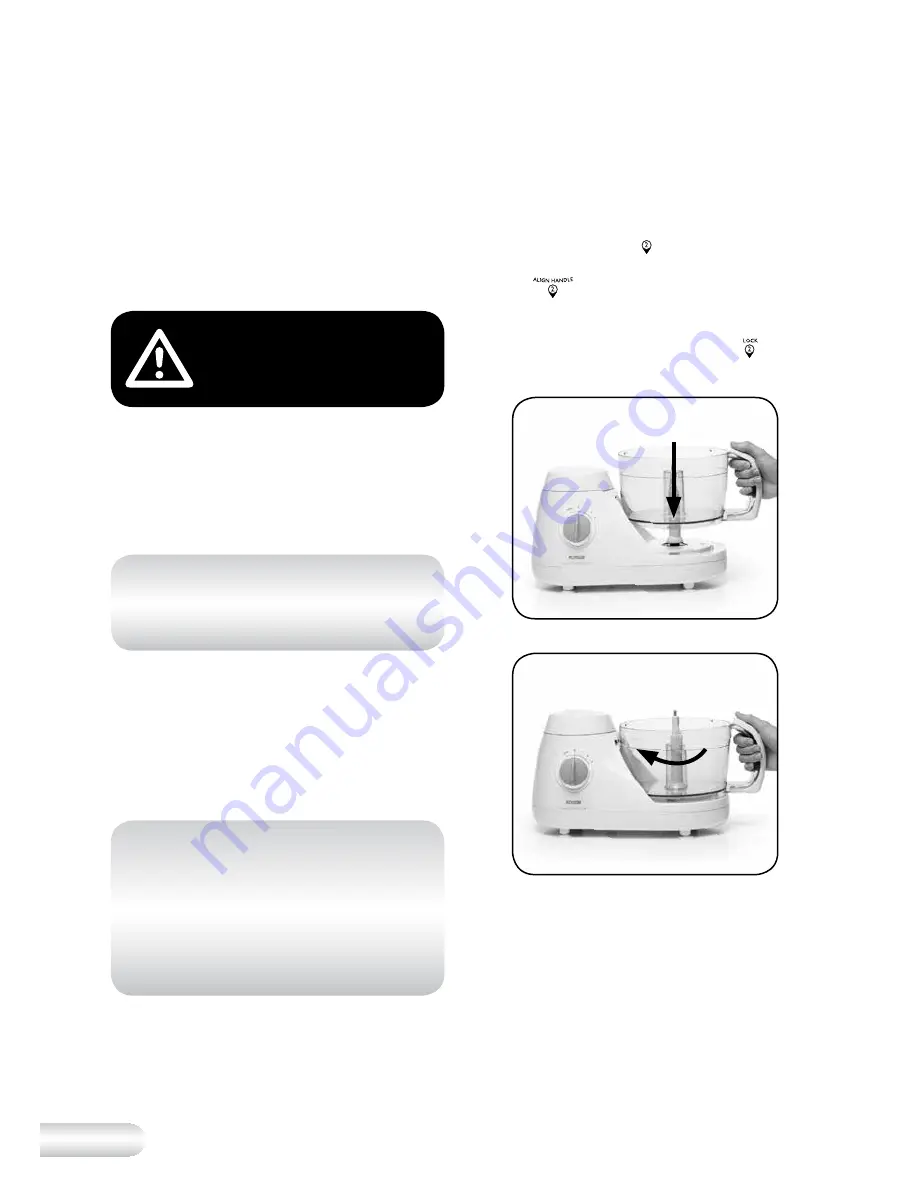
Place the empty bowl onto the base, 

with the handle on your right (see Fig. 

1). Align the arrow   on the processor 

bowl handle with the align handle 

arrow 

 on the motor base. Turn 

the bowl clockwise until the arrow on 

the processor bowl handle is aligned 

with the ‘lock’ indicator arrow   on 

the motor base (see Fig. 2).

Fig. 1

Fig. 2

Before First Use

Before first use remove and safely 

discard any promotional labels and 

wash the food processor bowl  

and all blades in warm, soapy water. 

Dry thoroughly. Place the motor base 

on a level, flat surface. 

CAutIon:

 Blades must 

be handled carefully as 

they are sharp!

Assembly and Operation of 

the


Food Processor

Your food processor features 3 safety 

locking devices.

notE:

 The food processor will 

not work unless all of the below 

are in place:

1.  The blender drive cover is correctly 

LOCKED into position

2.  The processor bowl is correctly 

LOCKED into position

3.  The processor lid is correctly LOCKED 

into position

notE:

 Always ensure that the 

food processor is disconnected 

from the power outlet and the 

speed selection Dial is turned 

to the ‘OFF’ (0)position before 

assembling or disassembling 

the food processor.

Summary of Contents for RFP200

Page 1: ...ustomer Service Fax 1800 621 337 Ronson New Zealand Private Bag 94411 Botany Manukau Auckland 2163 New Zealand Customer Service Line Spare Parts 0800 273 845 Customer Service Fax 0800 288 513 Due to continual improvement in design or otherwise the product you purchase may differ slightly from the illustration in this book Issue A13 ...

Page 2: ...Suits all RFP200 models Food Processor ...

Page 3: ...re use In the event that you need some assistance with your Ronson appliance please contact our Customer Service Department on 1300 139 798 Australia or 0800 2738 45 New Zealand Alternatively visit us on our website at www Ronson com au or www Ronson co nz ...

Page 4: ...Contents Ronson Recommends p4 Safety First Your Ronson Food Processor p6 Using Your Ronson p8 Food Processor Processing Guide p13 Care and Maintenance p18 Recipes p19 ...

Page 5: ...tely assembled before operating The appliance will not operate unless properly assembled Ensure the Speed Selection Dial is in the OFF 0 position and the Food Processor is switched off at the power outlet and the power cord is unplugged before attaching the processing blade discs or processing lid Always secure the processing bowl onto the motor base before attaching the processing blade or discs ...

Page 6: ... table touch hot surfaces or become knotted To protect against electric shock do not immerse the power cord power plug or appliance in water or any other liquid unless it is recommended in the cleaning instructions The appliance is not intended for use by persons including children with reduced physical sensory or mental capabilities or lack of experience and knowledge unless they have been given ...

Page 7: ...6 Your Ronson Food Processor 19 1 2 3 4 5 6 7 8 9 10 12 13 14 15 16 17 18 20 21 22 11 ...

Page 8: ...ve cover are correctly engaged on the motor base not shown 10 Food pusher with removable inner 80ml Measuring Cup fits the into the food chute for safely adding foods onto the blades and prevents splashing when using the processing blade 11 Processor drive shaft 12 Stainless steel thin slicing disc for slicing vegetables and fruits 13 Stainless steel thick slicing disc for slicing vegetables chick...

Page 9: ...or bowl and all blades in warm soapy water Dry thoroughly Place the motor base on a level flat surface Caution Blades must be handled carefully as they are sharp Assembly and Operation of the Food Processor Your food processor features 3 safety locking devices NOTE The food processor will not work unless all of the below are in place 1 The blender drive cover is correctly LOCKED into position 2 Th...

Page 10: ... blade 2 Place the processing mixing blade over the drive shaft and push down see Fig 3 Using the Slicing Grating Discs 1 Select the desired slicing grating disc and assemble into the disc holder see Fig 4 To fit the stainless steel disc onto disc holder fit left side of disc when writing is towards you with locating tab into holder then push right side down firmly until it locks into place see Fi...

Page 11: ...rrectly locked into position Insert Slot Lid Locking Tab Fig 7 Fig 8 Fig 9 Ensure the speed dial is in the Off 0 position Plug into a 230V or 240V power outlet and turn the power on The processor is now ready to use To begin processing slicing grating turn the Speed Selection Dial from the Off 0 position to either the Low 1 Medium 2 or High 3 speed settings depending on your requirements The speed...

Page 12: ...pe down the sides of the bowl then recommence processing NOTE Do not over fill the processor bowl past the MAX line for solids and past the 750ml mark for liquids For greater quantities of liquids the blender jug should be used When processing is complete turn to the Off 0 position Wait until the blades have stopped rotating before removing the lid blades or processor bowl Assembly And Operation O...

Page 13: ...tor cover Turn the blender jug clockwise until the arrow on the blender is aligned with the lock handle arrow on the motor cover a click sound will be heard 3 Ensure the speed dial is in the Off 0 position 4 Plug into a 230V or 240V power outlet 5 Turn the power on at the power outlet The blender is now ready to use 6 Place ingredients into the jug Note do not overfill the jug ie above the MAX mar...

Page 14: ...lices of bread and break up the biscuits Place them in the processing bowl and process using setting 2 Process up to 1 loaves of bread crusts removed or 1 loaf with crusts at a time Use stale bread for dry breadcrumbs Place up to 2 cups of nuts in the processing bowl at a time and process using the PULSE switch If chopped too finely the nuts will become oily and eventually form a butter Processing...

Page 15: ...ly a melt and mix method Add ingredients in the order specified in the recipe Be careful not to over mix Place the flour and butter in the processing bowl and process using setting 2 until butter is rubbed in With the motor running pour the liquid down the feed tube and process until mixture forms a ball approximately 30 seconds Do not mix more than 2 cups of flour at a time Place butter sugar and...

Page 16: ...e the quarters on their sides in the feed tube and process using firm pressure of the food pusher Prepare the beans Cut into lengths and pack horizontally into the feed tube Process using firm pressure on the food pusher Cut cabbage into wedges to fit feed tube and process using firm pressure Separate the leaves of the lettuce and wash and dry Roll the leaves firmly and pack into the feed tube Pro...

Page 17: ...s in the feed tube cut edge down Process using firm pressure Peel and place minimum 250g into the feed tube and process using firm pressure Note If small quantities are used they may block the holes in the grating disc To help wash the ingredients through pour 1 4 cup olive oil for garlic or 1 4 cup sherry for ginger down feed tube Excess amount can be stored for later use The Stainless Steel Coar...

Page 18: ...hakes Soups Sauces Pureeing Less Than 1 Litre Mayonnaise Marinades Dressings Fill the jug to at least 1 4 full Remember to leave room to allow froth to form as the drink is aerated Place mixture in the jug and blend on settings 2 or 3 until desired consistency Pour oil into the jug gradually through the opening in lid with motor running Blend on setting 2 The Blender Jug The blender jug offers ver...

Page 19: ...ling and storing these parts Always store the processing blade with the protective covers provided Store the food processor with the processing blade in the bowl and the lid and the food pusher in position but DO NOT lock as this places unnecessary strain on the operating switch Store the blender in an upright position on or near to the food processor Never use an abrasive cleaner Do not place any...

Page 20: ...l and process on setting 2 or setting 3 until mixture is pureed and shallots are finely chopped 3 Serve with corn chips or vegetable strips vegetable strips can be made using the chopping blade Recipes Hommos Serves 6 Uses Dip sauce spread thickener 2 cups chick peas canned or precooked 2 cloves garlic peeled 2 tablespoons plain yogurt 1 teaspoon paprika 1 teaspoon tahini 1 tablespoon olive oil 1 ...

Page 21: ...s olives garlic and olive oil in the processing bowl and process until pureed and well combined Stir oregano through the sauce heat through and pour over lamb steaks Grilled Chicken with Pesto Serves 6 Uses for Pesto on chicken lamb potatoes pasta 6 chicken breast fillets skin removed Pesto 1 bunch basil 60g pinenuts 2 cloves garlic roughly chopped 60g fresh Parmesan cheese grated cup olive oil 1 ...

Page 22: ...setting 3 6 Blend the soup in the processing bowl until smooth in two batches 7 Return the soup to saucepan stir through cream and reheat gently 8 Do not allow to boil Pumpkin and Cumin Soup Serves 6 500g butternut pumpkin peeled and roughly chopped 2 potatoes peeled and roughly chopped 2 onions peeled and quartered 3 cups stock vegetable or chicken 2 teaspoons ground cumin pinch of salt Sour crea...

Page 23: ...t oil in a saucepan and add the processed herbs shrimp paste and curry powder Cook stirring over a moderate heat for 4 5 minutes until mixture has softened 5 Add prawns and coconut milk Cook gently until prawns are opaque and cooked through 6 Place noodles and sprouts in serving bowl and spoon laksa over the top Tabouli Serves 8 2 3 cup cracked wheat 1 cups parsley sprigs cup mint leaves 1 clove g...

Page 24: ...an tomatoes 2 tablespoons tomato paste 1 tablespoon mixed herbs Cheese Sauce 90g tasty cheese 30g butter or margarine 2 tablespoons plain flour cup milk cup cream 1 1 x 450g packet instant lasagne sheets 2 Use processing blade on speed setting 3 3 Place steak onion and garlic in processing bowl and process until finely chopped 4 Heat oil in a frypan and add meat mixture Cook until browned add toma...

Page 25: ...s and sauté for 1 minute Stir in peanut butter water and soy sauce Heat stirring until well combined and thickened Fold through coconut milk and serve Basic Buttercake 185g butter or margarine cubed 1 cup sugar teaspoon vanilla 3 x 60g eggs 3 cups self raising flour cup milk 1 Use the mixing blade on speed setting 3 2 Place butter sugar and vanilla into the processing bowl and process until light ...

Page 26: ...d for 5 minutes 3 Place flour sugar cocoa and bicarbonate of soda into the processing bowl and process until combined Add melted butter egg and milk and process until smooth 4 Pour mixture into a greased 20cm ring and bake in a moderate oven 180ºC for 40 45 minutes or until cooked Mango Smoothie 2 mangoes peeled and sliced 1 cups plain yoghurt 1 cup orange juice 1 Place mangoes yoghurt and orange ...

Page 27: ... Dissolve cocoa and coffee in boiling water Combine with sugar egg wheat germ and milk Pour into blender jug Blend on setting 3 until smooth and frothy 2 Serve immediately Banana Smoothie 2 bananas peeled and chopped 1 cup plain yoghurt 1 cup milk cup honey 1 Place bananas yoghurt milk and honey into the blender jug Blend on setting 3 until well combined 2 Serve immediately ...

Page 28: ...ome grated cheese onto the dough Fold the top corner into the centre of the dough then fold each side to meet itself and roll inwards to form a roll and place on a greased baking tray 6 Place the tray in a warm position until the rolls have doubled in size 7 Bake in a moderate oven 180º 200ºC for 15 20 minutes NOTE Other fillings can be incorporated in the same way i e pesto mustard and grains Sho...

Page 29: ...bake in a hot oven 230º 250ºC for 12 15 minutes or until brown Pizza Dough Makes 1 large pizza or 2 medium pizzas 2 cups 300g plain flour 1 teaspoon salt 1 teaspoon sugar 7g dried yeast 30g butter or margarine 1 x 60g egg cup 125mls warm milk 1 Use the processing or mixing blade on speed setting 3 2 Place the flour salt sugar and yeast into the processing bowl add butter and egg process until well...

Page 30: ...29 ...

Page 31: ...30 Notes ...

Page 32: ...31 Notes ...

Reviews: