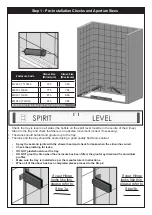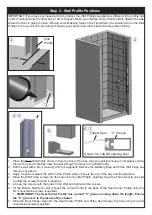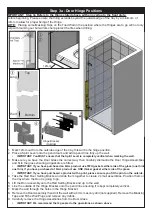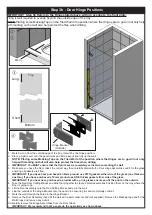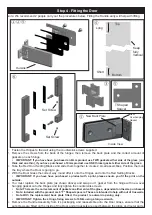
Step 4 - Fitting the Door
Note: We recommend 2 people carry out the procedures below. Fitting the Handle early will help with lifting.
1. Fasten the Hinges to the wall using the countersink screws supplied.
2. Remove the screws from the back of the hinges, then remove the back plate and the correct amount of
gaskets on each hinge.
• IMPORTANT: If you have have purchased an 8mm product use TWO gaskets either side of the glass (one
thick and one thin), if you have purchased a 10mm product use ONE thicker gasket either side of the glass.
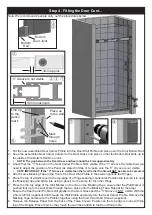
3. Take the Red Door Setting Blocks and slide them together to create 2 small assemblies. Position them on
the tray where the Door is going to go.
4.
With the Door Glass the correct way round offer it onto the Hinges and onto the Red Setting Blocks.
•
IMPORTANT: If you have have purchased a product with a print, please ensure you fit the print on the
outside.
5. You must replace the back plate (as shown above) and swap out 1 gasket from the hinge with new over
hanging gasket onto the Hinges and fully tighten the countersink screws.
•
Note: There are the correct amount of gaskets on either side of the glass, dependant on the size purchased.
•
Note: Included with the product are 6 “T” Shaped spacers. These are intended to help with out of true walls.
•
Note:With the replacement back plate fitted, the product is outward opening only.
hhhhhhhhhhhhhhl
•
IMPORTANT: Tighten the 4 Hinge fixing screws to 10N/m using a torque wrench.
6. Remove the Handle Assembly from it’s packaging and reassemble onto the Door Glass, ensure that the
set screws are fitted on the inside of the Door and all gaskets are used between the glass and metal parts.
③
①
Set Screw
Set Screw
Outside
②⑤
⑥
T Shaped
Spacer
⑤
Top
Bottom
Long
Short
④
Keep
fully
Vertical
Inside View
⑤
New Back Plate
New
Overhanging
Gasket


