Step 2 - Wall Profile Positions
IMPORTANT: If you have purchased an 8mm product, the Wall Profiles supplied are different. One profile has
an 8mm channel while the other has a 10mm channel. Make sure that the 10mm Wall Profile is fitted at the side
where the door is going to close. Placing some Masking Tape on the Tiled Wall in the position where the Wall
Profiles are to go will not only help with marking out but will also help protect the tiles when drilling.
⑤
⑥
④
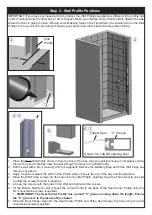
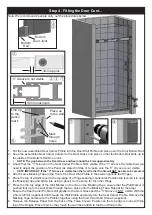
1. Place the Door
Wall Profile 10mm in from the front of the tray. Using a spirit level keep it completely vertical
then with a pencil carefully mark the wall through the holes in the Wall Profile.
2.
Drill the wall with a 6mm masonry drill (not supplied). Remove the Masking Tape and fit the Wall Plugs and
remove any debris.
3.
Apply a bead of sealant the width of the Profile where it meets the top of the tray and the tiled wall.
4.
Place the Wall Fixing screws into the holes into the Wall Profile, carefully move the Foam Seal to one side
to allow the screws through if required.
5. Line up the screws with the holes in the Wall and tighten all the screws.
6.
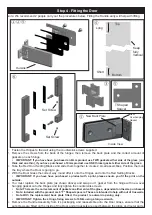
Fit the Bottom Rail Door Joint (choose the correct hand) to the base of the Seal Carrier Profile using the
9mm countersink screws (supplied).
•
IMPORTANT: The Seal Carrier Profile has a small “V” groove running down it’s length. Ensure
the “V” groove is to the inside of the shower.
7.
Slide the Door Flipper Seal into the Seal Carrier Profile and fit the Seal Carrier Top Cap using the 9mm
countersink screws (supplied).
10mm
Wall
Profile
“V” Groove
⑥
Flipper Seal
Shown for outward opening door
②
①
⑦
③


