background image


rolleaseacmeda.com 

© 2020 Rollease Acmeda Group 


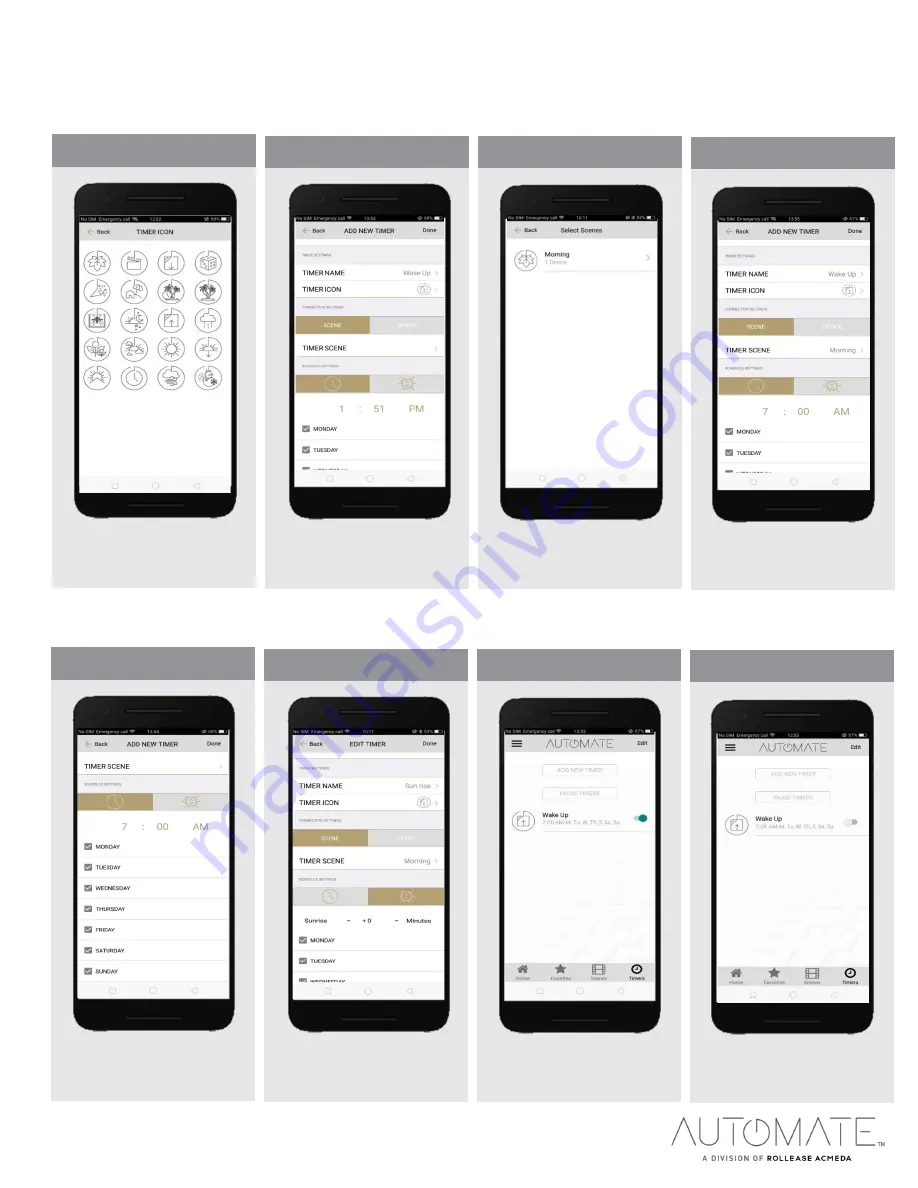
STEP 5 

 Create a Timer 

Select the appropriate icon for the 
Timer. 


STEP 6 

 Create a Timer 

Select the ‘TIMER SCENE’ to choose 

the scene you wish the timer to 
activate. 


STEP 7 

 Create a Timer 

In the Scene list, add the scenes you 
wish to operate. 


STEP 8 

 Create a Timer 

Set the time you wish the timer to 
trigger shade control. 


STEP 9 

 Create a Timer 

Select the days you wish the timer to 
operate. 


STEP 10 

 Create a Timer 

If you prefer, track your timer 
through the Sunrise/Sunset functions. 

Select ‘DONE’ to finalize your timer.


STEP 11 

 Enable /Disable Timer 

Your timers can be manually enabled 
and disabled by toggling the switch 
for each timer. 


STEP 12 

 Pause/Un-Pause Timer 


Your timers can be paused and un-
paused to switch all timers on and off 
at the same time.


Summary of Contents for AUTOMATE Pulse 2

Page 1: ...to that location Our step by step guide will explain in more detail WI FI HUB TECHNICAL SPECIFICATIONS Radio Frequency range 60 feet no obstructions Radio Frequency 433MHz Wi Fi 2 4 GHz or Ethernet C...

Page 2: ...scenes created Timers Show a list of scene timers App Version 2 0 13 Menu Rooms Locations Devices Home Favorite Scenes Timers A Automate Pulse 2 Hub B USB Power Supply C 32 80cm USB Power Cord E Quic...

Page 3: ...e Quick Start guide Select YES STEP 2 Add Location You can create a name for your location or select Next to use the Default My House Email l Email l Email l STEP 3 Sign Up Creating an account will re...

Page 4: ...to STEP 6 Configure a Hub Open your Wi Fi settings and connect to the appropriate RA PULSE xxx network that corresponds with your hub STEP 10 Wi fi Network Hub Enter your correct Wi Fi networks passwo...

Page 5: ...t the Application STEP 11 Configure a Hub Wait while the hub connects to your Wi Fi Network STEP 12 Configure a Hub Before selecting NEXT verify the network changes over to your home Wi Fi network STE...

Page 6: ...connect to the appropriate RA PULSE xxx network that corresponds with your hub STEP 8 Configure a Hub In the app verify you are connected to your RA_PULSE xxxx network press NEXT to pair the hub STEP...

Page 7: ...listed If it is not type in the correct network name STEP 10 Wi fi Network Enter your correct Wi Fi networks password STEP 11 Configure a Hub Wait while the hub connects to your Wi Fi Network STEP 13...

Page 8: ...Image from Library STEP 4 Custom Home Image You will need to Allow Pulse 2 access to import a picture Select the image and crop as desired STEP 1 Add Location Open the App from the home screen and se...

Page 9: ...a motor From the list select the HUB you wish to pair the motor too STEP 3 Pair a motor Select which device type best represents your shade NOTE this can t be changed later STEP 4 Pair a motor Make su...

Page 10: ...ce will now be added to the DEVICE tab STEP 12 Shade Ready Shade is now ready for operation from Pulse 2 App STEP 3 Close a shade Open the shade by pressing the Up arrow icon or scrolling the black li...

Page 11: ...ROOM NAME to enter the desired room name STEP 3 Create a Room Enter the Room Name and click OK Device Information From the device window if you select Edit you can see all the motors device settings...

Page 12: ...devices you wish to be added to the room STEP 8 Add Shades to a Room Press DONE to complete the setup of the room STEP 9 Add Shades to a Room Wait for the App to conclude the process of room set up ST...

Page 13: ...the name of your scene STEP 3 Create a Scene Input your scene name STEP 4 Create a Scene Select SCENE PICTURE to customize the icon for your scene STEP 8 Manual Scene Creation Choose custom heights by...

Page 14: ...om scene just press GO next to the desired scene name STEP 9 Manual Scene Creation Repeat for all shade in that scene Set the shade height percentage if necessary Select DONE to create your scene STEP...

Page 15: ...a Timer Set the time you wish the timer to trigger shade control STEP 9 Create a Timer Select the days you wish the timer to operate STEP 10 Create a Timer If you prefer track your timer through the...

Page 16: ...to adjust the limits on STEP 2 Adjust Limits Select EDIT in the top right to open the shades settings page STEP 1 Create a Favorite Device Select the Plus icon to add a favorite device to your Favorit...

Page 17: ...STEP 6 Setting Limits The app will configure the new top position STEP 7 Setting Limits Press the Bottom Position to change the lower limit of your shade Press OK to continue STEP 8 Setting Limits To...

Page 18: ...s possible to connect to a shared hub STEP 2 Share a Hub The HUB must have been shared from another account STEP 3 Share a Hub The shared Hub will be listed on the shared Hubs list to be added STEP 4...

Page 19: ...r 100ms and off for 500ms Pulse received configuration via the app Before reset after Pairing Mode Blue LED is Solid Connected to Internet Paired Red LED long blinks four times a second On for 250ms a...

Page 20: ...Battery Percentage Icon 3 Levels of Battery Full 100 70 Medium 69 11 Low 10 or less and motor starts beeping Pop up Motor Offline Pop up reminder The motor is offline and the control device is not on...

Page 21: ...OT CONNECT TO MY 5GHZ WI FI NETWORK The AUTOMATE PULSE 2 HUB does not currently support operation over a 5GHz network It operates on a 2 4GHz network or using a LAN CONNECTION CAT 5 Most routers are d...

Page 22: ...digital device pursuant to part 15 of the FCC Rules These limits are designed to provide reasonable protection against harmful interference in a residential installation This equipment generates uses...

Reviews: