


13
Playing/Recording Patterns (PATTERN SEQUENCER)
The pattern sequencer is a function that lets you record your keyboard performance
and knob movements, and then play them back repeatedly. The recorded data is
called a “pattern,” and you can record and save patterns of up to eight measures.
5
A pattern consists of tracks 1–8, and recording occurs on the currently selected
track.
5
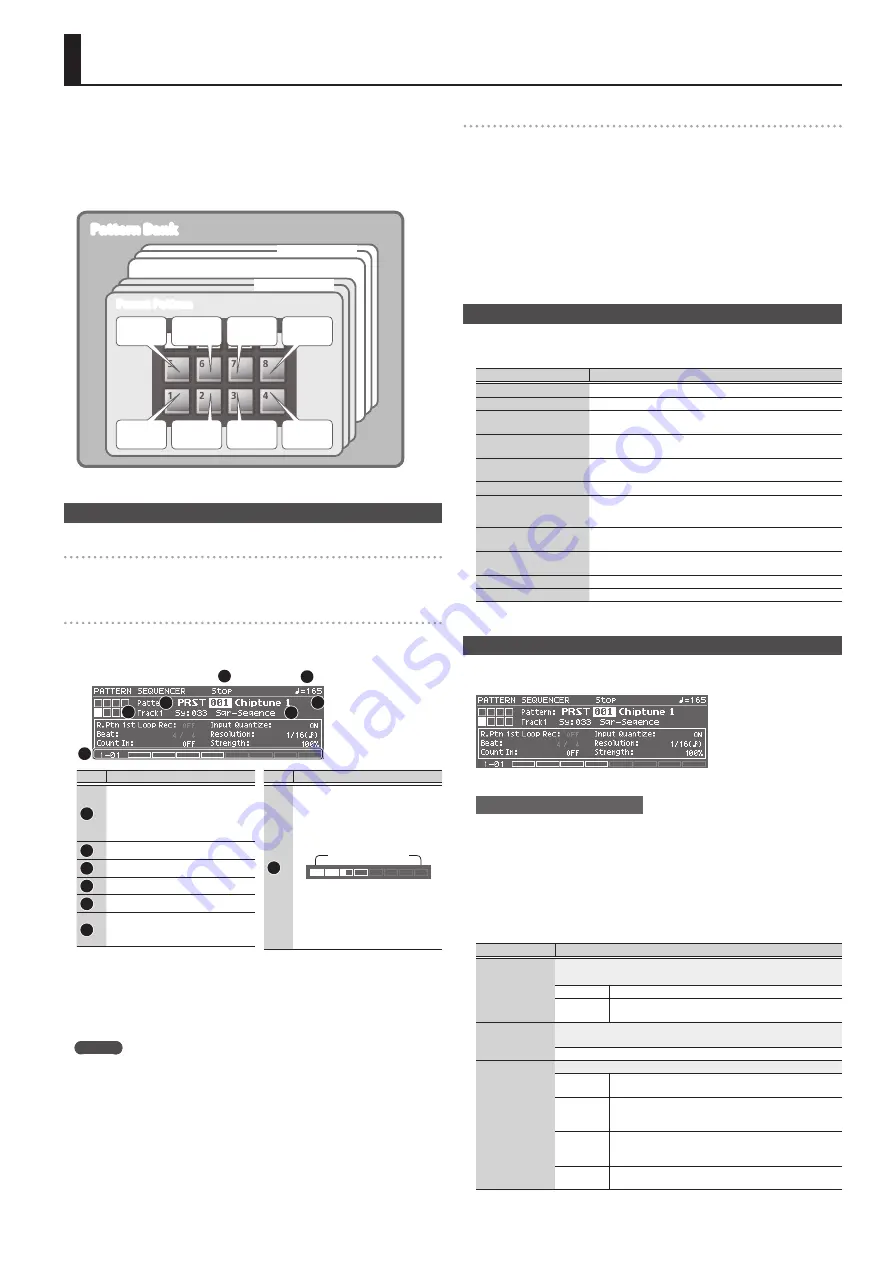
The patterns are organized into 32 preset patterns (PRST) and 128 user patterns
(USER), and are saved in a “pattern bank.”
Pattern Bank
User Pattern
USER001–128
Track 1
Track 2
Track 3
Track 4
Track 5
Track 6
Track 7
Track 8
(Rhythm)
Preset Pattern
PRST001–032
Playing Patterns
Playing the currently selected pattern
1.
With the [PATTERN SEQUENCER] button lit, press the [
s
] button.
Press the button once again to stop.
Selecting and playing a pattern
1.
Press the [PATTERN SEQUENCER] button to make it light.
The PATTERN SEQUENCER screen appears.
1
2
3
4
5
6
7
No.
Explanation
1
Status indication
5
Now Recording
5
Now Playing
5
Rec Standby
5
Stop
2
Tempo
3
Pattern bank (PRST/USER)
4
Pattern number, Pattern name
5
Selected track
6
Patch that is used to play/record the
selected track
Category number, Patch name
No.
Explanation
7
Playback/recording progress
indication
This indicates the playback/recording
position as Measure: Beat: Tick units
and as a bar graph.
Number of measures
(maximum 8)
White exterior frame:
Measures specified by PATTERN
LENGTH
Gray exterior frame:
Measures not specified by PATTERN
LENGTH
2.
Move the cursor to the pattern bank, and use the value dial to select a “PRST”
or “USER.”
3.
Move the cursor to the pattern number, and use the value dial to select the
pattern that you want to play.
MEMO
You can move the cursor to the pattern number, press the [ENTER] button, and
select a pattern from the PATTERN LIST screen that appears.
4.
Press the [
s
] button to play the pattern.
Press the button once again to stop.
Muting a specific track (Track Mute)
Use this function to mute specific tracks when a pattern is playing.
1.
Press the [MUTE] button to make it light.
Now the pads are in mute setting mode.
2.
Press pads [1]–[8] to select the track(s) that you want to mute.
You can press multiple pads.
The pad you pressed blinks, and its track is muted.
To cancel muting, press the blinking pad.
3.
Press the [MUTE] button to make it go dark.
The pad mute setting mode is cancelled.
* Track muting is maintained even after you cancel pad mute setting mode.
Basic Operations for the Pattern Sequencer
Operations for the pattern sequencer are valid only when the [PATTERN SEQUENCER]
button is lit.
Controller
Explanation
[
s
] button
Plays/stops the pattern.
[
u
] button
Returns the pattern to the beginning.
[
t
] button
Creates a pattern by recording your keyboard performance and
controller operations in real time.
[TAP] button
Sets the tempo to the interval at which you press this button
repeatedly.
[MUTE] button
If this is on, you can use pads [1]–[8] to mute the specified
track(s).
[ERASE] button
Erases a recorded pattern or a portion of the pattern.
[LOOP] button
5
If this is on, the pattern loops between the specified measures.
5
If this is off, the pattern plays/records to the specified measure,
and then stops.
Pads [1]–[8]
Selects tracks. You can use the keyboard to play or record the
selected track.
[PATTERN LENGTH] button
Changes the number of measures in the pattern. You can create a
pattern of up to eight measures.
[TEMPO] button
Changes the tempo.
[MIXER] button
Lets you specify the volume and pan of each track.
Recording Patterns
1.
Press the [PATTERN SEQUENCER] button to make it light.
The PATTERN SEQUENCER screen appears.
2.
Select the pattern that you want to record.
When making a new recording
If you want to make a new recording but continue using the sound settings that are
currently selected for each track, use the PATTERN ERASE function (p. 14) to clear
the contents of the pattern before you continue.
If you want to initialize the sound settings as well as the recorded contents, initialize
the pattern (p. 15).
3.
Press the [
t
] button.
The [
t
] button blinks, and the XPS-30 is in record-ready mode.
4.
Make settings for the pattern that you want to record.
Parameter
Value/Explanation
R. Ptn 1st Loop
Rec
Specifies how the rhythm pattern will be recorded.
* This can be specified only if an empty pattern is selected.
OFF
A rhythm pattern will not be recorded.
ON
Only on the first cycle of recording, the performance of the
selected rhythm pattern is recorded on track 8.
Beat
Specifies the time signature of the pattern.
* This can be specified only if an empty pattern is selected.
(1–32) / (2, 4, 8, 16)
Count In
Selects the way in which recording is started.
OFF
Recording begins immediately when you press the [
s
]
button.
1 MEAS
When you press the [
s
] button, a count begins from
one measure before the recording start location; recording
begins when the recording start location is reached.
2 MEAS
When you press the [
s
] button, a count begins from two
measures before the recording start location; recording
begins when the recording start location is reached.
WAIT NOTE
Recording begins when you press the [
s
] button, or
when you press a key or press the hold pedal.
Summary of Contents for XPS-30
Page 22: ...22 MEMO...
Page 23: ...23...