


17
Overall Settings for the XPS-30
Parameter
Value/Explanation
KNOB
Knob 1–4 Assign
Assigning the Function of the Control Knobs
Specifies the function that is assigned to each knob when the parameter
controlled by the control knobs is set to ASSIGN 1–4.
* For details, refer to “Parameter Guide (English)” (PDF).
SYNC/TEMPO
Sync Mode
Specifies the synchronization message that the XPS-30 will use for
operation.
MASTER
The XPS-30 will be the master. Choose this setting when
using the XPS-30 by itself without synchronizing to another
device.
SLAVE
The XPS-30 will be the slave. Choose this setting when you
want the XPS-30 to synchronize to MIDI Clock messages
received from another MIDI device.
Clock Source
When the Sync Mode is “SLAVE,” this setting specifies whether the XPS-30
will synchronize to synchronization messages from the MIDI IN connector
or from the USB COMPUTER port.
MIDI, USB
Startup Tempo
Specifies the tempo when the XPS-30 starts.
20–250
Tempo Lock
When you switch performances or patterns, this specifies whether the
tempo of the newly selected performance/pattern is used, or the current
tempo is maintained.
OFF, ON (maintain)
METRONOME
Metronome Mode
Specifies how the metronome will be sounded.
OFF
No metronome is sounded.
PLAY-ONLY
The metronome sounds when a pattern is playing.
REC-ONLY
The metronome sounds when a pattern is being recorded.
PLAY&REC
The metronome sounds when a pattern is playing or being
recorded.
ALWAYS
The metronome sounds at all times.
Metronome Level
Adjusts the metronome volume.
0–10
Metronome
Sound
Selects the metronome sound.
TYPE1
Conventional metronome sound (first beat is a bell)
TYPE2
Click sound
TYPE3
Beep sound
TYPE4
Cowbell sound
Metronome
Accent Switch
Adds an accent to the metronome sound.
OFF, ON
MIDI
Local Switch
Determines whether the internal sound generator is disconnected (OFF)
from the controller section (keyboard, pitch bend/modulation lever,
buttons, sliders, pedal, and so on); or not disconnected (ON). Normally
you’ll leave this “ON.” Choose the “OFF” setting if you want operations on
the XPS-30 to only control DAW software on your computer.
OFF, ON
Patch Rx/Tx Ch
In patch mode, specifies the MIDI message transmit/receive channel for
the keyboard part.
1–16
Performance
Contorl Channel
Specifies the MIDI receive channel on which MIDI messages (program
change/bank select) from an external MIDI device will be received by the
XPS-30 to switch performances. Choose “OFF” setting if you don’t want
performances to be switched from a connected MIDI device.
1–16, OFF
Transmit
Program Change,
Bank Select,
Active Sensing
Specifies whether program change messages/bank select messages/active
sensing messages will be transmitted (ON) or not be transmitted (OFF).
OFF, ON
Transmit Edit
Data
Specifies whether changes you make in the settings of a patch or
performance will be transmitted as system exclusive messages (ON), or will
not be transmitted (OFF).
OFF, ON
Receive
Program Change,
Bank Select
Specifies whether program change messages/bank select messages will
be received (ON) or not be received (OFF).
OFF, ON
Soft Through
If this is “ON,” incoming MIDI messages from the MIDI IN connector will be
re-transmitted without change from the MIDI OUT connector.
OFF, ON
USB Driver
Sets the USB driver.
* This setting will take effect when you turn the power off, then on again.
GENERIC
Choose this if you want to use the generic USB driver
provided by your computer’s operating system.
VENDOR
Choose this if you want to use a USB driver downloaded
from the Roland website. (*1)
CONTROL
* For details, refer to “Parameter Guide (English)” (PDF).
INFORMATION
Version
View the software version.
Expansion
Displays information about expansion sounds.
*1:
Download the Driver
In order to use the XPS-30 with the “VENDOR” setting, you must download the driver from
the following URL and install it on your computer.
For details on installation, refer to the following URL.
&
http://www.roland.com/support/
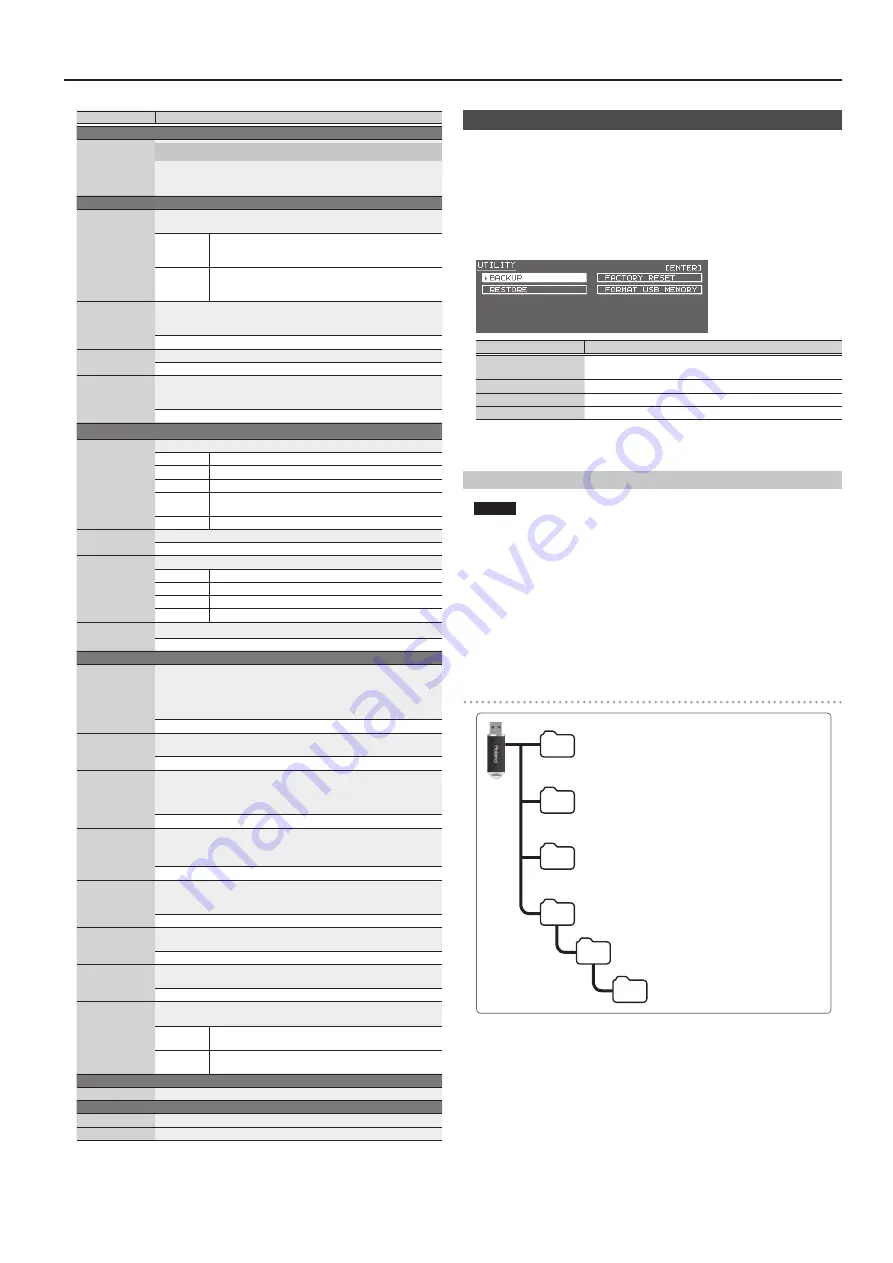
Convenient Functions (UTILITY)
These functions let you back up the XPS-30’s internal data to a USB flash drive, or to
restore data from a USB flash drive into the XPS-30.
Other utility functions let you return the XPS-30 to its factory-set state, or initialize a
USB flash drive.
1.
Press the [MENU] button.
The MENU screen appears.
2.
Move the cursor to “UTILITY,” and press the [ENTER] button.
The UTILITY screen appears.
Menu
Explanation
BACKUP
Backs up user data to the USB flash drive.
System and user setting (.SVD) and pattern (.BIN) files are created.
RESTORE
Restores data from the USB flash drive.
FACTORY RESET
Returns the XPS-30 to the factory-set condition.
FORMAT USB MEMORY
Initializes a USB flash drive.
3.
Move the cursor to the item that you want to execute, and press the [ENTER]
button.
Initializing USB Flash Drive (FORMAT USB MEMORY)
NOTE
5
If the USB Flash drive contains important data that you’ve created, be aware
that all of this data will be lost when you execute this operation.
5
Never turn off the power or remove the USB flash drives while the screen
indicates “Processing....”
1.
In the UTILITY screen, move the cursor to “FORMAT USB MEMORY,” and
press the [ENTER] button.
A confirmation message appears.
If you decide to cancel, press the [EXIT] button.
2.
Move the cursor to “OK,” and press the [ENTER] button.
When formatting is completed, the display indicates “Format Completed!”
The folder structure of a USB flash drive
EXPORT folder
Exported SMF files are saved in this folder.
IMPORT folder
Place files to be imported in this folder.
SONG LIST folder
Place audio files to be played using Audio Player in this folder.
ROLAND folder
Backup data is saved in this folder.
XPS
BACKUP
Summary of Contents for XPS-30
Page 22: ...22 MEMO...
Page 23: ...23...