background image

5

Input Settings

EnglishEnglish

Preamp

Changing the AUTO-SENS Settings

You can choose whether AUTO-SENS will be ended automatically or manually. You can 

also specify the maximum setting for the recording level. The recording level will be set 

automatically according to the maximum volume that was input during the AUTO-SENS 

setting time.

Windows

From the “Options” menu, select [Device settings].

Mac

From the “UA-S10 Control Panel” menu, select [Device settings].

Value

Explanation

AUTO 

(default)

The AUTO-SENS setting will finish automatically when there has been no 

input for approximately four seconds, after the [AUTO-SENS] was clicked.

MANUAL

AUTO-SENS settings will not end until you click [FINISH] or [CANCEL].

Range for Margin: 0–12

Value

Explanation

6 (default)

Headroom is set at 6 dB. This setting provides a good overall balance.

0

The maximum value for the recording level is set at 0 dBFS. Clipping will 

occur if audio that exceeds the recording level detected by AUTO-SENS is 

input.

12

Headroom is set at 12 dB. The recording level will be reduced.

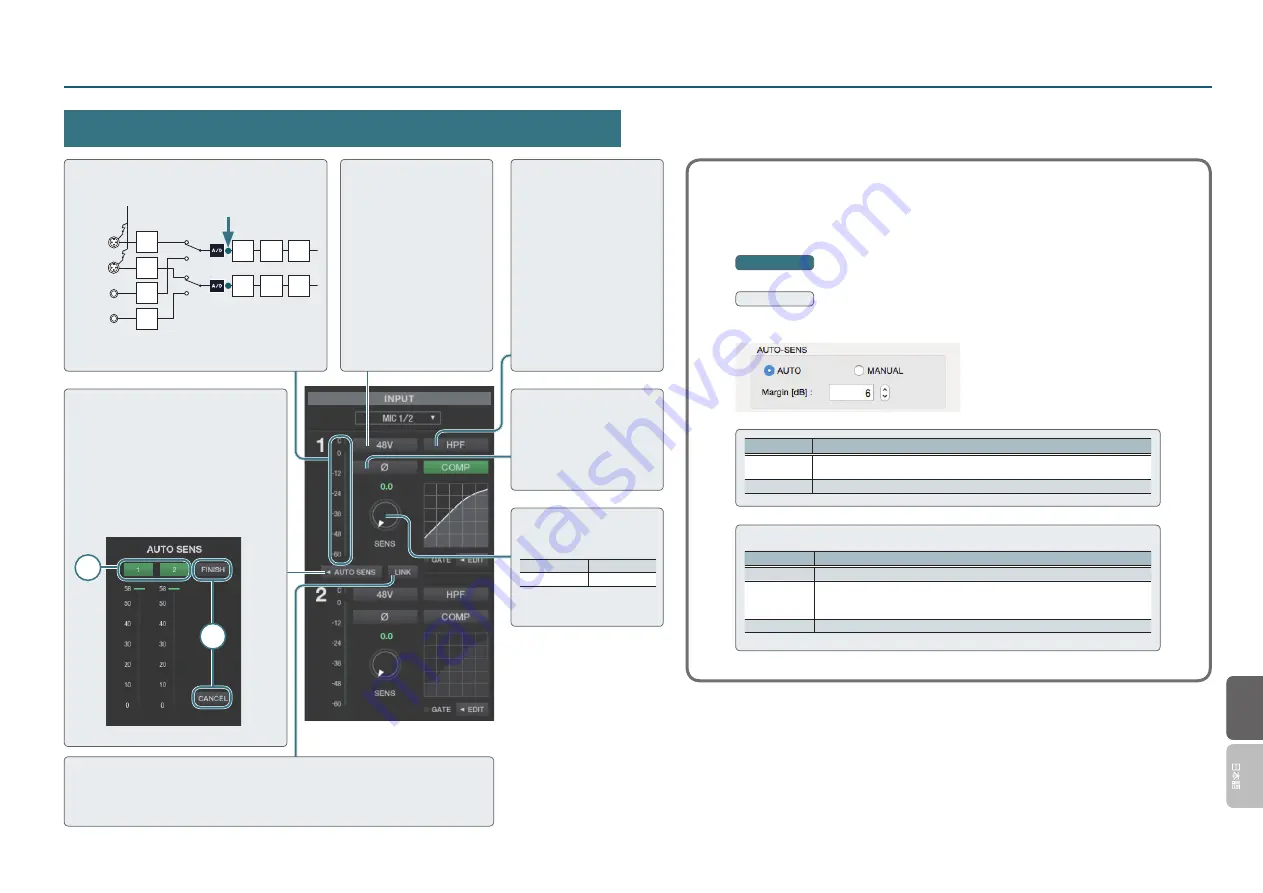
Input Level Meter

This indicates the level of the input signal.

MIC 1

MIC 2

LINE IN L

LINE IN R

Ф

COMP

48V

SENS

HPF

SENS

SENS

SENS

Down

sampling

Ф

COMP

HPF

48V

Phantom power can be 

supplied to the MIC 1, 2 jacks. 

Turn this on if you’re using a 

device that requires phantom 

power, such as a condenser 

mic.
This is not available for the 

LINE IN jacks.

HPF

Enables the low cut filter for 

the input.
Cutoff frequency: 75 Hz

AUTO-SENS

1  

Click [AUTO SENS].

2  

Turn on the channel that you want to 

use auto-sense.

3  

Input sound.

4  

When you have finished, click [FINISH]. 

If you decide to cancel, click [CANCEL].

2

4

LINK

If this is on, sensitivity and compressor settings will be linked in stereo.
This setting is on as the fixed value if the input is [LINE IN], and is off as the fixed value if the 

input is [MIC 1/LINE R].

Φ (Polarity)

Inverts the polarity of the 

input signal.

SENS

Adjusts the input signal’s 

sensitivity.

MIC 1, 2 jacks

0–58 dB

LINE IN jacks

0–32 dB

Summary of Contents for UA-S10

Page 1: ...t also lets you edit parameters that cannot be edited from the Super UA itself The explanations in this manual include illustrations that depict what should typically be shown by the display Note howe...

Page 2: ...ngs 11 Saving Loading the Settings 11 Saving Settings 11 Loading Settings 11 Initializing the Settings 11 Other Settings 12 View in Foreground 12 Viewing this Help File 12 Viewing the Version of the C...

Page 3: ...combine a dynamic mic with a condenser mic Direct Mixer Here you can adjust the balance between the audio from the input jacks and the audio that s played back from the computer By adjusting the balan...

Page 4: ...LINE IN R jacks MIC 1 LINE R If the breakout box is not connected to the main unit s I O port MIC 1 2 and MIC 1 LINE R are not available for selection 2 Adjust settings such as Preamp p 5 and Compres...

Page 5: ...ipping will occur if audio that exceeds the recording level detected by AUTO SENS is input 12 Headroom is set at 12 dB The recording level will be reduced Input Level Meter This indicates the level of...

Page 6: ...cifies the signal level at which the compressor begins operating dB ATTACK Specifies the time from when the input level exceeds the threshold until the compressor begins to operate msec KNEE Adjusts w...

Page 7: ...ick Store then the save destination preset number U00 U15 and enter a preset name of up to 16 characters Loading one user preset Click User Preset then the preset number that you want to load U00 U15...

Page 8: ...VEL Adjusts the input level of the signal Mix Level Meter The level of the mixed signal is displayed DIRECT MIXER PAN LEVEL PAN LEVEL LEVEL STEREO If this is on the LEVEL of INPUT 1 and INPUT 2 is ste...

Page 9: ...connected to the main unit s I O port PATCH BAY TYPE You can change the signal flow within the patch bay For details refer to p 10 D A CONVERSION Normally you should set this to 1 bit Turn it off in...

Page 10: ...use click 2 Channel output destination 2 Start a playback application that supports DSD and set it to play back using the DoP standard When you play back a DSD audio data the control panel will automa...

Page 11: ...choose Save settings Mac From the UA S10 Control Panel menu choose Save settings 2 Specify the file name Loading Settings 1 Windows From the Options menu choose Load settings Mac From the UA S10 Cont...

Page 12: ...al flow diagram appears Windows From the Options menu click Show the signal flow Mac From the UA S10 Control Panel menu click Show the signal flow Reversing the Mouse Scrolling Direction You can rever...

Page 13: ...LINE OUT A LINE OUT B DIRECT MIXER OUT Up sampling PCM OUT 1 2 PCM OUT 3 4 PCM OUT 5 6 DSD OUT 1 2 PHONES LINE OUT A LINE OUT B DIRECT MIXER OUT To USB From USB 1 2 MONITOR 1 2 1 2 5 6 3 4 PCM DSD OU...

Page 14: ...UA S10 English 02 2015 UA S10 Super UA Super UA UA S10...

Page 15: ...2 English Super UA 3 4 4 5 6 7 8 9 PATCH BAY TYPE 10 2 Channel 10 6 Channel 10 11 11 11 11 11 12 12 12 12 Super UA 12 12 12 352 8kHz 12 13...

Page 16: ...R LINE OUT A L LINE OUT A R MUTE PHONES MUTE MUTE VOLUME VOLUME VOLUME PHONES DIRECT MIXER PAN LEVEL PAN LEVEL LEVEL MIC 1 MIC 2 LINE IN L LINE IN R COMP 48V SENS HPF SENS SENS SENS Down sampling COMP...

Page 17: ...4 English 1 MIC 1 2 MIC 1 2 LINE IN LINE IN MIC 1 LINE IN R MIC 1 LINE R I O MIC 1 2 MIC 1 LINE R 2 P 5 P 6 MIC 1 2 LINE IN MIC 1 LINE R 2 1...

Page 18: ...AL FINISH CANCEL AUTO SENS Margin 0 12 6 6dB 0 0dBFS AUTO SENS 12 12dB MIC 1 MIC 2 LINE IN L LINE IN R COMP 48V SENS HPF SENS SENS SENS Down sampling COMP HPF 48V MIC 1 2 LINE IN HPF 75Hz AUTO SENS 1...

Page 19: ...h COMP EDIT IN OUT GR MIC 1 MIC 2 LINE IN L LINE IN R COMP 48V SENS HPF SENS SENS SENS Down sampling COMP HPF IN OUT GATE dB RATIO THRESH dB ATTACK msec KNEE RELEASE msec GAIN dB LINK PRESET P 7 COMP...

Page 20: ...7 English 18 P00 P17 16 U00 U15 16 1 Store U00 U15 16 1 User Preset U00 U15 User Preset Save User Presets User Preset Load User Presets 16...

Page 21: ...8 English PAN LEVEL LEVEL OUT 1 2 INPUT 2 INPUT 1 PAN LEVEL MIX DIRECT MIXER PAN LEVEL PAN LEVEL LEVEL STEREO INPUT 1 INPUT 2 LEVEL INPUT 1 PAN INPUT 2 PAN DIRECT MIXER PAN LEVEL PAN LEVEL LEVEL DSD...

Page 22: ...L LINE OUT A R MUTE PHONES MUTE MUTE VOLUME VOLUME VOLUME PHONES LINE OUT A LINE OUT A LINE OUT B LINE OUT B I O PATCH BAY TYPE PATCH BAY P 10 D A CONVERSION 1 bit 5 5 5 5 PATCH BAY TYPE 6 Channel MUT...

Page 23: ...p sampling DSD 2 8MHz 5 6MHz DSD DoP 1 2 Channel 2 DSD DoP DSD PATCH BAY TYPE 2 Channel D A CONVERSION 1 bit OUT 1 2 5 6MHz DSD 2 8MHz PCM OUT 1 2 PCM OUT 3 4 PCM OUT 5 6 DSD OUT 1 2 PHONES LINE OUT A...

Page 24: ...11 English UA S10 5 5 P 4 5 5 P 8 5 5 P 9 1 Windows Mac UA S10 Control Panel 2 1 Windows Mac UA S10 Control Panel 2 1 Windows Mac UA S10 Control Panel 2 OK...

Page 25: ...anel Windows Mac UA S10 Control Panel Windows Mac UA S10 Control Panel Super UA Windows Mac UA S10 Control Panel Windows Mac UA S10 Control Panel UA S10 Control Panel 352 8kHz 352 8kHz 2 ASIO Core Aud...

Page 26: ...NE OUT B DIRECT MIXER OUT Up sampling PCM OUT 1 2 PCM OUT 3 4 PCM OUT 5 6 DSD OUT 1 2 PHONES LINE OUT A LINE OUT B DIRECT MIXER OUT To USB From USB 1 2 MONITOR 1 2 1 2 5 6 3 4 PCM DSD OUT OUT IN PATCH...

Reviews: