background image

Selecting Tones ([Piano] [Other] Buttons)

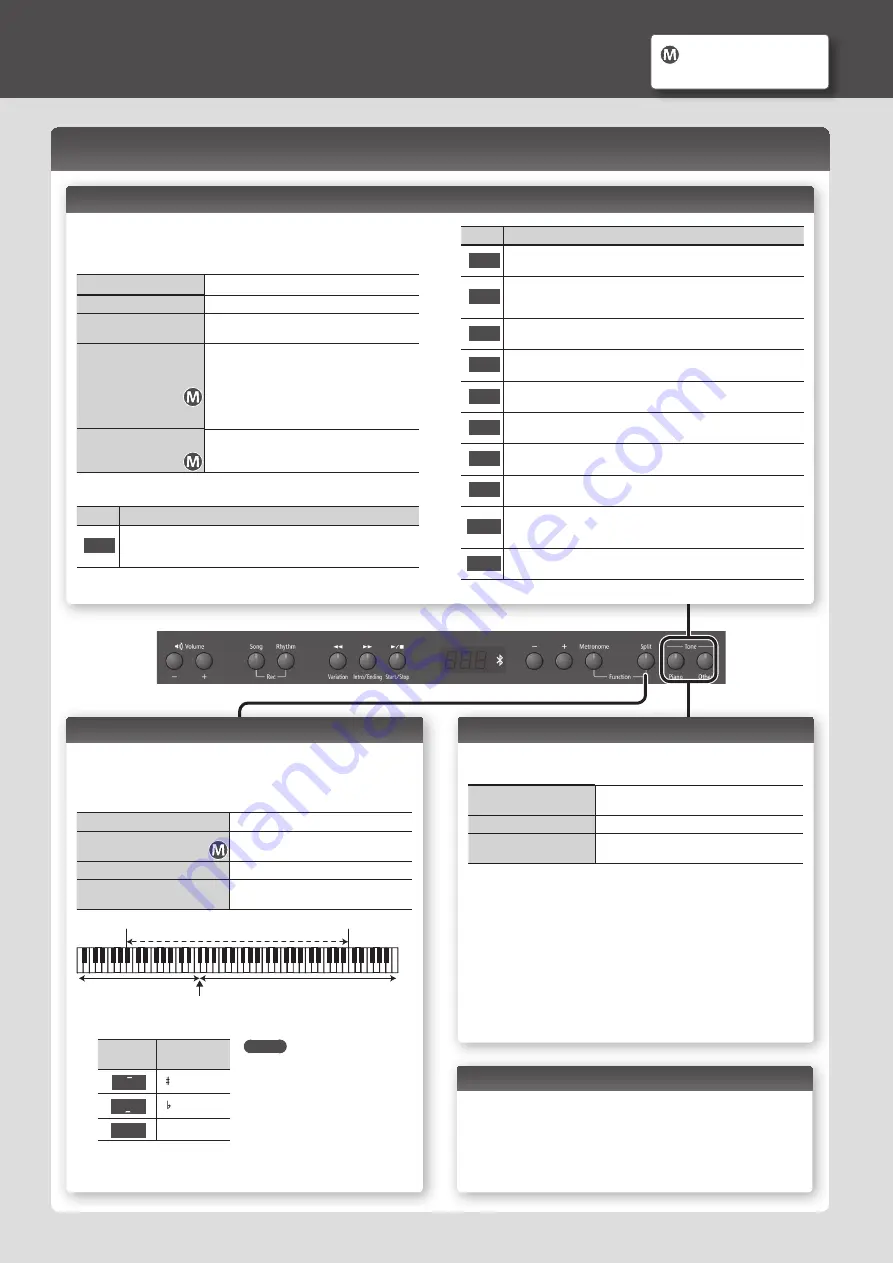
Playing Different Tones with the Right and Left Hands ([Split] Button)

You can play different tones in the left and right sides of the keyboard, divided at a 

certain key.
This feature is called “Split Play,“ and the key at which the keyboard is divided is 

called the “Split Point.”

Turning the split feature on

Press the [Split] button so it’s lit.

Changing the keyboard’s 

split point

Hold down the [Split] button and press the 

key at the desired split point.

Changing the Right-Hand Tone

Same as “Selecting Tones.”

Changing the Left-Hand Tone

Hold down the [Split] button and use the 

steps described in “Selecting Tones.”

B1

B6

Left-Hand Tone

Right-Hand Tone

Range in which you can specify the split point

Split point when the power is turned on: F#3

*  The split point is the highest note of the left-hand tone.

Display 

(example)

Pitch

F 3

F 3

A 4

A 4

C 4

C4

MEMO

Separate, independent settings 

for Split can be made for the 

Song mode (p. 4) and the 

Rhythm mode (p. 5).

Layering Two Tones (Dual Play)

You can play two tones simultaneously from each note of the keyboard. This feature 

is called “Dual Play.”

Turning Dual on

Hold down the [Piano] button and press the 

[Other] button.

Turning Dual off

Press the [Piano] or the [Other] button.

Selecting tones

Select tones for the [Piano] button and [Other] 

button before you turn Dual on.

1 . 

Press the [Piano] button, and then use the [-] [+] buttons to 

select a tone.

2 . 

Press the [Other] button, and then use the [-] [+] buttons to 

select a tone.

3 . 

Hold down the [Piano] button and press the [Other] button to 

turn Dual on.

Tone 1 and tone 2 are heard together.
To turn Dual off, press the [Piano] button or the [Other] button.

Operation Guide

Performing

This digital piano lets you enjoy playing a variety of piano tones (sounds) and other 

types of tones.
You can select a tone and adjust the way that it sounds.

Selecting a piano tone

Press the [Piano] button.

Selecting other tones

Press the [Other] button.

Selecting various tones

Press the [Piano] or [Other] button, and then press 

the [-] [+] buttons.

Adjusting the spaciousness 

of the sound
(Ambience)

Hold down the [Piano] button and press the [-] [+] 

buttons.
*  If you’re using headphones and the Headphones 

3D Ambience effect (p. 11) is set to “On,“ this 

lets you adjust the depth of the Headphones 3D 

Ambience effect.

Adjusting the brightness of 

the sound
(Brilliance)

Hold down the [Other] button and press the [-] [+] 

buttons.

[Piano] button

Display Explanation

  1

Concert Piano
The sound of a splendid concert grand piano. This piano sound has our 

highest recommendation, and can be used for any style of music.

Display Explanation

  2

Ballade Piano
A mellow grand piano sound, recommended for quiet songs.

  3

Bright Piano
A brilliant grand piano sound, recommended when you want the piano to 

stand out in an ensemble.

  4

Magical Piano
A charming sound that layers synth bells with Concert Piano.

  5

Piano+Strings
Strings layered with Concert Piano.

  6

Piano+Pad
A pad layered with Concert Piano.

  7

Piano+Choir
A choir layered with Concert Piano.

  8

Rock Piano
A robust piano sound, recommended for boogie-woogie playing.

  g

Ragtime Piano
A honky-tonk piano sound, recommended for ragtime playing.

 10

Harpsichord
A type of keyboard instrument widely used in Baroque music, producing a 

delicate sound.

 11

Coupled 8+4
The sound of a harpsichord layered with sound an higher octave.

   Settings for items with this icon 

are saved by Memory Backup 

(p. 11).

Changing the Key (Transpose)

The Transpose function lets you shift the pitch of the keyboard in semitone steps.
You can use this to play the song in a different key.
For details, refer to “Transposing the Keyboard or Song (Transpose)” (p. 11).

2

Summary of Contents for RP501R

Page 1: ...n 15 Transferring MIDI Data 15 Problems with Bluetooth Functionality 15 Troubleshooting 16 Message List 17 USING THE UNIT SAFELY 18 IMPORTANT NOTES 18 Contents Copyright 2016 ROLAND CORPORATION Main S...

Page 2: ...playing a variety of piano tones sounds and other types of tones You can select a tone and adjust the way that it sounds Selecting a piano tone Press the Piano button Selecting other tones Press the O...

Page 3: ...peaker C4 C5 C6 C7 C8 C3 C2 C1 C4 C5 C6 C3 C4 C5 C3 C6 The damper pedal for the left area The damper pedal for the right area Conventional keyboard Twin Piano Divide point List of Time Signatures Disp...

Page 4: ...button and press the s button All Song Play Starting Stopping Song Playback Press the s button When the song has finished playing to the end it will stop Fast Forward Press the y button By holding dow...

Page 5: ...rd a rhythm based on the chord that was played is sounded When the keys marked with in the illustration are played the result is recognized as C Note that it is not necessary to press all of the const...

Page 6: ...he s button once again you can hear the song that you just recorded Selecting the Destination of the Save 7 Use the buttons to select the destination at which to save and then press the Metronome butt...

Page 7: ...lapsed Lower the Level of an Audio File s Central Sound This feature lets you reduce the loudness of the central sound of the audio Center Cancel 1 When a song is selected hold down the s button and u...

Page 8: ...ttons to adjust the balance g 1 Song is louder 1 g g g Same volume Volume of the song Volume of the manual performance Manual performance is louder g 1 Piano is louder 1 g g g Same volume Volume of th...

Page 9: ...connect a USB flash drive here p 7 Use a commercially available USB flash drive or a USB flash drive sold by Roland However we cannot guarantee that all commercially available USB flash drives will w...

Page 10: ...itch ON After a brief interval you ll be able to produce sounds by playing the keyboard 2 Use the Volume buttons to adjust the volume The volume increases when you press the Volume button and decrease...

Page 11: ...6 Off On Applying a Headphones 3D Ambience Effect to the Piano Sound Headphones 3D Ambience You can apply a Headphones 3D Ambience effect which produces the sensation that the sound is emanating from...

Page 12: ...play chords refer to Chord Fingering List at the end of this manual Standard 0 Normal chord recognition F13 Off On Preventing Doubled NotesWhen Connected to a Sequencer Local Control If a software sy...

Page 13: ...mode can be restored to their factory set condition This operation is called Factory Reset NOTE The Factory Reset operation will erase all settings stored by the Memory Backup function as well as all...

Page 14: ...ttons to select On and then press the s button 4 Select F16 and press the s button 5 Use the buttons to select P and then press the s button MEMO By selecting P N here you can use the page turning fun...

Page 15: ...ct F16 and press the s button 5 Use the buttons to select N and then press the s button 6 Turn on the Bluetooth function of the mobile device MEMO The example shown here uses the iPhone For details re...

Page 16: ...d to the headphone jacks p 9 Has Local Control been set to Off When Local Control is set to Off no sound is produced on the keyboard Set Local Control to On p 12 Not all the notes you play are sounded...

Page 17: ...E 16 The data could not be read fast enough during song playback After waiting several seconds you may be able to play back the song by pressing the s button once again E 18 This audio format is not s...

Page 18: ...ncreasing amounts of pressure while taking care not to scratch the keys Repairs and Data Before sending the unit away for repairs be sure to make a backup of the data stored within it or you may prefe...

Page 19: ...ld Foxtrot 5 7 Quick Step 5 8 Go Twist Latin 6 1 Gold Rhumba 6 2 Beguine 6 3 Gold Cha Cha 6 4 That s Mambo 6 5 Cuba Salsa 6 6 Acoustic Samba 6 7 Jazz Bossa 6 8 Fast Bossa 6 g Samba Tradit World 7 1 Po...

Page 20: ...m Dm E m Em Fm Cm7 C m7 Dm7 E m7 Em7 Fm7 Cdim C dim Ddim E dim Edim Fdim Dm7 5 Em7 5 Caug C aug Daug E aug Eaug Faug C7sus4 C 7sus4 D7sus4 E 7sus4 E7sus4 F7sus4 Fm7 5 E m7 5 C m7 5 Csus4 C sus4 Dsus4...

Page 21: ...7 Gm7 A m7 Am7 B m7 Bm7 F dim Gdim A dim Adim B dim Bdim Gm7 5 Am7 5 Bm7 5 F aug Gaug A aug Aaug B aug Baug F 7sus4 G7sus4 A 7sus4 A7sus4 B 7sus4 B7sus4 B m7 5 A m7 5 F m7 5 F sus4 Gsus4 A sus4 Asus4...

Page 22: ...iszek Chopin a 3g Fr hlingslied Felix Mendelssohn a 40 Pr ludium C Dur BWV846 Johann Sebastian Bach a 41 J gerlied Felix Mendelssohn a 42 Passepied Claude Achille Debussy a 43 F r Elise Ludwig van Bee...

Page 23: ......

Page 24: ...ich is marked with the letter L or coloured RED Under no circumstances must either of the above wires be connected to the earth terminal of a three pin plug NEUTRAL LIVE For the U K For the USA DECLAR...

Page 25: ...genden Anforderungen und den brigen einschl gigen Bestimmungen der Richtlinie 1999 5 EG befindet Estonian K esolevaga kinnitab Roland Corporation seadme RP501R vastavust direktiivi 1999 5 E p hin uete...

Page 26: ...5 1 0 0 0 5 2 9 0 2 0 1...

Reviews: