


Chapter 5 Feature Reference
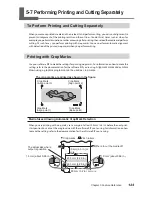
5-7 Performing Printing and Cutting Separately
125
Chapter 5 Feature Reference
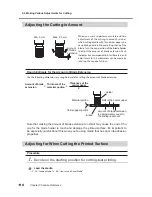
If this does not resolve the problem, then perform alignment manually.
P. 125, "Aligning Manually and Cutting"
If the crop marks cannot be detected easily because of the effects of media warping or the like, then
perform alignment manually. When you want to perform automatic alignment with lengthy media, we
recommend performing output with the data separated into sizes that are as short as possible. With
large sizes, error due to warping and the like increases, making smooth detection impossible.
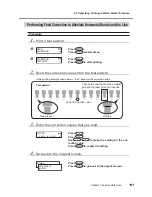
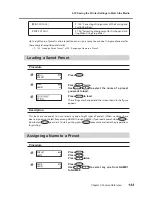
To Quit Detection and Start Cutting
Press
.
Crop-mark detection stops. Depending on the content of the
data, some time may pass before detection actually stops.
Press
.
This stops detection and starts cutting.
Note: After pressing
in step
, resuming detection or canceling output is also possible.
P. 90, "Pausing or Canceling Output"
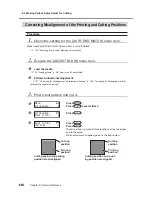
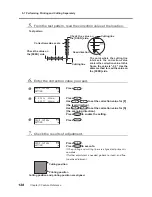
Aligning Manually and Cutting
Depending on the type of media, it may not be possible to detect crop marks automatically. When crop
marks cannot be detected automatically, you perform alignment manually.
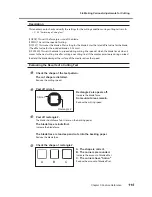
1.
Set the base point.
Use
to align the center of the blade with the loca-
tion shown in the figure.
Press
.
CANCEL CROPMARK
DETECTION?
Summary of Contents for LEC-300A
Page 24: ...22 ...
Page 25: ...Chapter 1 Introduction 23 ...
Page 32: ...30 ...
Page 33: ...Chapter 2 Basic Operation 31 ...
Page 56: ...54 ...
Page 57: ...Chapter 3 Operation of the Me dia Take up System 55 ...
Page 65: ...Chapter 4 Maintenance and Adjustment 63 ...
Page 91: ...Chapter 5 Feature Reference 89 ...
Page 151: ...Chapter 6 What to Do If 149 ...
Page 164: ...162 ...
Page 165: ...Chapter 7 Specifications 163 ...
Page 173: ...171 ...
Page 174: ...172 ...
Page 175: ...173 ...
Page 176: ...174 ...
Page 177: ...175 ...
Page 178: ...176 ...
Page 179: ......
Page 180: ...R1 091026 ...


