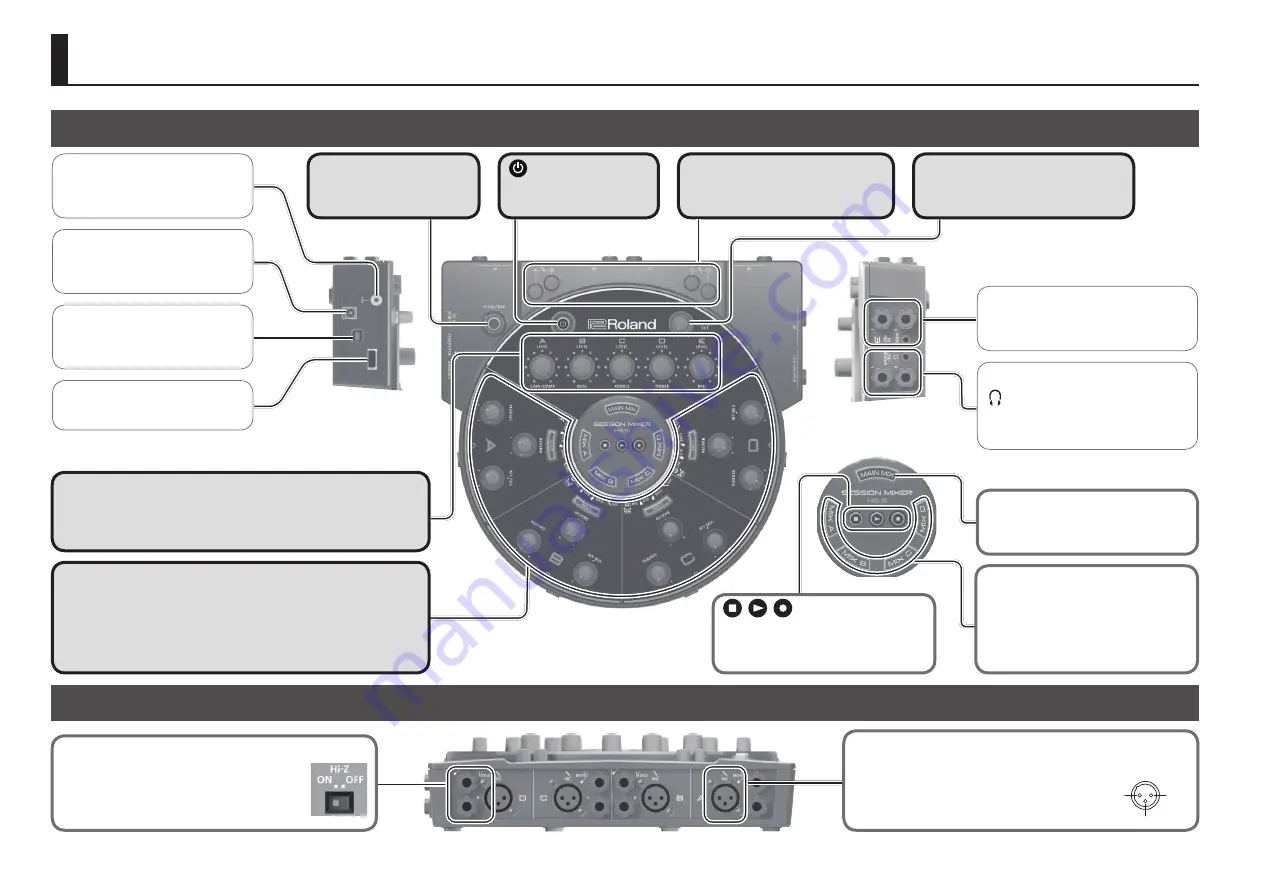
background image

2

Rear Panel

Top/Side Panel

Panel Descriptions

DC IN jack

Connect the included AC adaptor 

here.

MEMORY port

Connect a USB flash drive here.

COMPUTER port

Use this when connecting the HS-5 

to your computer via a USB cable.

[CLICK/TAP] button

This turns the click on/off and 

specifies its tempo.

Mic gain adjustment knobs

These adjust the mic gain (sensitivity) 

of sections A–D.

LINE IN L, R/STEREO jacks

Connect a line output device such as a 

keyboard or an audio player here.

MAIN MIX OUT L, R/

   headphone jacks

The sound of sections A–E is mixed and 

output here. 

[A]–[E] knobs

These knobs adjust the mix balance of sections A–E. These knobs are 

also used to adjust the depth of the effect that's selected for the input 

type, and to adjust the tempo and volume of the click.

      button

This turns the power of the 

HS-5 on/off.

Guitar(L/MONO)/R jacks

Here you can connect guitars, electronic drums, 

or other instruments. If you are connecting a 

guitar, turn the HS-5 on its back and turn on the 

[Hi-Z] switch (A–D) of your own section.

Ground terminal

Refer to “Ground terminal” (p. 12). 

[MAIN MIX OUT] knob

This adjusts the output volume of the 

MAIN MIX OUT L, R/headphone jacks.

[MAIN MIX] button

Press this when you want to adjust the 

volume balance of the main mixer.

MIC jacks

Here you can connect dynamic mics.

*  This instrument is equipped with balanced (XLR) type jacks. 

Wiring diagrams for these jacks are shown below. Make 

connections after first checking the wiring diagrams of other 

equipment you intend to connect.

1: GND

2: HOT

3: COLD

1: GND

2: HOT

3: COLD

TIP: HOT

RING: COLD

SLEEVE: GND

[MIX A–D] buttons

These buttons turn on the sub-mixer, 

allowing you to adjust the volume 

balance between your own performance 

and the performances of the other 

musicians.

Section A–D

You can connect headphones to each section, and adjust the volume 

balance between your own performance and the performances of the 

other musicians. You can also apply reverb or another suitable effect to 

your performance.


                buttons

Use these buttons to record your 

performance onto a USB flash drive, or 

to play back a recorded performance.

Summary of Contents for HS-5

Page 1: ...on 9 Saving and Loading Settings Snapshot 10 Volume Limiter Settings 10 Connecting Two HS 5 Units 11 Mounting on a Stand 11 Connecting to a Computer 11 USING THE UNIT SAFELY 12 Changing the AUTO OFF setting 12 IMPORTANT NOTES 12 Returns the HS 5 to the factory set condition Factory Reset 12 Specifications 14 Contents Copyright 2014 ROLAND CORPORATION All rights reserved No part of this publication...

Page 2: ...turn the HS 5 on its back and turn on the Hi Z switch A D of your own section Ground terminal Refer to Ground terminal p 12 MAIN MIX OUT knob This adjusts the output volume of the MAIN MIX OUT L R headphone jacks MAIN MIX button Press this when you want to adjust the volume balance of the main mixer MIC jacks Here you can connect dynamic mics This instrument is equipped with balanced XLR type jack...

Page 3: ...jack in the MAIN MIX OUT section Connecting a dynamic mic 1 Turn the mic gain adjustment knob toward the left to the minimum setting 2 Connect your dynamic mic to the mic input jack Connecting a guitar 1 On the bottom of the HS 5 turn the Hi Z switch on 2 Connect your instrument to the guitar L MONO jack Connecting electronic drums or a synthesizer 1 On the bottom of the HS 5 turn the Hi Z switch ...

Page 4: ...sh drive that s connected to the MEMORY port Button Operation Stops playback or recording Starts playback Starts recording Rapidly press tap twice Selects the preceding data Selects the next data MIX A Rewind MIX D Fast forward Performing and Recording Your Performance 6 Here s how to adjust the input level appropriately so that the vocal or instrumental sound is not distorted 1 Set the PHONES kno...

Page 5: ...dit the effect parameters Switching the effect amp simulator effect You can switch the Input type effect as appropriate for your performance 1 Press the INPUT button to switch the input type 2 Long press the INPUT button of your own section 3 Hold down the INPUT button and turn knob A to switch the effect amp simulator effect that s applied Type indicators Effect amp simulator effect LINE LINE Let...

Page 6: ...erform The volume of the click tone can be adjusted individually for each section By default the tempo is set to 120 BPM Switching the Click On Off and Setting theTempo 1 Press the CLICK TAP button The CLICK TAP button blinks and the click begins to sound 2 Repeatedly tap press the CLICK TAP button in time with the tempo of your song The click tone sounds at the tempo interval at which you tap the...

Page 7: ...s as needed Less reverberation More reverberation Switching the ReverbType and Editing the Parameters The HS 5 lets you change the type of reverb and how it sounds 1 Long press the section B and section C INPUT buttons The INPUT button blinks 2 Use the A D knob to change the type and parameters Reverb type Pre delay time Reverb time Reverb level Number of indicators Reverb Type Character 1 ECHO Si...

Page 8: ... and press the button 3 To stop playback press the button 5 5 If a click tone is sounding during playback the click tone also stops 5 5 By holding down the CLICK TAP button and pressing the button you can stop just the click tone Adjusting the recording level and playback level Normally there is no need to make these adjustments Adjusting the recording level 1 Check the recording level If the soun...

Page 9: ... can be adjusted by the A E knobs Dimly lit The sub mixer is on and can not be adjusted by the A E knobs If the sub mixer settings are being shared this can be made the share source Unlit The sub mixer is off Blinking The solo function is active Signal Flow MAIN MIX OUT Main mixer Input sound MIX A D button Input sound of sections A E Sound adjusted by main mixer Sound adjusted by sub mixers Sound...

Page 10: ...normal state If you decide to return to the normal state without saving overwrite saving press the button Loading your settings 1 Connect your USB flash drive sold separately to the MEMORY port 2 Press the section C and section D INPUT buttons 3 button to loading the settings When the button stops blinking the settings have been loaded The HS 5 then returns to its normal state If you want to retur...

Page 11: ...0 stand holder as shown in the illustration 2 Attach the stand holder to the PDS 10 and fasten it For details on how to assemble the PDS 10 and how to attach the stand holder refer to the PDS 10 owner s manual Do not use the screws that are included with the pad stand Connecting to a Computer You can use a commercially available USB 2 0 cable to connect the HS 5 to your computer and use recording ...

Page 12: ...the unit pull out the plug from the outlet Even with the power switch turned off this unit is not completely separated from its main source of power When the power needs to be completely turned off turn off the power switch on the unit then pull out the plug from the outlet For this reason the outlet into which you choose to connect the power cord s plug should be one that is within easy reach and...

Page 13: ...quipment does cause harmful interference to radio or television reception which can be determined by turning the equipment off and on the user is encouraged to try to correct the interference by one or more of the following measures Reorient or relocate the receiving antenna Increase the separation between the equipment and receiver Connect the equipment into an outlet on a circuit different from ...

Page 14: ... Output Audio Input Section A D MIC jacks XLR type balanced INPUT L R jacks 1 4 inch phone type unbalanced 1 Section E INPUT L R jacks 1 4 inch phone type unbalanced Stereo miniature phone type 1 INPUT L jack supports high impedance Audio Output Section A D PHONES jacks Stereo 1 4 inch phone type Stereo miniature phone type MAIN MIX OUT PHONES jacks Stereo miniature phone type OUTPUT L R jacks 1 4...

Page 15: ...15 ...

Reviews: