background image


15


Names of Things and What They Do (HP305)
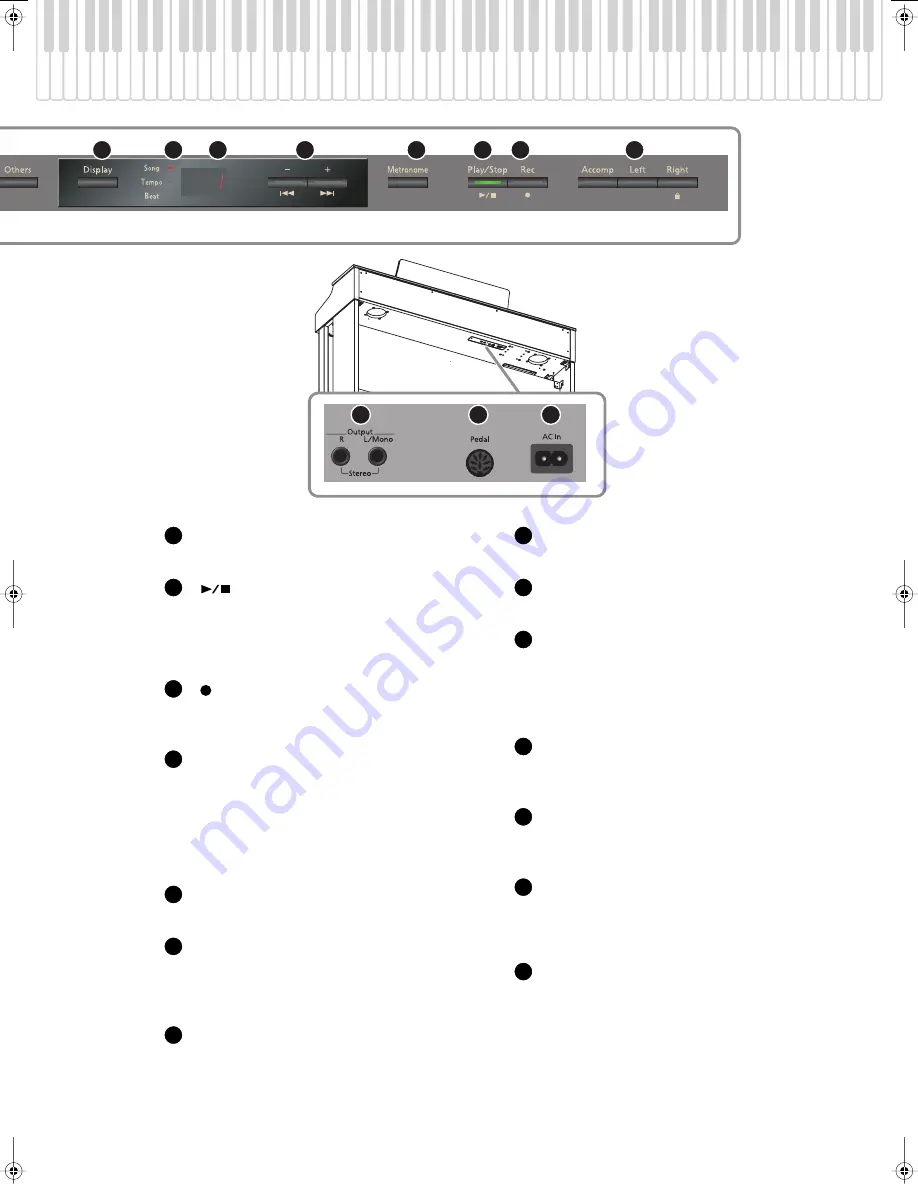
 

[Metronome] button


Turns the internal metronome on/off (p. 26).


[

] (Play/Stop) button


Stops/starts playback of an internal song or a 
recorded performance (p. 39).

Starts/stops recording of your performance
 (p. 43).


[

] (Rec) button


This lets you record your own performance into the 

HP305 (p. 43).


Track buttons


Allows you to play back your performance 
separately for each hand (p. 40).

Records your performance separately for each 
hand (p. 50).

Holding down the [Right] button will disable all 
button operations (Panel Lock) (p. 38).


[Power] switch


Turns the power on/off (p. 21).


Output jacks (L/Mono, R)


You can connect an audio device or external 

powered speakers here to reproduce the HP305’s 

sound (p. 67).


Pedal connector


Connect the pedal cord of the dedicated stand to 

this connector (p. 18).


AC In (AC Inlet)


Connect the included power cord here (p. 18).


Phones jacks


Here you can connect headphones (p. 23).


Input jacks (L/Mono, R)


Here you can connect an audio device or another 

electronic musical instrument, and listen to the 

connected device through the HP305’s speakers 

(p. 67).


MIDI Out/In connectors


You can connect these to external MIDI devices to 

transfer performance data (p. 69).


USB connector


You can connect this to your computer for 

transferring performance data (p. 72).


Pedal


These are used mainly when playing piano (p. 22).

You can assign a variety of functions to the pedals 
(p. 59).


External Memory connector


Here you can connect USB memory, a CD drive, or a 

floppy disk drive, and use it to play or save songs 

(p. 62).

6

7

8

9

10

11

12

13

14

16

17

18

11

12

13

14

15

16

17

18

19

20

21

22

23

24

HP305_302_e.book 15 ページ 2010年1月5日 火曜日 午後12時2分

Summary of Contents for HP302

Page 1: ...in accordance with the manufacturers instructions 8 Do not install near any heat sources such as radiators heat registers stoves or other apparatus including amplifiers that produce heat 9 Do not defe...

Page 2: ...metronome Performing with the metronome p 26 Check your own performance Recording your performance p 43 Play together with your family Dividing the keyboard for two person performance Twin Piano p 32...

Page 3: ...hones p 23 Using the Headphones p 23 Play using different sounds Play using different sounds Performing with various sounds p 25 Performing with various sounds p 25 Night time or early morning lessons...

Page 4: ...t in 28 Adding Reverberation to the Sound Reverb 29 Adjusting the Depth of the Reverb Effect 29 Adjusting the Keyboard Sensitivity Key Touch 30 Performing with Two Layered Tones Dual Play 31 Dividing...

Page 5: ...Connecting a Media 62 Installing the CD Drive 62 Installing the Floppy Disk Drive 62 Connecting USB Memory 62 Initializing the Memory 63 Changing the External Memory Setting External Memory Mode 63 Pl...

Page 6: ...vy objects on it Doing so can damage the cord producing severed elements and short circuits Damaged cords are fire and shock hazards This unit either alone or in combination with an amplifier and head...

Page 7: ...use of insecticides perfumes alcohol nail polish spray cans etc near the unit Swiftly wipe away any liquid that spills on the unit using a dry soft cloth The unit and the AC adaptor should be located...

Page 8: ...di ately re tighten them using the supplied tool Never insert your hand into the gap the metal height adjustment mechanism under the seat lid Doing so may cause your hand to be pinched or injured Alwa...

Page 9: ...low rubber vinyl or similar materials to remain on the unit for long periods of time Such objects can discolor or otherwise harmfully affect the finish Do not allow objects to remain on top of the key...

Page 10: ...t the nearest Roland Service Center A small amount of heat will radiate from the unit during normal operation Handling the Floppy Disk Drive Using Optional Floppy Disk Drive Never attempt to remove a...

Page 11: ...Moore Microprocessor Portfolio refers to a patent portfolio concerned with microprocessor architecture which was developed by Technology Properties Limited TPL Roland has licensed this technology fro...

Page 12: ...er Function mode where you can make settings for the sounds and make changes in a variety of the instrument s functions p 55 Tone buttons Here you can select the sound you ll hear when you play the ke...

Page 13: ...05 s sound p 67 Pedal connector Connect the pedal cord of the dedicated stand to this connector p 18 AC In AC Inlet Connect the included power cord here p 18 Phones jacks Here you can connect headphon...

Page 14: ...l enter Function mode where you can make settings for the sounds and make changes in a variety of the instrument s functions p 55 Tone buttons Here you can select the sound you ll hear when you play t...

Page 15: ...al connector Connect the pedal cord of the dedicated stand to this connector p 18 USB connector You can connect this to your computer for transferring performance data p 72 MIDI Out In connectors You...

Page 16: ...t located at the rear of the bottom panel 2 Plug the other end of the power cord into an AC outlet You must use the power cord included with the HP305 Connecting the AC Adaptor HP302 Check before you...

Page 17: ...simal electrical charge which is absolutely harmless However if you are concerned about this connect the ground terminal see figure with an external ground When the unit is grounded a slight hum may o...

Page 18: ...Before moving the piano be sure to remove the music rest to prevent accidents Be careful not to lose the screws used to fasten the music rest or allow small children to accidentally swallow them Using...

Page 19: ...wer is switched on but this is normal and does not indicate a malfunction 3 Use the Volume slider to adjust the volume p 21 Turning the Power Off 1 Move the Volume slider all the way to the left to mi...

Page 20: ...pressed produces a sound that is not as strong as when otherwise played with the equivalent strength This is the same function as the left pedal of an acoustic piano The softness of the tone can be va...

Page 21: ...Headphones The HP305 HP302 has two headphone jacks two people can also use headphones simultaneously 1 Plug the headphones into the Phone jack If headphones are connected no sound will be output from...

Page 22: ...headphone hook Doing so may damage the instrument or the hook Cautions when Using Headphones To prevent damage to the cord s internal conductors avoid rough handling When using headphones mainly try...

Page 23: ...ome tones there are keys that do not produce sound For details on the tones refer to Tone List p 78 Button Description Piano button Selects a variety of instruments including grand pianos honky tonk p...

Page 24: ...nk and the display will indicate Tempo The metronome will sound The Metronome button will blink red and green according to the currently selected time signature red indicates the strong beats and gree...

Page 25: ...n If you specify 0 4 only the weak beats will sound If you record your performance it will be recorded with the time signature you specify here When you play back a song the metronome s time signature...

Page 26: ...in to Synchronize Your Performance Count in A series of sounds rhythmically played to indicate the tempo before a song starts is called a count in If you sound a count in it will be easier for you to...

Page 27: ...r reverb The adjusted setting will return to its previous value when you turn off the power If you wish you can have this setting be retained even while the power is turned off p 21 You can t specify...

Page 28: ...ty Key Touch Indicate Description Fixed The sound plays at one set volume regardless of the force used to play the keys Extra Light This setting produces the lightest keyboard touch Light You can achi...

Page 29: ...e 2 in steps of an octave p 57 When you press a damper pedal while using Dual play the effect will apply to both tone 1 and tone 2 but you may change this so that the effect applies to only one tone p...

Page 30: ...the keyboard the pedals and the tone will change to the following settings fig Panel When you press the Twin Piano button a number of times the Twin Piano function will turn off and the Twin Piano but...

Page 31: ...idual The sound of the right hand keyboard zone will be heard only from the right speaker The sound of the left hand keyboard zone will be heard only from the left speaker The reverb effect will be tu...

Page 32: ...he Twin Piano button a number of times so the Split screen will appear When Split is turned on the keyboard settings will be as follows fig Panel Press the Twin Piano button a number of times to turn...

Page 33: ...Press the or button A different tone is selected Changing the left hand tone fig Panel 1 Hold down the Twin Piano button and press a tone button The number of the tone currently selected for the left...

Page 34: ...ng will revert to its original state when you turn off the power If you wish you can have this setting be remembered even while the power is turned off p 61 Factory default F 3 The key belongs to the...

Page 35: ...ld down the Transpose button and press both of the or buttons simultaneously You can use the Transpose button to turn the Transpose function on off if the transposition setting is other than 0 The HP3...

Page 36: ...l 1 Hold down the Right button for a while Panel Lock will be activated To cancel Panel Lock once again hold down the Right button for a while Panel Lock will also be cancelled when you turn off the p...

Page 37: ...ton When the song has played to its end playback will stop To pause the playback press the button once again The next time you press the button playback will resume from where you paused For details o...

Page 38: ...accompaniment part muted you can skip the introduction The mute setting will be cancelled when you switch songs Playing Parts Individually Performance parts and tracks Each part is assigned to the tr...

Page 39: ...f when you stop playback or turn off the power You can adjust the volume at which the song plays This is helpful when you want to adjust the volume balance between your keyboard playing and the song p...

Page 40: ...steps While you hold down the Transpose button the Playback Transpose setting is displayed If the value is anything other than 0 the Transpose button will be lit The transposition setting will return...

Page 41: ...desired sound the metronome p 26 4 Press the button The button will light the button will blink and the HP305 HP302 will enter recording standby mode If you decide not to record press the button once...

Page 42: ...keep your recorded performance you must save it to internal memory p 46 or to USB memory p 66 You won t be able to play back another song if there is an unsaved performance You ll need to either dele...

Page 43: ...ar and the button and button will blink If you decide not to erase the performance press the button 2 Press the button The recorded performance will be erased If you hold down the button while pressin...

Page 44: ...d separately p 66 If you want to save a song from internal external memory to external internal memory select the song that you want to save fig Panel Getting ready to save 1 Hold down the Twin Piano...

Page 45: ...ewly saved song select the number of the unwanted song 2 Press the button The display will indicate Sur and the button and button will blink If you decide not to save the song press the button 3 Press...

Page 46: ...fig Panel Getting ready to delete 1 Hold down the Twin Piano button and press the Key Touch button The display will indicate Fnc and you ll be in Function mode p 55 2 Hold down the Display button and...

Page 47: ...fig Panel 1 Press the button The display will indicate Sur and the button and button will blink If you decide not to delete the song press the button 2 Press the button The selected song will be dele...

Page 48: ...on once again 4 Press the button for any track that you don t want to record so it s not lit Your performance can be recorded separately to the relevant track buttons Advanced Recording Methods 1 2 4...

Page 49: ...the button Additional recording fig Panel 1 Press the button You ll return to the beginning of the recorded performance 2 Press the button The button will light the button and the button of the track...

Page 50: ...2 Press the button The recorded performance will play back Press the button once again to stop playback Your recorded performance will be lost when you turn off the power If you want to keep your rec...

Page 51: ...p 26 The tempo of your recorded performance will be the tempo of the song you selected for recording When you record a performance that you play along with a song it will be recorded with the time sig...

Page 52: ...2 Press the button Recording will stop Listening to the recorded performance fig Panel 1 Press the button You ll return to the beginning of the recorded performance 2 Press the button The recorded pe...

Page 53: ...will light The display will indicate Fnc and you ll be in Function mode fig Screen Selecting the setting that you want to edit fig Panel 1 While holding down one of the blinking buttons press the or...

Page 54: ...ert to their original value when you turn off the power For some settings you can specify that they retain their edited state even when you turn off the power p 61 For details on the settings that can...

Page 55: ...f the Lower Tone to the same pitch of the Upper Tone in Split play Others Tempo Mute p 60 Local Control p 71 MIDI Transmit Channel p 71 Composer MIDI Out p 71 V LINK Transmit Channel p 73 Track Assign...

Page 56: ...undamental pitch of the other instruments Adjusting the Dual Play Volume Balance Dual Balance Setting 9 1 tone 1 is louder 9 9 same volume 1 9 tone 2 is louder Tuning Settings Matching the Pitch with...

Page 57: ...f the Damper Resonance TheDamperResonancefunctionisnotactivewhen the value is set to OFF Producing the Resonance of the Strings When the Keys Are Played String Resonance Setting Description OFF 1 10 T...

Page 58: ...correctly recognize the type of CD being used In such instances you can specify the type of CD manually Note that some commercial player piano CDs cannot be played back on the HP305 HP302 Other Setti...

Page 59: ...te Execute this function when you want the settings you saved using the Memory Backup function to be restored to the state they were in when you purchased the HP305 HP302 When you execute Factory Rese...

Page 60: ...efully insert the USB Memory all the way in until it is firmly in place Use a USB memory sold by Roland We cannot guarantee operation if any other USB memory is used Connecting a Media Device What you...

Page 61: ...ents of the selected memory will be erased Once the memory has been initialized the following screen will appear In some cases when USB memory is connected to the external memory connector it may take...

Page 62: ...ies are selected Select a song that s inside a folder 1 Press the Display button a number of times so the Song indicator is lit 2 Press the button If there are folders they are indicated as shown at t...

Page 63: ...songs using Center Cancel may affect the tonal character You can connect a commercially available USB CD drive to the HP305 HP302 and play back separately sold CD ROMs created for the VIMA VIMA TUNES...

Page 64: ...be saved Never turn off the power while the display indicates SAv You can t select another song if the recorded performance has not been saved Please save the recorded performance p 44 Here s how to d...

Page 65: ...P302 and the connected audio device The sounds from the connected audio device are played by the HP305 HP302 Adjust the volume by using the controls of your audio device Turning Off the Power 1 Turn t...

Page 66: ...st the volume level on the HP305 HP302 and the connected speakers When you play the HP305 HP302 s keyboard the sound is played from the connected speakers Turning Off the Power 1 Turn the volume all t...

Page 67: ...1 Connecting to MIDI Devices What s MIDI MIDI short for Musical Instrument Digital Interface was developed as a universal standard for the exchange of performance data between electronic instruments a...

Page 68: ...r to the HP305 HP302 and the connected MIDI device 5 Adjust the volume level on the HP305 HP302 and the connected MIDI device 6 You should also set the MIDI transmit channel as needed For details on t...

Page 69: ...on those devices The HP305 HP302 will receive all sixteen channels 1 16 1 Enter Function mode choose Ch p 55 2 Press the or button to edit the setting When set to OFF none of the data describing what...

Page 70: ...driver may solve the problem Specify the USB driver you want to use and then install the driver 1 Enter Function mode choose USb p 55 2 Press the or button to switch GEn or OrG If you change this sett...

Page 71: ...While V LINK is switched on no sound is produced when you press any of the twelve keys at the left end of the keyboard To cancel V LINK hold down the Reverb button and press the Transpose button Here...

Page 72: ...ices Are the external devices connected to more than one AC power outlet If you connect external devices be sure to connect them to the same AC outlet Device connected to the Input jacks have insuffic...

Page 73: ...gardless of the damper pedal These notes also have a somewhat different tonal character HP305 HP302 faithfully simulate this characteristic of acoustic pianos On the HP305 HP302 the range that is unaf...

Page 74: ...mpo may become unstable if there is an excessive amount of performance data Can t record play back Can t record Has one of the track buttons for recording been selected p 50 p 53 You cannot record aud...

Page 75: ...may be able to play back the song by pressing the button again This audio format is not supported Please use 44 1 kHz 16 bit linear WAV format audio files The internal memory capacity of the HP305 HP3...

Page 76: ...pvox 16 Glass Pad 17 Angels Choir 18 Beauty Vox 19 Soft Pad 20 Female Aahs 21 Male Aahs 22 Thum Voice 23 Lunar Strngs 24 Decay Choir 25 Dcy ChoirPad 26 Nylon str Gt 27 Steel str Gt 28 Jazz Guitar 29 A...

Page 77: ...trings 151 Syn Strings1 152 Syn Strings3 153 Syn Strings2 154 Choir 1 155 Choir 2 156 Voice 157 Humming 158 Synth Voice 159 Analog Voice 160 OrchestraHit 161 Bass Hit 162 6th Hit 163 Euro Hit 164 Trum...

Page 78: ...dblock 250 Castanets 251 Taiko 252 Concert BD 253 Melodic Tom1 254 Melodic Tom2 255 Synth Drum 256 TR 808 Tom 257 Elec Perc 258 Reverse Cym 259 Gt FretNoise 260 Gt Cut Noise 261 BsStringSlap 262 Breat...

Page 79: ...Ilyich Tchaikovsky 29 To The Spring Edvard Hagerup Grieg 30 Valse op 64 2 Fryderyk Franciszek Chopin 31 Radetzky Marsch Johann Baptist Strauss 32 Tr umerei Robert Alexander Schumann 33 Moments Musica...

Page 80: ...Resonance p 59 String Resonance p 59 Key Off Resonance p 59 Damper Pedal Part p 59 MIDI Transmit Channel p 71 V LINK Transmit Channel p 73 Track Assign p 60 CD Audio Type p 60 Reverb On Off Depth p 2...

Page 81: ...seeks to provide a way to go beyond the limitations of proprietary designs and standardize the MIDI capabilities of sound generating devices Sound generating devices and music files that meets the Ge...

Page 82: ...1 16 Mode 3 x O O 15 113 x x x O x x x x x O O x O O x O x x x O O O O O O O O O O O O O Reverb O Chorus O O 0 127 O x x x O O x x x x O x 1 16 1 16 Mode 3 Mode 3 4 M 1 O O 0 127 0 127 O O O O 0 127 O...

Page 83: ...adjustable in increments of 0 1 Hz Transpose Transpose 6 5 in semitones Playback Transpose with Audio CD Audio File 6 5 in semitones Effects Reverb Off 1 10 Rotary Speaker Effect only for organ tones...

Page 84: ...oft capable of continuous detection function assignable Sostenuto function assignable Other Function Panel Lock Classic Position V LINK Connectors AC inlet Input jacks L Mono R Output jacks L Mono R U...

Page 85: ...Mode 55 G General MIDI 83 General MIDI 2 83 Ground terminal 17 GS Format 83 H Headphone 23 Headphone Hook 24 I Indicator 14 16 Individual 33 Initializing 63 Initializing the Memory 57 Input jack 15 17...

Page 86: ...lit Point 36 82 Stretch Tuning 56 58 82 String Resonance 56 59 82 T Temperament 56 58 82 Temperament Key 56 58 82 Tempo Mute 57 60 Tone button 14 16 Track Assign 57 60 82 Track button 15 17 Tracks 40...

Page 87: ...MEMO...

Page 88: ...MEMO...

Page 89: ...MEMO...

Page 90: ...adio or television reception which can be determined by turning the equipment off and on the user is encouraged to try to correct the interference by one or more of the following measures Reorient or...

Page 91: ...For EU Countries For China...

Page 92: ...ribuidora De Instrumentos Musicales J E Olear y ESQ Manduvira Asuncion PARAGUAY TEL 595 21 492147 PERU Audionet Distribuciones Musicales SAC Juan Fanning 530 Miraflores Lima Peru TEL 511 4461388 TRINI...

Reviews: