background image

Installation Manual

D

OC

. 50102/16.08.00 / V

ERSION

 1.0

Auto Alarm System

T

ECHNICAL

 F

EATURES

S

TAND

-

BY

 C

URRENT

 C

ONSUMPTION

.............................................................................................

MAX

. 15mA

S

IREN

 O

UTPUT

............................................................................................................................

MAX

. 1A

T

RUNK

 R

ELEASE

 O

UTPUT

.......................................................................................................

MAX

. 500mA

W

INDOWS

 R

OLL


UP

 W

HEN

 A

RMING

, O

UTPUT

..............................................................................

MAX

. 500mA

E

NGINE

 K

ILLER

 O

UTPUT

..........................................................................................................

MAX

. 500mA

D

OORS

 I

NPUT

................................................................................................................

NEGATIVE


TRIGGER

 1

T

RUNK

/H

OOD

 I

NPUT

........................................................................................................

NEGATIVE


TRIGGER

 2

C

ENTRAL

 D

OOR

 L

OCK

 R

ELAYS

..................................................................................................... 10A/12V

R

EMOTE

 C

ONTROLS

............................................................................................................... H

OPPING

 C

ODE

P

ROGRAMMABLE

 P

ARAMETERS

............................................................................................... 16 P

ARAMETERS

A

LARM

 M

EMORY

........................................................................................ A

LARM

 T

YPE

 D

ISTINCTLY

 I

NDICATED

D

ISABLING

 F

AULTY

 S

ENSORS

............................................................................... S

ENSOR

 D

ISTINCT

 I

NDICATION

S

YSTEM

 S

TATE

 M

EMORIZED

 W

HEN

 S

WITCHING


OFF

 P

OWER

Romano Electro Int’l


S.A.

27-29 Calimachi str., 72266, Bucharest,
Tel.:40-1-242.20.20, Fax:40-1-242.20.30,
E-mail: [email protected]

www.roel.ro

Summary of Contents for Alcar H51

Page 1: ...00mA DOORS INPUT NEGATIVE TRIGGER 1 TRUNK HOOD INPUT NEGATIVE TRIGGER 2 CENTRAL DOOR LOCK RELAYS 10A 12V REMOTE CONTROLS HOPPING CODE PROGRAMMABLE PARAMETERS 16 PARAMETERS ALARM MEMORY ALARM TYPE DIST...

Page 2: ...5 5 4 Arming with silent alarm 16 5 5 5 Car finding 16 5 5 6 Panic 16 5 5 7 Signalling the remote controls number 17 5 5 8 Anti carjacking mode 17 5 5 9 Trunk release function 18 5 5 10 Two level Door...

Page 3: ...attempts With the system armed simulate burglary attempts in all the possible ways 1 Put the key in contact and try starting the engine the relay contacts should open the engine should not start and t...

Page 4: ...or 2 without disarming the system For disarming the system when the alarm is in progress press button 1 twice once to stop the alarm and second time to disarm the system 5 18 COMFORT FUNCTION The Com...

Page 5: ...ut doors hood sensors within 20s after arming then whn disarming after opening any door the hood or trunk the system will indicate by the state LED the type of input as follows 1 blink shock sensor 2...

Page 6: ...SIVE ARMING WARNING AT PASSIVE ARMING TEMPORARY DISABLE OF PASSIVE ARMING If parameter 4 passive arming disabled by default is set enabled the system will arm passive after 30s from turning off the en...

Page 7: ...for 1s followed by 2 optical signals and it enters the disarming mode c If the button 2 is not pressed and the system reaches the state 4 then the exit procedure should be executed again from point a...

Page 8: ...ing on arming mode 5 5 7 Signalling the remote controls number The hopping code remote controls of ALCAR H51 are learnt by the central unit through the procedure described in chapter 5 1 Learning clea...

Page 9: ...ve arming period When disarming the system the bypass is disabled Example If one wishes to bypass the shock sensor only it will proceed as follows 1 During the first 5s after the arming command press...

Page 10: ...ts a lot of functions that will be explained in the followings 5 5 1 Arming disarming with confirmation by siren chirps and flashing lights System arming disarming is simply made by shortly pressing a...

Page 11: ...amming mode switch the contact key to OFF position Notes If during the parameters programming procedure the push button is not pressed for 15s the LED will turn OFF and the system will wait for the co...

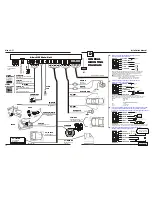
Page 12: ...imeter Sensor F3 BLACK GND F4 BLUE Alarming for movement detection inside the car F5 GREEN Warning for movement detection around the car G Adjusting trimmer for the built in ultrasonic sensor H H4 H3...

Reviews: