


Installation Manual
Alcar
®
H51
9
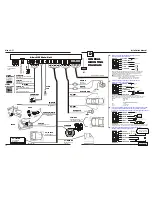
1)
GND;
2)
Warning input (when detecting movement around the car);
3)
Alarm input (when detecting movement inside the car);
4)
Commanded power up for the optional microwave sensor;
5)
Commanded power up for the optional ultrasonic sensor;
The connector has 4 pins for standard configuration. Optional, when an internal sensor is mounted
besides the built-in sensor, the central unit has to be properly equippated (to assure a separate
power supply for ultrasonic sensor / sensors and microwave sensor).
These external sensors should provide a negative trigger output when activated.
The central unit commands separately the sensors power supplies. They are interrupted when
bypassing the sensors (by remote control or when it if found faulted when arming).
The external sensors sensitivity is adjustable.
NOTE:
For all sensors, adjusting the trimmer to the left or to the right the sensitivity decreases or
increases respectively.
4.4.7 G Connector
This is the connector for the push-button (valet switch). This switch it is used for:
- Remote controls learning;
- Service mode / emergency disarming;
- System parameters programming.
NOTE!
The push-button should be mounted in a hidden place known by the owner only!
4.4.8 H connector
This one connects the ultrasonic sensor microphones.
4.4.9 Pager connecting
Pager connecting is optional. The related module, by default is not included in the basic kit.
C
HAPTER
V: S
YSTEM
OPERATING
5.1 L
EARNING
/ C
LEARING
REMOTE
CONTROLS
The central unit already knows the two remote controls provided with the basic kit. Up to four
remote controls can be learnt by the central unit.
In order to learn or clear from memory remote controls, one should do the following:
1) Disarm the system;
2)
Switch the engine contact key twice, such as the key switches subsequently
between: ON, OFF, ON, OFF;
3)
Press the push-button three times within 15s.
A success-
ful enter in learn/clear mode
will be confirmed by
two optical and acoustical signals;
4)
For learning
, press one of the remote controls buttons within 15s. after pressing the push-
16
by an optical-acoustic or optical signal (depending on arming mode) and advances to the next
sensor.
If the button 2 of the remote control is pressed, the system doest bypass the sensor, but it
advances to the next sensor and confirms by optical-acoustic or optical signal.
Sensors bypass is only available for that respective arming period. When disarming the system the
bypass is disabled.
Example
: If one wishes to bypass the shock sensor only it will proceed as follows
:
1.
During the first 5s after the arming command press
button 2
to advance at the shock sensor
without
bypassing
the proximity sensor. The system confirms by an optical-acoustical signal (or
just optical if the arming was silent).
2.
Press
button 1
to
bypass
the shock sensor. The system confirms by an optical-acoustical
signal (or just optical if the arming was silent).
3.
Press
button 2
for
not
bypassing
the ultrasonic sensor. If the button 2 is pressed the system
confirms by an optical-acoustical signal (or just optical if the arming was silent).
5.5.4 Arming with silent alarm
If the owner dos not want the theft to be warned, then the system can be armed with silent alarm
(the siren is disabled). The using of this function is needed when the system has a pager. The alarm
state will be notified on page and flashing lights only, according to the value of parameter 9 (see 5.2.
system parameters).
The silent alarm function can only be activated
within the first 5s after the arming command,
by simultaneously pressing both remote control buttons.
The function is active during that
specific arming period only. The function enabling is confirmed by 2 optical-acoustic signals (or only
optical signals for silent arming). When disarming the system, the function is disabled.
5.5.5 Car finding
In order to locate the car in a full parking area,
press shortly (0.5s) the button 2.
Five optical and
acoustical signals will be provided. The signals will be:
- short if no alarm was reported meanwhile;
- long if there was an alarm since the system was armed
This function is active
with the system armed only.
NOTE!
The car finding function is not active during the reserved 5s after the arming command.
If the button 2 is pressed during the first 5s after arming this command will be interpreteted
according to sensors disabling by remote control procedure.
5.5.6 Panic
In case of emergency,
pressing shortly (0.5s) and simultaneously the two buttons of a
remote control
can trigger the alarm.
The siren will sound continuously, the pager will emit the
alarm signal (if there is provided a pager, which is optional) and the flashing lights will flash
for
three minutes
.
This function is used to discourage a potential burglar, and to draw the attention towards the
vehicle.
The function is enabled no matter of the systems state (armed/disarmed), except the first 5s after
arming and can be stopped during the thre minutes by pressing shortly any of the buttons.


