Page 10
Rocky Mountain Westy - Ph. (970) 310-3441
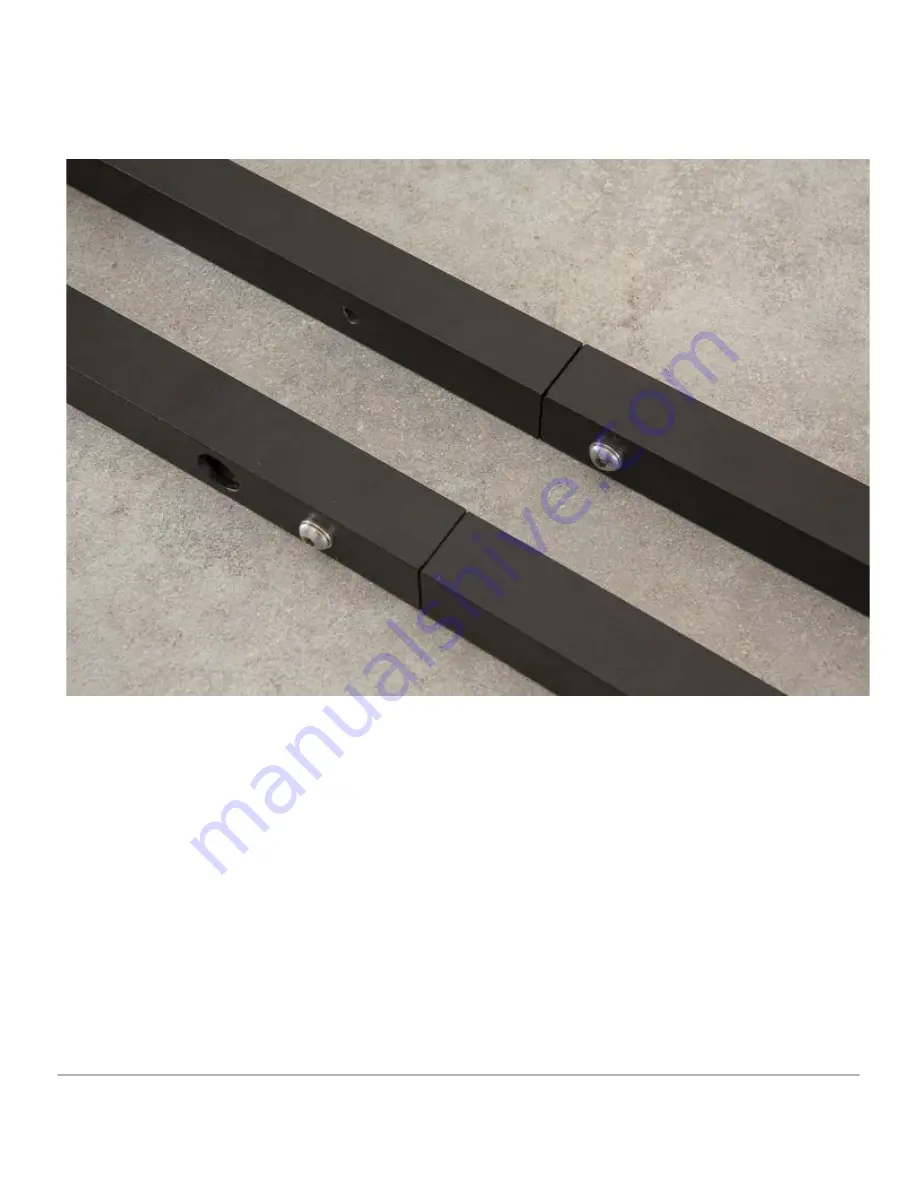
At this point both sets of the
Upper Ladder Stringers
and
Lower Ladder Stringers
should be
mounted together.
Page 1: ...g the Rocky Mountain Westy Vanagon Ladder Kit We pride ourselves in the products we develop and would not bring an item to market that we did not fully believe in This Vanagon Ladder Kit will mount to...
Page 2: ...the entire process beforehand which will make the installation go smoothly The Vanagon Ladder Kit will be installed on the rear Driver s Side of your Vanagon Tools Required 13mm Wrench 3 16 5 32 7 32...
Page 3: ...3441 Supplied Hardware Included in the Vanagon Ladder Kit is a Hardware Package Hardware Package A Upper Block short x2 Middle Block Long x2 Hardware Package B 5 8 Button Cover Cap 5 16 x 18 x 2 Foot...
Page 4: ...Cover Cap X10 End Cap X2 Hardware Package D 1 4X20X1 SS Socket Head Screw X10 1 4 SS Washer X14 3 8 SS Buttonhead Screw X2 3 8 SS Washer X2 1 4X20X3 4 SS Buttonhead Screw x4 Hardware Package E Ladder...
Page 5: ...A Study the diagram below carefully and place your components in the same fashion The Upper Ladder Stringer has three small holes on one side of the stringer The Lower Ladder Stringer has three small...
Page 6: ...Lower Ladder Stringer apart about 6 Place the Middle Block in between the two stringers and make sure the screw holes in the block match the photo below Take note that the Middle Block screw hole fur...
Page 7: ...p with the small hole in the Lower Ladder Stringer Take a 1 4x20x1 SS Button Head Screw and a 1 4 SS Washer from Hardware Package A and hand thread the screw into both the Lower Ladder Stringer and th...
Page 8: ...the open end of the Upper Ladder Stringer until the threaded hole of the Middle Block lines up with the small hole in the Upper Ladder Stringer Take a 1 4x20x1 SS Button Head Screw and a 1 4 SS Washe...
Page 9: ...Page 9 Rocky Mountain Westy Ph 970 310 3441...
Page 10: ...Page 10 Rocky Mountain Westy Ph 970 310 3441 At this point both sets of the Upper Ladder Stringers and Lower Ladder Stringers should be mounted together...
Page 11: ...refully and place your components in the same fashion The Upper Ladder Stringer has three large holes on one side of the stringer The Lower Ladder Stringer has two large holes on one side of the strin...
Page 12: ...n the side of the Upper Block is on the same side as the small hole on the Upper Ladder Stringer It is important to align these correctly If the Upper Block is installed into the Upper Ladder Stringer...
Page 13: ...13 Rocky Mountain Westy Ph 970 310 3441 Use a Mallet to lightly tap the Upper Block into place making sure the two holes mentioned line up correctly Repeat the process for the other Upper Ladder Stri...
Page 14: ...Page 14 Rocky Mountain Westy Ph 970 310 3441 Both Upper Blocks installed into the Upper Ladder Stringers...
Page 15: ...own with the Upper Ladder Stringers pointing towards the left Set the Top Angle Mount and both Rain Gutter Angle Mounts near the upper end of the ladder Place the Bottom Rung and the Bottom Support ne...
Page 16: ...Page 16 Rocky Mountain Westy Ph 970 310 3441 Take a 3 8 SS Button Head Screw and a 3 8 SS Washer from Hardware Package C...
Page 17: ...Place the Top Angle Mount onto the Ladder Stringers and thread a 3 8 SS Button Head Screw and a 3 8 SS Washer through the Top Angle Plate and into the Upper Block that is mounted inside the Upper Ladd...
Page 18: ...nd a Ratchet in order to tighten the Button Head Screw DO NOT FULLY TIGHTEN AT THIS POINT Leave a few threads shy of fully tightening This will allow the installation of the Ladder Rungs to go more sm...
Page 19: ...untain Westy Ph 970 310 3441 Slide the Bottom Support over the Bottom Rung which has exposed aluminum ends These exposed aluminum ends will be inserted into the large holes at the bottom of the Lower...
Page 20: ...Page 20 Rocky Mountain Westy Ph 970 310 3441 Take a 1 4x20x1 SS Socket Head Screw and a 1 4 SS Washer from Hardware Package C...
Page 21: ...3 16 Hex Bit Socket in order to hand thread the 1 4x20x1 SS Socket Head Screw and a 1 4 SS Washer into one of the Ladder Rungs Do not fully tighten Repeat the process on the other end of the Ladder R...
Page 22: ...Rocky Mountain Westy Ph 970 310 3441 Once all Ladder Rungs have had their Socket Head Screws hand threaded use a 3 16 Hex Bit Socket and a Ratchet to fully tighten the Socket Head Screws at each Ladd...
Page 23: ...e 23 Rocky Mountain Westy Ph 970 310 3441 Once all Ladder Rungs are tightened in place use a 7 32 Hex Bit Socket and a Ratchet in order to fully tighten the two Button Head Screws at the Top Angle Mou...
Page 24: ...310 3441 Take a 5 8 Button Cover Cap from Hardware Package D and simply press them into place covering the Socket Head Screw that secures the Ladder Rung Repeat this process at every open hole allowi...
Page 25: ...Page 25 Rocky Mountain Westy Ph 970 310 3441 The finished look of the 5 8 Button Cover Cap...
Page 26: ...2 LG Foot Adjuster both from Hardware Package B Slide the Foot Adjuster through the Rain Gutter Angle Mount and thread it into the threaded hole of the Upper Block in the Ladder Stringer Leave the Jam...
Page 27: ...3 4 End Caps from Hardware Package D can now be pressed into the bottom of the Ladder Stringers These can be very snug and may need to be pressed in by using your weight down on the ladder while the...
Page 28: ...e the contents of Hardware Package E Lay the Nylon Lanyard down onto the table as such Thread one of the SS Quick Release Pins over the Nylon Lanyard and then thread the loop of the Nylon Lanyard onto...
Page 29: ...Page 29 Rocky Mountain Westy Ph 970 310 3441 Insert each of the SS Quick Release Pins into the holes on the Bottom Support...
Page 30: ...3441 Wrap the loose end of the Nylon Lanyard around the Bottom Rung and snap the Nylon Lanyard onto itself This will tether the Nylon Lanyard and SS Quick Release Pins to the Ladder so they re not los...
Page 31: ...Page 31 Rocky Mountain Westy Ph 970 310 3441 Assembly Complete The Vanagon Ladder Kit is now completely assembled and ready for installation...
Page 32: ...3441 Installing the RMW Ladder on your Van Take a look inside the jack point of your van There is a small tab at the upper inside of the jack point that needs to be bent upward by about You can use a...
Page 33: ...Page 33 Rocky Mountain Westy Ph 970 310 3441 Hang the ladder from the rain gutter and screw the bump stop OUT until it just touches the body of your van...
Page 34: ...jack point until the hole for the second pin is inside the jack point The ladder should now be under slight tension so it does not rattle or vibrate If there is still looseness in the fit screw the bu...
Page 35: ...Page 35 Rocky Mountain Westy Ph 970 310 3441 We ve included five feet of grip tape and would encourage you to install the tape on the top side of the climbing rungs in order to have secure footing...
Page 36: ...Page 36 Rocky Mountain Westy Ph 970 310 3441 Installation Complete Congratulations Please enjoy your Rocky Mountain Westy ladder Thank you for your continued support of Rocky Mountain Westy products...