Rockwell Automation Publication 2715P-UM001C-EN-P - March 2019
85
Install and Replace Components
Chapter 5
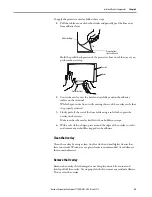
To apply the protective overlay, follow these steps.
1.
Pull the tab from one of the short sides and partially peel the liner away
from adhesive layer.
Hold the peeled back portion of the protective liner out of the way as you
perform the next step.
2.
Center the overlay over the bezel and carefully position the adhesive
surface on the terminal.
While the protective liner is still covering the rest of the overlay, verify that
it is properly centered.
3.
Slowly peel off the rest of the liner while using a soft cloth to press the
overlay on the screen.
Make sure that the overlay lies flat with no bubbles or warps.
4.
With a soft cloth or finger, press around the edges of the overlay to seal it,
and remove any air bubbles trapped in the adhesive.
Clean the Overlay
Clean the overlay by using a clean, lint-free cloth, and a mild glass cleaner that
leaves no streaks. Window or eye glass cleaner is recommended. Avoid cleaners
that contain abrasives.
Remove the Overlay
Remove the overlay if it is damaged or needs replacement. Lift a corner and
slowly pull off the overlay. Use isopropyl alcohol to remove any residual adhesive.
Do not reuse the overlay.
Tab
Adhesive Ring
Protective liner
(covers adhesive)
Overlay
Bezel
Protective Liner
Summary of Contents for Allen-Bradley PanelView 5510 Series
Page 6: ...6 Rockwell Automation Publication 2715P UM001C EN P March 2019 Table of Contents Notes...
Page 10: ...10 Rockwell Automation Publication 2715P UM001C EN P March 2019 Preface Notes...
Page 108: ...108 Rockwell Automation Publication 2715P UM001C EN P March 2019 Index Notes...
Page 109: ...Rockwell Automation Publication 2715P UM001C EN P March 2019 109 Index Notes...
Page 110: ...110 Rockwell Automation Publication 2715P UM001C EN P March 2019 Index Notes...
Page 111: ......

