background image

Rockwell Automation Publication 1512A-UM101B-EN-P - December 2021

51

Chapter 5          Maintenance

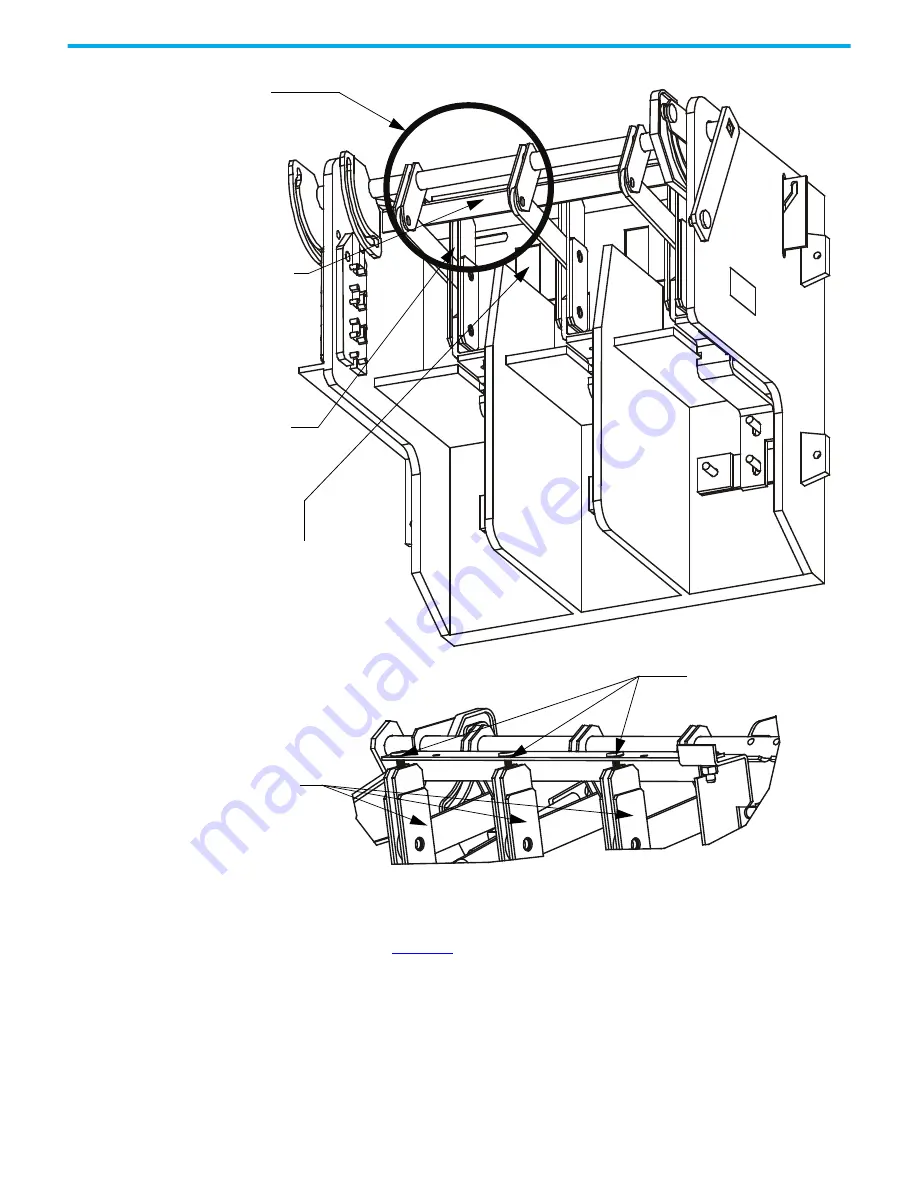
Figure 38 - Inspecting Isolation Switch in Open Position

6. Check the line and load sides of the contactor with a hot stick or 

appropriate voltage measuring device to verify that they are voltage free 
(see 

Figure 39

). 

a. Check for line-side voltage at the top vacuum bottle terminals. 
b. Check for load-side voltage at the bottom vacuum bottle terminals.

See Detail A

Grounding Bar

Isolation Switch Blades

must fully engage
Grounding Pins of

Grounding bar

(Verify for each phase)

Isolation Switch Shutters 

must be closed

(Verify for each phase)

Detail A

Grounding Pins

Isolation Switch

Blades in open

position

Viewed from back with components 
removed for clarification

Summary of Contents for Allen-Bradley CENTERLINE 600

Page 1: ...CENTERLINE 600 A One High Cabinet Standard and Arc Resistant Enclosure Bulletin Numbers 1512A 1512AT 1512DM 1512DO 1512M 1562E 1912B 1912L User Manual Original Instructions ...

Page 2: ...ll Automation Inc with respect to use of information circuits equipment or software described in this manual Reproduction of the contents of this manual in whole or in part without written permission of Rockwell Automation Inc is prohibited Throughout this manual when necessary we use notes to make you aware of safety considerations Labels may also be on or inside the equipment to provide specific...

Page 3: ...oring 15 Joining Sections 16 Access to the Power Bus 17 Rear Access 18 Side Access 18 Front Access Top Incoming Line Cables and Power Bus 19 Front Access Bottom Incoming Line Cables 22 Load Cable Connections 23 Chapter 3 Installation Arc Resistant Door Opening Procedure 27 Opening the Low Voltage Doors 27 Opening the Medium Voltage Door 28 Anchoring 29 Joining Sections 31 Access to the Power Bus 3...

Page 4: ...chanism Inspection and Maintenance 59 Isolation Blade Switch Adjustment 61 Isolation Switch Mechanism Grounding Adjustment 64 Auxiliary Contacts Inspection and Replacement 65 Auxiliary Contacts Adjustment 65 Adjusting the Normally Open ISa Contacts 66 Adjusting the Normally Closed ISb Contacts 67 Adjusting the Change of State Point 68 Emergency Circumvention Procedure for Power Cell Entry 69 Insta...

Page 5: ...e Front of the Plenum Sections 86 STEP 5 Extension and Elbow Assembly 86 STEP 6 Mounting Extension Elbow to Plenum Line up 87 STEP 7 Additional Mounting Support 88 Appendix C ArcShield Chimney Installation Instructions Recommended Torque Values 91 General Plenum Layout for ArcShield Line up 92 Cabinet Preparation 93 Chimney Placement on Structure 94 Appendix D Integrated Protective Maintenance Gro...

Page 6: ...6 Rockwell Automation Publication 1512A UM101B EN P December 2021 Notes ...

Page 7: ...s Starter 1562E 600 A MV SMC Flex Solid State Reduced Voltage Starter Input Section 1912B 600 A Synchronous Controller Stator 1912L 600 A Brushless Synchronous Controller Stator Download Firmware AOP EDS and Other Files Download firmware associated files such as AOP EDS and DTM and access product release notes from the Product Compatibility and Download Center at rok auto pcdc Topic Page Added spe...

Page 8: ... conduct security assessments implement Rockwell Automation products in a secure system harden the control system manage user access and dispose of equipment Industrial Components Preventive Maintenance Enclosures and Contact Ratings Specifications publication IC TD002 Provides a quick reference tool for Allen Bradley industrial automation controls and assemblies Safety Guidelines for the Applicat...

Page 9: ...tached to the right side flange of the structure see Figure 1 See the nameplate for information such as series number section number NEMA enclosure type unit ratings and bus ratings Figure 1 Typical Structure Nameplate A nameplate is also found in the low voltage compartment see Figure 2 with specific unit motor application information ...

Page 10: ...installing components or when reassembling the cabinet tighten the following bolt sizes to the specified torque values Recommended Line and Load Cable Sizes Table 1 Torque Values for Hardware 1 4 in hardware 8 N m 6 lb ft 5 16 in hardware 15 N m 12 lb ft 3 8 in hardware 27 N m 20 lb ft 1 2 in hardware 65 N m 48 lb ft Table 2 Recommended Maximum Line and Load Cable Sizes Standard Cabinet Arc Resist...

Page 11: ...t condensation The equipment must be stored in a heated building which has adequate air circulation Rockwell Automation products are built using materials that comply with Class 1 Industrial Clean Air sulfur environments as defined in IEC Standard 60654 4 Operating Conditions for Industrial Process Measurement and Control Equipment and G1 as defined in ISO S71 04 1985 Environmental Conditions for ...

Page 12: ...12 Rockwell Automation Publication 1512A UM101B EN P December 2021 Chapter 1 General Information Notes ...

Page 13: ...re 3 Standard Cabinet Refer to Access to the Power Bus on page 17 for the procedure to open the swing out low voltage panel behind the low voltage door IMPORTANT For information on the installation site preparation see publication MV QS050 ATTENTION Use suitable personal protective equipment PPE per local codes or regulations Failure to do so may result in severe burns injury or death Refer to the...

Page 14: ...nd will swing open to the left 4 Reverse the procedure to close the door ATTENTION Medium voltage components may be located behind the swing out low voltage panel standard cabinets only Complete the power lockout procedure See Power Lock out Procedure on page 49 before attempting to open the swing out low voltage panel Failure to do so may result in severe burns injury or death ATTENTION Complete ...

Page 15: ...tighten the bolts Ifthedoorisnotsecurelyfastened it is not be possible to move the isolation switch handle to the ON position ATTENTION Complete the Power Lock out procedure See Power Lock out Procedure on page 49 before beginning any service procedures to the unit Failure to do so may result in severe burns injury or death Refer to Dimension Drawing provided with order documentation for additiona...

Page 16: ...Cable Conduit Opening 9 00 x 10 00 229 x 242 C Control Wire Conduit Opening 3 00 x 3 00 76 x 76 0 0 4 65 118 16 04 407 30 00 762 36 00 914 0 0 3 62 92 5 41 137 6 62 168 36 00 914 A B C A B C D E A Line Cable Conduit Opening 5 68 x 9 00 144 x 229 B Load Cable Conduit Opening 9 00 x 10 00 229 x 242 C Control Wire Conduit Opening 3 00 x 5 00 76 x 127 D Non removable Sill Channels 1 00 x 3 00 25 x 76 ...

Page 17: ...oming Line Cables on page 22 6 Secure the right section to the floor using M12 1 2 in floor mounting bolts refer to Anchoring on page 15 Figure 7 Joining Sections Access to the Power Bus Rear access is the preferred access method for attaching line cables and for making bus splice connections However these procedures can be done with front only access Front access requires more time and disassembl...

Page 18: ...s removed you will see the three busbars Figure 9 Figure 8 Access to Power Bus from Side and Rear of Cabinet Figure 9 Rear Power Bus Access Rear Panel Removed Side Access A side bus access cover is on each side of the controller 1 Remove the hardware from the appropriate side bus access cover 2 Remove the side bus access cover 3 Once the side bus access cover is removed you will see the three busb...

Page 19: ...rocedure on page 49 for both medium voltage power cells and the power bus 1 Open the low voltage cell door refer to Opening the Low Voltage Doors on page 13 2 Open the medium voltage cell doors refer to Opening the Medium Voltage Doors on page 14 3 Remove the three door hinge pins on each medium voltage compartment door 4 With two people carefully set the doors carefully aside 5 Remove the two 1 4...

Page 20: ... Remove the two 1 4 20 self tapping screws from the lower low voltage panel upright supports Figure 12 7 Pull on right hand side of low voltage panel Swing low voltage panel to the front and left of cabinet Remove self tapping screws from center vertical channel The power MV cell doors must be removed before rotating the low voltage panel ...

Page 21: ...emovable bus access barriers Figure 13 Figure 13 Power Bus Barriers Remove self tapping screws from center vertical channel Remove These Panels For Access To Power Bus ATTENTION Confirm all barriers are replaced before re energizing the equipment Failure to do so may result in electrical faults and can cause damage to equipment or severe injury to personnel ...

Page 22: ...ess Top Incoming Line Cables and Power Bus 1 Open the power cell door 2 Locate incoming cable duct at rear left hand side of power cell see Figure 14 3 Remove the 1 4 20 self tapping screws from the cable duct access barriers Remove barriers 4 Route and install incoming line cables to power bus Torque to specifications see Recommended Torque Values on page 10 5 Reverse procedure after cables have ...

Page 23: ...6 Connect cable shields if present to the ground lug 7 Reinstall the current transformer barrier and reassemble the cabinet ATTENTION To avoid shock hazards lock out incoming power See Power Lock out Procedure on page 49 before working on the equipment Verify with a hot stick or appropriate voltage measuring device that all circuits are voltage free Failure to do so may result in severe burns inju...

Page 24: ...tallation Standard Enclosure Figure 15 Access to Load Cable Conduit Openings Bottom Entry ATTENTION Confirm all barriers are replaced before re energizing the equipment Failure to do so may result in electrical faults and can cause damage to equipment or serious injury to personnel ...

Page 25: ...tomation Publication 1512A UM101B EN P December 2021 25 Chapter 2 Installation Standard Enclosure Figure 16 Load Cable Conduit Openings Top Exit Ground Lug Load Cable Conduit Opening For Cables From Top Power Cell ...

Page 26: ...26 Rockwell Automation Publication 1512A UM101B EN P December 2021 Chapter 2 Installation Standard Enclosure ...

Page 27: ...IMPORTANT For information on the installation site preparation see publication MV QS050 ATTENTION Use suitable personal protective equipment PPE per local codes or regulations Failure to do so may result in severe burns injury or death Refer to the standards such as NFPA 70E Standard for Electrical Safety in the Workplace and CSA Z462 Workplace Electrical Safety Standard for safety guidance when w...

Page 28: ...oor 8 Swing open the door that is now released 9 Reverse the procedure to close the door Tighten the 3 8 1 75 door lock bolts by hand until threads are engaged 10 Verify all four 3 8 1 75 door locking bolts on the right hand side of the MV doors are in place and tightened until there is no gap between the side sheet flange and door locking bolt collar DO NOT CROSSTHREAD OR OVER TIGHTEN 11 Turn all...

Page 29: ...atching mechanism can be damaged by forcing the arc latching handle Anchoring Place the controller in the desired installation location Use M12 1 2 in floor mounting bolts to securely fasten the controller to the mounting surface See Figure 20 as an example of the location of the mounting holes in the cabinet ATTENTION Do not over tighten the bolts ATTENTION Complete the Power Lockout Procedure on...

Page 30: ...unting must be reviewed by an accredited engineer Many jurisdictions require an engineer from the local area to review the design Seismic qualification does not indicate that the equipment will function properly after a seismic event A Line Cable Conduit Opening 5 68 x 9 00 144 x 229 B Load Cable Conduit Opening 9 00 x 10 00 229 x 242 C Control Wire Conduit Opening 3 00 x 3 00 76 x 76 D Front Exte...

Page 31: ...ition the right section against the left section Ensure that the surface is level 5 Secure the sections together using the 1 4 20 self tapping screws 12 lb ft 15N m Thread the screw through the 7 mm 0 281 in clearance hole to the corresponding 6 mm 0 219 in pilot hole To access the rear clearance holes remove the rear covers of the starter If rear access is not available refer to Front Access to P...

Page 32: ...ied around power bus cutout area to prevent gas leakage between joined cabinets ATTENTION This procedure requires contact with medium voltage components To avoid shock hazards lock out incoming power before working on the equipment See Power Lock out Procedure on page 49 Verify with a hot stick or appropriate voltage measuring device that all circuits are voltage free Failure to do so may result i...

Page 33: ...quired 1 Remove the hardware from the appropriate side bus access cover 2 Remove the side bus access cover Figure 22 3 ArcShield units at the end of a line up have a ground connection to the inner plate of the side bus access cover see Figure 24 and Figure 25 This connection must be maintained to ensure unit arc resistant performance Figure 23 ArcShield Side Bus Access Cover Warning Label Side Bus...

Page 34: ...Bus Bottom Entry Exit 1 Complete the Power Lock out Procedure See Power Lock out Procedure on page 49 for both the medium voltage power cell and the power bus 2 Open the medium voltage door refer to Opening the Medium Voltage Door on page 28 3 The low voltage panel is isolated and affixed to the MV door and it will rotate away as the MV door is opened to the left see Figure 26 Side Bus Access Cove...

Page 35: ...cess Top Incoming Line Cables Top Entry Exit 1 Complete the Power Lock out Procedure See Power Lock out Procedure on page 49 for both the medium voltage and the power bus 2 Open the top medium voltage cell door refer to Opening the Low Voltage Doors on page 27 3 Open the bottom medium voltage cell door refer to Opening the Medium Voltage Door on page 28 4 Remove retaining screws from removable bus...

Page 36: ... out incoming power See Power Lock out Procedure on page 49 before working on the equipment Verify with a hot stick or appropriate voltage measuring device that all circuits are voltage free Failure to do so may result in severe burns injury or death IMPORTANT The current transformers may be positioned for top or bottom cable exit Follow the appropriate procedure described for your starter configu...

Page 37: ...021 37 Chapter 3 Installation Arc Resistant Figure 27 Load Cable Conduit Openings Top Exit Cable Configuration Shown Figure 28 Load Cable Conduit Openings Bottom Exit Cable Configuration Shown Ground Lug Load Cable Conduit Opening For Cables From Top Power Cell ...

Page 38: ...38 Rockwell Automation Publication 1512A UM101B EN P December 2021 Chapter 3 Installation Arc Resistant Notes ...

Page 39: ...ten the nuts to 45 lb ft 61 N m ATTENTION This procedure requires contact with medium voltage components To avoid shock hazards lock out incoming power before working on the equipment See Power Lock out Procedure on page 49 Verify with a hot stick or appropriate voltage measuring device that all circuits are voltage free Failure to do so may result in severe burns injury or death IMPORTANT Verify ...

Page 40: ...ng Configuration Viewed from Front Figure 31 Typical 3000 A Power Bus Splicing Configuration Viewed from Front Bus Clamp Flat Washer Lock Washer Hex Nut Power Bus Splice Bar Bus Support Main Horizontal Power Bus Bus Clamp Flat Washer Lock Washer Hex Nut Power Bus Splice Bars Bus Support Main Horizontal Power Bus Bus Support Main Horizontal Power Bus Bus Clamp Flat Washer Lock Washer Hex Nut Power ...

Page 41: ... 5 N m 1 N m 11 lb ft 1 lb ft 3 Check all hardware for correct tightness and replace all covers and plates Figure 32 Typical Ground Bus Splicing Configuration Front View ATTENTION Verify all barriers are replaced before re energizing the equipment Failure to do so may result in electrical faults and cause damage to equipment or severe injury to personnel Ground Bus Support Main Ground Bus Hex Nut ...

Page 42: ...Figure 33 Figure 33 Incoming Line Cable Connections Standard Enclosure Top Entry Line Lug Shown 3 Connect the ground wire to the ground bus lug 4 Connect any external control wires to the control panel terminal blocks in the low voltage compartment Refer to wiring diagram ATTENTION To avoid shock hazards lock out incoming power See Power Lock out Procedure on page 49 before working on the equipmen...

Page 43: ...ad Control voltage is correct Settings for protective relays Heater elements if provided in overload relay are secure and undamaged Equipment grounding External power and control connections match electrical diagrams All hardware is correctly reinstalled and torqued to specifications see Recommended Torque Values on page 10 All barriers are replaced to correct positions All fuses are correct class...

Page 44: ...Turn the selector switch to the OFF position and unplug the test voltage 4 Remove any metal filings or loose hardware from around the magnetic cores of the vacuum contactor The debris is attracted to the coil once it is energized and could prevent the contactor from closing properly Figure 34 Typical Wiring Diagram Electrically Held Vacuum Contactor with IntelliVAC Control ATTENTION Some control c...

Page 45: ...Rockwell Automation Publication 1512A UM101B EN P December 2021 45 Chapter 4 Common Installation ...

Page 46: ...46 Rockwell Automation Publication 1512A UM101B EN P December 2021 Chapter 4 Common Installation Figure 35 Typical Wiring Diagram Electrically Held Vacuum Contactor Relay Control ...

Page 47: ...9 16 in Ratchet handle and extension Wrenches 7 16 in 1 2 in 9 16 in Feeler gauges 1 3 mm 0 050 in 2 mm 0 080 in 0 5 mm 0 020 in Flat blade screwdriver Nyogel 759G 760G lubricant Rockwell Automation part no 80158 357 51 ATTENTION Use suitable personal protective equipment PPE per local codes or regulations Failure to do so may result in severe burns injury or death IMPORTANT Establish a maintenanc...

Page 48: ...itable tool to depress the door interlock lever in the switch Hold the lever down while moving the handle to the ON closed position Figure 36 Door Interlock Lever ATTENTION The door interlock mechanism is designed to prevent access to the medium voltage cell while the unit is energized When the unit is in operation do not circumvent this interlocking safety feature Always disconnect and lock out i...

Page 49: ...t or at a remote location f Disengage the contactor and move the control switch to the NORMAL position Disconnect the external power supply g Complete the Power Lockout procedure ATTENTION Use suitable personal protective equipment PPE per local codes or regulations Failure to do so may result in severe burns injury or death ATTENTION Always perform the power lockout procedure before servicing the...

Page 50: ...re 37 Typical Contactor Control Panel IntelliVAC Control 4 Open the medium voltage door 5 Visually inspect that the isolation switch blades fully engage the grounding pins on the grounding bar The isolation switch shutters should be closed see Figure 38 Control Switch Auxiliary Power Receptacle ...

Page 51: ...re voltage free see Figure 39 a Check for line side voltage at the top vacuum bottle terminals b Check for load side voltage at the bottom vacuum bottle terminals See Detail A Grounding Bar Isolation Switch Blades must fully engage Grounding Pins of Grounding bar Verify for each phase Isolation Switch Shutters must be closed Verify for each phase Detail A Grounding Pins Isolation Switch Blades in ...

Page 52: ...he ON position 8 Check the isolation switch blades with a hot stick or appropriate voltage measuring device to verify that they are voltage free see Figure 40 Figure 40 Isolation Switch Voltage Check Points 9 Once all power circuits are verified to be voltage free move the isolation switch handle back to the OFF position The unit is now safe to service Line Side Load Side Isolation Switch Blades m...

Page 53: ...ment Hazardous voltages may exist in the cabinet even with the circuit breaker in the off position Recommended practice is to disconnect or lock out control equipment from power sources and confirm discharge of stored energy in capacitors If it is necessary to work in the vicinity of energized equipment the safety related work practices of NFPA 70E Electrical Safety requirements for Employee Work ...

Page 54: ...ng the fuse in one entire movement 5 To install the replacement fuse place the fuse between the fuse clips 6 Ensure that the flares on the fuse ferrules are properly located with regard to the fuse clips 7 Apply a rapid shove to the bottom portion of the fuse barrel to force the fuse into the clip 8 Apply a rapid shove to the top portion of the fuse barrel to force the fuse into the clip 9 Grip ce...

Page 55: ...e control wiring harness from the wire plug at the lower left side of the contactor see Figure 43 2 Remove the control power transformer primary fuses from the top of the contactor 3 Disconnect the control power transformer primary leads from the fuse terminals at the top of the contactor 4 Use a 9 16 in socket wrench to disconnect the power cables and bus bars from the rear of the contactor Flare...

Page 56: ...ve in the contactor operating lever see Figure 44 Figure 44 Removing the Contactor 7 Remove the two 5 16 18 contactor mounting bolts 11 lb ft 14 5 N m at the front of the contactor 8 Slide the contactor forward slightly to disengage the retaining tabs at the rear of the contactor from the mounting bracket inside the cabinet 9 Carefully remove the contactor from the cabinet Armature Plate Magnetic ...

Page 57: ... move the isolation switch handle halfway between the OFF and ON position see Figure 45 Keep the handle in this position until the adjustment procedure is completed 2 With the contactor in the OFF position insert a 1 5 mm 0 060 in feeler gauge in the gap between the interlock lever and the isolation switch operating lever The gap must be between 1 0 2 0 mm 0 039 0 078 in ATTENTION The contactor we...

Page 58: ...ting lever Do not overtighten the nyloc nut as it will move the operating lever and reduce the gap To Increase the Gap Distance 1 Loosen the two screws in the stop bracket and move the stop bracket away from the interlock lever 2 Loosen the nyloc nut until the gap reaches the desired size 3 Move the stop bracket until it just touches the interlock lever and tighten the screws 4 Apply Loctite 290 o...

Page 59: ...Complete the Power Lockout Procedure refer to Power Lock out Procedure on page 49 2 Open the medium voltage door 3 Inspect the condition of the clevis pin and cotter pins that are shown in Figure 47 Replace any worn parts 4 If it is necessary to replace the isolation switch operating lever or the interlock lever apply Dow Corning 55 O ring lubricant Rockwell Automation part no RU 8216 or equivalen...

Page 60: ...frared window is available complete the following steps during normal equipment run mode a Using a thermal camera measure the temperature of the isolation switch at least every 6 months a Monitor every reading and record temperature variations Temperatures above 100 C 212 F is cause for concern See Recommended Corrective Action on page 61 Contactor Interlock Rod Lubrication Points at replacement o...

Page 61: ...ace the incoming line stabs Pitting can indicate incorrect adjustment of the isolation switch auxiliary switches Contact technical support for assistance Isolation Blade Switch Adjustment 1 Insert a screwdriver in the Isolation Switch Defeater push down and hold at the bottom position 2 Actuate the Isolation Switch Operating Handle from open black to closed red in a continuous movement Do not use ...

Page 62: ... Linkage Assembly Location 4 Rest the customer supplied digital protractor on the bottom of the isolation switch linkage assembly The angle of the linkage must be 180º or slightly higher with a tolerance of 0 6º Closed position Open position Isolation Switch Operating Handle Isolation Switch Defeater Isolation Switch Linkage Assembly Phase 3 If a digital protractor is unavailable lay a straight ed...

Page 63: ... switch mechanical threaded linkage with a wrench until the overall travel angle of the switch link is within the required tolerance 7 Hold the position of the threaded linkage and tighten the lock nuts Figure 51 Isolation Switch Mechanical Threaded Linkage 8 Actuate the Isolation Switch handle to verify the travel angle Must have tolerance of 0 6º Shaft Assembly Red Glass Polyester Switch Link Is...

Page 64: ...adjust the distance from the blades to the bar disconnect the threaded connecting rod at the handle operating lever 3 Turn the threaded connecting rod to lengthen or shorten it This will adjust the position of the isolation switch blades in the ON and OFF position ATTENTION All three isolation switch linkage assemblies must meet the angle tolerance requirements ATTENTION To avoid shock hazards loc...

Page 65: ... 53 Figure 53 Auxiliary Contact Orientation Auxiliary Contacts Adjustment The auxiliary contacts are mounted on the left side of the isolation switch slightly below the cams on the isolation switch shaft Normally open contacts Isolation Switch a Contacts ISa are on the outside of the isolation switch housing and normally closed contacts Isolation Switch b Contacts ISb are on the inside of the hous...

Page 66: ...tion switch handles to the ON closed position and check that nothing prevents cam from rotating with the shaft 4 Insert a 6 35 mm 0 25 in diameter pin into the cam groove between the cam follower and the end of the cam groove ISa Auxiliary Contacts N O ISb Auxiliary Contacts N C IMPORTANT The Isolation Switch Ground Adjustment procedure refer to Isolation Switch Mechanism Grounding Adjustment on p...

Page 67: ...ve the isolation switch handle to the OFF open position 2 Loosen the bolt holding the inside cam to the shaft Do not loosen the bolt entirely The cam should not be able to rotate freely on the shaft 3 Insert a 6 35 mm 0 25 in diameter pin into the cam groove between the cam follower and the end of the cam groove 4 Adjust the cam on the shaft so that the gap from the cam follower to the end of the ...

Page 68: ...the isolation switch handle towards the OFF position and observe the point at which the movable isolation switch blades separate from the incoming line stabs 4 If the auxiliaries do not change state before the isolation switch opens repeat the auxiliary contacts adjustment procedure refer to Auxiliary Contacts Inspection and Replacement on page 65 ATTENTION The auxiliary contacts must change state...

Page 69: ...75 bolts for the MV door 3 Use a flat headed screwdriver to turn the defeater pin on the right side of the isolation switch handle IMPORTANT The following procedure is intended to be used only when the isolation switch cannot be opened as described in the Door Opening Procedure for either standard or ArcShield enclosures ATTENTION This procedure may expose personnel to energized medium voltage com...

Page 70: ...25 in above the pin Open the door and tighten the 10 32 screws 2 7 lb ft 3 6 N m 9 Close the door and move the handle to the ON position Verify that the handle pin overlaps the Z clip and prevents the door from opening 10 Move the handle to the OFF position and tighten the 3 8 1 75 in door locking bolts Installing Z clip with Isolation Switch Handle in the ON Position 11 Close the door and tighten...

Page 71: ...iVAC fuse 6 3 A 250V Littlefuse 21506 3 2 1 Engineering Data 1 1 Consult spare parts list in service manuals that are provided following delivery of equipment Power Fuses 3 3 Power fuses are R rated for motor loads or E rated for non motor loads Power fuses are sized to the motor or transformer load data provided at the time the starter is ordered Refer to dimensional drawings for specific fuse ty...

Page 72: ...72 Rockwell Automation Publication 1512A UM101B EN P December 2021 Chapter 6 Spare Parts Notes ...

Page 73: ...overs plates and hardware that is removed for installation or maintenance purposes must be reinstalled and properly secured Failure to do so voids the arc resistant integrity Power cable entry points are to be treated as the boundary between a hazardous location and sealed accordingly Failure to do so voids the arc resistant integrity A plenum or chimney must be used to direct the arc flash energy...

Page 74: ...an be provided for each unit and is to be field mounted on the top of the unit structure some incoming units may not have a plenum if top cable entry is required The purpose of the plenum is to direct the hazardous flames and gases away from the top of the arc resistant enclosure Unit plenums are secured to the top of the unit structure and to adjacent plenums creating a continuous conduit for rel...

Page 75: ...rc gases are permitted to escape with plenum extensions see Figure 60 Figure 61 and Figure 62 2 Plenum duct to outside of control room see Figure 60 and Figure 61 Plan the location where the plenum will exhaust There is no access to personnel while equipment is energized Area is free of flammable material or vapors Ensure that adequate space is provided around the plenum exhaust as outlined in Fig...

Page 76: ...h Extensions to Internal Controlled Access Area Top View Figure 61 Plenum Exit Left with Extension s to Internal Controlled Access Area Front View Minimum H 3 5 m 138 in Minimum L 1 2 m 47 in Minimum Volume of space required for safe pressure relief X Y H 11 m3 390 cubic feet X L Y Personnel Access Barrier H L Personnel Access Barrier ...

Page 77: ...directly face the arc products may ignite Flame suppression is recommended The exit point can also be outside the building Ensure the exit area cannot be blocked by ice snow or vermin nests Access barriers are recommended as a means of restricting access by personnel while the equipment is energized Chain link fencing is a suitable barrier material Equipment that consists of more than 4 vertical s...

Page 78: ... chimney installation instructions Each ArcShield line up includes a chimney exhaust section that extends vertically directly above the enclosure Chimney Exhaust Considerations 1 From the outlet of the chimney there must be a minimum distance of 1 7 m 67 in from the top of the chimney to the ceiling and 1 m 39 in on each side 2 No obstructions for example piping can be in the path of the exhaust w...

Page 79: ...he distance from the end of the cabinets to the exit vent A flange is available for installing hangers to support the plenum weight The plenum extension has holes for mechanical support Weight per unit length of Rockwell Automation supplied plenum 28 kg m 19 lb ft The installer is responsible for ensuring that the plenum extension has sufficient support to resist the effect of vibrations and seism...

Page 80: ...E LA MORT DANGER DANGER HAZARD D ARC ÉLECTRIQUE 18 in wide Plenum Fastened directly over the 0 5 m 18 in wide cabinet 26 in wide Plenum Fastened directly over the 0 7 m 26 in wide cabinet 36 in wide Plenum Fastened directly over the 0 9 m 36 in wide cabinet 18 in long Extension Connected to the last Plenum on the exhaust end of the line up 26 in long Extension Connected to the last Plenum on the e...

Page 81: ...n alternatively exhaust to the left Engineered systems can be made site specific Figure 65 ArcShield Line up Shown with Arc Plenum Installed Plenum exhaust can be on the left or right hand end of the lineup Pictures and figures in this procedure are shown for a right hand exhaust exit direction Also shown is an optional vertical top direction exhaust extension see Figure 77 Sealed End 36 in Exhaus...

Page 82: ...s from where they came 11 lb ft 14 5 N m Failure to install the bolts negates the cabinets ability to control any arc gases properly 3 After the lifting angles or clips are removed remove 1 4 20 fasteners from the relief vent on the top of the MV enclosure Leave the 4 corner fasteners in place Figure 67 Front Duct Section Components ATTENTION Hardware used to retain the lifting provision hardware ...

Page 83: ...ef vent during installation Plenum Placement on Structure After lifting the plenum in to place directly over the relief vent see Figure 69 Reinstall all 1 4 20 fasteners 12 lb ft 15N m which were removed in Cabinet Preparation on page 82 and attach the plenum to the top of the enclosure Use hand tools only Figure 67 Typical Relief Vent Fasteners top view Figure 68 Relief Vent Relief vent Relief fa...

Page 84: ...nment of Side by Side Plenums Plenums that are mounted side by side must be fastened together through the aligning holes using 5 16 in supplied hardware see Figure 70 Figure 70 Aligning Side by Side Plenums Use recommended torque value for 1 4 20 fasteners Use silicone caulking generously to fill any air gaps once the Plenum has been securely mounted in place ...

Page 85: ...h enclosure and to the plenum directly beside it before the front duct sections are reattached see Figure 66 Figure 71 Sequence of Final Assembly The End Cover Plate must be mounted on the closed end of the line up during the assembly using 5 16 in hardware see Figure 71 left side IMPORTANT Any unused holes must be filled with thread forming screws All gaps must be sealed and filled with silicone ...

Page 86: ... in hardware in the following sequence Step 5A See Figure 73 Step 5B See Figure 74 Step 5C See Figure 75 Top Plate Bottom Plate Front Closing Plate IMPORTANT Do not reinstall the front duct section of the last plenum on the exhaust side of the line up refer to STEP 6 Mounting Extension Elbow to Plenum Line up on page 87 for more information Use silicone caulking generously to fill any air gaps onc...

Page 87: ...n page 86 the last plenum at the exhaust side of the line up has the front duct section removed This allows access to fastener holes to mount the extension elbow components see Figure 76 The Extension components are attached to the Elbow Section using 5 16 in Hardware Figure 75 illustrates what the Extension Elbow Assembly should resemble when finished Screen Cover Plate 36 in extensions Use silic...

Page 88: ... replaced and fastened through the holes on the outside flanges STEP 7 Additional Mounting Support The extension elbow assembly must have additional mounting support 90 Elbow Section Approximate weight 64 kg 142 lb 36 in Extension Assembly Approximate weight 51 kg 112 lb Figure 77 shows an example of how the extension elbow sections can be supported by suspension from a high ceiling Points A B and...

Page 89: ...Figure 77 Completed Assembly for optional vertical exit Plenum Right hand exit A B C During an arc fault the plenum will be subjected to a brief high pressure shock wave The extension elbow assembly may experience dynamic loading It is important to account for dynamic loading when selecting supporting means and materials ...

Page 90: ...90 Rockwell Automation Publication 1512A UM101B EN P December 2021 Appendix B ArcShield Plenum Installation Instructions Notes ...

Page 91: ... 16 18 Thread Fasteners 14 5 N m 11 lb ft Figure 78 Chimney Exhaust Label IMPORTANT Plan the location where the plenum will exhaust refer to Appendix A The plenum exhaust area is to be marked as a Hazardous Zone and labeled per Figure 78 ARC FLASH HAZARD PRESSURE RELIEF EXIT AREAS TO BE INACCESSIBLE TO PERSONNEL WHILE EQUIPMENT ENERGIZED FREE OF OBSTRUCTIONS REFER TO USER MANUAL SEVERE INJURY OR D...

Page 92: ...lation Instructions General Plenum Layout for ArcShield Line up An example of a general chimney assembly configuration is shown in Figure 79 Chimneys of varying widths are mounted directly over the MV enclosures of the corresponding width Figure 79 Typical ArcShield Line up with Chimney Arc Gas Ducting ...

Page 93: ...ft 15N m from the relief vent on the top of the MV enclosure The chimneys are designed to fit over the fastener heads at the 4 corners of the Relief vent The corner fasteners are required to secure the Relief vent during installation ATTENTION Hardware used to retain the lifting provision hardware must be reinstalled in the same holes Figure 80 Failure to replace this hardware will make the arc re...

Page 94: ...abinet Preparation on page 93 and attach the chimney to the top of the enclosure 12 lb ft 15N m Once the chimney has been lifted in place directly over the relief vent Figure 82 all 1 4 20 fasteners removed in Cabinet Preparation on page 93 are replaced to attach the chimney to the top of the enclosure Figure 82 Chimney Placement Use recommended torque value for 1 4 20 fasteners Use silicone caulk...

Page 95: ...short circuit currents within its capabilities from both feeding directions within the motor controller without any latching mechanism It is applied to safely ground earth the load connections to three phase motors power transformers and power capacitors ensuring that no harmful voltages are left or become present on the load connections before maintenance personnel enter the motor controller or s...

Page 96: ...d viewing window on the medium voltage compartment door The IPMG device is mounted on the controller floor plate or on the top of the main medium voltage vacuum contactor for 600 800 A controllers It is connected to the three load phases within the main controller using power cables Redundant flexible grounding conductors ensures the lowest impedance path to ground is maintained when the IPMG devi...

Page 97: ...perating shaft 2 Rotate the operating handle in one motion approximately 180 counterclockwise until the switch flips into its CLOSED position there is a significant sound as the IPMG device engages 3 Remove the handle 4 Verify the CLOSED position of the IPMG device by viewing the blade positions through the standard viewing window 5 Verify the position of the indication arrow Figure 87 and adjust ...

Page 98: ...e to accommodate at least 180 of clockwise motion The hexagon shaped shaft must mate with the connection of the IPMG operating shaft 2 Rotate the operating handle in one motion approximately 180 clockwise until the switch flips into an OPEN position there is a significant sound as the IPMG device disengages 3 Remove the handle 4 Verify the OPEN position of the IPMG device by viewing the blades pos...

Page 99: ...LOSED or GROUNDED position when the blades are in a vertical position If the blades are not readily visible and or if they are in a more horizontal position the IPMG device is in the OPEN position There is a secondary position indicator where the operating handle is used The graphic below details the location of the indicator that shows you what position the IPMG device is in Figure 87 Secondary P...

Page 100: ...d electrical position of the IPMG device OPEN ungrounded load connections or CLOSED grounded load connections These auxiliary switches can be incorporated into the controller s control circuit Their electrical ratings are shown Table 4 on page 100 Figure 88 800 A IPMG showing Auxiliary Contact Table 4 Auxiliary Switch Specifications Description Value Rated voltage V AC V DC 250 Maximum continuous ...

Page 101: ...oltage withstand 20 kV Rated short time withstand current 31 5 kA rms Short time withstand duration 4 s Rate peak current 80 kA rms Mechanical duration grade M1 Mechanical endurance operations 2000 Torsional strength 1600 N Mean time to failure MTTF 20 years Clearance between open contacts 125 mm 4 9 in Contact pressure 400 30 N Movable blade and ground electrode center center distance 116 5 mm 4 ...

Page 102: ...t that is caused by the mechanical interlocks and interfacing to the main contactor and isolation switch The grounding earthing process is achieved through the movable blades and the fixed terminal points within the frame of the IPMG device Verify that these connections are intact and that the flexible grounding conductors are attached to the common shaft of the IPMG device and are not broken dist...

Page 103: ...Rockwell Automation Publication 1512A UM101B EN P December 2021 103 Appendix D Integrated Protective Maintenance Grounding Device Notes ...

Page 104: ...104 Rockwell Automation Publication 1512A UM101B EN P December 2021 Appendix D Integrated Protective Maintenance Grounding Device ...

Page 105: ...and load 10 change of state 68 chimney 74 exhaust considerations 78 exhaust label 91 installation 91 location 94 minimum space requirements 77 torque values 91 typical structure 92 clip on fuse installation 54 conduit opening arc bottom line 30 arc bottom load 30 arc top line 30 arc top load 30 bottom line 16 bottom load 16 top line 16 top load 16 contactor inspection 43 interlock rod adjustment 5...

Page 106: ... provision hardware 82 line cables 10 linkage assembly 63 load cables 10 LOTO 49 low voltage doors location 13 open 13 M medium voltage doors location 14 open 14 mounting support 88 N nameplate 9 low voltage 10 structure 9 unit 10 NEMA EEMAC Type 12 sections 17 nylon contactor bushing 56 P personnel access barrier 76 pilot hole location 17 plenum 74 access barrier 76 bracing 79 cabinet preparation...

Page 107: ...over 18 side by side plenums 84 site preparation 13 spare parts 71 IPMG 102 splice kit 39 splicing ground bus 41 standard cabinet line and load cable 10 starter identification 9 start up 43 storage 11 T torque values 10 chimney 91 plenum 79 typical wiring diagrams 44 U UBC 15 uniform building code 15 W wiring diagrams 44 Z z clip installation 70 ...

Page 108: ...108 Rockwell Automation Publication 1512A UM101B EN P December 2021 Index Notes ...

Page 109: ...Rockwell Automation Publication 1512A UM101B EN P December 2021 109 CENTERLINE 600 A One High Cabinet Standard and Arc Resistant Enclosure User Manual ...

Page 110: ...ss Knowledgebase articles rok auto knowledgebase Local Technical Support Phone Numbers Locate the telephone number for your country rok auto phonesupport Literature Library Find installation instructions manuals brochures and technical data publications rok auto literature Product Compatibility and Download Center PCDC Download firmware associated files such as AOP EDS and DTM and access product r...

Reviews: