background image

Technical


Training


Guide


C)


Mission


Control


Figure


15

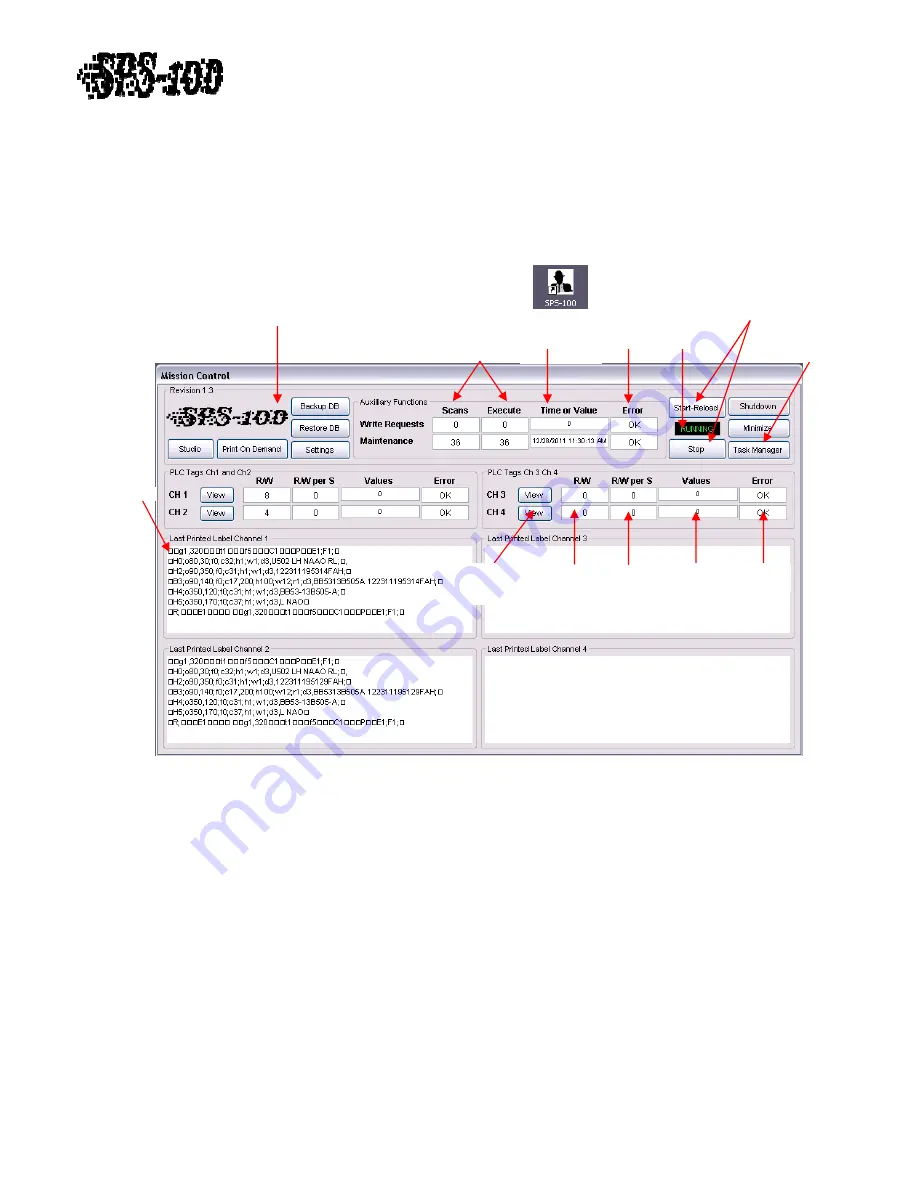
Mission


Control


is


the


application


that


monitors


changes


in


print


trigger


and


label


numbers


from


the


PLC


and


sends


applicable


label


strings


to


each


printer


when


triggered.


This


application


must


be


running


at


all


times.


Anytime


a


configuration


or


PLC


Address


change


is


made,


Mission


Control


will


need


to


be


restarted.


If


Mission


Control


is


inadvertently


or


purposely


shutdown


it


can


be


restarted


by


double


clicking


the


desktop


icon


shown


in


Figure


15.


Figure


16


Start


and


Stop


OPC


Reading


and


Writing


Number


of


Times


Ran


and


Successful


Executions


Enable/Disable


Windows


Task


Manager


Click


to


View


PLC


Values


Total


Hourly


OPC


Reads

OPC


Error

Last


Value


Read


OPC


Reads


Per


Second


Status


Error


during


Execution


Last


attempted

Time


Stamp


Function


Buttons


Last


Printed


Label


Status


The


Status


text


box


displays


whether


Mission


Control


is


running


or


not.


Green


“Running”


text


displays


when


PLC


scanning


is


occurring


and


red


“Stopped”


text


displays


when


PLC


scanning


is


not


occurring.


Left


click


the


Stop


Button


to


stop


PLC


scanning


and


left


click


the


Start

Reload


Button


to


start


or


restart


PLC


scanning.


Left


click


the


Shutdown


Button


to


shutdown


Mission


Control

.


Labels


will


not


automatically


print


unless


Mission


Control


is


started


and


PLC


Scanning


is


“Running”.


Shutting


down


Mission


Control


and/or


stopping


PLC


scanning


requires


the


system


password


to


be


entered.


(See


Figure


16)


PLC


Tag


Values


PLC


tag


values


can


be


monitored


and


viewed


for


troubleshooting


purposes.


Any


changes


in


values


of


the


print


Trigger


or


Label


Number


value


is


recorded


in


the


R/W


(Read/Write)


and


the


R/W


per


S


(Read/Write


per


Second)


text


boxes.


The


actual


value


recorded


is


shown


in


the


Values


text


box


and


any


PLC


addressing


errors


will


be


displayed


by


red


“Error”


text


in


the


Error


text


box.


Use


these


values


for


quick


troubleshooting.


If


all


values


are


zero,


no


values


are


displayed


or


there


is


red


“Error”


text


in


Revision


1.0

 ‐ 

7


of


15


Summary of Contents for Rockbox SPS-100

Page 1: ...rial Print Server TECHNICAL TRAINING GUIDE Overview 2 A Configuration 3 B Installation 6 C Mission Control 7 D Studio 9 E Print On Demand 12 F View and Configure from a Remote Computer 13 G System Bac...

Page 2: ...PLC and the Rockbox are connected to Studio Refers to the application intended for label and template creation and modification The executable file for this application is SPS100_Studio and is stored...

Page 3: ...4 Configure OPC Server software KepserverEx to allow reading of print trigger bit and label number register from PLC o Double click KepserverEx shortcut on desktop See Figure 5 o A preconfigured Keps...

Page 4: ...Functions o Left Click on Mission Control tab in task bar See Figure 9 Click on Settings Button in Mission Control See Figure 10 Figure 10 Figure 9 o Enter Password sps is default See Figure 11 Make m...

Page 5: ...Default is sps Comport Setting Make sure Printer dip switches match SPS 100 settings for each Channel Channel ID that can be used to identify what Channel was used to print each specific label Normall...

Page 6: ...e corresponding COM number labels to identify which Comport each USB port connects to See Figure 14a Connect serial cables from corresponding printers to applicable USB to RS 232 Serial converters See...

Page 7: ...Control is running or not Green Running text displays when PLC scanning is occurring and red Stopped text displays when PLC scanning is not occurring Left click the Stop Button to stop PLC scanning a...

Page 8: ...nance text boxes If there is an error there will be a red Error message in the Error text box Errors usually are a result of database backup locations being set to directories that don t exist The Bac...

Page 9: ...d Modify Delete Templates Figure 19 Select Label to modify delete or view PLC Label Register value Label Name for Identification Label Preview using Template and Dynamic Text values Choose whether to...

Page 10: ...ded to identify which Channel printed each specific label in multi channel systems Placing TIMESTAMP replaces TIMESTAMP with the current Time Stamp of the Rockbox when each label is printed The Rockbo...

Page 11: ...Stamp insertion Printer specific formatting instructions Error Log To view all recorded system errors view left click the Error Log Button See Figure 19 Some common errors that will get recorded in th...

Page 12: ...n be printed on any of the four available channels that are connected to a printer This is a good way to test label formatting prior to running live It also is a good way to ensure Channel COM configu...

Page 13: ...dification and deletion of label templates and labels Studio is a stand alone application that was intended to run on not only the Rockbox but on any computer connected to the network The SPS100_Studi...

Page 14: ...backup file in the input box and click OK See Figure 26 The default backup file will be the Back Up File listed in Settings Backing up to this file will overwrite the existing backup file saving the...

Page 15: ...another Communication Related Error 5 Reset and recheck IP Addresses along with the functionality of any network switches across the network if Ping checks are not successful Kepserver Channel or Devi...

Reviews: