Technical
Training
Guide
A)
Configuration
Rockbox
SPS
‐
100s
can
be
ordered
completely
preconfigured.
Below
are
instructions
for
manually
configuring.
1.
Connect
keyboard
and
mouse
to
available
two
available
USB
ports
and
connect
a
monitor
to
the
VGA
port
on
back
on
the
Rockbox.
2.
Press
Power
Button
on
front
of
the
Rockbox.
Figure 1
3.
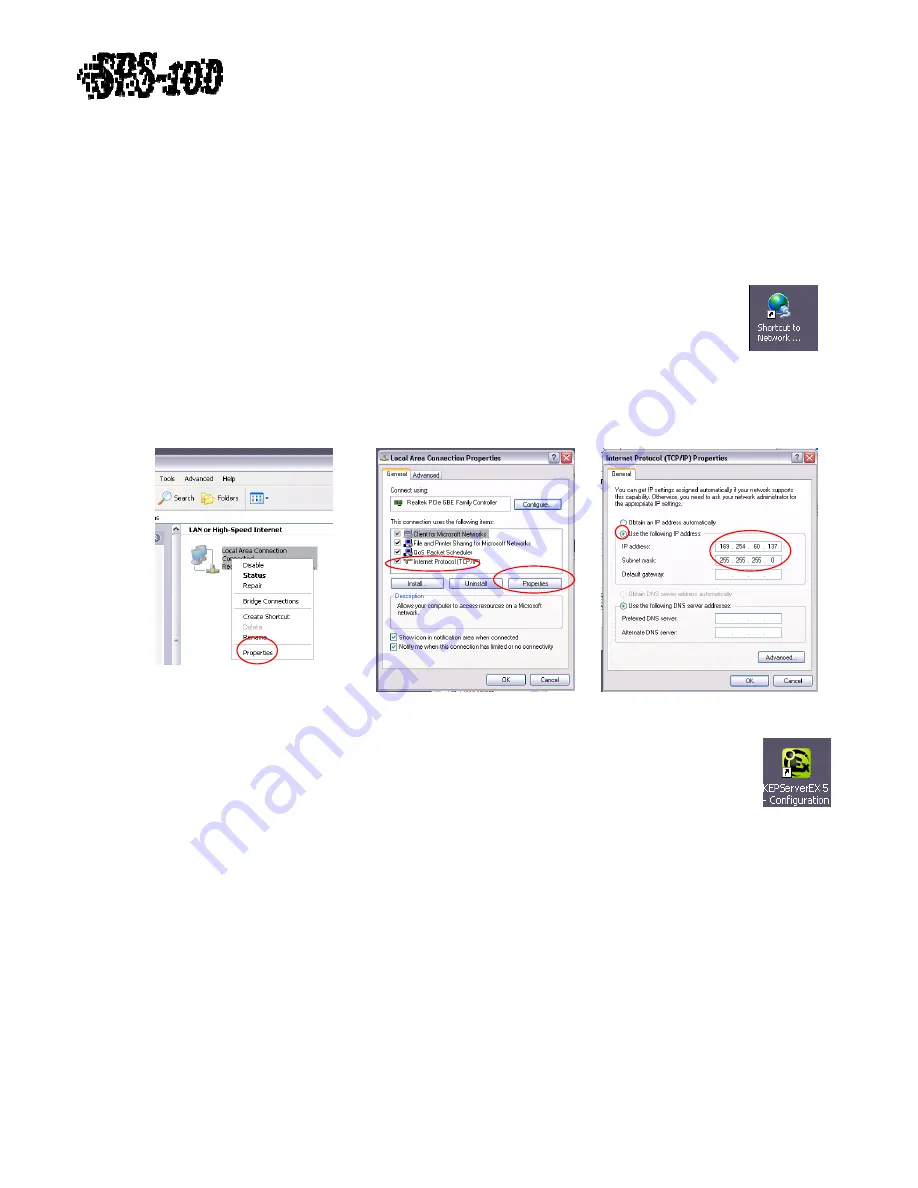
Set
IP
Address
and
subnet
mask
to
a
unique
address
compatible
with
the
triggering
PLC.
o
Double
click
Network
Connections
shortcut
on
the
desktop.
(See
Figure
1)
o
Right
click
on
Local
Area
Connection
and
left
click
Properties.
(See
Figure
2)
o
Left
click
on
Internet
Protocol
(TCP/IP)
and
left
click
Properties.
(See
Figure
3)
o
Manually
set
IP
Address
and
Subnet
Mask
to
allow
Ethernet
communication
to
PLC
and
computers
on
the
local
network.
(See
Figure
4)
Figure
2
Revision
1.0
‐
3
of
15
Figure
4
Figure
3
Figure
5
4.
Configure
OPC
Server
software
KepserverEx
to
allow
reading
of
trigger
bit
and
label
number
register
from
PLC.
o
Double
click
KepserverEx
shortcut
on
desktop.
(See
Figure
5)
o
A
preconfigured
Kepserver
Channel
and
Device
should
be
present.
The
Channel’s
name
is
SPS100
and
the
Device’s
name
is
SPS1
.
The
SPS
‐
100
system
requires
the
Channel
and
Device
name
to
be
SPS100
and
SPS1
respectively
or
OPC
communication
will
not
work
properly.
(See
Figure
6)
o
The
Kepserver
Channel
properties
can
be
accessed
by
right
clicking
the
Channel
(
SPS100
)
and
left
clicking
Properties
.
The
device
driver
needs
to
be
correct
for
the
make
and
model
of
PLC.
If
this
setting
is
not
correct
delete
Channel
and
create
a
new
Channel
named
SPS100
along
with
a
new
Device
named
SPS1
.
Select
the
correct
Device
Driver
.
Use
default
values
for
all
other
settings.
(See
Figure
7)
o
The
Kepserver
Device
properties
can
be
accessed
by
right
clicking
the
Device
(
SPS1
)
and
left
clicking
Properties
.
Change
the
IP
Address
of
the
Device
to
the
address
of
the
PLC.
(See
Figure
8)


