background image

7

Check Rockler.com for updates. If you have further 

questions, please contact our Technical Support 

Department at 1-800-260-9663 or 

[email protected]

Fig. 3

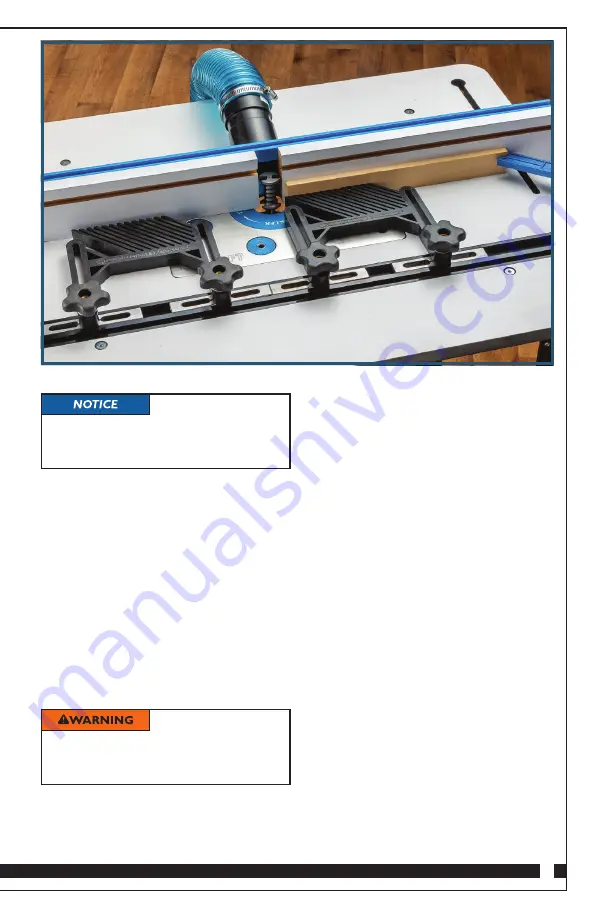
4. Install featherboards on the table on both 

  infeed and outfeed sides of the bit and set 

  it to maintain pressure on your workpiece 

  as you feed it past the bit. 

Fig. 3.

5. Plug in and turn on the router. Use a push 

  stick to make test cuts to verify the bit 

  cutting height and fence position. Test 

  the piece in a mortise drilled with your 

  Beadlock jig to check the fit. 

Fig. 3.

6. If fine-tuning is needed, turn off the router, 

  wait for it to fully stop and unplug it before 

  making adjustments.

7. Once adjustments are made, make an 

  additional test cut. Repeat the adjustment 

  and test-cut process until desired cutting 

  results are achieved.

8. Rout your workpiece(s) on both faces (front 

  and back) of your stock to create your 

  Beadlock tenon stock.

1. Install the Beadlock Tenon Router Bit in 

  your table-mounted router.

2. Sight down the table and adjust the height 

  of the bit until the bottom curve intersects 

  with the plane of the table surface. (You 

  will fine-tune this position after making 

  test cuts.) 

Fig. 1.

3. Move the fence so that most of the bit 

  is “buried” behind the face of the fence, 

  with the deepest point of the flutes in the 

  bit lined up with the fence face. 

Fig. 2. 

  The goal is a depth of cut that just rounds 

  the face of your workpiece without making 

  it narrower overall.


A piece of 

factory-milled Beadlock tenon stock 

can be used as a guide to help make 

setup quicker and easier.


Never postion a 

featherboard so that it applies pressure 

into the cutter. Use featherboards only 

on infeed and outfeed sides of the cutter.

Summary of Contents for 3/8 Tenon Router Bit

Page 1: ...ons prior to use for important safety information Always check Rockler com to confirm that you are using the most recent version of intstructions for your product 3 8 Tenon Router Bit Instructions Effective Semptember 2019 ...

Page 2: ...he user assumes all risk and responsibility for the proper and safe use of this product and for ensuring product suitability for the intended application It is the sole responsibility of the purchaser of this product to ensure that any anyone you allow to use this product reads and complies with all instructions and safety precautions outlined in this manual prior to use Follow all standard shop s...

Page 3: ...arning indicates a hazardous situation that if not avoided could result in death or serious injury Caution indicates a hazardous situation that if not avoided may result in minor or moderate injury or property damage Notice indicates important or helpful information and or user tips SAFETY WARNING KEY ...

Page 4: ...otation Feed Direction Turn off and unplug your router before installing the bit or adjusting the cutter height To avoid bit slippage during use make sure to install the bit properly in the router Insert the bit in the collet until it bottoms out then back it out 1 16 to 1 8 and tighten the collet Never use a router bit that is damaged or dull This router bit requires the use of a fence with split...

Page 5: ...e able to control the workpiece as you shape it at the router table We recommend a length of at least 12 2 Make sure that the faces of your stock are square to the edges You will be running the stock on edge past the bit so it s important that the stock is square When cutting your stock also cut extra pieces that can be used to make test cuts for verifying your setup Critical Stock Dimensions 3 8 ...

Page 6: ...during use make sure to install the bit properly in the router Insert the bit in the collet until it bottoms out then back it out 1 16 to 1 8 and tighten the collet Never use a router bit that is damaged or dull This router bit requires the use of a fence with split faces The bit must be partly buried in the fence between the halves of the split fence ALWAYS use table featherboards to make sure th...

Page 7: ...t process until desired cutting results are achieved 8 Rout your workpiece s on both faces front and back of your stock to create your Beadlock tenon stock 1 Install the Beadlock Tenon Router Bit in your table mounted router 2 Sight down the table and adjust the height of the bit until the bottom curve intersects with the plane of the table surface You will fine tune this position after making tes...

Page 8: ...Distributed by Rockler Companies Inc 4365 Willow Dr Medina MN 55340 1 800 279 4441 www rockler com 31318 Rev 09 19 ...

Reviews: