background image

First start-up

44

5

ignition request is disabled. The regular operation of the 

boiler is allowed only when the operation is completed.

To check and calibrate the CO

2

 value at maximum and minimum 

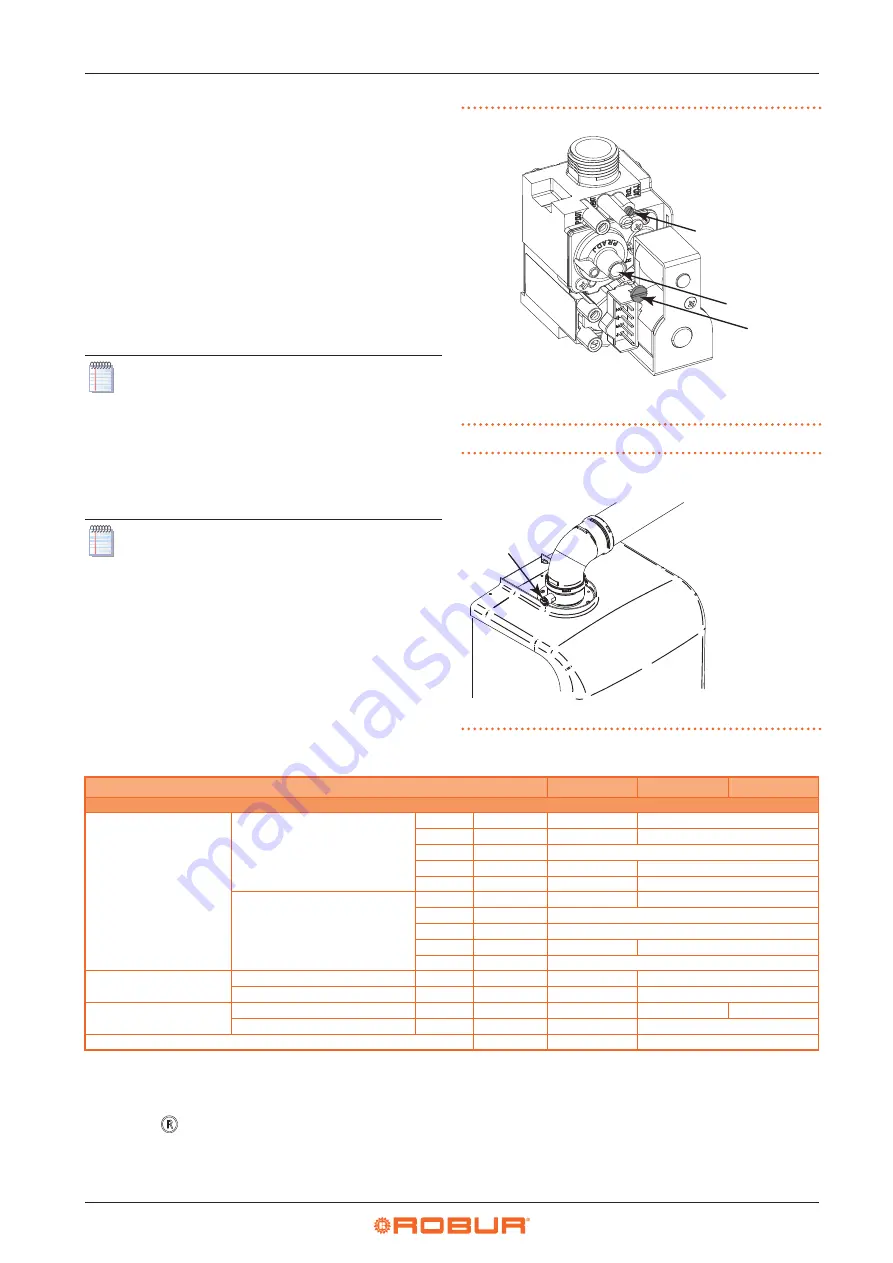
power, proceed as follows, referring to Figure 5.9 

p. 44.

The CO

2

 values and other parameters useful to verify combus-

tion are summarized in Table 5.5 

p. 44.


Power the boiler.


Open the gas valve on the boiler and check that the valves 

connecting to the system are open.


Activate the heating request to the boiler, through the con-

trol devices provided, and provide an adequate thermal load 

for carrying out the verification operations.


Insert the flue gas analyser into the flue gas analyser socket 

and turn it on.

For the Caldaria 35 and Caldaria 55.1 models, the flue gas 

analysis socket is positioned on the flanged socket (de-

tail PF, Figure 5.10 

p.  44), or on the optional rainproof 

terminal (code OTRM031).

If you want to use the flue gas analysis socket positioned 

on the flanged socket, to access the socket it is necessary 

to remove the upper flange and the upper casing of the 

boiler (Paragraph 5.2 

p. 34).

For the Caldaria 100.2 model, the flue gas analysis socket 

must be provided on the flue gas exhaust pipe. It is al-

ready provided on the rainproof terminal, available as 

optional OTRM009.

Figure 5.9  

 Gas  valve

 Protection  screw

Gas flow adjustment screw

Offset adjustment screw

1

2

A

Figure 5.10  

 Socket for flue gas analysis for Caldaria 35 and 55.1

PF 

 Flue  gas 
analysis socket

PF

Table 5.5  

 Caldaria combustion parameters

Caldaria 35

Caldaria 55.1

Caldaria 100.2

Installation data

CO

2

 percentage in fumes

Nominal heat input

G20

%

9,45 ÷ 9,25

9,3 ÷ 9,1

G25

%

9,35 ÷ 9,15

9,3 ÷ 9,1

G25.3

%

9,3 ÷ 9,1

G30

%

11,4 ÷ 11,2

11,3 ÷ 11,1

G31

%

10,55 ÷ 10,35

10,3 ÷ 10,1

Minimal heat input

G20

%

9,05 ÷ 8,85

9,0 ÷ 8,8

G25

%

9,0 ÷ 8,8

G25.3

%

9,0 ÷ 8,8

G30

%

10,75 ÷ 10,55

10,9 ÷ 10,7

G31

%

9,9 ÷ 9,7

Flue temperature

Nominal heat input

G20

°C

69,4

66,4

Minimal heat input

G20

°C

61,3

56,8

Fumes flow rate

Nominal heat input

G20

kg/h

54

80

161

Minimal heat input

G20

kg/h

7

8

CO emission

ppm

75,0

68,0

5.5.1 

   Minimum heating power

1.  Activate the chimney sweep function by pressing for 7 sec-

onds the 

 key (Figure 6.1 

p. 47). The maximum time be-

fore being forced out of the function is 15 minutes.

2.  Check that the CO

2

 value conforms to that reported in Table 

5.5 

p. 44.

3.  If this is not the case, unscrew the protection screw A and ad-

just with a 4 hex key the screw 2 of the offset adjuster (Figure 

5.9 

p.  44). To increase the value of CO

2

 turn the screw 

clockwise and vice-versa if you want to decrease it.

4.  Once completed the adjustment, tighten the protection 

screw A on the offset adjuster.

Summary of Contents for Caldaria 100.2 Condensing+ export

Page 1: ...Powered by natural gas LPG Installation use and maintenance manual Caldaria Condensing export Outdoor condensing boiler ...

Page 2: ... within this publication are not affected With the aim of continuously improving the quality of its products Robur S p A reserves the right to modify the data and contents of this Installation use and maintenance manual without prior notice Revision B Code D LBR875EN DISPOSAL The appliance and all its accessories must be disposed of separately in accordance with the regulations in force Use of the...

Page 3: ...reeze and anti lock function p 27 3 6 Fuel gas supply p 27 4 Electrical installer p 29 4 1 Warnings p 29 4 2 Electrical power supply p 29 4 3 Control device p 30 4 4 Operation via centralised external request p 32 4 5 DHW production p 32 5 First start up p 34 5 1 Preliminary checks p 34 5 2 How to access the boiler p 34 5 3 How to access the control panel p 35 5 4 Electronic board parameters setti...

Page 4: ...ied firm and by skilled personnel with specific knowl edge on heating electrical systems and gas appliances in compliance with the laws in force in the Country of installation Declaration of conformity Upon completing installation the installing firm shall issue to the owner client the appliance s workmanlike conformity declaration according to national local reg ulations in force and the manufact...

Page 5: ...e or flammable materials Do not deposit flammable materials paper diluents paints etc near the appliance Limescale and corrosion Depending on the chemical physical properties of the system water limescale or corrosion may damage the appliance Check system sealing Avoid frequent top ups Acid flue gas condensate Discharge the acid condensate of combustion flue gas in compliance with current exhaust ...

Page 6: ...ustion products ex haust Fire safety and prevention Any other applicable law standard and regulation III 3 EXCLUSIONS OF LIABILITY AND WARRANTY Any contractual or extra contractual liability of the man ufacturer for any damage caused by incorrect installa tion and or improper use and or failure to comply with regulations and with the manufacturer s directions in structions shall be disclaimed In p...

Page 7: ... is requested the electronic board starts the system water circulation pump the blower and then the burner When the burner starts up the flame detector checks that the burner has ignited in the event of a lack of flame the elec tronic control unit stops the appliance and indicates the block Resetting is manual In the event of abnormal overheating of the delivery the boiler is switched off The limi...

Page 8: ...1 56 90 RS 74 P2 25 23 60 85 75 55 1 2 2 Caldaria 55 1 Figure 1 3 Caldaria 55 1 dimensions A Flue gas outlet Ø 80 mm 240 160 600 869 480 A Figure 1 4 Caldaria 55 1 hydraulic connections bottom view A Outlet Ø 1 1 4 M G Gas Ø 3 4 M R Inlet Ø 1 1 4 M P1 P2 Cable glands Ø 2 7 mm SC Condensate drain Ø 25 mm M SPF Female socket SVS Safety valve drain Ø 19 mm M 95 83 55 144 103 96 23 69 242 82 93 273 R ...

Page 9: ...35 Figure 1 7 Caldaria 35 internal components 1 Flue safety thermal fuse 2 Heat exchanger 3 Burner unit 4 Flame detector 5 Heating return probe 6 Combustion blower 7 Safety valve 8 Automatic air vent valve 9 Modulating circulator 10 Gas valve 11 System drain tap 12 Safety thermostat 13 Heating delivery probe 14 Ignition electrode 15 Expansion tank 16 Ignition transformer 17 Air intake pipe 18 Vent...

Page 10: ...itch 16 Condensate drain siphon 17 Bypass 18 SYstem filling tap R F A G 1 2 3 4 6 7 8 9 6 10 11 12 13 14 15 17 18 SC 5 16 SVS RS 1 3 2 Caldaria 55 1 Figure 1 9 Caldaria 55 1 internal components 1 Flue safety thermal fuse 2 Heat exchanger 3 Burner unit 4 Flame detector 5 Combustion blower 6 Automatic air vent valve 7 Safety valve 8 Modulating circulator 9 Gas valve 10 Expansion tank 11 Manual air v...

Page 11: ...robe R A G 1 2 3 4 16 7 9 6 10 11 12 13 15 SC 5 14 8 17 18 SVS 1 3 3 Caldaria 100 2 Figure 1 11 Caldaria 100 2 internal components 1 Flue safety thermal fuse 2 Slave unit heat exchanger 3 Burner unit 4 Flame detector 5 Heating return probe 6 Combustion blower 7 Modulating circulator 8 Gas valve 9 Automatic air vent valve 10 Manual air vent tap 11 Heating delivery probe 12 Safety thermostat 13 Igni...

Page 12: ...heating energy efficiency class ErP A Heat input nominal 1013 mbar 15 C 1 kW 34 0 50 0 99 8 minimum 1 kW 4 1 5 0 Operating point 80 60 Nominal heat input effective power kW 33 4 49 2 98 1 efficiency 98 1 98 4 98 3 Operating point 50 30 Nominal heat input efficiency 106 4 106 8 Operating pointTr 30 C Heat input 30 efficiency 108 6 108 8 Operating pointTr 47 C Heat input 30 efficiency 102 1 102 8 He...

Page 13: ...1 Circulating pump characteristic curves 1 4 1 1 Caldaria 35 Figure 1 13 Circulating pump characteristic curves 0 0 5 1 0 1 5 2 0 2 5 0 0 2 0 4 0 6 0 8 0 2 4 6 8 0 1 2 3 4 5 6 7 8 0 10 20 30 40 50 60 70 0 0 5 1 0 1 5 2 0 2 5 0 20 40 60 p kPa H m P1 W Q m h Q l s Q Igpm Q m h max m a x 10 80 3 0 3 0 70 85 13 1 5 100 65 34 8 75 24 0 15 89 1 25 78 3 35 67 4 45 56 6 55 45 7 1 4 1 2 Caldaria 55 1 and 1...

Page 14: ...with no glycol in water 0 0 1 0 2 0 3 0 4 0 5 0 6 0 7 0 8 0 9 0 0 250 500 750 1000 1250 1500 1750 2000 l h m A B C 1 4 2 2 Caldaria 55 1 Figure 1 16 Available head and pressure drop of Caldaria 55 1 A Pump characteristic curve B Boiler pressure drop with 35 5 glycol water C Boiler pressure drop with no glycol in water 0 0 1 0 2 0 3 0 4 0 5 0 6 0 7 0 8 0 9 0 10 0 11 0 0 500 1000 1500 2000 2500 3000...

Page 15: ... 1 4 2 3 Caldaria 100 2 Figure 1 17 Available head and pressure drop of Caldaria 100 2 A Pump characteristic curve B Boiler pressure drop with 35 5 glycol water C Boiler pressure drop with no glycol in water 0 0 1 0 2 0 3 0 4 0 5 0 6 0 7 0 8 0 9 0 10 0 11 0 0 1000 2000 3000 4000 5000 6000 l h m A B C ...

Page 16: ...tor for optional outdoor temperature probe TA Antifreeze thermostat TB DHW thermostat alternative to SB probe TF Flue gas thermofuse TS Safety thermostat Ta Connector for optional room thermostat Tra Ignition transformer VD Buffer tank diverter valve for DHW charging VG Gas valve ar Orange bi White ce Light blue gi Yellow gr Grey ma Brown ne Black ma ce ma ce ma gi bi gr EV ce ma ce ma EA VG Tra c...

Page 17: ...urn probe Se Connector for optional outdoor temperature probe TA Antifreeze thermostat TB DHW thermostat alternative to SB probe TF Flue gas thermofuse TS Safety thermostat Ta Connector for optional room thermostat Tra Ignition transformer VD Buffer tank diverter valve for DHW charging VG Gas valve ar Orange bi White ce Light blue gi Yellow gr Grey ma Brown ne Black ma ce ma ce ma gi bi gr EV ce m...

Page 18: ... probe SRi Heating return probe TF Flue gas thermofuse TS Safety thermostat Tra Ignition transformer VG Gas valve ar Orange bi White ce Light blue gi Yellow gr Grey ma Brown ne Black ma ce ma ce ma gi bi gr EV ce ma ce ma EA VG Tra ER TS TF SR ce ma ma ce 11 10 9 8 7 12 13 14 15 16 17 M12 M9 M7 M5 M2 M4 M8 M10 M15 M16 1 2 3 4 57 61 60 59 58 44 43 42 41 40 39 38 37 36 35 34 33 32 31 30 29 28 27 26 ...

Page 19: ...outdoor temperature probe TA Antifreeze thermostat TB DHW thermostat alternative to SB probe TF Flue gas thermofuse TS Safety thermostat Ta Connector for optional room thermostat Tra Ignition transformer VD Buffer tank diverter valve for DHW charging VG Gas valve ar Orange bi White ce Light blue gi Yellow gr Grey ma Brown ne Black ma ce ma ce ma gi bi gr EV ce ma ce ma EA VG Tra ce ma ER TS TF SR ...

Page 20: ...ble for the load Do not stand under suspended loads 2 2 HANDLING Handling and lifting Always handle the appliance in its packing as delivered by the factory Comply with safety regulations at the installation site In the event of handling with forklift or pallet truck comply with the handling instructions shown on the packing 2 3 MINIMUM CLEARANCE DISTANCES Keep the appliance away from combustible ...

Page 21: ...ort bracket and the one for the frame of the external module a depth of 90 mm is sufficient the hole Ø 80 mm must be drilled for the entire thickness of the wall 3 Insert a plastic pipe through the wall into the hole Ø 80 mm cut to size 4 Position the support bracket of the external module in corre spondence with the upper holes made Ø 10 mm depth 90 mm and secure it with the supplied wall plugs 5...

Page 22: ...supplied with the boiler on the outlet and inlet pipes 3 4 angle valves for Caldaria 35 and 1 1 4 fittings with shut off valves and elbow for Caldaria 55 1 and Caldaria 100 2 after disassembling the fitting cover Connect the hydraulic pipes to the water delivery and return connections of the boiler Paragraph 1 2 p 7 equipped with the appropriate isolation valves interposing appropri ate gaskets on...

Page 23: ...pply has been connected to the boiler system filling con nection and let all the air out 4 Check with pressure gauge Figure 3 6 p 23 that system pressure reaches 1 2 bar Figure 3 8 p 24 5 Open the automatic air vent valves on the system if any and check the air venting process 6 Make sure that the unit is energized 7 Send an operating request to the unit for a few seconds The circulating pump will...

Page 24: ...essing the button again the symbol will appear on the display The circulation pump will remain in operation for a few minutes Repeat the operation several times until the pressure of the circuit remains unchanged Figure 3 9 Caldaria 55 1 and 100 2 air vent 1 Cap of the jolly valve 2 Tap 2 1 3 3 3 System water characteristics Responsibility of the user operator installer The installer operator and ...

Page 25: ...for Ø 100 mm male pipe The rain cover supplied must be mounted on the flue gas ex haust pipe to protect the internal components of the boiler de tail E Figure 3 10 p 25 The combustion air is drawn from the outside of the casing by means of special louvres located in the lower part of the casing Flanged socket Caldaria 35 and 55 1 The Caldaria 35 and Caldaria 55 1 are supplied with a flanged socket...

Page 26: ... indications given in Paragraph 3 4 3 p 26 Figure 3 12 Roof vertical flue gas exhaust Figure 3 13 Horizontal flue gas exhaust 3 4 3 Possible flue In case of extension of the duct follow the instructions below Use ducts and terminals suitable for forced draft condensing appliances The residual head is detailed in Table 3 3 p 27 The horizontal sections for flue gas exhaust must always be mounted on ...

Page 27: ...tarts the circulation pump and the burner ignition at minimum power When the water temperature of the DHW buffer tank reaches 8 ºC the control board will turn off the burner Electrical and gas continuity The antifreeze function is only effective if the power and gas supplies are assured Otherwise antifreeze fluid might be required Pump anti lock function In order to prevent the circulation pump fr...

Page 28: ... the flow rate of the gas meter is such as to ensure the simultaneous use of all the devices connected to it Although it is normal for the inlet pressure to decrease during the operation of the appliance it is important to check that there are no excessive fluctuations in the inlet pressure In order to limit the extent of these variations it is necessary to appropriately define the diameter of the...

Page 29: ...un occasional blackouts are tolerated To switch the appliance on and off use only the control device provided for this purpose remote control or ex ternal request The cables inside the boiler must be routed through the P1 and P2 cable glands Paragraph 1 2 p 7 To do this make a hole in the cable gland slightly smaller than the cable so that the air does not pass through 4 2 ELECTRICAL POWER SUPPLY ...

Page 30: ... 100 2 which already has the card onboard Possibility to manage temperature probes mixing valves and tappings on the system Additional optionals can be associated with each of the above devices to achieve more complete and complex control functionality For example it is possible to combine the OSND009 outdoor probe with the OCDS006 remote control to obtain the variable temperature heating service ...

Page 31: ...hermostat OCDS006 remote control to Caldaria 35 A Plate B Terminal block CR External request room thermostat OCDS006 remote control L N Se Se A Ta Ta B CR Caldaria 55 1 and 100 2 Remove the electrical bridge on the TA contacts T1 T2 of the male plug SPM and then connect the two non polarized con ductors on the T1 T2 contacts Figure 4 4 p 31 Figure 4 4 Connection of external request room thermostat...

Page 32: ...2 Paragraph 5 4 p 35 when closing the CS contact the ac tivation request for heating is disabled For the electrical connection of the centralized external request follow the instructions below For Caldaria 35 connect the centralized external request to the CS terminal block on the left side of the control panel Figure 1 18 p 16 For Caldaria 55 1 and Caldaria 100 2 connect the central ized external...

Page 33: ...ngth is 3 meters If a longer length is required a 2x0 75 mm shielded cable with a maximum length of 50 metres must be used For further information refer to the documentation sup plied with the DHW buffer tank probe OSND011 Figure 4 8 Connection of OCDS011 DHW buffer tank probe SB DHW buffer tank probe OSND011 M9 SB 32 33 34 35 36 37 4 5 3 Connection of DHW buffer tank thermostat The TB DHW buffer ...

Page 34: ...ation Gas smell Non compliant mains gas pressure Non compliant flue gas exhaust All situations that may involve operation abnormalities or are potentially hazardous 5 1 3 Non compliant system and corrective actions Should the TAC find any non conformities the user installer is bound to perform any corrective procedures required by the TAC After performing the remedial actions the installer s respo...

Page 35: ...connections of the control pan el proceed as follows Figure 5 3 p 35 1 Simultaneously grab the control panel support brackets by widening them and turn the panel upside down by rotating it towards you and down 2 Unscrew the four fixing screws 1 3 In case of slave control panel Figure 5 4 p 36 disconnect the four hooks 2 4 Remove the C casing upwards Figure 5 3 Accessing the control panel 1 Cover f...

Page 36: ...1 The operating parameters are shown in the followingTables and are visible on the internal display of the boiler Figure 5 5 Access and setting of boiler parameters 5 4 1 Caldaria 35 Table 5 1 Caldaria 35 electronic board parameters Parameter Description Range Default Setting P00 Boiler model selection 0 10 9 9 Caldaria 35 P01 1 2 Boiler type selection 0 5 5 0 heating and buffer tank DHW with DHW ...

Page 37: ...the type of gas parameter P02 45 P13 Value in hertz 1 Hz 30 RPM P13 Maximum blower speed adjustment for heating It is possible to set the maximum speed of the blower for the heating service which corresponds to the maximum power of the burner during a heating request see Figure 5 7 p 43 The value is preset according to the set power parameter P00 and the type of gas parameter P02 P12 203 Value in ...

Page 38: ... verification at each switch on of the correct operation of the circulator 0 1 1 0 disabled 1 enabled 1 In presence of cascade controller ODSP039 optional if DHW production is managed by the controller itself param eter P01 must be set to value 0 Parameters P15 P21 P25 will be inhibited as they are managed directly by the controller 2 By setting a value of parameter P01 other than 5 heating on ly ...

Page 39: ...t up phases The value is preset according to the set power parameter P00 and the type of gas parameter P02 P10 203 Value in hertz 1 Hz 30 RPM P15 1 Legionella function WARNING burn hazard See Paragraph 5 8 p 46 0 1 1 0 disabled 1 enabled P16 Setting the climate curve only with outdoor probe OSND009 connected The OSND009 outdoor temperature probe may be connected and acts by auto matically changing...

Page 40: ...configured only in the presence of the cascade controller ODSP039 optional following the instructions provided in the manual supplied with the controller itself 5 4 3 Caldaria 100 2 Table 5 3 Caldaria 100 2 electronic board parameters Parameter Description Range Default Setting P00 1 Boiler model selection 0 3 3 3 55 kW P01 2 3 Boiler type selection 0 2 1 0 heating and storage DHW the DHW manageme...

Page 41: ...ture Te taking into account the degree of insulation of the building The values of the outlet temperatures Tm refer to standard systems 30 80 C or floor systems 25 45 C The type of system can be set using parameter P03 0 30 25 The numbering of the value corre sponds to the Kd curves of the graph Figure 5 6 p 42 P17 2 3 DHW buffer tank setpoint differential It is possible to set the differential va...

Page 42: ... locking function 3 In presence of cascade controller ODSP039 optional if DHW production is managed by the controller itself param eter P01 must be set to value 0 and parameter P32 to value 2 Parameters P15 P17 P21 will be disabled as they are man aged directly by the controller 4 Parameters P26 P33 relating to Modbus settings must be configured only in the presence of the cascade controller ODSP0...

Page 43: ... G25 G25 3 G31 0 5 10 15 20 25 30 35 40 45 50 55 35 50 65 80 95 110 125 140 155 170 185 200 215 230 245 Ti kW Freq Hz 5 5 COMBUSTION PARAMETERS CHECK The CO2 value should be checked with casing assem bled while the gas valve should be adjusted with the casing open Theignitionsystemwillautomaticallyactivatethesystem venting cycle function shown in the display with code F33 lasting 2 minutes except ...

Page 44: ...eady provided on the rainproof terminal available as optional OTRM009 Figure 5 9 Gas valve A Protection screw 1 Gas flow adjustment screw 2 Offset adjustment screw 1 2 A Figure 5 10 Socket for flue gas analysis for Caldaria 35 and 55 1 PF Flue gas analysis socket PF Table 5 5 Caldaria combustion parameters Caldaria 35 Caldaria 55 1 Caldaria 100 2 Installation data CO2 percentage in fumes Nominal h...

Page 45: ...uri with the one suitable for the type of gas to be used and make sure that the orientation of tooth D is downwards on the aluminium body 6 Reassemble the components proceeding in the opposite se quence to the disassembly operations making sure that the gasket G is reassembled 7 Set the boiler to operate with the new type of gas chang ing the value of parameter P02 gas type selection from the cont...

Page 46: ...ssible to specify in advance the day and time of execution of the anti legionella disinfection cycle Thermostatic valve In order to avoid scalding or damage to persons animals or property we recommend installing a thermostatic valve at the DHW buffer tank output If it is not possible to install a thermostatic valve at the DHW buffer tank output it is recommended to deacti vate the anti legionella ...

Page 47: ...ameter value adjustment keys hold the keys at the same time for 5 seconds to activate display backlighting for 10 minutes 6 Display 5 1 6 2 3 4 Figure 6 2 Boiler display icons 1 Parameter number indication or displayed info code 2 Parameter programming function active 3 Not used 4 Not used 5 Not used 6 Not used 7 Temperature display setpoint parameter value 8 OpenTherm communication present remote...

Page 48: ... repeat the ignition operation a few times due to the presence of air in the gas piping 1 If the boiler does not start up the relative error will be indi cated both on the remote control and on the internal panel of the boiler It will be possible to reset the boiler either re motely or directly on the boiler panel 2 Program the operation according to your needs For operation of the remote control ...

Page 49: ...Caldaria 100 2 Table 6 1 List of displayable data from menu Info Info code Description d0 Not used temperature d1 Outdoor probe temperature d2 Combustion blower speed d3 Not used temperature d4 Return probe temperature d5 dE Not operating data Table 6 2 Caldaia 100 2 List of displayable data from menu Info Info code Description d00 Not used temperature d01 Outdoor probe temperature d02 Not used te...

Page 50: ...all the water has drained off close the drain tap Figure 7 1 System drain tap position RS Drain tap RS Figure 7 2 Caldaria 55 1 Drain tap position RS Drain tap RS Figure 7 3 Caldaria 100 2 Drain tap position RS Drain tap RS ...

Page 51: ...ithout flame ignition No gas supply Check the gas supply network Manual reset press key 1 Broken or badly positioned ignition electrode Replace Gas valve fault Replace Slow ignition set too low Adjust the minimum pressure to the burner or slow ignition Inlet pressure of gas valve too high only for LPG supply Check the maximum burner pressure With flame ignition Power supply with phase and neutral ...

Page 52: ...tion E99 Generic CRAD board error Incorrect setting of parameter P29 to value 1 Set parameter P29 to 0 Automatic 1 In the Caldaria 100 2 press the key on the master control panel 2 Only for boilers with DHW production 3 Not applicable to Caldaria 100 2 4 Only for Caldaria 100 2 Table 8 2 Signalling codes visible ONLY on the boiler display Code Function Description F07 Chimney sweep function active...

Page 53: ... 125 kW Standby heat loss P stby 0 059 kW At part load elmin 0 025 kW Ignition burner power consumption P ign 0 kW In standby mode P SB kW Annual energy consumption Q HE 268 7 GJ Sound power level indoors outdoors L WA 52 4 dB Contact details Robur SPA Via Parigi 4 6 I 24040 Zingonia BG Additional information required by COMMISSION REGULATION EU No 813 2013 Table 1 Emissions of nitrogen oxides NO ...

Page 54: ... temperature regime means 60 C return temperature at heater inlet and 80 C feed temperature at heater outlet 9 1 3 Caldaria 100 2 Figure 9 3 Table 7 Model s Caldaria 100 2 Condensing boiler yes Low temperature boiler no B11 boiler no Cogeneration space heater no If yes equipped with a supplementary heater no Combination heater no Item Symbol Value Unit Item Symbol Value Unit Rated heat output Prat...

Page 55: ......

Page 56: ...11 F 39 035 884165 www robur it robur robur it 20 10 2020 20 MCL SDC 016 Code D LBR875EN Revision B Robur is dedicated to dynamic progression in research development and promotion of safe environmentally friendly energy efficiency products through the commitment and caring of its employees and partners Robur mission ...

Reviews: