


45
Chapter 2. Assembling RoboBuilder
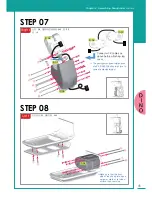
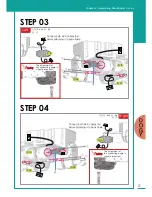
ID 06
ID 07
ID 08
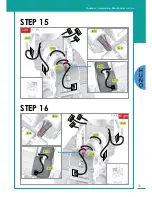
Connect wCK cables as
above before attaching leg
cover.
Right
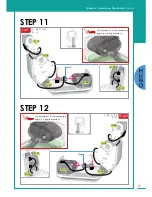
STEP 07
②
①
①② : B16, ③④⑤⑥⑦⑧⑨⑩ : B40, ⑪ : B12
ⓐ : J6
ID 07
ID 08
⑩
⑨
⑧
⑦
⑥
⑤
④
③
ⓐ
⑪
STEP 08
Left
①②③④ : B5, ⑤⑥⑦⑧ : B40
ID 04
⑧
⑦
⑥
⑤
④
③
②
①
※ The pentagon-shaped rotation axes
of wCK ID06,07,08 should all face to
same direction(outwards)
※ Make sure that the front
side of the shoe plate has a
narrower width of its folded
surface than rear side.
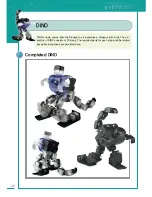
D
I
N
O
Summary of Contents for DIY Robot kit
Page 2: ......
Page 20: ...21 Chapter 2 Assembling RoboBuilder HUNO DINO ...
Page 36: ...37 Chapter 2 Assembling RoboBuilder H U N O ...
Page 49: ...50 STEP 18 STEP 17 B40 ID 01 ID 06 ID 11 ID 12 ID 02 ID 07 ...
Page 108: ...109 Chapter 4 Troubleshooting MEMO ...
Page 109: ...110 MEMO ...