background image

26

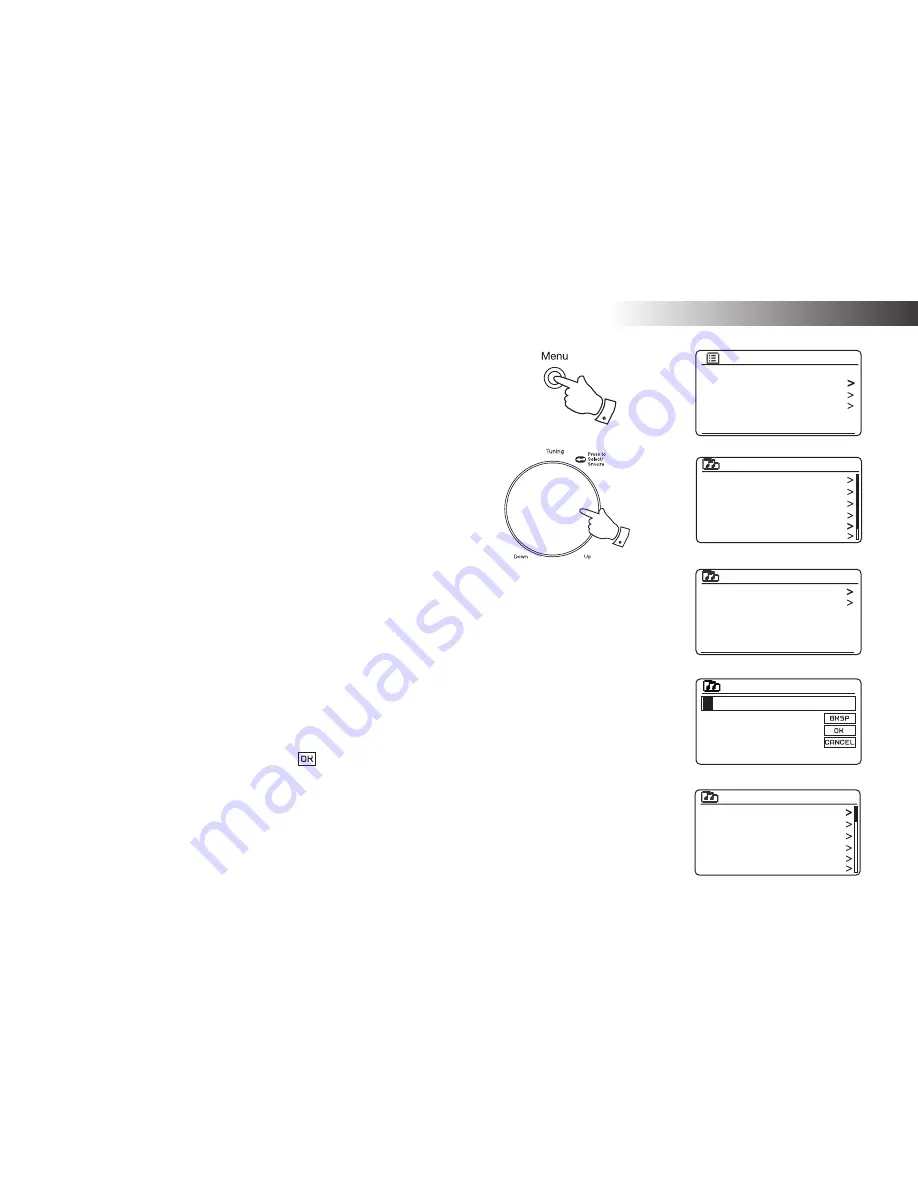
Selecting a podcast / BBC Listen Again

Some radio stations allow you to listen to programmes that have already 
been broadcast. The BBC's Listen Again service is an example of this. In 
addition, radio broadcasters and individuals may make programmes which 
are intended normally to be downloaded into a computer or copied onto a 
portable media player. These are commonly known as Podcasts.
On your sound system, both Listen Again programmes and Podcasts are 
grouped together as Podcasts, and the same menu is used to access and 
listen to both types of programming. Listen Again programmes are also 
accessible via the Stations menu (see pages 21-22).

1. Press 

the 

Menu 

button to enter the main Internet Radio menu. Rotate  

the 

Tuning/Select 

control


until 

'Station list'

 is highlighted on the display 

and then press the control to select.

2.   Rotate the 

Tuning/Select 

control


until


'Podcasts'

 is highlighted on the 

display and then press the control to select.

3.  You may then search by location, genre, or using part of the name of 

the podcast. The searches operate in exactly the same way as when 
searching for a conventional radio station.


Searching by location is done 

fi

 rst by continent, then by country. You 

may then list 

'All shows'

 or search within a country by genre.


Searching by genre is more direct, since once the genre is chosen 
the next menu display shows a list of available podcasts.


Searching by name operates in the same way as when searching 
for a named radio station, selecting the '

' symbol when you have 

entered the text. You may enter one or more pieces of text which will 
be used for the search.

4. Rotate 

the 

Tuning/Select 

control and then press the control


to con

fi

 rm 

your chosen podcast. The display will show 

'Connecting...'

 while it 

fi

 nds the new programme.

Last listened

Station list

System settings

Main menu

Internet radio

My Favourites

Local United Kingdom

BBC

Stations

Podcasts

My Added Stations

Internet radio

Location

Genre

Search podcasts

Podcasts

Podcasts

0   1   2   3   4   5   6

7   8   9    .   _   -   @

,         a   b   c   d   e

f    g   h    i    j   k   l

m   n   o   p   q   r   s   

1

Internet Radio           

1-4

Arts, Drama, Readings

Breakfast show

Gardening tips

Rock show

Theatre news

Show time

Podcasts

Summary of Contents for Stream 93i

Page 1: ...ROBERTS DAB FM WiFi Sound System with Internet Radio Music Player and Spotify Connect and remote control from ConnectR app for iPhone and Android Please read this manual before use ...

Page 2: ... 51 52 Spotify Connect 53 57 Spotify Connect the basics 53 Set up a Spotify Connect account 53 Playing music using Spotify Connect 54 Controlling Spotify on your sound system 55 Display modes Spotify Connect 56 57 Streaming data rate 57 Friendly name 57 DAB mode 58 66 Selecting a DAB radio station 59 Display modes 60 61 Finding new DAB radio stations 62 Manual Tuning 63 Dynamic Range Control setti...

Page 3: ... for simpler setting up with compatible wireless routers Works with Windows Play to function as a UPnP renderer Compatible with Spotify Connect allowing your Spotify selections to be played through the sound system remotely controlled from your iPhone iPad or Android device Supports remote control from Apple iPhone iPad and Android using Roberts ConnectR app All radio station presets network confi...

Page 4: ...our network using a wired Ethernet connection than an Ethernet cable of appropriate length will be needed If it is intended to listen to FM radio extensively then there may be benefit in using a shielded Ethernet cable since this may reduce possible interference to the radio The radio s WiFi system is compatible with 802 11b g or n networks If connecting using WiFi the sound system will typically ...

Page 5: ... how you may play music files that you may have stored on a computer connected to your network The use of Shared Media using UPnP and USB playback is explained The Spotify Connect section explains the use of the sound system in conjunction with the Spotify internet based music streaming service The two sections for DAB and FM Radio describe how to use the sound system to listen to conventional rad...

Page 6: ...eset 4 Pause button 7 Preset 3 Stop button 8 Preset 2 Fast forward button 9 Preset 1 Rewind button 10 Preset button 11 Info button 12 Alarm button 13 On Standby button 14 Volume control 15 Remote control sensor 16 Display panel 17 Tuning Select Snooze control 18 Loudspeaker x 2 5 14 15 17 6 7 8 9 10 11 12 13 16 1 2 3 4 18 18 ...

Page 7: ...ocket 20 Line output socket 21 Auxiliary input socket 22 USB playback socket 23 USB socket for service use only 24 Ethernet socket RJ 45 25 DC input socket 26 Subwoofer 27 Telescopic aerial antenna cable socket behind Introduction 21 20 19 27 26 22 23 24 25 ...

Page 8: ... Standby button 2 Preset buttons 1 5 Playback control buttons 3 Mode button 4 Info button 5 Volume Down button 6 Volume Up button 7 Select Snooze button 8 Tuning Menu Up button 9 Menu Back button 10 Tuning Menu Down button 11 Alarm button 12 Preset button 13 Menu Forward button 14 Menu button ...

Page 9: ...e the battery cover by re applying the cover to the control in the position marked Open and then use a coin to rotate the cover clockwise so that there is a slight click and the dot on the cover is aligned with the Lock marking on the remote control 4 If the remote is not to be used for an extended period of time it is recommended that the battery is removed IMPORTANT The battery should not be exp...

Page 10: ... item If there are more than six items in a menu then the display will automatically scroll up or down so that the additional items become visible A sliding bar on the right will give an indication showing the current portion of the menu that is displayed If there are many items in a menu then the sound system allows the menu to wrap around in either direction This can make it easier to reach item...

Page 11: ...socket outlet completely 4 When you apply power the display on the sound system will light up and say ROBERTS and Stream 93i After a few seconds the radio will then enter Standby and the clock will display 00 00 as shown To continue to setup your sound system press and release the On Standby button Ifthisisthefirsttimethatyouuseyoursoundsystem orafteraFactory Reset the display will show Setup wiza...

Page 12: ...ge option The display will then change to show the System Settings menu in the chosen language 11 Rotate the Tuning Select control until the Setup wizard option is highlighted on the screen and then press the control If you change the language you will not see Setup wizard in English You will see an equivalent menu item in your language for example Assistant réglages in French or Inställningsguide...

Page 13: ...mputer network on page 11 Otherwise you will first need to select the correct time zone and daylight savings setting see the next steps If you choose No update you will need to set the clock manually later see page 76 Press the control to confirm your choice 4 Rotate the Tuning Select control to highlight the time zone for your current location Press the Tuning Select control to enter the setting ...

Page 14: ...rol to highlight the required option and then press the control to make the selection After setting the Keep Connected option the display will show a list of supported WiFi regional options Rotate the Tuning Select control to highlight the required region for the UK choose Most of Europe and then press the control to make the selection Do this even if you are planning to use the wired Ethernet con...

Page 15: ...he sound system finds your wireless network it displays the Network Name SSID for the wireless access point on the screen This is a name that is allocated to the access point in your router by the person who set up the network for example Jones family or Paul s network If the router supports WiFi Protected Setup then WPS will be shown in front of the SSID It is possible and in some locations highl...

Page 16: ...then connect with the encryption key sent automatically to the sound system Skip WPS if you wish to enter the encryption key yourself or if it was previously entered If you chose Push Button or PIN the screen will then show Connecting and then Setup wizard completed Press the Tuning Select control to exit the setup wizard and then go to paragraph 10 on the next page 7 If your network is configured...

Page 17: ... erase a character just entered long press to clear Info again to continue select when the complete key has been entered select to cancel and re run the Network Wizard If a WEP or WPA key has previously been entered for the selected SSID then the display will show Key Set If you have previously entered a different key you must clear this by selecting the symbol This will remove the Set indication ...

Page 18: ...ing Select control to the desired network name Press the control to select this network The sound system will then use its WiFi system to communicate with the network Depending on the settings for the new network you may need to enter an encryption key see pages 13 14 By default the sound system will then acquire an IP address and other network settings from the network s router using DHCP Dynamic...

Page 19: ...and DHCP enable please skip to step 6 on page 17 in order to set up the wireless connection details If you chose DHCP disable for either connection method the next step is to set up the IP address 3 The manually specified IP address should be chosen to be compatible with the settings in your router and must be a unique address on your network If you are using DHCP for some devices and static manua...

Page 20: ...ed until the complete network name has been entered The SSID setting is sensitive to upper and lower case characters and symbols You must enter it exactly as set up in your router The three controls on the right hand side of the screen have special functions You can quickly access these by pressing the Info button and then use the Tuning Select control as needed select to erase a character just en...

Page 21: ...ng of between 8 and 63 characters and must be identical to the key which has been entered into your router Note the encryption key is sensitive to the use of upper and lower case letters and symbols Take care to enter the key exactly or the radio will not be able to connect to your router The three controls on the right hand side of the screen have special functions You can quickly access these by...

Page 22: ...ct the sound system to the application Keep network connected Your sound system has the option to shut down its WiFi or Ethernet connection when it is in Standby This minimises power consumption but it does mean that you will need to switch the sound system on manually in order to use either Spotify Connect the Play to function or any remote control software such as the Roberts ConnectR app If you...

Page 23: ... Location If you know the name of the station and the country from which a station is broadcast this may be the easiest method to find a station It is also a great way to experience radio from other parts of the world You may also search for an Internet radio station by Genre If you prefer a particular type of music Blues for example you may search for a radio station that broadcasts that type of ...

Page 24: ...w a list of countries within the chosen continent If there are many countries shown you can scroll through the list continuallyineitherdirection Forexample ifthechosencontinentwas Europe then to find the United Kingdom scroll up from the top of the list to the bottom by turning the Tuning Select control anti clockwise Press the Tuning Select control to choose the desired country 7 You will typical...

Page 25: ...on Note If your sound system is unable to connect to an Internet radio station it will generally either display Network Error or Stopped This can be for many reasons but typically will be due to one of the following The radio station may not be broadcasting at the present time Theradiostationmaynotbeabletoaccommodateanymoreconnections from internet listeners The broadcaster may limit listening to ...

Page 26: ...Note if a country is not shown then the station may still appear in the All Stations list Rotate and then press the Tuning Select control to choose as needed 6 Alist of radio stations is then shown Rotate the Tuning Select control until the desired station name is highlighted on the display 7 Press the Tuning Select control to select the station The display will show Connecting while it finds the ...

Page 27: ...rol Rotate the control or press Info again to go back to the character selection After the final character of the search has been entered use the Info button and then the Tuning Select control to highlight the symbol on the screen and then press the control to finish 5 The sound system will search for radio stations that match your search data If you include a space between two search items the so...

Page 28: ...Select control until Stations is highlighted on the display and then press the control to select 3 Rotate the Tuning Select control until Popular stations or New stations is highlighted on the display Press the Tuning Select control to enter your choice 4 Rotate the Tuning Select control to highlight the station that you wish to listen to and then press the control to enter your choice The display...

Page 29: ...tion genre or using part of the name of the podcast The searches operate in exactly the same way as when searching for a conventional radio station Searching by location is done first by continent then by country You may then list All shows or search within a country by genre Searching by genre is more direct since once the genre is chosen the next menu display shows a list of available podcasts S...

Page 30: ...e preset buttons 1 5 1 Press the On Standby button to switch on your sound system Tune to the required station using one of the methods described on the preceding pages 2 To store the currently playing radio station as a preset press and hold the required Preset button 1 5 until the display shows Preset stored The station will be stored using the chosen preset button Repeat this procedure as neede...

Page 31: ...ange Press and release the Tuning Select control to store the preset Preset stored will be shown on the display Repeat this procedure as needed for the remaining presets 4 Stations which are already stored in the presets may be over written by following the procedure above Recalling a preset using the menu 1 Select the Internet radio mode using the Mode button 2 Press and release the Preset button...

Page 32: ...t Radio mode press the Menu button The first item on the menu is Last listened With this item highlighted press the Tuning Select control 2 The display will then show a list of the last ten Internet radio stations or podcasts Rotate the Tuning Select control to highlight whichever you wish to listen to and then press the control to cause your sound system to reconnect to that radio station or podc...

Page 33: ...Displays programme type information e g Pop Classic News etc and the location of the current radio station c Reliability Displays the reliability of the data stream from the station currently being received d Format Displays the bit rate and format of the station being received 1 Description The best new music and entertainment Internet radio 12 34 BBC Radio 2 2 Genre Variety Show country London U...

Page 34: ...tional or alternative information may be displayed when listening to Podcasts Categories displayable can include Episode name Show description Show genre Show language Episode URL Bit rate Codec Sampling rate Whenever the sound system is displaying an information screen as opposed to a menu screen the time is displayed in the top right corner of the display and a WiFi strength or Ethernet connecti...

Page 35: ...n access code This allows it to uniquely identify your Internet radio from the many others that it also provides data for To obtain the access code please follow these steps 2 With your sound system switched on and in Internet Radio mode press the Menu button then select Station list using the Tuning Select control 3 Scroll down the Station List menu to the item called Help Press the Tuning Select...

Page 36: ...the web site use thelink Myaddedstations inthe Myaccount area Todeleteanadded radio station click on the icon with a heart and minus symbol Customising your radio cont Configuring My Favourite Stations 1 Using the web site at http www wifiradio frontier com it is possible to search among the many radio stations that are available by location genre or language You may also choose from new or popula...

Page 37: ... to the required station using one of the methods described on the preceding pages 3 Press and hold the Tuning Select control The display will show Favourite added 4 These stations will be available on your radio from the Internet Radio menu item My Favourites see Selecting your favourite stations overleaf Repeat this procedure as needed to store other favourite stations Smith fav Podcasts Station...

Page 38: ... then press the control to confirm your selection The display will show Connecting while it finds the new station If the station has on demand content that is it gives the option of listening to programmes which have already been broadcast please see page 26 Selecting a podcast BBC Listen again Should you be unable to connect to a particular station please note that some radio stations do not broa...

Page 39: ...per day and some stations are not always on line Inaddition asmentionedonpage33 itispossibletospecifyaudiostreams for My added stations which are not compatible with your sound system In this event the station will not be playable The Roberts Stream 93i can only play MP3 WMA FLAC and AAC internet radio streams Note that the audio coding formats listed are generic terms There are many variations of...

Page 40: ...which have DRM protection is not supported by the sound system WhenusingaUPnPserver thesearchandselectioncriteriaaredetermined by the server software not by the sound system but typically include searching by Artist Album and Genre Many server applications also allow you to access your files according to the folders within which they are stored as well as other criteria Windows Media Player is les...

Page 41: ...en All music or Artist Album etc This will show you the current library contents You may then simply drag and drop files from other locations into the library Alternatively with media files or folders on the screen you may right click on the file or folder and select Include in library and then select Music In this way you can quickly add additional content to your music library 2 In WMP 12 click ...

Page 42: ...t you that there has been a connection to your UPnP server Whether prompted or not in order that the radio may access the music files you will need to click the Library tab in WMP 12 and select the Stream item to open the Media Streaming window Select Automatically allow devices to play my media then select Automatically allow all computer and media devices Alternatively select More Streaming opti...

Page 43: ...ia categories which are made availablebytheUPnPserver forexample Album Artist and Genre Rotate the Tuning Select control to highlight which category you wish to browse then press the control to confirm your choice If you wish to use the search function rotate the Tuning Select control until Search is selected on the display You may select characters to build a keyword for searching for content to ...

Page 44: ...P theywillnormallybelistedintracknumberorder butaswiththesearch criteria this can vary according to the server application used 3 With the first track in the album indicated press the Tuning Select control The album will then begin playing While the sound system is playing from your media library you may use the menus as described above to choose a different selection When you select the track fro...

Page 45: ...to start playback of the previous track in the list 4 Press the Fast forward button to start playback of the next track in the list 5 Press and hold the Fast forward or Rewind button to move through the current track The longer the button is pressed the greater the speed at which the player will move through the track Release the button when the desired point is reached Note that this feature is n...

Page 46: ... disable the Shuffle option press and hold the Preset button The Shuffle icon will show on the display when Shuffle is enabled You may also control the option from the Main Music Player menu 2 Rotate the Tuning Select control until Shuffle play is highlighted 3 ToactivatetheshuffleoptionpresstheTuning Selectcontrolsothat On appears on the display Your selected tracks will be played in random order...

Page 47: ...P server or USB memory 1 a e d c b 1 06 Music player 12 34 Love Me Do 2 21 My Music Music player 12 34 Love Me Do My Music Artist The Beatles Music player 12 34 Love Me Do My Music Album 1 The Beatles Music player 12 34 Love Me Do My Music Bit rate 192 kbps Codec WMA Sampling Rate 44 1 kHz Music player 12 34 Love Me Do My Music Playback buffer f Music player 12 34 Love Me Do My Music Today s Date ...

Page 48: ...ess WMA Voice WMA 10 Professional nor files of any format which have DRM protection Recommendations Unless you have only a few files on the USB memory device do not place all files in the root folder The number of items files sub folders in any folder should be less than 2000 Searching and playback will be more responsive if the number of files in any one folder is limited we suggest not more than...

Page 49: ...e Music Player mode is selected 3 Rotate the Tuning Select control until USB playback is highlighted on the display and press the control The sound system will now list the content stored on the USB memory device If there are many files or folders this may take a few seconds 4 Rotate the Tuning Select control to highlight the required folder and press the control to enter the current folder The li...

Page 50: ...mory device press and hold the Tuning Select control and the display will show Added to My playlist 2 The track will be added to the playlist for playback later Adding an entire album or folder 3 When using a UPnP server or a USB memory device highlight the chosen album artist or folder and press and hold the Tuning Select control The display will show Added to My playlist 4 Each of the tracks wit...

Page 51: ...display Press the control to enter the playlist 3 Rotate the Tuning Select control until the track you wish to erase is highlighted Press and hold the Tuning Select control 4 You will be asked to confirm the deletion To delete the track rotate the Tuning Select control until YES is highlighted on the display then press the control to confirm the deletion 5 If you do not wish to delete the track fr...

Page 52: ...laylist is highlighted on the display Press the control 3 To play the playlist from a particular track rotate the Tuning Select control until the desired track is highlighted then press the control to start play 4 While playing from the playlist you can use this function to jump to a particular track within the playlist 5 Whileplayingfromtheplaylist youmayaddadditionaltracksoralbums or remove spec...

Page 53: ... sound system Prune servers Prune shared media wake on LAN servers USB playback My playlist Repeat play Off Shuffle play Off Clear My playlist Prune servers Music player DAD Les JENNY Jenny s music HOME_PC Mum s music Shared media 50 Prune servers YoursoundsystemstoresdetailsofUPnPserversthatithasseenviaitsnetwork connection in its internal memory If you use the sound system at different locations...

Page 54: ...ther computer types and for handheld devices using Apple s iOS or Android operating systems In this mode the sound system acts as a UPnP Renderer 1 In order to use the Play to function the sound system must be actively connected to the network The first time that you use the Play to function you will need to allow Windows to recognise your sound system To do this please go to step 2 If you have pr...

Page 55: ...e playback using the sound system s controls while it is in DMR mode 8 While playing you may select additional content within Windows and again use the Play to function see steps 3 5 The additional tracks will be added to the playlist in the current Play to window You may also delete or change the order of tracks within the Play to window 9 When you wish to exit DMR mode simply either switch off y...

Page 56: ...em remotelycontrolledfromyouriPhone iPadorAndroiddevice ConnectalsoallowsyoutotransfertheplayingofthesoundtootherSpotify Connect enabled devices under the control of your tablet or smart phone Spotify Connect compatibility is shown with the following identifier Setting up Spotify Connect For more details about setting up Spotify Connect please go to spotify com connect TouseSpotifywithyourStream93...

Page 57: ...ndroid device are connected to the same network and that you have downloaded the latest Spotify app on your device 3 Simply open Spotify on your Apple iOS Android device and tap the Spotify Connect icon on the play screen When the Spotify app has identified other devices that are compatible with Connect the Connect icon will be shown with a circle When another device is playing the Spotify Connect...

Page 58: ...ase the Play button playback will resume from the point where it was paused 3 Press the Forward button to start playback of the next track in the current Spotify playlist 4 Press the Rewind button to start playback of the previous track in the current Spotify playlist 5 RotatetheVolumecontroltosettherequiredvolumelevel Thevolume may also be controlled from within the current Spotify app Artist Edg...

Page 59: ...ent track is taken d Bit rate Displays the bit rate and sampling rate of the track currently playing e Playback buffer Displays the radios internal buffer level Whenevertheradioisdisplayinganinformationscreen thetimeisdisplayed in the top right corner of the display and a WiFi strength indicator is shown in the bottom right corner 1 Artist Edgar Froese Spotify 12 34 Magic Lantern Album Beyond the ...

Page 60: ...ions at the top of the web page allow you to specify the data rate used either 96k 160k or 320k bits per second Select the rate according to your needs For example listening at a rate of 320kbps for 1 hour each day for a month equates to approximately 4 5 gigabytes of data usage If you have a low data allowance you may wish to choose one of the lower data rates 3 The new data rate will be used by ...

Page 61: ...d system The bar graph indicates the progress of the scan 5 When scanning is completed the radio will list the stations found in numeric alpha order 0 9 A Z unless it has previously been tuned to a DAB station Rotate the Tuning Select control to scroll through the list of available DAB radio stations Press the Tuning Select control to select the highlighted station The display may show Connecting ...

Page 62: ...tem It may still be available The use of the radio station presets is described on page 72 Secondary services Some DAB radio stations can have one or more secondary stations associated with them Typically these are not broadcast continually If a station has a secondary station available then the secondary will appear in the list of station names beneath the main or primary station Examples are the...

Page 63: ...ltiplex Frequency to which the current station belongs as well as its broadcast frequency d Signal error strength Displays the signal error and strength for the station being listened to A lower error number indicates a better quality of radio signal The signal strength graph can be used when positioning the radio or its antenna For good reception the graph should occupy three or more blocks Heart...

Page 64: ...one is available a message No DL is displayed Asignal strength indicator is always shown in the lower area of the display on the right hand side If the broadcast being received is in stereo then the stereo speaker symbol will be shown If the currently tuned station has been stored as a preset then the preset number will also be shown see page 72 Bit rate 128 kbps Codec MP2 Channels Joint Stereo DA...

Page 65: ...button as needed to select DAB Radio mode 2 Once in DAB mode press the Menu button 3 Rotate the Tuning Select control until Scan is highlighted on the display 4 Press the Tuning Select control to initiate the scan The display will show Scanning and your radio will perform a scan of the Band III DAB frequencies As new stations are found the station counter will increase and stations will be added t...

Page 66: ...e name of the DAB multiplex found if any A bar graph shows the signal strength and is useful if you need to reposition the sound system or its aerial The minimum signal marker I which separates the left and right parts of the signal graph shows the minimum signal level required for satisfactory reception Any new radio stations found on the tuned DAB multiplex will be added to the list stored in th...

Page 67: ...ustment mode The current DRC setting will be indicated with an asterisk 6 Rotate the Tuning Select control to highlight the required DRC setting the default is Off DRC Off DRC is switched off Broadcast DRC will be ignored DRC high DRC is set as sent by broadcaster DRC low DRC level is set to 1 2 that sent by broadcaster 7 Press and release the Tuning Select control to confirm the setting Note Not ...

Page 68: ...nter the station order adjustment mode 5 Rotate the Tuning Select control to choose between Alphanumeric Ensemble and Valid Alphanumeric sorts the station list alpha numerically 0 9 A Z Ensemble organises the station list by DAB multiplex Valid shows only those stations for which a signal can be found The current setting is indicated by an asterisk 6 Press the Tuning Select control to select the r...

Page 69: ... the Tuning Select control until Prune invalid is highlighted Press the Tuning Select control 5 To cause the stations list to be pruned eliminating unavailable stations rotatetheTuning Selectcontroluntil YES ishighlightedonthedisplay 6 Press the Tuning Select control to cause the invalid station names to be removed from the station list If you do not wish to prune stations highlight NO and then pr...

Page 70: ...ion name If you only hear hiss or interference simply press the Tuning Select control to scan further Your sound system may have found a spurious interference signal 5 To find more FM stations press the Tuning Select control to repeat the scan operation To scan down in frequency rotate the Tuning Select control in a anti clockwise direction first and then press the control Your radio will scan dow...

Page 71: ...ng Select control to control the frequency that the radio will tune to The frequency will change in steps of 50kHz When the end of the waveband is reached the radio will recommence tuning from the opposite end of the waveband 4 Use the Volume control to adjust the sound level as needed 68 FM Radio 2 1 4 3 http Internet Radio DAB Radio My Music FM Radio AUX FM Radio FM 12 34 103 40MHz FM Radio ...

Page 72: ...nly be able to display the frequency There will be no text or programme type information available under these conditions Thesoundsystemonlyprovidesdisplayswhenthereisinformationavailable So if there is no text for example that display is not available The RDS indicator at the bottom of the display shows that there is some RDS data present in the broadcast being received The stereo speaker display...

Page 73: ...gnals are found during scanning rotate the Tuning Select control until YES is highlighted Press the Tuning Select control to confirm the setting Normally this will restrict scanning to local transmissions Alternatively to set your radio so that all available stations are found during scanning local and distant transmissions rotate the Tuning Selectcontroluntil NO ishighlighted PresstheTuning Selec...

Page 74: ...er the audio setting mode The current setting is indicated with an asterisk 4 To switch to mono in order to reduce the hiss from a weak FM signal rotate the Tuning Select control until YES is highlighted Press the Tuning Select control to confirm the setting Alternatively to return to the normal automatic stereo or mono mode rotate the Tuning Select control until NO is highlighted Press the Tuning...

Page 75: ...eeded for the remaining presets 4 Stations which are already stored in the presets may be over written by following the above procedure Note The radio station presets are retained in memory when the sound system is switched off and disconnected from the mains supply Recalling a preset using preset buttons 1 5 1 Press the On Standby button to switch on your sound system 2 Select the required operat...

Page 76: ... on the display Repeat this procedure as needed for the remaining presets 4 Stations which are already stored in the presets may be over written by following the procedure above Recalling a preset using the menu 1 Select the DAB or FM mode using the Mode button 2 Press and release the Preset button to display the Recall from Preset menu 3 Use the Tuning Select control to select the desired preset ...

Page 77: ...n 1 With your sound system switched on press the Menu button to access the menu for the current mode 2 Rotate the Tuning Select control until System settings is highlighted on the display Press the control to enter the System Settings menu 3 Rotate the Tuning Select control until Time Date is highlighted on the display Press the control to enter the time setup 4 Rotate the Tuning Select control un...

Page 78: ...ect control until Set format is highlighted on the display Press the control to enter the Clock Format menu The current clock display format is marked with an asterisk 5 Rotate the Tuning Select control to select either 12 or 24 hour format Press the control to confirm your choice of clock format The display will then revert to the previous menu If the 12 hour clock format is chosen the radio will...

Page 79: ...nge from winter to summer time go to step 13 To change the current time or date setting rotate the Tuning Select control until Time Date is highlighted on the display then press the control to enter the time and date setting screen 5 Rotate the Tuning Select control until Set Time Date is highlighted on the display Press the control to enter the clock setup The day digits will flash 6 Rotate the T...

Page 80: ...to confirm the setting Press the Menu button to exit or go to step 13 to set the summer winter time option 13 Rotate the Tuning Select control until Daylight savings is highlighted on the display then press the control The asterisk shows the current setting In the UK ON is equivalent to British Summer Time OFF is equivalent to Greenwich Mean Time 14 Rotate the Tuning Select control to highlight ON...

Page 81: ... system is switched on either press and release the Alarm button or alternatively press the Menu button to access the menu for the current mode Rotate the Tuning Select control until Main menu is highlighted on the display Press the control to enter the Main menu 4 Rotate the Tuning Select control until Alarms is highlighted on the display Pressthecontroltoseethecurrentalarmsettings Ifnochange is ...

Page 82: ... Daily the alarm will sound everyday Once the alarm will sound once Weekends the alarm will sound only at weekends Weekdays the alarm will sound on weekdays only Rotate the Tuning Select control to choose the required alarm frequency option Choosing Off will disable the alarm Press the control to confirm the selection If you choose to set the alarm to Once you will also need to set the date using ...

Page 83: ...ms with the new alarm setting shown in the display If you decide not to save the settings press the Back button The display will show Save changes with a YES or NO option Rotate the Tuning Select control to choose NO and then press the control Alarm not saved will show on the display Active alarms are shown using small alarm indicators at the bottom of the playing displays and on the clock display...

Page 84: ...emaining snooze time is shown next to the flashing alarm icon on the clock display 3 In order to cancel the Snooze timer while the alarm is suspended press the On Standby button The display will briefly show an Alarm Off message Disabling alarms 1 To disable an alarm while the radio is in standby mode press and release the Alarm button to cycle through the alarm on off options see page 78 step 1 2...

Page 85: ...ween 15 and 120 minutes or to Off 5 Your sound system will switch into Standby mode after the preset time has elapsed An active sleep timer is shown using a small timer indicator at the bottom of the playing displays This indicator also shows the sleep time remaining before the radio switches itself into Standby mode 6 To cancel the sleep time before the preset time has elapsed and to turn off the...

Page 86: ...the Tuning Select control until System settings is highlighted on the display Press the control to enter the System Settings menu 3 Rotate the Tuning Select control until Equaliser is highlighted on the display Press the control 4 Rotate the Tuning Select control to cycle through and highlight the various modes Press the control to confirm your selection a Normal Flat b Jazz c Rock d Movie e Class...

Page 87: ...ress the control to enter adjustment mode and rotate the control until the desired level between 14 and 14 is displayed The sound will change as you turn the control Press the control when you are happy with the treble setting 5 Press the Back button and the display will prompt you to save the changes If you wish to save the changes rotate the control to highlight YES If you do not wish to save th...

Page 88: ...witched on rotate the Tuning Select control until Normal is highlighted on the display To adjust the display brightness when the radio is in standby rotate the Tuning Select control until Standby is highlighted Press the control to enter the selected brightness adjustment mode The current setting will be marked with an asterisk 4 Rotate the Tuning Select control to choose either the High Medium or...

Page 89: ...ired Headphone socket A 3 5mm Headphone Socket located on the rear of your sound system is provided for use with headphones Inserting a plug automatically mutes the internal loudspeaker Please be aware that the sensitivity of headphones can vary widely We therefore recommend setting volume to a low level before connecting headphones to the sound system IMPORTANT Excessivesoundpressurefromearphones...

Page 90: ...d to set its output to maximum to get an adequate audio signal level 5 After use disconnect your player in order to listen to your sound system conventionally 3 1 http Internet Radio DAB Radio My Music FM Radio AUX AUX in Inactive Standby feature In order to minimise its energy consumption when not in use your sound system includes an automatic Inactive Standby feature This is designed to put your...

Page 91: ...ether with any preset stations will be erased and your wireless network connection details will be lost All configuration settings will be restored to their defaults the clock and alarms will be reset Factory reset Proceed 1 Information 1 4 DAB FM AUX in Sleep Alarms System settings Main menu Equaliser Network Time Date Brightness Language Factory Reset System settings In case of malfunction for a...

Page 92: ...e sound system will check to see if an update is available The display will show Checking for new versions If there are no updates then the display will show Software up to date If a software update is available your radio will then offer the choice of updating the software or not displaying New version available Update software Select the YES option if you wish to go through the update process 3 ...

Page 93: ...play Press the control to enter the System Settings menu 2 Rotate the Tuning Select control until Network is highlighted on the display Press the control to enter the Network Settings menu 3 Rotate the Tuning Select control until Network profile is highlighted on the display Press the control to see the stored profiles The profile which is currently in use if any is marked with an asterisk 4 To re...

Page 94: ...e press the Menu button Rotate the Tuning Select control until Station list is highlighted on the display Press the Tuning Select control 2 Rotate the Tuning Select control until Help is highlighted on the display Press the Tuning Select control to enter the Help menu 3 Rotate the Tuning Select control until FAQ is highlighted Press the control to display some frequently asked questions 4 Rotate t...

Page 95: ...to display the current network settings 5 Rotate the Tuning Select control until the IP address is showing on the display This is the local IP address used by your radio on your network In the example screen to the right the IP address is 192 168 1 27 Make a note of the IP address shown on your sound system s display for the next stage 6 Ensure that your computer is on the same network as the soun...

Page 96: ...he help section on our web site If you have difficulty connecting the radio to your computer network some of these steps may help to resolve the problem 1 Confirm that a WiFi connected PC can access the Internet i e can browse the web using the same network 2 Check that a DHCP server is available normally a router function Your radio will by default use DHCP unless you choose to disable it This ma...

Page 97: ...ebroadcasters suchastheBBC provide different data streams for PC users and Internet radio listeners so this test is not always conclusive If you cannot play the station via your PC this may indicate that the problem is not necessarily due to your radio but it could be your network your internet connection the broadcaster or internet congestion Music Player UPnP problems The use of the Music Player...

Page 98: ...ols even within UPnP In general your radio will play the supported formats with most common UPnP servers The following table summarises the maximum supported bit rates for the various audio formats that are playable on your radio Higher rates may be playable in some cases but performance of the product may be affected Codec Maximum supported data rate AAC LC HE HE V2 320 kbits sec FLAC 1 1 5 Mbits...

Page 99: ...adaptor or the radio It is recommended to operate the product such that there is a minimum distance 10cm recommended to adjacent objects in order to ensure good ventilation The ventilation of the product should not be restricted by covering it with items such as newspapers tablecloths curtains etc No naked flame sources such as lighted candles should be placed on the product It is recommended to a...

Page 100: ...tion Frequency Coverage FM 87 5 108MHz DAB 174 928 239 200MHz Circuit features Loudspeaker 2 x 34 mm Subwoofer 1 x 76mm Output Power Tweeter 3 8W into 4 ohms Subwoofer 4 4W into 6 ohms Headphone socket 3 5mm diameter stereo Aux In socket 3 5mm diameter stereo Line out socket 3 5mm diameter stereo Aerial System WiFi Built in antenna DAB Telescopic aerial FM Telescopic aerial The Company reserves th...

Page 101: ...duct is protected by certain intellectual property rights of Microsoft Use or distribution of such technology outside of this product is prohibited without a license from Microsoft Microsoft Real Time Streaming Protocol RTSP This product is protected by certain intellectual property rights of Microsoft Use or distribution of such technology outside of this product is prohibited without a license f...

Page 102: ...99 Notes ...

Page 103: ... under guarantee Procedure Any claim under this guarantee should be made through the dealer from whom the product was purchased It is likely that your Roberts dealer will be able to attend to any defect quickly and efficiently but should it be necessary the dealer will return the product to the company s service department for attention In the event that it is not possible to return the product to...

Page 104: ...Issue 1 ROBERTS RADIO LIMITED PO Box 130 Mexborough South Yorkshire S64 8YT Website http www robertsradio com 2014 Roberts Radio Limited ...

Reviews: