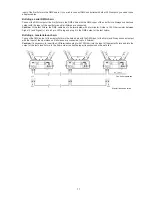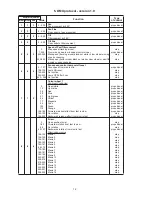
6
7
4. Installation
4.1 Fitting the lamp
DANGER ! Install the lamps with the device switched off only.
Unplug from mains before !
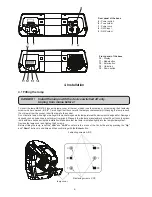
To insert the lamp MSR 575/2 loosen the lamp cover at the rear of head (see the drawings ) by remowing the 3 fastening
screws which are marked
„X,Y,Z”
. Carefully pull out the cover with the lamp socket assembly.If changing the lamp, remove
the old lamp from the socket. Insert the lamp to the socket.
Do not install a lamp with a higher wattage! A lamp like this generates temperatures the device is not designed for. Damages
caused by non-observance are not subject to warranty. Please follow the lamp manufacturer‘s notes! Do not touch the glass-
-bulb with bare hands during the installation! Make sure that the lamp is installed tightly into the lampholder system.
Reclose the lamp cover and tighten the 3 screws.
Before striking the lamp, reset the
“LAti”
and
“LASt”
counter s in the menu of the Control Board, by pressing the
“Up”
and
“Down”
buttons in one time and then confirming with the
Enter
-button.
Front panel of the base
10 -
Display
11 -
Mode-button
12
- Enter-button
13
- Up-button
14
- Down-button
Rear panel of the base
5 -
Power switch
6
- Fuse holder
7
- Power cord
8
- DMX input
9
- DMX output
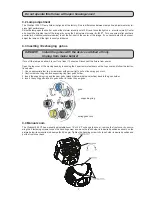
3 fastening screws X,Y,Z
3 adjusting screws A,B,C
lamp cover
Summary of Contents for clubspot 500 CT
Page 1: ...Version 1 1 ...
Page 2: ......
Page 24: ...24 Beampath Dimensions mm Weight net EU version 31 7 kg US version 35 6 kg ...
Page 26: ...26 ...


