background image

24

25

EN

EN

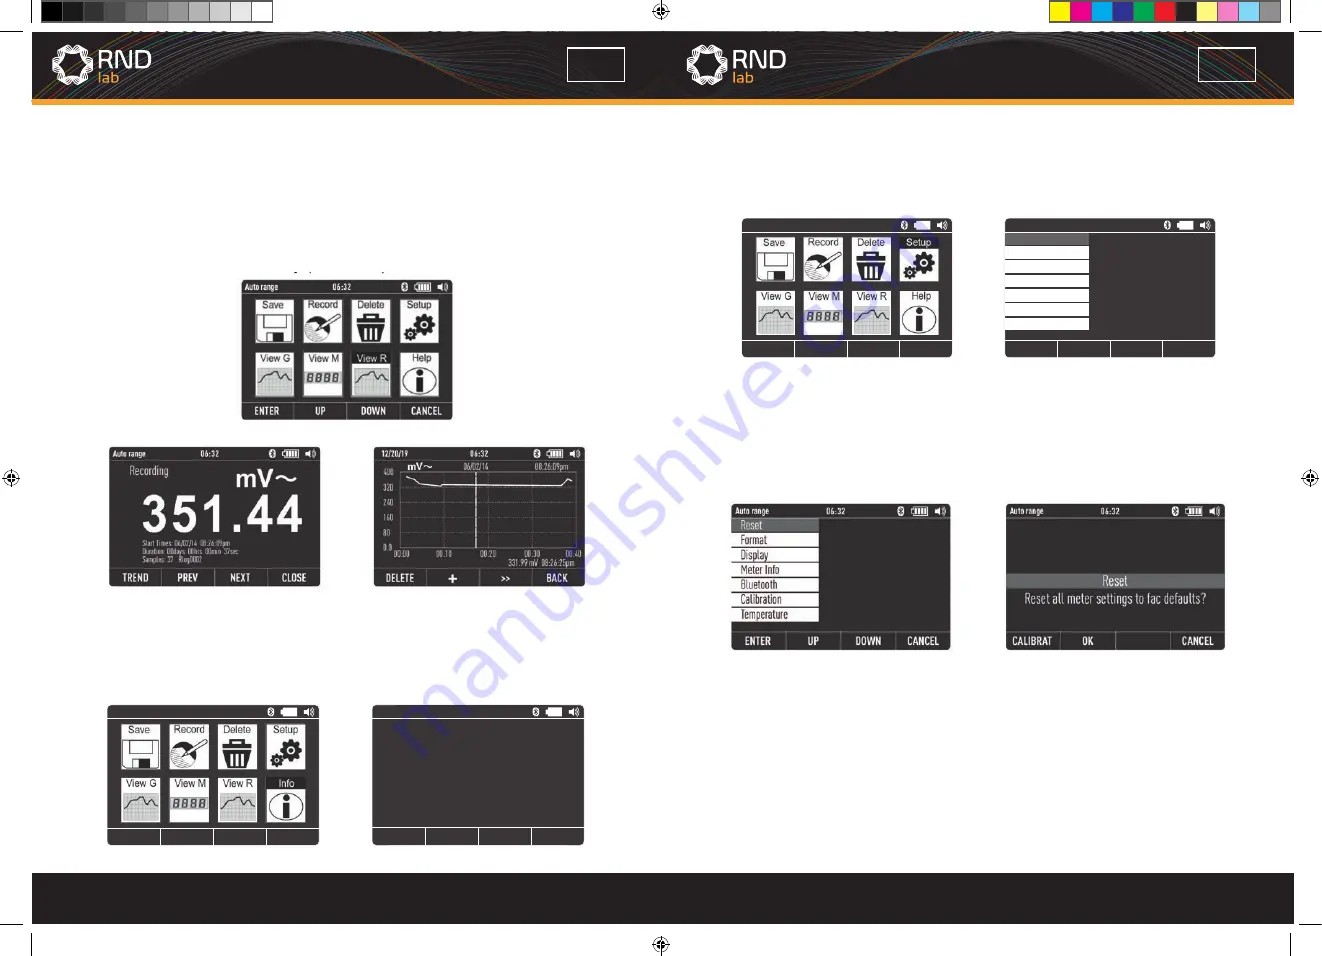
5-12.Info

• Viewing data stored in the Meter’s memory is performed through the save menu.
• Press the 

DOWN

 Button (

F3

), position the menu selector next to the menu item labeled  


Info

 and pressing the the 

ENTER

 Button (

F1

).

Auto range 

06:32

ENTER

UP

DOWN

CANCEL

Auto range 

06:32

DOWN

CLOSE

UP

g

r

6.Setup Options

• Viewing data stored in the Meter’s memory is performed through the save menu.
• Press the 

DOWN

 Button (

F3

), position the menu selector next to the menu item label      


Setup

 and pressing the 

ENTER

 Button (

F1

).

Auto range 

06:32

ENTER

UP

DOWN

CANCEL

Auto range 

06:32

ENTER

UP

DOWN

CANCEL

Reset

Format
Display
Meter Inf
Bluetooth
Calibration
Temperature

6-1.Resetting Meter

• The Meter’s setup options can be reset to default values through the setup menu.
• Open the setup menu, position the menu selector next to the menu item labeled

 Reset 


   and press


the 

ENTER

 Button

 (F1).

• Then a message will appear asking to confirm the reset action.
• Press the 

OK

 Button (

F2

) to perform the reset.

6-2.Meter Info

• The Meter Info selection lists the serial number, firmware version, are displayed.
• Open the setup menu, position the menu selector next to the menu item labeled 

Meter   

   Info

 and press the 

ENTER

 Button (

F1

).

DOWN

DOWN

Fno. Graph- According to graphically display 
measurement information

Fno. Mode-Related to the rotary switch function

Fno. Save-Accesses the memory management
menu for saving measuremnt, setting up recording
sessions, or viewing and deleting stored 
measurements from memory

CLOSE

DOWN

DOWN

5-11.Viewing Trend Data

• Viewing data stored in the Meter’s memory is performed through the save menu.
• Press the 

DOWN

 Button (

F3

), Position the menu selector next to the menu item labeled  


ViewR

 and pressing the 

ENTER

 Button (

F1

).

• Press the the 

TREND

 Button (

F1

).

• Press the + Button (

F2

) to increase graph resolution, press the >> Button (

F3

) to 

   move cursor.

Summary of Contents for 355-00010

Page 1: ...www rnd electronics com True RMS Autoranging Digital Multimeter User Manual RND 355 00010...

Page 2: ...service 2 Safety 2 1 Safety Symbols This symbol adjacent to another symbol terminal or operating device indicates that the operator must refer to an explanation in the operating instructions to avoid...

Page 3: ...y Cycle Diode Test Continuity Temperature Surge Protection 8kV peak per IEC 61010 Maximum Input V DC or V AC 800mA 1000V fast acting fuse 10A 1000V fast acting fuse 10A for 30 seconds max every 10 min...

Page 4: ...for APO F4 Software Key Default modes MIN MAX starts and stops MIN MAX recording RANGE Button Into manual range and select range of the measure if pressing the Range Button for greater that 1 second w...

Page 5: ...he red test lead into the Positive Input Jacks 3 Position the black test probe tip and red test probe tip respectively in the spots of the circuit to be measured 4 Read the AC voltage in the display O...

Page 6: ...5 Read the mV voltage in the display 500 00 Auto range 06 32 GRAPH 500 300 100 01 00 300 500m V MODE SA VE MAX mV OFF CAP mA AUT O POWER OFF 10A mA A 10A V 10A 800mA FUSED COM CAT IV 600V CAT III 100...

Page 7: ...o the 10A Input Jack 5 Press the MODE Button F2 to indicate AC on the display 6 Remove power from the circuit under test then open up the circuit at the point where you wish to measure current 7 Touch...

Page 8: ...st lead into the COM Input Jack and the red test lead into the Positive Input Jacks 4 Position the black test probe tip and red test probe tip respectively in the spots of the circuit to be measured 5...

Page 9: ...CAT III 1000V True RMS Autoranging Digital Multimeter 30 sec MAX every 15 min IP67 WA TERPROOF V V CAP Hz Temp A AC DC Hz Temp C F LPF mA 4 20 mV Bluetooth RANGE HOLD REL F1 F2 F4 F3 V 4 12 Capacitan...

Page 10: ...Button F2 to indicate C or F 4 Touch the Temperature Probe head to the part whose temperature you wish to measure Keep the probe touching the part under test until the reading stabilizes About 30 sec...

Page 11: ...ys change function to allow saving the collected data Pressing the CLOSE Button F4 exits the MAX MIN record session without saving the collected data To save the MAX MIN screen data the MAX MIN sessio...

Page 12: ...e menu Press the DOWN Button F3 position the menu selector next to the menu item labeled ViewG and pressing the ENTER Button F1 Press the Button F2 and the Button F3 to move cursor 5 10 Recording Meas...

Page 13: ...o the menu item labeled Reset and press the ENTER Button F1 Then a message will appear asking to confirm the reset action Press the OK Button F2 to perform the reset 6 2 Meter Info The Meter Info sele...

Page 14: ...DO WN CANCEL Reset Format Display Meter Info Bluetooth Calibration Temperature Auto range 06 32 CL OSE Format DO WN UP EDIT Beeper Numeric Format Date Format Time Format Auto range 06 32 CANCEL Forma...

Page 15: ...t 6 8 Set Font Open the setup menu position the menu selector next to the menu item labeled Display and press the ENTER Button F1 Then Position the menu selector next to the menu item labeled Select F...

Page 16: ...e Fuses WARNING To avoid electric shock disconnect the test leads from any source of voltage before removing the meter cover WARNING To avoid electric shock do not operate your meter until the fuse co...

Page 17: ...0Hz 1kHz 3 0 5 digits 1 5 10 digits 5kHz 3 0 5 digits 20kHz 1 5 5 20 digits 3 5 10 digits Unspecified Unspecified Unspecified 500mV 2 5V 50V 500V 1000V 0 01mV 0 0001V 0 001V 0 01V 0 1V 0 1 5 digits 0...

Page 18: ...C 50 C Temp Rang accuracy 3 5 C 10 2 General Specifications Enclosures Double molded Shock 6 5 feet 2 meters Waterproof IP67 Diode Test Test current of 1 5mA maximum open circuit voltage 3 2V DC typi...

Page 19: ...EN61010 1 and IEC61010 1 2nd Edition 2001 to Category IV 600V and Category III 1000V Pollution Degree 2 The meter also meets UL 61010 1 2nd Edition 2004 CAN CSA C22 2 No 61010 1 2nd Edition 2004 and U...

Page 20: ...bei normalem Gebrauch besonders gef hrlichen Spannungen ausgesetzt sein k nnen Um maximale Sicherheit zu gew hrleisten d rfen das Messger t und seine Messleitungen nicht angefasst werden wenn diese An...

Page 21: ...in IP67 t TERPROOF V V CAP Hz Temp A AC DC Hz Temp C F LP F mA 4 20 mV _ RANGE HOLD REL F1 F2 F4 F3 1 2 6 4 5 7 8 9 10 11 12 3 13 14 42 DE 3 2 Erl uterung der Anzeige 1 Softtastenbezeichnungen zeigen...

Page 22: ...m verwenden die V OHM und COM Eingangsklemmen Zwei Stromeingangs Klemmen f r 500 mA und 10 A Strommessung 10 A Eingang f r Strom von 0 A bis 10 00 A 20 A berlast f r 30 Sekunden Ein 10 Minuten Aus AmA...

Page 23: ...AC DC Spannungsmessungen 1 Stellen Sie den Funktionsschalter auf die Position V DC AC DC 2 Stecken Sie die schwarze Messleitung in die COM Eingangsbuchse und die rote Messleitung in die positive Einga...

Page 24: ...Stromkreises 8 Legen Sie Strom an den Stromkreis an 9 Lesen Sie auf der Anzeige den Stromwert ab 48 DE OFF CAP mA AUT O POWER OFF 10A mA A 10A V 10A 800mA FUSED COM CAT IV 600V CAT III 1000V True RMS...

Page 25: ...in die positive Eingangsbuchse 3 Positionieren Sie die Spitzen der schwarzen und der roten Pr fspitzen jeweils an den Stellen des zu messenden Stromkreises 4 Lesen Sie auf der Anzeige den Frequenzwer...

Page 26: ...ROOF V V CAP Hz Temp A AC DC Hz Temp C F LPF mA 4 20 mV Bluetooth RANGE HOLD REL F1 F2 F4 F3 52 DE 25 000 Auto range 06 32 01 00 2003 00 400 500 MODE SA VE MAX OFF CAP mA AUT O POWER OFF 10A mA A 10A...

Page 27: ...utoranging Digital Multimeter 30 sec MAX every 15 min IP67 WA TERPROOF V V CAP Hz Temp A AC DC Hz Temp C F LPF mA 4 20 mV Bluetooth RANGE HOLD REL F1 F2 F4 F3 50 00 Auto range 06 32 nF MODE SA VE MAX...

Page 28: ...zu aktivieren dr cken Sie die MAX Taste F4 im Messmodus Wie in der Abbildung dargestellt werden die Messger te oben auf der Seite f r Messungen angezeigt w hrend das MAX MIN Startdatum und die Uhrzei...

Page 29: ...en Sie die Taste SAVE Speichern F3 um in das Speicher Men zu gelangen Auto range 06 32 ENTER UP DO WN CANCEL 5 7 Speichern einzelner Messdaten Bei allgemeinen Messfunktionen wird durch Dr cken der Tas...

Page 30: ...y empty Dauer festlegen 00 Tage 00 Stunden 01 Minuten Sample Intervall festlegen 00 Minunten 01 Sekunde Aufzeichnung starten Batterie fast leer NACH UNTEN NACH UNTEN 60 DE 5 12 Info Die Anzeige der im...

Page 31: ...eigt ffnen Sie das Setup Men positionieren Sie den Men wahlschalter neben dem Men punktmit der Bezeichnung Meter Info Messger teinformation und dr cken Sie die Taste ENTER F1 NACH UNTEN NACH UNTEN 62...

Page 32: ...TER F1 Positionieren Sie dann den Men wahlschalter neben dem Men punkt mit der Bezeichnung Auto Power Off automatische Stromabschaltung und dr cken Sie die Taste EDIT Bearbeite F1 Um die Abschaltautom...

Page 33: ...en Sie die Taste OK F1 Die Bluetooth App kann auf Handys installiert werden Der empfohlene Kommunikationsabstand zwischen Mobiltelefon und Multimeter sollte 5 5 m nicht berschreiten Wenn die Verbindun...

Page 34: ...icherung aus der Halterung schieben 4 Setzen Sie nur die angegebenen Ersatzsicherungen ein 5 Setzen Sie die Baugruppe Akkufachabdeckung wieder ein und sichern Sie sie indem Sie die Schraube eine halbe...

Page 35: ...001 mA 0 01 mA 0 001 A 0 5 5 Stellen 0 3 8 Stellen 0 5 8 Stellen 70 DE 500 A 5000 A 50 mA 500 mA 10 A 0 01 A 0 1 A 0 001 mA 0 01 mA 0 001 A 50 60 Hz 0 8 5 Stellen 5 kHz 3 5 Stellen 10 A Max 30 Sek mit...

Page 36: ...Messger te messen bei jedem Signaltyp genau ACV Bandbreite 50 Hz bis 20 000 Hz Anzeige TFT LCD mit 50 000 Z hlwerten Die Bereichs berschreitungsanzeige OL wird angezeigt Automatische Stromabschaltung...

Page 37: ...www rnd electronics com...

Reviews: