background image


User's Guide HDSPe AES

 © RME

53


26. TotalMix: The Matrix 


26.1 Overview 

 
The mixer window of TotalMix looks and operates similar to mixing desks, as it is based on a 
conventional stereo design. The matrix display presents a different method of assigning and 
routing channels, based on a single channel or monaural design. The matrix view of the HDSP 
has the looks and works like a conventional patchbay, adding functionality way beyond compa-
rable hardware and software solutions. While most patchbays will allow you to connect inputs to 
outputs with just the original level (1:1, or 0 dB, as known from mechanical patchbays), TotalMix 
allows you to use a freely definable gain value per crosspoint. 
 
Matrix and TotalMix are different ways of displaying the same processes. Because of this both 
views are always fully synchronized. Each change in one view is immediately reflected in the 
other view as well. 


26.2 Elements of the Matrix View 

 
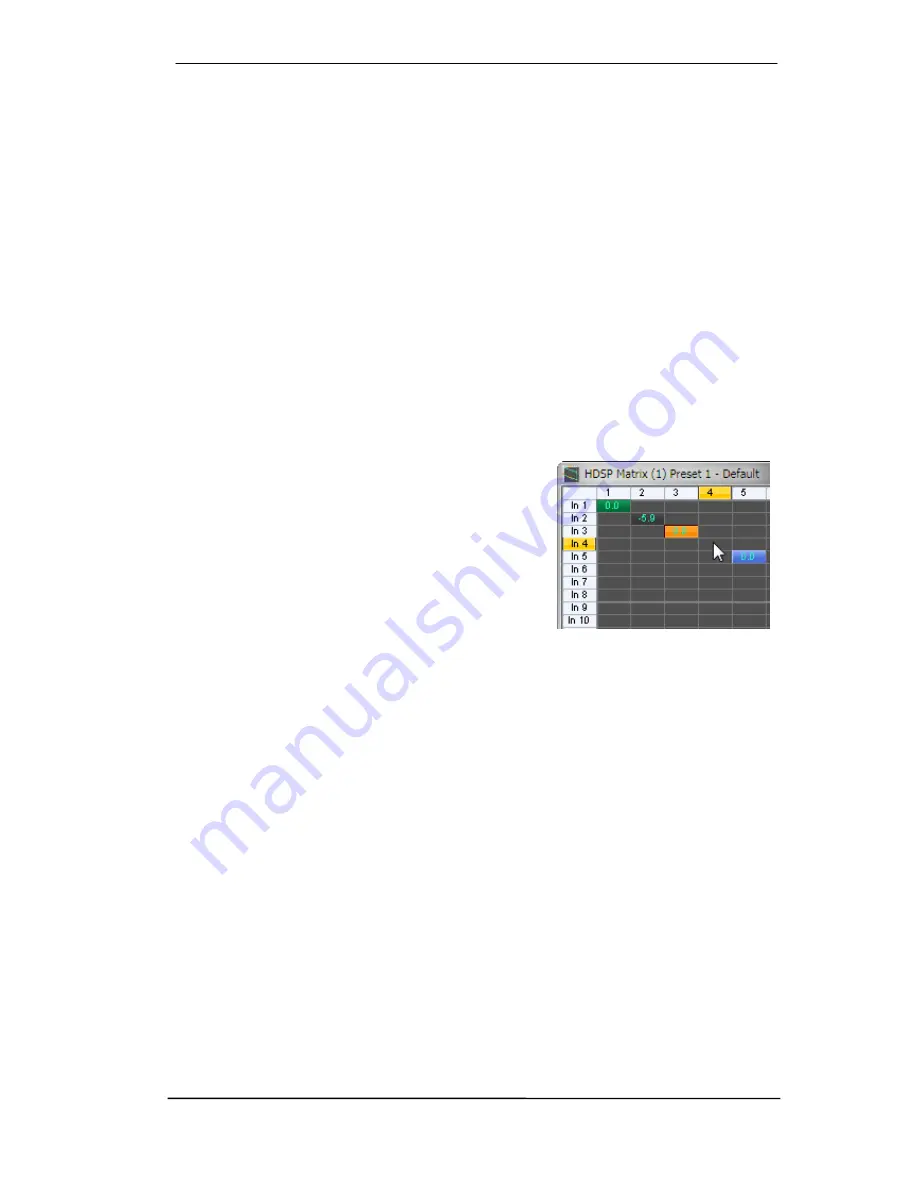
The visual design of the TotalMix Matrix is mainly determined by the architecture of the HDSP 
system:  
 

  Horizontal labels: All hardware outputs 


  Vertical labels: All hardware inputs. Below are all play-

back channels (software playback channels) 


  Green 0.0 dB field: Standard 1:1 routing 


  Black gain field: Shows the current gain value as dB 


  Orange gain field: This routing is muted. 


  Blue field: Phase 180° - inverted. 

 
To maintain overview when the window size has been reduced, the left and upper labels are 
floating. They won't leave the visible area when scrolling. 


26.3 Operation 

 
Using the Matrix is a breeze. It is very easy to indentify the current crosspoint, because the 
outer labels light up in orange according to the mouse position. 
 
If input 1 is to be routed to output 1, use the mouse and click one time on crosspoint 

In 1

 / 

1

The green 0.0 dB field pops in, another click removes it. To change the gain (equals the use of 
a different fader position, see simultaneous display of the mixer view), hold Ctrl down and drag 
the mouse up or down, starting from the gain field. The value within the field changes accord-
ingly. The corresponding fader in the mixer view is moving simultaneously, in case the currently 
modified routing is visible. 
 
A gain field marked orange indicates activated mute status. Mute can only be changed in the 
mixer view. 
 
A blue field indicates phase inversion. This state is displayed in the Matrix only, and can only be 
changed within the Matrix view. Hold down the Shift-key while clicking on an already activated 
field. Mute overwrites the phase display, blue becomes orange. If mute is deactivated the phase 
inversion is indicated again. 

Summary of Contents for Hammerfall HDSPe AES

Page 1: ...mmerfall DSP System HDSPe AES PCI Express Digital I O Card 32 Channels AES EBU Interface 24 Bit 192 kHz Digital Audio 32 x 16 Matrix Router 2 x MIDI I O TotalMix 24 Bit 192 kHz 9 SyncAlign ZLM SyncChe...

Page 2: ...and Firmware 10 1 Driver Installation 12 10 2 Driver Update 12 10 3 De Installing the Drivers 13 10 4 Firmware Update 13 11 Configuring the HDSPe AES 11 1 Settings Dialog 14 11 2 Settings Dialog Pitch...

Page 3: ...DIGICheck Mac 32 22 Hotline Troubleshooting 32 Connections and TotalMix 23 Connections 23 1 AES EBU Inputs 34 23 2 AES EBU Outputs 35 23 3 MIDI 36 24 Word Clock 24 1 Word Clock Input and Output 37 24...

Page 4: ...oup Loopback 56 27 6 Using external Effects Devices 57 27 7 MS Processing 58 28 TotalMix MIDI Remote Control 28 1 Overview 59 28 2 Mapping 59 28 3 Setup 60 28 4 Operation 60 28 5 Simple MIDI Control 6...

Page 5: ...User s Guide HDSPe AES RME 5 User s Guide HDSPe AES General...

Page 6: ...DSPe AES PCI Express card HDSPe AES expansion board Quick Info guide RME Driver CD MIDI breakout cable Expansion Board ribbon cable 26 conductor 3 System Requirements Windows XP or higher Mac OS X Int...

Page 7: ...press slot press and fasten the screw 6 Insert the Expansion Board and fasten the screw 7 Replace the computer s housing 8 Reconnect all cables including the power cord 6 Hardware Connectors 6 1 Exter...

Page 8: ...PCB 7 Accessories RME offers several optional components Additionally parts of the HDSPe AES like the special breakout cables are available separately Part Number Description BOHDSP9652 MIDI breakout...

Page 9: ...of their respective owners RME DIGICheck and Hammerfall are registered trademarks of RME Intelligent Audio Solutions HDSPe AES HDSP AES 32 TMS DIGI96 SyncAlign ZLM SyncCheck and TotalMix are trademar...

Page 10: ...to correct the interference by one or more of the following measures Reorient or relocate the receiving antenna Increase the separation between the equipment and receiver Connect the equipment into an...

Page 11: ...User s Guide HDSPe AES RME 11 User s Guide HDSPe AES Driver Installation and Operation Windows...

Page 12: ...rted manually after the failed driver installation Hit the Win key type Device Manager start the Device Manager by selecting it from the list and hit Enter The device is shown with a yellow warning sy...

Page 13: ...lash Update Tool updates all e HDSPe series products to the latest firmware version It requires an already installed driver Start the program pcie_fut exe The Flash Update Tool displays the current re...

Page 14: ...d immediately confirmation e g by clicking on OK or exiting the dialog is not required However settings should not be changed during playback or record if it can be avoided as this can cause unwanted...

Page 15: ...t Format Double Speed Sample rates in the range of 64 kHz to 96 kHz can also be transmitted using the standard 48K frame Note that when selecting Double Wire the number of output channels is reduced t...

Page 16: ...e specific card Changing the sample rate during record playback often results in a loss of audio or brings up warning messages of the audio software Therefore the desired sample rate should be set at...

Page 17: ...es whether there is a valid signal Lock No Lock for each input Word AES TCO Sync In or if there is a valid and synchronous signal Sync In the field Clock Mode the clock reference is shown See chapter...

Page 18: ...Preferred Device in Control Panel Multimedia Audio or Control Panel Sound Playback The screenshot to the right shows a typical configuration dialog as displayed by a ste reo wave editor After selectin...

Page 19: ...l Panel Sounds and Multimedia Audio and Use only default devices has to be checked Additionally the loudspeaker setup found under Volume Speaker Settings Ad vanced has to be changed from Stereo to 5 1...

Page 20: ...use one stereo channel twice the basic and the interleaved device even with different applica tions Multi Channel using WDM The WDM Streaming device Loudspeaker Analog 1 2 of the RME driver can operat...

Page 21: ...If no sample frequency is recognized it will read No Lock This way configuring any suitable audio application for digital recording is simple After selecting the correct input HDSPe AES displays the c...

Page 22: ...ple frequency but also have to be in sync All devices connected to the Hammerfall DSP must be properly configured for Full Duplex operation As long as SyncCheck in the Set tings dialog only displays L...

Page 23: ...pplication examples Peak level measurement RMS level measurement over detection phase correlation measure ment dynamic range and signal to noise ratios RMS to peak difference loudness long term peak m...

Page 24: ...he input signal cannot be monitored in real time ASIO Direct Monitoring has not been enabled and or monitoring has been disabled globally for example in TotalMix Playback works but record doesn t Chec...

Page 25: ...User s Guide HDSPe AES RME 25 User s Guide HDSPe AES Driver Installation and Operation Mac OS X...

Page 26: ...s Hammerfall DSP Mixer Applications Hammerfall DSP Settings Library Audio MIDI Drivers HDSP MADI MIDI plugin System Library Extensions HDSPMADI kext Users username Library Preferences Hammerfall DSP f...

Page 27: ...ialog is not required However settings should not be changed during playback or record if it can be avoided as this can cause unwanted noises The tab About shows the current firmware and driver versio...

Page 28: ...channels is 4 For further details about the settings Professional Emphasis and Non Audio please refer to chapter 23 2 Preferred Sync Ref Input Status Used to pre select the desired clock source If th...

Page 29: ...Hz and 200 kHz The HDSPe AES outstanding clock control allows for a synchronization of the output signal to the word clock s input signal not only at identical sample rates but also at half quarter do...

Page 30: ...evice is greyed out and therefore inactive Mostly removing the greyed out device and searching for MIDI devices again will solve the problem The HDSP MIDI driver is a plugin During installation it wil...

Page 31: ...ncy Use Speaker Setup to freely configure the playback to all available channels Even multichan nel playback Surround DVD Player can be set up this way 20 Using more than one HDSPe System OS X support...

Page 32: ...tion analysis ITU weighting and ITU summing meter ITU1770 EBU R128 Meter For standardized loudness measurements Bit Statistics Noise Shows the true resolution of audio signals as well as errors and DC...

Page 33: ...User s Guide HDSPe AES RME 33 User s Guide HDSPe AES Connections and TotalMix...

Page 34: ...lock of the AES wire Rearranging the formats Double and Quad Wire to Single Wire is lossless the existing samples are just re ordered again Information on the distribution of the samples in Double and...

Page 35: ...he audio data digital signals in SPDIF or AES EBU format contain a channel status coding which is being used for transmitting further information The output signal coding of the HDSPe AES has been imp...

Page 36: ...re 64 kHz 96 kHz Quad Wire 4 channels 1 channel via 2 AES wires The effective sample frequency is four times the clock of the AES wire 32 kHz 48 kHz All these conversions are lossless Only the existin...

Page 37: ...ck output of the HDSPe AES is constantly active providing the current sample frequency as word clock signal As a result in Master mode the provided word clock is defined by the currently used software...

Page 38: ...er networks You will find all the neces sary components T adapters terminators cables in most electronics and or computer stores The latter usually carries 50 Ohms components The 75 Ohms components us...

Page 39: ...ettings dialog has been set to Word and a valid word clock signal is present The signal at the BNC input can be Single Double or Quad Speed the HDSPe automatically adapts to it As soon as a valid sign...

Page 40: ...plete implementation of the ADM functions Integration of external devices Use TotalMix to insert external effects devices be it in the playback or in the record path Depending on the current applicati...

Page 41: ...User s Guide HDSPe AES RME 41...

Page 42: ...channel can be routed and mixed to any hardware output bottom row Middle row Playback channels playback tracks of the audio software Via fader and routing field any playback channel can be routed and...

Page 43: ...how TotalMix works Starting up TotalMix the last settings are recalled automatically When executing the application for the first time a default file is loaded sending all playback tracks 1 1 to the c...

Page 44: ...nels 7 and 8 The present pan value is also being displayed below the fader Please carry out the same steps for Out 2 now in order to route it to out put 8 as well In short While editing the Submix 7 8...

Page 45: ...uble Wire or Quad Wore mode The display is adjusted accordingly and all fader settings remain stored 25 5 Submix View Such a wide range of possibilities make it difficult to maintain the overview Beca...

Page 46: ...rth be tween a signal distribution complete input monitoring a stereo and mono mix and various submixes without any problem If any parameter is being altered after loading a preset e g moving a fader...

Page 47: ...dB routed to the same output All outputs 0 dB Level display set to RMS 3 dB View Submix active Note This preset is Default offering the standard functionality of a I O card Preset 2 Description All c...

Page 48: ...hone signal source defined in Preferences is sent to the three destinations Monitor Phones described below The microphone level is adjusted with the channel s input fader Monitor Phones 1 2 3 Use the...

Page 49: ...a much more stable loudness when moving an ob ject between left and right 25 11 Editing the Names The channel names shown in the grey label area can be edited A right mouse click on the grey name fiel...

Page 50: ...otalMix also supports combinations of these keys If you press Ctrl and Alt at the same time clicking with the mouse makes the faders jump to 0 dB pairwise and they can be set pairwise by Shift Alt in...

Page 51: ...Level Meter Text Color Colour adjustment for the Gain and Level meter text displays Default Hue 110 Saturation 225 Brightness 135 Preferences Opens a dialog box to configure several functions like Pan...

Page 52: ...0 The latter is a point often overlooked but nonetheless important A RMS measurement shows 3 dB less for sine signals While this is mathematically correct it is not very reasonable for a level meter...

Page 53: ...Standard 1 1 routing Black gain field Shows the current gain value as dB Orange gain field This routing is muted Blue field Phase 180 inverted To maintain overview when the window size has been reduc...

Page 54: ...set up routings which would be nearly impossible to achieve by fiddling around with level and pan Let s say you want to send input 1 to output 1 at 0 dB to output 2 at 3 dB to output 3 at 6 dB and to...

Page 55: ...the menu Edit It shows Copy In 5 Now select the desired new input for example In 8 The menu now shows Paste In 5 to In 8 Click on it done If you are familiar with this functionality just use Ctrl C a...

Page 56: ...hannel is no longer sent to the recording software but still passed through to TotalMix Therefore TotalMix can be used to route this input signal to any hardware output Using the subgroup recording th...

Page 57: ...just a matching output level at the reverb unit Now click on channels 11 12 in the bottom row and move the fader of inputs 5 6 until the reverb effect gets a bit too loud in the headphones Now click o...

Page 58: ...he setup First select the two input channels in the picture to the right In 3 and 4 having the current routing destination Out 1 2 Now the string MS Processing In 3 4 to Out 1 2 On is shown in Options...

Page 59: ...e elements Element Meaning in TotalMix Channel faders 1 8 volume Master fader Main Monitor channel s faders SEL 1 8 DYNAMICS reset fader to Unity Gain V Pots 1 8 pan pressing V Pot knobs pan center CH...

Page 60: ...pport This option in Preferences F3 activates complete Mackie Control LCD support with eight channel names and eight volume pan values Attention this feature causes heavy traffic on the MIDI port when...

Page 61: ...3 A 6 Mono 2A 42 F 2 Talkback 5E 94 A 6 Monitor Phones 1 3F 63 D 4 Monitor Phones 2 40 64 E 4 Monitor Phones 3 41 65 F 4 Preset 1 36 54 F 3 Preset 2 37 55 G 3 Preset 3 38 56 G 3 Preset 4 39 57 A 3 Pre...

Page 62: ...ol protocol requires feedback of the received commands back to the hard ware controller So usually TotalMix will be set up with both a MIDI input and MIDI output Un fortunately any small error in wiri...

Page 63: ...User s Guide HDSPe AES RME 63 User s Guide HDSPe AES Technical Reference...

Page 64: ...yClock guarantees super low jitter synchronization even in varispeed operation Not effected by DC offsets within the network Signal Adaptation Circuit signal refresh through auto center and hysteresis...

Page 65: ...hm Level 0 2 V up to 5 Vss 0 2 V up to 0 5 Vss Clock accuracy not specified I 50ppm II 0 1 III Variable Pitch Jitter 0 025 UI 4 4 ns 44 1 kHz not specified Besides the electrical differences both form...

Page 66: ...s a simple LOCK is not sufficient The above described problem can be solved elegantly by setting the HDSPe AES from Master to AutoSync its inter nal clock will then be the clock delivered by the mixin...

Page 67: ...d track of about 2 ms Buffer Size Latency Windows This option found in the Settings dialog defines the size of the buffers for the audio data used in ASIO and WDM see chapter 13 Mac OS X The buffer si...

Page 68: ...as then possible to transmit two channels of 96 kHz data via one AES EBU port But Double Wire is still far from being dead On one hand there are still many devices which can t handle more than 48 kHz...

Page 69: ...0 kHz SteadyClock has originally been de veloped to gain a stable and clean clock from the heavily jittery MADI data signal The embedded MADI clock suffers from about 80 ns jitter caused by the time r...

Page 70: ...ire method is an industry standard today however it has a number of different names like Dual AES Double Wide Dual Line and Wide Wire The AES3 specification uses the uncommon term Single channel doubl...

Page 71: ...ed to pins 2 5 8 11 16 19 22 25 Pin 13 is not connected The Yamaha pinout is quite popular as well When building a D sub to D sub adapter or con nection cable please make sure that the connectors are...

Page 72: ...Out 5 6 Out 5 6 Out 7 8 Out 7 8 D Sub 21 8 10 22 24 11 13 25 GND is connected to pins 3 6 9 12 14 17 20 23 Pin 1 is not connected AES EBU The XLR connectors are wired according to AES3 1992 1 GND shi...

Reviews: