background image


User's Guide HDSP System Multiface II

 © RME

47


25.3 The Channels 

 
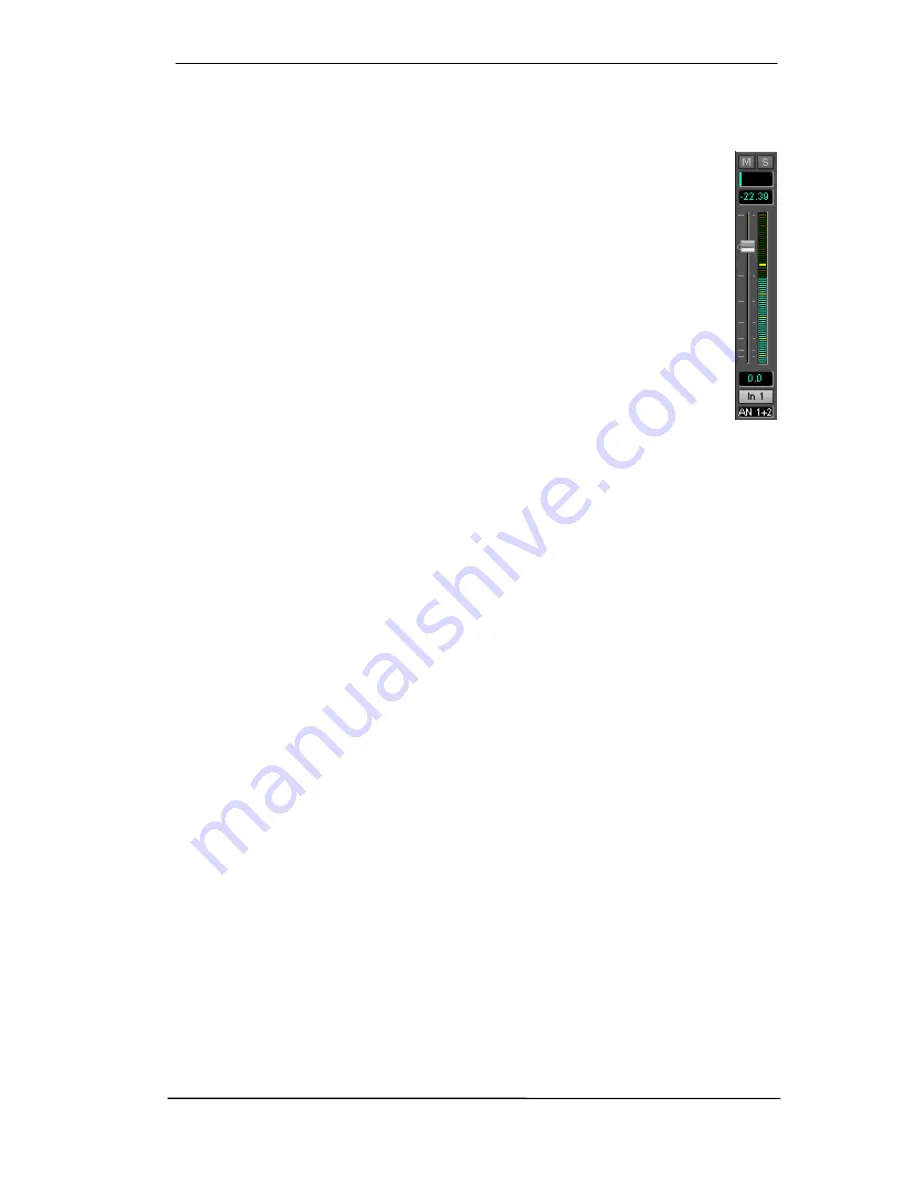
A single channel consists of various elements: 
 
Input channels and playback channels each have a mute and solo button. 
 
Below there is the panpot, realized as indicator bar (L/R) in order to save space. 
 
In the field below, the present level is displayed in RMS or Peak, being updated about 
every half a second. Overs (overload) are indicated here by an additional red dot. 
 
Next is the fader with a level meter. The meter shows both peak values (zero attack, 1 
sample is enough for a full scale display) by means of a yellow line, and mathemati-
cally correct RMS values by means of a green bar. The RMS display has a relatively 
slow time constant, so that it shows the average loudness quite well. 
 
Below the fader, the current gain and panorama values are shown. 
 
The white area shows the channel name. Selecting one or more channels is done by 
clicking on the white label which turns orange then. A click in the third row with 
pressed Ctrl-key activates internal loopback mode, the label turns red. A right mouse 
click opens a dialog to type in a new name. 
 
The black area (routing field) shows the current routing target. A mouse click opens the routing 
window to select a routing target. The list shows all currently activated routings by checkmarks 
in front of the routing targets. 


25.4 Tour de TotalMix 

 
This chapter is a practical guide and introduction on how to use TotalMix and on how TotalMix 
works. 
 
Starting up TotalMix the last settings are recalled automatically. When executing the application 
for the first time, a default file is loaded, sending all playback tracks 1:1 to the corresponding 
hardware outputs with 0 dB gain, and activating phones monitoring. 
 
Hold down Ctrl and click on preset button 1 to make sure that factory preset 1 is loaded. The 
faders in the top row are set to maximum attenuation (called m.a. in the following), so there is 
no monitoring of the input channels. The 

Submix View

 is active, therefore for improved over-

view all outputs except Phones are greyed out. Additionally all faders are set to the routing tar-
get Phones. All faders of the middle row are set to 0 dB, so no matter on which channels a 
playback happens, the audio will be audible via the Phones output. Just try it! 
 
We will now create a submix on analog outputs 1/2. Please start a multitrack playback. In the 
third row, click on the channels of hardware output AN1 or AN2. The Submix View changes 
from Phones to AN1/AN2. Both the fader settings and the output levels of all other channels are 
still visible, but greyed out for improved orientation. 
 
As soon as AN1/AN2 became active, all faders of the second row jumped to their bottom posi-
tion – except those of playback channel 1/2, because as mentioned above the factory preset 
includes a 1:1 routing. Click on AN 3/4 and the faders above are the only active ones, same for 
AN5/6 and so on. 
 
Back to AN1/2. Now you can change all the faders of all inputs and playback channels just as 
you like, thus making any input and playback signals audible via the outputs AN1/2. The pano-
rama can be changed too. Click into the area above the fader and drag the green bar in order to 
set the panorama between left and right. The level meters of the third row display the level 
changes in real-time.

Summary of Contents for DSP Multiface

Page 1: ...fessional multitrack recording system Analog and Digital Audio I O System PCI CardBus PCI Express and ExpressCard Interface 8 8 2 Channels Analog ADAT SPDIF Interface Hi Power Hi End Headphone Output...

Page 2: ...ware 7 1 Driver Installation 11 7 2 Driver Update 11 7 3 De installing the Drivers 11 7 4 Firmware Update 12 8 Configuring the Multiface II 8 1 Settings Dialog 13 8 2 Clock Modes Synchronization 15 9...

Page 3: ...re than one Hammerfall DSP 33 19 DIGICheck Mac 34 20 Hotline Troubleshooting 34 Disconnect Mode Connections and TotalMix 21 Disconnect Mode 36 22 Analog Connections 22 1 Line Inputs 36 22 2 Line Outpu...

Page 4: ...27 7 MS Processing 62 28 TotalMix MIDI Remote Control 28 1 Overview 63 28 2 Mapping 63 28 3 Setup 64 28 4 Operation 64 28 5 Simple MIDI Control 65 28 6 Loopback Detection 66 Technical Reference 29 Tec...

Page 5: ...User s Guide HDSP System Multiface II RME 5 User s Guide Multiface II General...

Page 6: ...ions as possible not in the driver i e the CPU but within the audio hardware 2 Package Contents Please check your Hammerfall DSP package contains each of the following PCI PCIe Interface PCI card HDSP...

Page 7: ...tches to select the analog reference level and several status LEDs MIDI IN and OUT are the MIDI input and output realized as 5 pin DIN jacks The LEDs MIDI IN and OUT indicate sent or received data for...

Page 8: ...ed using a thread therefore can be turned and even completely removed 5 2 Quick Start After the driver installation see chapter 7 15 connect the TRS jacks with the analog signal source The input sensi...

Page 9: ...User s Guide HDSP System Multiface II RME 9 User s Guide Multiface II Driver Installation and Operation Windows...

Page 10: ...e 2 Insert the CardBus ExpressCard into the appropriate slot 3 Plug the power jack of the supplied switching power supply into the connector labelled AUX on the rear of the Multiface 4 Connect power c...

Page 11: ...ht click on the device and select Update Driver Software from the context menu The dialog Update Driver Software appears Now follow the instructions given below 7 2 Driver Update When facing problems...

Page 12: ...The firmware of the Multiface is part of the driver invisible and loaded automatically during boot PCI card revision 1 8 or up black PCB CardBus with 6 pin FireWire connector all PCIe and ExpressCard...

Page 13: ...mmediately confirmation e g by clicking on OK or exiting the dialog is not required However settings should not be changed during playback or record if it can be avoided as this can cause unwanted noi...

Page 14: ...sample rate Selecting Single Speed causes the output signal to always stay within the range of 32 kHz to 48 kHz So at 96 kHz sample rate the output word clock is 48 kHz I O Box Disconnect interrupts t...

Page 15: ...SP ADAT and SPDIF input operate simultaneously Because there is no input selector however the HDSP has to be told which of the signals is the sync reference a digital device can only be clocked from a...

Page 16: ...red Device in Control Panel Multimedia Audio or Control Panel Sound Playback The screenshot shows a typical configuration dialog of a stereo wave editor After selecting a device audio data is sent to...

Page 17: ...ontrol Panel Sounds and Multimedia Audio and check Use only default devices Additionally the loudspeaker setup found under Volume Speaker Settings Advanced has to be changed from Stereo to 5 1 Surroun...

Page 18: ...alled WDM Kernel Streaming bypassing the WDM mixer thus achieves a similar performance to ASIO Because of the driver s multichannel streaming ability Sonar not only finds the stereo device mentioned a...

Page 19: ...9 5 Multi client Operation RME audio interfaces support multi client operation Several programs can be used at the same time The formats ASIO and WDM can even be used on the same playback channels si...

Page 20: ...t whenever a recording is started punch in 9 7 Digital Recording Unlike analog soundcards which produce empty wave files or noise when no input signal is present digital I O cards always need a valid...

Page 21: ...2 Channel Count under ASIO At a sample rate of 88 2 or 96 kHz the ADAT optical input and output operate in S MUX mode so the number of available channels per port is reduced from 8 to 4 Note When cha...

Page 22: ...ift between audio and MIDI or in case of a fixed deviation MIDI notes placed close before or behind the correct position the settings in Cubase Nuendo have to be changed At the time of print the optio...

Page 23: ...alculated from the Fireface hardware Vector Audio Scope World wide unique Goniometer showing the typical afterglow of a oscilloscope tube Includes Correlation meter and level meter Surround Audio Scop...

Page 24: ...Check that there is a valid signal at the input If so the current sample frequency is dis played in the Settings dialog Check whether the HDSP system has been selected as recording device in the audio...

Page 25: ...User s Guide HDSP System Multiface II RME 25 User s Guide Multiface II Driver Installation and Operation Mac OS X...

Page 26: ...e 2 Insert the ExpressCard into the appropriate slot 3 Plug the power jack of the supplied switching power supply into the connector labelled AUX on the rear of the Multiface 4 Connect power cord to p...

Page 27: ...rfall DSP Settings Library Audio MIDI Drivers HDSP MADI MIDI plugin System Library Extensions HDSPMADI kext Users username Library Preferences Hammerfall DSP folder Users username Library Preferences...

Page 28: ...g the dialog is not required However settings should not be changed during playback or record if it can be avoided as this can cause unwanted noises The status displays at the bottom of the dialog box...

Page 29: ...sed to pre select the desired clock source If the selected source isn t available the unit will change to the next available one The current clock source and sample rate is displayed in the AutoSync R...

Page 30: ...y have one master If the HDSP s clock mode is set to Master all other devices must be set to Slave The Hammerfall DSP s ADAT optical input and the SPDIF input operate simultaneously Be cause there is...

Page 31: ...ay of checking whether all digital de vices connected to the system are properly configured With SyncCheck finally anyone can master this common source of error previously one of the most complex issu...

Page 32: ...r the device is greyed out and therefore inactive Mostly removing the greyed out device and searching for MIDI devices again will solve the problem The HDSP MIDI driver is a plugin During installation...

Page 33: ...input signal to output channels 1 2 Hold the Ctrl key down and click on the labels AN1 and AN2 in the third row Their labels turn red the internal loop mode is active Result the desired input signal i...

Page 34: ...ctral Analyser World wide unique 10 20 or 30 band display in analog bandpass filter technology 192 kHz capable Totalyser Spectral Analyser Level Meter and Vector Audio Scope in a single window Complet...

Page 35: ...User s Guide HDSP System Multiface II RME 35 User s Guide Multiface II Disconnect Mode Connections and TotalMix...

Page 36: ...anced design which handles unbalanced mono jacks and balanced stereo jacks correctly automatically adjusting the level reference When using unbalanced cables with TRS jacks be sure to connect the ring...

Page 37: ...ast usage At 10 dBV a headroom of 12 dB is common practice each mixing desk op erating at 10 dBV is able to send and receive much higher levels Lo Gain is best suited for professional users who prefer...

Page 38: ...is required Pins 2 and 3 of a female XLR plug are connected indi vidually to the two pins of a phono plug The cable shielding is only connected to pin 1 of the XLR not to the phono plug The ground fre...

Page 39: ...rrectly even with heavily mis shaped dc prone too small or overshoot prone signals Thanks to automatic signal centering 300 mV 0 3V input level are sufficient in principle An additional hysteresis red...

Page 40: ...th BNC T adapters and terminated with resistors We recommend using off the shelf BNC cables to connect all devices as this type of cable is used for most computer networks You will find all the neces...

Page 41: ...TATE will light up as soon as a word clock signal is de tected To change to word clock as clock source activate the Clock Source Word in the field Clock Mode within the Settings dialog The status disp...

Page 42: ...42 User s Guide HDSP System Multiface II RME...

Page 43: ...User s Guide HDSP System Multiface II RME 43 User s Guide Multiface II TotalMix...

Page 44: ...most complete implementation of the ADM functions Integration of external devices Use TotalMix to insert external effects devices be it in the playback or in the record path Depending on the current a...

Page 45: ...User s Guide HDSP System Multiface II RME 45...

Page 46: ...i e fader independ ent Via fader and routing field any input channel can be routed and mixed to any hardware output bottom row Middle row Playback channels playback tracks of the audio software Via f...

Page 47: ...application for the first time a default file is loaded sending all playback tracks 1 1 to the corresponding hardware outputs with 0 dB gain and activating phones monitoring Hold down Ctrl and click o...

Page 48: ...en channels 7 and 8 The present pan value is also being displayed below the fader Please carry out the same steps for Out 2 now in order to route it to output 8 as well In short While editing the Subm...

Page 49: ...entering Double Speed mode 96 kHz The display is adjusted accordingly and all fader settings remain stored 25 5 Submix View Such a wide range of possibilities make it difficult to maintain the overvie...

Page 50: ...ete input monitoring a stereo and mono mix and various submixes without any problem Also here RME s love for details can be seen If any parameter is being altered after loading a preset e g moving a f...

Page 51: ...tput Level display set to RMS 3 dB View Submix active Note This preset is Default offering the standard functionality of an I O card Preset 2 Description All channels routed 1 1 input and playback mon...

Page 52: ...microphone signal source defined in Preferences is sent to the three des tinations Monitor Phones described below The microphone level is adjusted with the channel s input fader Monitor Phones 1 2 3...

Page 53: ...B gives a much more stable loudness when moving an ob ject between left and right 25 11 Editing the Names The channel names shown in the grey label area can be edited A right mouse click on the grey n...

Page 54: ...ime TotalMix also supports combinations of these keys If you press Ctrl and Alt at the same time clicking with the mouse makes the faders jump to 0 dB pairwise and they can be set pairwise by Shift Al...

Page 55: ...r 25 15 Level Meter Text Color Colour adjustment for the Gain and Level meter text displays Default Hue 110 Saturation 225 Brightness 135 Preferences Opens a dialog box to configure several functions...

Page 56: ...ant A RMS measurement shows 3 dB less for sine signals While this is mathematically correct it is not very reasonable for a level meter Therefore the RMS readout is usually corrected by 3 dB so that a...

Page 57: ...uting Black gain field Shows the current gain value as dB Orange gain field This routing is muted To maintain overview when the window size has been reduced the left and upper labels are floating They...

Page 58: ...o output 4 at 9 dB Each time you set up the right channel 2 4 the change in pan destroys the gain setting of the left channel 1 2 A real hassle In Matrix view you simply click on the corresponding rou...

Page 59: ...same way on all headphones Select input 1 open the menu Edit It shows Copy In 1 Now select the desired new input for example In 8 The menu now shows Paste In 1 to In 8 Click on it done If you are fam...

Page 60: ...put signal to any hardware output Using the subgroup recording the input can still be recorded on a different channel Note Because of a technical limitation the input s level meter no longer shows the...

Page 61: ...adjust a matching output level at the reverb unit Now click on channels 9 10 in the bottom row and move the fader of inputs 5 6 until the reverb effect gets a bit too loud in the headphones Now click...

Page 62: ...mplify the setup First select the two input channels in the picture to the right In 3 and 4 having the current routing destination Out 1 2 Now the string MS Processing In 3 4 to Out 1 2 On is shown in...

Page 63: ...surface elements Element Meaning in TotalMix Channel faders 1 8 volume Master fader Main Monitor channel s faders SEL 1 8 DYNAMICS reset fader to Unity Gain V Pots 1 8 pan pressing V Pot knobs pan ce...

Page 64: ...splay Support This option in Preferences F3 activates complete Mackie Control LCD support with eight channel names and eight volume pan values Attention this feature causes heavy traffic on the MIDI p...

Page 65: ...42 F 2 Talkback 5E 94 A 6 Monitor Phones 1 3F 63 D 4 Monitor Phones 2 40 64 E 4 Monitor Phones 3 41 65 F 4 Preset 1 36 54 F 3 Preset 2 37 55 G 3 Preset 3 38 56 G 3 Preset 4 39 57 A 3 Preset 5 3A 58 A...

Page 66: ...e Control protocol requires feedback of the received commands back to the hard ware controller So usually TotalMix will be set up with both a MIDI input and MIDI output Un fortunately any small error...

Page 67: ...User s Guide HDSP System Multiface II RME 67 User s Guide Multiface II Technical Reference...

Page 68: ...DA 44 1 kHz 0 5 dB 5 Hz 20 9 kHz Frequency response DA 96 kHz 0 5 dB 5 Hz 45 8 kHz Output 6 3 mm TRS jack servo balanced Output impedance 100 Ohm Output level switchable Hi Gain 4 dBu 10 dBV Output l...

Page 69: ...ed by DC offsets within the network Signal Adaptation Circuit signal refresh through auto center and hysteresis Overvoltage protection Level range 1 0 Vpp 5 6 Vpp Lock Range 28 kHz 105 kHz Jitter when...

Page 70: ...ple 1 The Multiface is set to 44 1 kHz internally clock mode Master and a mixing desk with ADAT output is con nected to input ADAT1 The corresponding LED will show LOCK immediately but usually the mix...

Page 71: ...equency range as far as possible This typically generates a delay of one millisecond A playback and re record of the same signal via DA and AD loopback then causes an offset of the newly recorded trac...

Page 72: ...rries one channel whose odd and even samples are being distributed to the former left and right channels By this you get the double amount of data i e also double sample rate Of course in order to tra...

Page 73: ...ble in principle because the audio information is stored in the same place in the data stream However there are blocks of additional information which are different for both standards In the table the...

Page 74: ...74 User s Guide HDSP System Multiface II RME 31 Diagrams 31 1 Block Diagram Multiface II...

Page 75: ...balanced with no loss in level This is the same as when using a TRS jack with ring connected to ground TRS Phones jack The analog monitor output on the front is accessible through a stereo TRS jack Th...

Page 76: ...76 User s Guide HDSP System Multiface II RME...

Page 77: ...User s Guide HDSP System Multiface II RME 77 User s Guide Multiface II Miscellaneous...

Page 78: ...M 5 m 16 4 ft 36010 FireWire cable IEEE1394 6M 6M 10 m 32 8 ft FireWire cable for the HDSP system both sides 6 pin male Cable longer than 16 ft is not al lowed for FireWire therefore hard to get in co...

Page 79: ...x RME news driver updates and further product information are available on our website http www rme audio com Manufacturer IMM Elektronik GmbH Leipziger Strasse 32 D 09648 Mittweida Trademarks All tra...

Page 80: ...ment off and on the user is encouraged to try to correct the interference by one or more of the following measures Reorient or relocate the receiving antenna Increase the separation between the equipm...

Reviews: