User’s Guide ADI-2 DAC
© RME
39
21. Configuring the ADI-2 DAC
21.1 Settings Dialog
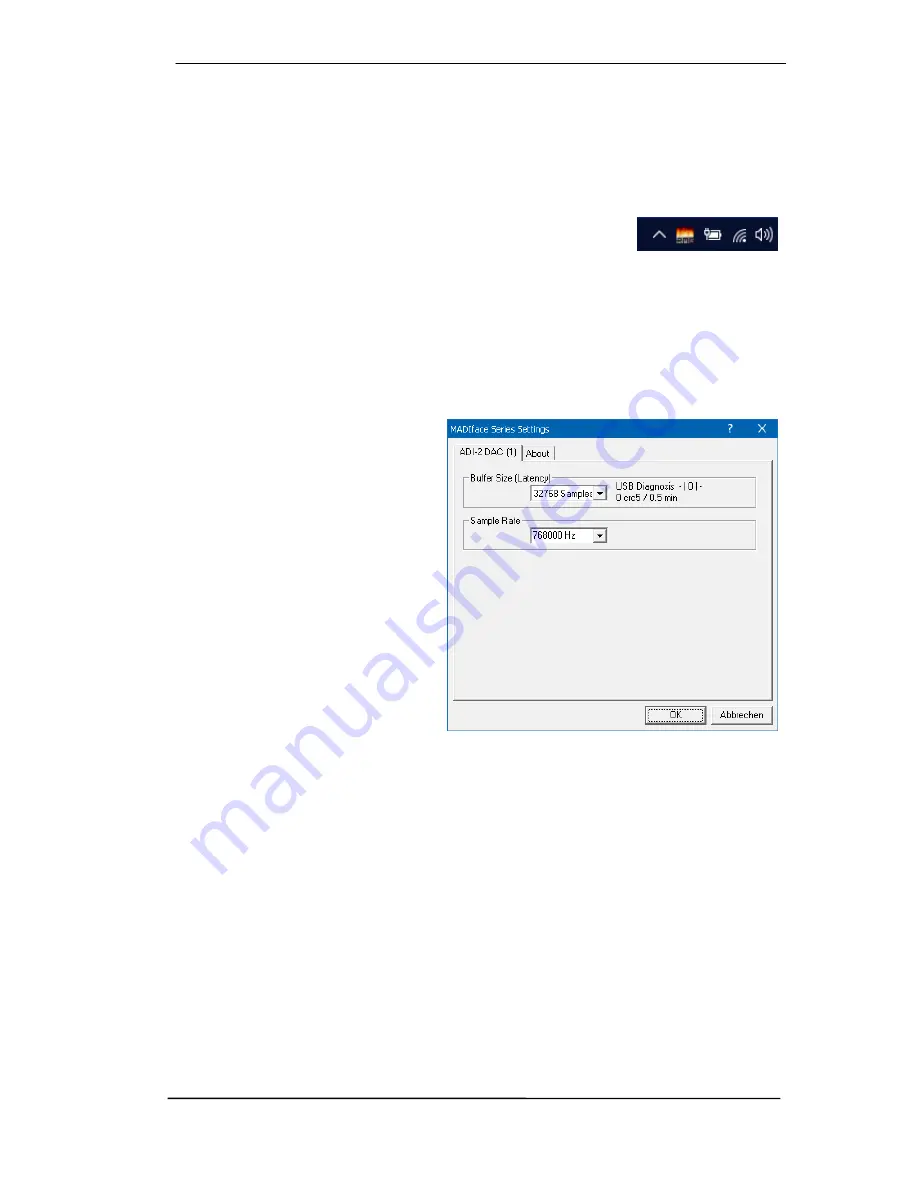
Configuration of the ADI-2 DAC is usually done directly at the unit. For ASIO operation sample
rate and buffer size (latency) can be set via a dedicated settings dialog. The panel 'Settings' can
be opened by clicking on the fire symbol in the Task Bar's notification area
Any changes made in the Settings dialog are applied immediately -
confirmation (e.g. by clicking on OK or exiting the dialog) is not re-
quired.
However, settings should not be changed during playback or record if it can be avoided, as this
can cause unwanted noises. Also, please note that even in 'Stop' mode, several programs keep
the recording and playback devices active, which means that any new settings might not be
applied immediately.
Buffer Size
The setting
Buffer Size
determines the latency between incoming and outgoing ASIO and WDM
data, as well as affecting system stability.
USB Diagnosis
shows specific USB
transmission errors (CRC5, usually 0)
and general errors. If the unit detects a
record or playback error the number
shown will no longer be 0. An audio
reset is performed automatically. The
counter
is
reset
on
start
of
playback/record.
Sample Rate
Sets the currently used sample rate.
Offers a central and comfortable way of
configuring the sample rate of all WDM
devices to the same value, as since
Vista the audio software is no longer
allowed to set the sample rate.
However, an ASIO program can still set
the sample rate.
During record/playback the selection is greyed out, so no change is possible.
The tab
About
includes information about the current driver and firmware version plus two more
options:
Lock Registry
Default: off. Checking this option brings up a dialog to enter a password. Changes in the Set-
tings dialog are no longer written to the registry. As the settings are always loaded from the
registry when starting the computer, this method provides an easy way to define an initial state
for the ADI-2 DAC.
Enable MMCSS for ASIO
activates support with higher priority for the ASIO driver. Note: At this
time, activating this option seems to be useful only with the latest Cubase/Nuendo at higher
load. With other software this option can decrease performance. The change becomes active
after an ASIO reset. Therefore it is easy to quickly check which setting works better.
Summary of Contents for ADI-2 DAC
Page 9: ...User s Guide ADI 2 DAC RME 9 5 4 Overview Menu Structure...
Page 17: ...User s Guide ADI 2 DAC RME 17 User s Guide ADI 2 DAC Operation Controls and Display...
Page 33: ...User s Guide ADI 2 DAC RME 33 User s Guide ADI 2 DAC Inputs and Outputs...
Page 37: ...User s Guide ADI 2 DAC RME 37 User s Guide ADI 2 DAC Installation and Operation Windows...
Page 42: ...42 User s Guide ADI 2 DAC RME...
Page 43: ...User s Guide ADI 2 DAC RME 43 User s Guide ADI 2 DAC Installation and Operation Mac OS X...
Page 46: ...46 User s Guide ADI 2 DAC RME...
Page 47: ...User s Guide ADI 2 DAC RME 47 User s Guide ADI 2 DAC Installation and Operation iOS...
Page 49: ...User s Guide ADI 2 DAC RME 49 User s Guide ADI 2 DAC Technical Reference...
Page 54: ...54 User s Guide ADI 2 DAC RME 31 4 Filter Curves 44 1 kHz 31 5 Frequency Response...
Page 56: ...56 User s Guide ADI 2 DAC RME 31 7 Total Harmonic Distortion Measurements 31 8 Loudness...
Page 57: ...User s Guide ADI 2 DAC RME 57 31 9 Extreme Power Charts...
Page 64: ...64 User s Guide ADI 2 DAC RME 31 16 Block Diagram...
Page 65: ...User s Guide ADI 2 DAC RME 65 User s Guide ADI 2 DAC Miscellaneous...


