


User’s Guide ADI-2 DAC
© RME
23
13. EQ
The key EQ brings up a graphical EQ display (Bode plot) screen to set the EQ quickly and with
full overview for the current output. The
I/O - Settings
submenu
Parametric EQ
mirrors the set-
tings done in this screen.
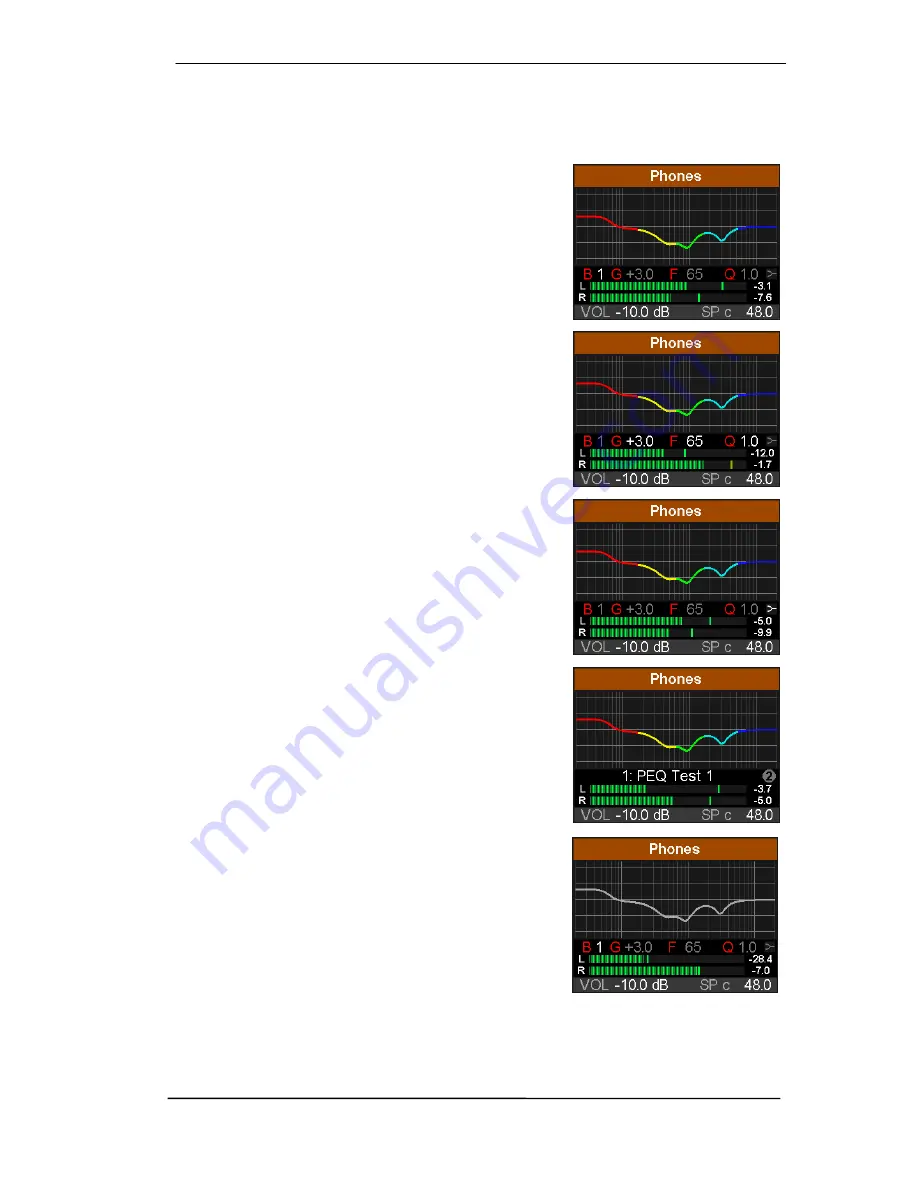
Turning encoder 2 or pushing VOLUME repeatedly scrolls
through all 5 bands, as can be seen in the parameter line
(B1 to B5). VOLUME steers the
gain
of the current band, the
other parameters are not available for adjustment. This view
provides quick view and verification of all parameters of all
bands, without the risk of changing any of them
unintentionally.
Push encoder 2 to select the
parameter line
, with all values
now shown in white color. They can be adjusted by turning
the three encoders. The Volume knob changes Gain,
encoder 1 Frequency, encoder 2 Q (Quality factor). All
changes are shown in real-time as frequency response
curve (Bode plot), making it very easy to find the desired
settings.
The five bands have different colors to clearly show what is
currently selected: band 1 red, band 2 yellow, band 3 green,
band 4 light blue, band 5 dark blue. To change to the next
band push VOLUME.
Another push on encoder 2 selects the
filter symbol
in the
right of the parameter line. As this function is only available
in bands 1 and 5, the symbol stays greyed out in band 2, 3
and 4. Band 1 and 5 can be set to work in Peak mode, Shelf
mode or as High Pass / High Cut. Turning encoder 2 scrolls
through the available options with the symbol changing
according to the selected filter function.
The next push on encoder 2 changes to the
graphical EQ
Preset selection
. Turning encoder 2 will scroll through all
EQ presets while the display shows the respective Bode plot
and the name of the preset in the parameter line. In this
screen VOLUME is available to change the volume and to
switch the current output.
Pushing encode 2 again returns to the above band gain
control. From here it is possible to directly jump to the
graphical EQ selection by pressing encoder 1 one time.
If the frequency graph is shown as
grey line
the EQ is
disabled. There are two ways to change this state:
¾
Push key EQ again to change to the page EQ Enable /
Presets, see below.
¾
Push key I/O, select current output, subpage Parametric
EQ, EQ Enable ON or OFF
Summary of Contents for ADI-2 DAC
Page 9: ...User s Guide ADI 2 DAC RME 9 5 4 Overview Menu Structure...
Page 17: ...User s Guide ADI 2 DAC RME 17 User s Guide ADI 2 DAC Operation Controls and Display...
Page 33: ...User s Guide ADI 2 DAC RME 33 User s Guide ADI 2 DAC Inputs and Outputs...
Page 37: ...User s Guide ADI 2 DAC RME 37 User s Guide ADI 2 DAC Installation and Operation Windows...
Page 42: ...42 User s Guide ADI 2 DAC RME...
Page 43: ...User s Guide ADI 2 DAC RME 43 User s Guide ADI 2 DAC Installation and Operation Mac OS X...
Page 46: ...46 User s Guide ADI 2 DAC RME...
Page 47: ...User s Guide ADI 2 DAC RME 47 User s Guide ADI 2 DAC Installation and Operation iOS...
Page 49: ...User s Guide ADI 2 DAC RME 49 User s Guide ADI 2 DAC Technical Reference...
Page 54: ...54 User s Guide ADI 2 DAC RME 31 4 Filter Curves 44 1 kHz 31 5 Frequency Response...
Page 56: ...56 User s Guide ADI 2 DAC RME 31 7 Total Harmonic Distortion Measurements 31 8 Loudness...
Page 57: ...User s Guide ADI 2 DAC RME 57 31 9 Extreme Power Charts...
Page 64: ...64 User s Guide ADI 2 DAC RME 31 16 Block Diagram...
Page 65: ...User s Guide ADI 2 DAC RME 65 User s Guide ADI 2 DAC Miscellaneous...


