background image


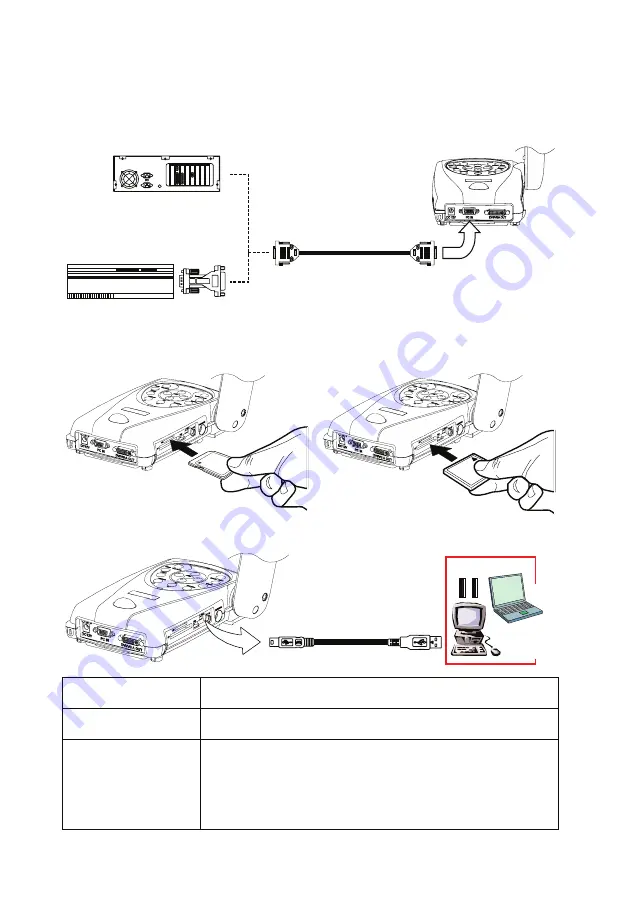
Connecting an IBM Compatible PC or Macintosh Computer 

You can connect the RM Eye to an IBM compatible PC, Macintosh, or notebook (laptop) 
computer. After physically connecting the unit to your PC, you can display an image on 
your computer by pressing the 

PC 

button on the unit’s control panel or remote control. 

VGA Cable

 (not supplied)

Plug to Display Card

IBM Compatible PC

Macintosh

Computer Adapter

(optional)

OR

MA
C


Inserting and Ejecting the Memory Card 

Insert the card fully with the label facing up until it reaches the end. To remove, pull the 
card out. We highly recommend formatting the memory card with the RM Eye. 

SD Card

(not supplied)

CF Card

(not supplied)

DC12V

PC IN

DVI/VG A

 OUT

TV/

RS2

32

DC 6

V

SW

SD

CF

DC12V

PC IN

DVI/VG A

 OUT

TV/

RS2

32

DC 

6V

SW

SD

CF


Transferring the Pictures to a Computer via USB Connection   

DC12V

PC IN

DVI/VG A

 OUT

TV/

RS2

32

DC 

6V

SW

SD

CF

USB Cable

(supplied)

USB Port

Laptop

Computer


Computer 

Operating System 

Requirement   

Windows 2000 SP4 

and XP SP1 

No driver is required. Plug the RM Eye into an available 

USB port. A new disk icon appears on your system. 

Windows Me and 

98/98SE  

You need to install the driver before connecting the unit to 

the computer USB port. Insert the Driver CD in the 

CD-ROM drive. The installation main screen will 

automatically appear and then click 

Install

. (For detailed 

mass storage driver installation procedure, see the 

instruction provided in the CD and click 

User Manual

.)   

Summary of Contents for RM Eye

Page 1: ...RM RM Eye User Manual Digital Document Camera...

Page 2: ...P N 300AACEN Made in Taiwan...

Page 3: ...gital device pursuant to Part 15 of the FCC Rules this device must be installed in computer equipment certified to comply with the Class B limits All cables used to connect the computer and peripheral...

Page 4: ...during long periods of non use Always remove exhausted batteries from the remote control Battery leakage and corrosion can damage this remote control dispose of batteries safely Do not mix old and new...

Page 5: ...nd Ejecting the Memory Card 6 Transferring the Pictures to a Computer via USB Connection 6 Using RM Eye as USB PC Cam 7 Installing the LED Lamp 7 Connecting the Power Adapter 7 Installing the Optional...

Page 6: ......

Page 7: ...parencies and 3D objects onto a TV LCD or DLP projector making presentations simple RM Eye is an ideal presentation tool for the academic community Driver CD ENTER REVERSE Remote Control batteries inc...

Page 8: ...isplay negative film as positive image R RM M E Ey ye e P Pa ar r t ts s The illustrations below identify the parts of RM Eye 1 Camera Lens 2 Extendable Arm 3 Side Panel 4 Control Panel 5 LED 6 IR Rem...

Page 9: ...Lens F1 8 2 7 AF Shooting Area 380mm x 285mm max 40mm x 30mm min Zooming Optical 5x Digital 8x Accelerated Focusing Auto Manual Power Source 100 220V 1 8A 50 60 Hz Consumption 15 Watts lamp off 30Wat...

Page 10: ...it through to the DVI VGA out port 4 DVI VGA OUT Connect it to a VGA Mac monitor LCD DLP projector or high end projector with DVI interface to display your presentation 5 CF Card Slot Insert the CF c...

Page 11: ...ter optional VGA Monitor DVI VGA Adapter optional DVI Cable not supplied Connecting a TV To display a presentation on TV set the DIP switch no 1 to the TV system that you have UP for NTSC and DOWN for...

Page 12: ...Eye SD Card not supplied CF Card not supplied DC12V PC IN DVI VG A OUT TV RS 232 DC 6V SW SD CF DC12V PC IN DVI VG A OUT TV RS232 DC 6V SW SD CF Transferring the Pictures to a Computer via USB Connec...

Page 13: ...quate lighting focus the light towards the object to balance the distribution or range of luminance for better image projection Stretch the arm and insert the LED lamp Press to release the latch and o...

Page 14: ...al TURN ON Light Box optional Connecting to a Microscope Connecting the RM Eye to a Microscope enables you to examine microscopic objects on a big screen without straining your eyes To view microscopi...

Page 15: ...es from left to right As you rotate the camera head the camera adjusts the focus automatically 15 degrees 90 degrees Mechanical Arm The mechanical arm is designed to move from almost any angle Follow...

Page 16: ...l of the RM Eye U Us si in ng g t th he e I In nf fr ra ar re ed d R Re em mo ot te e C Co on nt tr ro ol l Use the RM Eye Remote Control to enhance your presentation switch between three presentation...

Page 17: ...isplay 16 thumbnail images or the selected image from the memory source To switch to other memory source RM Eye must be in camera mode then press MENU ADVANCED MEMORY TYPE select the source and press...

Page 18: ...l zoom level of about 5 times you can still continue to digitally zoom in the image up to 800 The image may appear blurry when optically zooming the image in and out After achieving the desired magnif...

Page 19: ...A MODE Switch to Camera mode and display the image from the RM Eye s built in digital video camera 2 PC MODE Switch to PC mode and display the video signal coming from the PC IN port 3 PLAYBACK MODE S...

Page 20: ...se the and to make a selection and then press CAP FULL SCRN button 8 ZOOM In Preview mode press or to digitally zoom in and zoom out the picture In Camera mode press or to optically zoom in and out of...

Page 21: ...view on screen function selections 2 Press or buttons to select TIMER 3 Press or buttons to set a time value You can set the time value up to 120 minutes 4 After setting the time value press the MENU...

Page 22: ...ULT NO DIGITAL ZOOM OPTICAL 800 X 600 640 X 480 RESOLUTION 1024 X 768 BLUE MEASURE MANUAL RED MODE TEXT GRAPHICS MICROSCOPE EFFECT B W NEGATIVE COLOR MIRROR REVERSE YES FORMAT NO CF TYPE SD MENU BASIC...

Page 23: ...st the setting press or buttons OSD Menu Description BRIGHTNESS 50 0 50 BRIGHTNESS Press or buttons to increase or decrease the brightness level and improve the visibility of the image You can adjust...

Page 24: ...age by 180 DEFAULT NO YES DEFAULT Use or buttons to select YES to restore to original factory default setting or NO to keep the current setting MENU BRIGHTNESS CONTRAST ZOOM TIMER MODE EFFECT DEFAULT...

Page 25: ...RESOLUTION 1024 X 768 800 X 600 640 X 480 RESOLUTION Use or buttons to choose from 1024x768 800x600 or 640x480 display resolution then press ENTER to make the selection This is available only for RGI...

Page 26: ...his resolution you will not be able to see an image on your display device You can simply press the MENU and RIGHT or LEFT button to the increase or decrease the resolution setting The picture on the...

Reviews: