Riso VALEZUS T2100 User Manual Download Page 19

17

VALEZUS T2100 User’s Guide

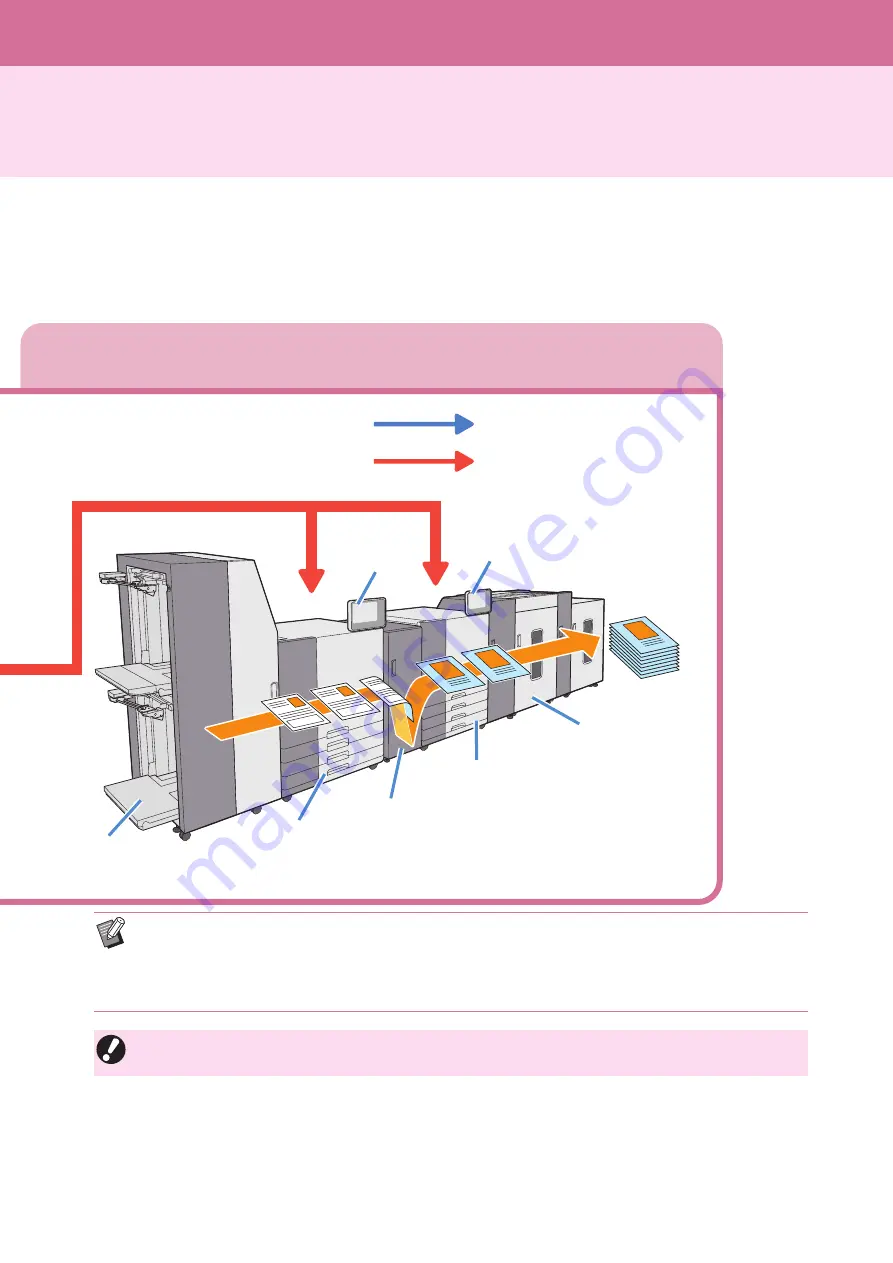
The RISORINC/C IV data sent from the Print Controller to Printer 1 and Printer 2 is synchronized between 
the two printers. The front side of the paper is printed in Printer 1, the paper is flipped in JOINT UNIT, and 
the back side of the paper is printed in Printer 2.

Printing Process

Double Tray Feeder

Printer 1

JOINT UNIT

Printer 2

Double Tray Stacker

: PS Data, etc.

: RISORINC/C IV Data

• The Operation Panel 1 displays the paper settings and error messages such as when paper is jammed in 

Double Tray Feeder, Printer 1, and JOINT UNIT. The Operation Panel 2 displays error messages such as when 
paper is jammed in Printer 2 and Double Tray Stacker.

• You cannot change the paper size during a print job. When using different size of paper, take out the printed 

papers from Double Tray Stacker and adjust the stacker fence. 

• There are five color ink cartridges installed in each of the two printers. You cannot print if even one color out of 

the ten cartridges is indicating a message to replace the cartridge. Replace the cartridge of the color shown.

Operation Panel 2

Operation 
Panel 1

Summary of Contents for VALEZUS T2100

Page 1: ...User s Guide VALEZUS T2100 T2_UG EN_05...

Page 2: ...on against harmful interference when the equipment is operated in a commercial environment This equipment generates uses and can radiate radio frequency energy and if not installed and used in accorda...

Page 3: ...inter and replacement of consumables User s Guide This guide describes handling precautions and specifications as well as the operations and settings of each function Read this guide for a more detail...

Page 4: ...uare brackets Illustrations Used in This Guide The screenshots and illustrations contained in this guide may vary depending on the usage environment including the connected dedicated equipment The var...

Page 5: ...10 Handling 11 Usable Paper 11 Printable Area 11 Part Names and Functions 12 The Whole System 12 JOINT UNIT 12 Operation Panel 13 Home Screen 14 What You Can Do with the System 15 System Configuratio...

Page 6: ...fstellungsort 43 Netzanschluss 43 Masseanschluss 43 Behandlung 44 Vor Inbetriebnahme 45 Aufstellungsort 45 Netzanschluss 45 Abmessungen 46 Behandlung 47 Verwendbares Papier 47 Bedruckbarer Bereich 47...

Page 7: ...5 VALEZUS T2100 User s Guide...

Page 8: ...may cause human injury or damage to properties The symbol indicates a prohibited action A specific prohibited action is drawn inside or next to the symbol The figure on the left indicates that disass...

Page 9: ...e wet Otherwise an electric shock might occur CAUTION Connect the plug securely to the optional connection outlet on the printer main unit to avoid a loose connection Do not pull the power cord when u...

Page 10: ...ock might occur Immediately hold down the Power key on the operation panel to turn off the operating power and then turn off the main power switches of both printers Next be sure to unplug all of the...

Page 11: ...or cold and dry Places close to fire or heat Places directly subject to cold air from air conditioners or hot air from heaters as well as radiant heat Places with poor air permeability or ventilation...

Page 12: ...Double Tray Feeder Print Unit JOINT UNIT Print Unit and Double Tray Stacker Required Spacing As seen from the front Units mm inch 1 445 56 7 8 4 765 187 19 32 The width is 4 955 mm 195 3 32 when the...

Page 13: ...are always added around the edges of the paper Handling Usable Paper Size VALEZUS T2100 148 mm 210 mm 330 2 mm 460 mm 5 13 16 8 1 4 13 18 1 8 Feed Tray Printer 1 182 mm 210 mm 297 mm 432 mm 7 3 16 8...

Page 14: ...ansport the paper to the printer 2 c Reversing Part d Power cord Normally you leave it connected to an electrical outlet The Whole System JOINT UNIT For information on the Double Tray Feeder and the D...

Page 15: ...lamp flashes when an error occurs g Main Power Lamp This lamp lights up when the main power is on h Job Status Key Press this key to check jobs that are in progress or finished i Start Key It is not...

Page 16: ...r depending on the consumable or configured details You are using RISO ink You are using non RISO ink When lit Ink information is entered When flashing Ink information is not entered For more informat...

Page 17: ...int Density Initial operation is required if the above conditions are not the same in each job When the file format of print data is AFP PDF or PS PostScript print data can be processed as continuous...

Page 18: ...nd controls the print job Print Data Creation Windows PC Other Server Network Print Controller Print Controller corresponds to AFP IPDS print workflow which is often used for transaction printing Supp...

Page 19: ...per settings and error messages such as when paper is jammed in Double Tray Feeder Printer 1 and JOINT UNIT The Operation Panel 2 displays error messages such as when paper is jammed in Printer 2 and...

Page 20: ...he paper is printed in Printer 1 the paper is flipped in JOINT UNIT and the back side of the paper is printed in Printer 2 Path of the printed paper Paper Feed Path When operating the duplex printing...

Page 21: ...key of Operation Panel 1 The lights on the Power keys of Printer 1 and Printer 2 turn off 2 Turn off the main power switch All the Main Power lamps turn off In the Admin Menu settings you can change t...

Page 22: ...ings on the Operation Panel 1 You can change the paper settings from Paper Tray Setting on the System Info Consumables screen Also make sure correct paper is inserted in the specified feed tray Sendin...

Page 23: ...ers are located on both sides of the standard tray paper guide side in two places c Standard Tray Descent Button Use this button to move the Double Tray Feeder up or down when replacing or adding the...

Page 24: ...el If the label is not stuck on the Double Tray Feeder is peeling off or is unreadable contact your dealer or authorized service representative Location of the Caution Label The location of the cautio...

Page 25: ...to unlock and spread the guide 3 Load the paper Load about 500 sheets at a time in the standard tray 4 Adjust the paper feed guides side so that they are suitable for the paper size Slide the guides...

Page 26: ...aper feed guide end to match the guide against the edge of the paper and turn the knob clockwise to fix the guide in position 8 Adjust the side air adjustment levers both sides For general use set to...

Page 27: ...ent button twice 5 Adjust the paper feed guide end so that it is suitable for the paper size Adding the Paper Hold down The standard tray will keep lowering for as long as the button is being pressed...

Page 28: ...per tray Feed 1 In doing so it is also possible to configure the paper size upon correcting the measured value for the height of the paper Add Edit Delete Registration Name Paper Size Custom Size 148...

Page 29: ...Tray Feeder screen is displayed 2 Configure the settings 3 Touch OK The Admin Menu screen is displayed Double Tray Feeder When Paper out is set to 3 the standard tray is lowered to the bottommost posi...

Page 30: ...left covers closed b Upper Transfer Cover Open this cover when removing printouts setting the carriage in position or when removing paper jams c Right Cover Open this cover when removing printouts se...

Page 31: ...r are closed The stacking tray will not operate if the covers are open The stacking tray will be automatically lowered to bottommost position after it outputs approximately 3 200 to 4 000 sheets of pa...

Page 32: ...g tray has been lowered Depending on the size of the paper that has been output the printouts may interfere with the handle of the carriage making it difficult to be removed In such case close the rig...

Page 33: ...remove printouts set the stacking tray on the carriage and return the Double Tray Stacker together with the carriage 1 Align the end of the stacking tray with the two screws at the base of the handle...

Page 34: ...pages variable printing or a small number of printouts When you output a small number of printouts the time for waiting until the stacking tray returns to the printing position can be shorted When set...

Page 35: ...t Tray Priority Specify the priority for the stacking trays when outputting paper When the output tray is specified on the print settings of the print con troller printouts are output to the specified...

Page 36: ...operation panel When an error occurs the error lamp flashes in red Error messages on the printer s touch panel A description of the problem and instructions for resolving the problem are displayed as...

Page 37: ...power and the power back on again For more information see Power Supply p 19 2 If the system does not recover contact your dealer or authorized service representative Mention the error code displayed...

Page 38: ...an injury might occur 1 Touch the alphanumeric button indicating the location of the paper jam to display how to remove the jammed paper 2 Follow the procedure displayed on the touch panel to remove t...

Page 39: ...as well as other sheets of paper may remain in the transfer path When using an internal dial of the printer or an internal dial of the JOINT UNIT to remove jammed paper turn the dial four or five time...

Page 40: ...llution degree 2 At an altitude of 2000 m or lower The pollution degree of the usage environment due to dirt and dust in the air Degree 2 corresponds to a general indoor environment Model Double Tray...

Page 41: ...ht up to 440 mm 17 11 32 1 2 trays Offset Height up to 405 mm 16 2 2 trays Power Source AC 100 V 240 V 1 9 A 1 0 A 50 Hz 60 Hz Power Consumption Max 190 W Ready3 80 W or less Stand by 0 5 W or less Op...

Page 42: ...ler or authorized service representative Use the ink cartridge within approximately 24 months from the date of manufacture when preserved under room temperature For optimal printing quality we recomme...

Page 43: ...41 Consumables VALEZUS T2100 User s Guide...

Page 44: ...ossene Drucker sind Produkte der Klasse B Sie gelten jedoch als Klasse A Produkte wenn sie als System verwendet werden Eine Reihe von Ger tekonfigurationen einschlie lich der an das JOINT UNIT angesch...

Page 45: ...ird daran gezogen oder das Kabel geknickt kann das Kabel Schaden erleiden und dadurch einen Brand bzw einen elektrischen Schlag verursachen Niemals das Kabel mit nassen H nden aus der Steckdose ziehen...

Page 46: ...nem Stromschlag kommen Dr cken Sie sofort die Netz Taste auf dem Bedienfeld um die Antriebsenergie abzuschalten Schalten Sie dann die Hauptschalter beider Drucker ab Trennen Sie dann unbedingt alle St...

Page 47: ...i e und feuchte oder sehr kalte und trockene Orte Orte nahe offener Feuerstellen oder Hitzequellen Beheizte Stellen oder Orte die direkter Kaltluft von Klimaanlagen oder Hei luft sowie abgestrahlter W...

Page 48: ...zen von Verbrauchsartikeln und zur Wartung Doppelte Zufuhr Druckeinheit JOINT UNIT Druckeinheit und Doppelte Ablage Abmessungen Von Vorne gesehen Einheit mm 1 445 4 765 Die Breite betr gt 4 955 mm mit...

Page 49: ...Gr e H he bis zu 110 mm 2 H he bis zu 405 mm gilt nicht f r A5 oder Papier unregelm iger Gr e Es kann nicht ohne R nder gedruckt werden An den Seiten des Blattes werden stets R nder gelassen Behandlu...

Page 50: ...eich Grad der Verschmutzung 2 H henlage bis zu 2000 m Grad der Umgebungsverschmutzung auf Grund von Schmutz und Staub in der Luft Grad 2 entspricht einer normalen Innenraumumgebung Modell Double Tray...

Page 51: ...405 mm2 2 F cher Stromversorgung 100 V 240 V AC 1 9 A 1 0 A 50 Hz 60 Hz Stromverbrauch Max 190 W Ready3 80 W oder weniger Stand by 0 5 W oder weniger Betriebsger usch 68 dB A oder weniger A4 LEF Simp...

Page 52: ...ch an Ihren H ndler oder eine autorisierte Kundendienstvertretung Verbrauchen Sie die Tintenpatrone innerhalb von etwa 24 Monaten ab dem Herstellungsdatum bei Aufbewahrung bei Raumtemperatur F r ein b...

Page 53: ...s dieses Produkt nach dem 13 August 2005 auf den Markt gebracht worden ist An wen kann ich mich wenden wenn ich mehr ber die WEEE Verordnung wissen m chte F r weitere Informationen sollten Sie sich an...

Page 54: ...52 VALEZUS T2100 User s Guide...

Page 55: ......

Page 56: ...Copyright 2021 RISO KAGAKU CORPORATION Please contact the following for supplies and service 2021 2...

Reviews: