cod
. Doc
-
0
9
6
4
5
8
r
e
v.
10
/20
19
TAU 2100-2600 N
EN
INSTALLATION, TECHNICAL ASSISTANCE SERVICE AND SYSTEM MANAGEMENT MANUAL
Page 1: ...cod Doc 0096458 rev 0 10 2019 TAU 2100 2600 N EN INSTALLATION TECHNICAL ASSISTANCE SERVICE AND SYSTEM MANAGEMENT MANUAL...
Page 2: ...are specially trained to keep your boiler efficient and cheap to run They also stock any original spare parts that might be required This instruction manual contains important instructions and precaut...
Page 3: ...11 2 5 Useful information 12 3 INSTALLER 13 3 1 Unpacking the product 13 3 2 Overall dimensions and weights 14 3 3 Handling 15 3 4 Installation premises 16 3 5 Positioning of sensor sockets 17 3 5 1 W...
Page 4: ...nd must ALWAYS accompany the boiler even if it is sold to another owner or transferred to another user or to another installation If you damage or lose this manual order a replacement immediately from...
Page 5: ...trol panels of the RIELLOtech range which take into account the dif ferent operating functions the needs of the heating system and the various devices used on them Note for additional information see...
Page 6: ...n window with pressure meas urement fitting 3 Door 4 Body interior inspection flange 5 Outlet 6 Safety device fitting 7 Heating return high temperature 8 Combustion chamber 9 Heating return low temper...
Page 7: ...20164364 20163867 RLS 410 M MX 20087649 x 20163867 RLS 310 E MX 20087643 x 20164364 20163867 RLS 410 E MX 20087645 x 20163867 GAS PREMIX RX 2500 S E 20148881 x 20164364 20163866 RX 3000 S E 20148882...
Page 8: ...burner s own manual RS gas RLS gas Light oil burner RX premix burner If you are installing a new boiler but re using an old burner always perform the following checks Make sure that the performance o...
Page 9: ...ow tem perature mode n1 with return 30 C GCV NCV 97 9 97 9 108 7 108 7 Losses from stack for sensible heat Qmax 1 5 Losses from casing with burner on 0 3 Constant pressure drop P max 0 2 Flue gas temp...
Page 10: ...ust the timer thermostat if installed or the tempera ture control to the desired temperature 20 C Turn the boiler s mains power switch ON Turn the control panel power switch ON and make sure that the...
Page 11: ...gents 0 0Never clean the boilerwithout first disconnecting it from the mains electricity supply by turning the mains power switch and the control panel switch OFF 9 9The combustion chamber and flue pi...
Page 12: ...information Seller Mr Address Tel Technical Assistance Service Mr Address Tel Installer Mr Address Tel Date Work done Fuel oil supplier Mr Address Tel Date Quantity supplied Date Quantity supplied Da...
Page 13: ...velope H containing Instruction manual Technical data plate adhesive to be applied to the panelling when installing the boiler Hydraulic test certificate Conventional warranty conditions 9 9The instru...
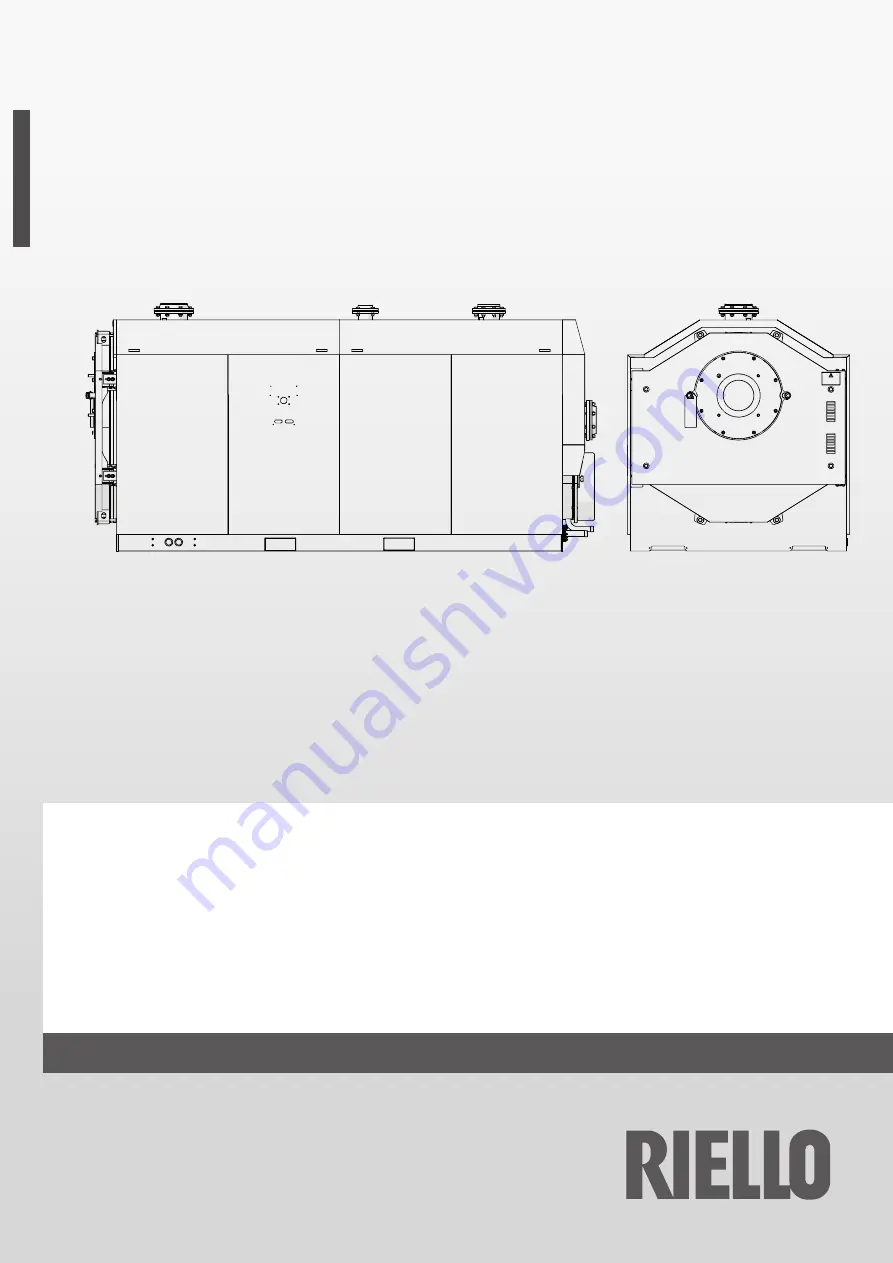
Page 14: ...LER INSTALLER 3 2 Overall dimensions and weights P P1 H1 H L1 L DESCRIPTION TAU N 2100 2600 L 1750 1850 mm L1 1800 1900 mm P 4020 4425 mm P1 3612 4024 mm H 1945 2070 mm H1 1870 2128 mm Net weight 4750...
Page 15: ...art of the boiler Proceed as follows to move the boiler and remove the packaging Remove the protective film Move the boiler to the place of installation use a crane for lifting and using only the lift...
Page 16: ...the front door opened without having to remove the burner 9 9For Belgium boilers must be installed according to the NBN D51 003 standard the NBN B61 001 standard output 70 kW 9 9When installing the b...
Page 17: ...Flow sensor socket connector 1 2 70mm 150mm 70mm 150mm 2 Overtemperature protection 1 2 120mm 190mm 120mm 190mm 3 Return sensor socket connector 1 2 120mm 150mm 120mm 150mm 4 Flue gases sensor socket...
Page 18: ...60 70 80 90 100 0 10 20 30 40 50 60 70 80 90 100 110 120 130 140 150 160 170 180 190 200 210 220 230 240 250 260 270 280 290 300 TAU N 2100 TAU N 2600 Flow rate m3 h The curves refer to a density of 9...
Page 19: ...rst time once it is filled and the air expelled it should never need to be topped up again Systems should also be operated at maximum working tem perature the first time they are started up in order t...
Page 20: ...all applicable legislation 9 9Circuits filled with anti freeze must be fitted with water disconnectors DESCRIPTION TAU N 2100 2600 1 System delivery DN200 PN6 DN200 PN6 DN 2 2nd return High temperatur...
Page 21: ...9 9Domestic hot water and central heating circuits must be completed with expansion vessels of adequate capacity and suitable correctly sized safety valves The discharge of safety valves and applianc...
Page 22: ...RN LT RETURN CENTRAL HEATING SUPPLY MAKE UP WATER 1 2 1 2 1 2 1 Boiler 2 Burner 3 Disconnect valves 4 Central heating system pump 5 Non return valves 6 Automatic vent valve 7 Boiler safety valve 8 Boi...
Page 23: ...AL HEATING SUPPLY 1 2 1 2 1 Boiler 2 Burner 3 Disconnect valves 4 Central heating system pump 5 Non return valves 6 Automatic vent valve 7 Boiler safety valve 8 Boiler drain cock 9 Y filter 10 Pressur...
Page 24: ...N LT CENTRAL HEATING RETURN CENTRAL HEATING SUPPLY 1 2 1 2 1 2 1 Boiler 2 Burner 3 Disconnect valves 4 Central heating system pump 5 Non return valves 6 Automatic vent valve 7 Boiler safety valve 8 Bo...
Page 25: ...1 2 1 2 1 2 COLD WATER INLET 1 Boiler 2 Burner 3 Disconnect valves 4 Central heating system pump 5 Non return valves 6 Automatic vent valve 7 Boiler safety valve 8 Boiler drain cock 9 Y filter 10 Pre...
Page 26: ...top fitting H2 O L 3 10 Neutralising the condensate TYPE N3 NEUTRALISATION KIT The TYPE N3 neutralisation units were designed for systems equipped with the central heating plant condensate outlet trap...
Page 27: ...he boiler condensate drain fitting using the flexible hose C supplied This condensate drain hose is specially made to prevent combustion fumes escaping into the atmosphere The outlet fitting B of the...
Page 28: ...e condensate boiler condensate at discharge or neutralisation of condensate 9 9The stack must guarantee the minimum draught specified by applicable technical standards assuming zero pressure at the co...
Page 29: ...y If you need to reverse the direction of opening remove the boil er s side panel and proceed as follows 9 9Check that the main locking screws 1 are fully tightened 1 Remove the snap ring 2 and the th...
Page 30: ...y a connection point is pro vided in the centre of the frame to be connected to an effective earthing system Proceed as follows Unscrew the nut and washer 1 from the earth terminal Attach the earth ca...
Page 31: ...l panel cable grommets Route the electrical cables through them and insert the sensors in their sockets Fasten the control panel A to the panelling using the screws supplied 4 A 3 Fit the side panels...
Page 32: ...e lower profile of the rear panel 14 hook the profile to the pro vided pins and fix it with two self threading screws 14 Fit the central rear panels 15 16 inserting them from the sides to hook them to...
Page 33: ...on en condensafvoerleidingen MINSTENS EENMAAL PER JAAR volgens de aanwijzingen in de handleiding voor gebruik en onderhoud Controlar y limpiar el sif n y las tuber as de evacuaci n condensaci n ANUALM...
Page 34: ...ly bled The condensate discharge siphon has been filled with water The mains power connections to the boiler and its ac cessories burner pump control panel thermostats etc have been properly made 9 9T...
Page 35: ...formed properly Check that all the electrical connections shown on the control panel wiring diagrams have been performed properly 4 3 Checks during and after initial start up Once the boiler has start...
Page 36: ...ch OFF Close all the gas cocks Door opening To open the door simply completely unscrew the main locking nuts 1 that support themselves on the structure 1 To avoid dangerous leaks of combustion gases t...
Page 37: ...racket B If one of these two conditions is not met proceed with the ad justment operations described on the following pages 2 1 B 9 9The pin 1 must not be used as a handle to close the door Door balan...
Page 38: ...eted tighten the nut 8 completely Check the correct opening closing of the door 8 9 8 Door seal adjustment Loosen the screws 10 of the upper and lower hinge and adjust the position of the door until t...
Page 39: ...ket wrench A 9 9Make sure that there are no leaks around the boiler door seal If you detect any leakage of fumes increase the tight ening of the door fixing bolts 9 9Make sure that the door is properl...
Page 40: ...sumption Open the front door 1 Remove the turbulators 2 check their state of wear and the opening of the fins replace if necessary Clean the internal surfaces of the combustion chamber and the flue g...
Page 41: ...trically disconnected Suitable personal protection equipment The water and fuel shut off valves closed In order to inspect the upper part of the boiler partially empty the boiler before opening inspec...
Page 42: ...Air in the circuit Check the circuit pressure Check the vent valve The generator is at temperature but the heating system is cold Air in the circuit Bleed the circuit Pump malfunctioning Check unseize...
Page 43: ...43 TECHNICAL ASSISTANCE SERVICE TECHNICAL ASSISTANCE SERVICE...
Page 44: ...lo 7 37045 Legnago VR www riello com The manufacturer strives to continuously improve all products Appearance dimensions technical specifications standard equipment and accessories are therefore liabl...