27
LUFT-/BRENNSTOFFEINSTELLUNG
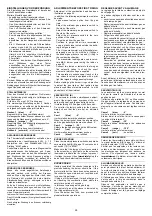
Die Luft-/Brennstoffabstimmung erfolgt mt Hilfe
eines Stellantriebs, der √ mit einem Nocken mit
variablem Profil verbunden √ auf die Luftklap-
pen im Auslass und über ein Hebelsystem auf
den Flammkopf und die Gasdrossel einwirkt.
Siehe Abb. (B).
Um Verluste zu reduzieren und einen weiten
Regelbereich zu haben, sollte der Stellantrieb
auf das Maximum der benutzten Leistung, so
nah wie möglich an der Höchstöffnung (125°)
gestellt werden.
An der Gasdrossel erfolgt die Drosselung des
Brennstoffs je nach verlangtem Potential bei
ganz geöffnetem Stellantrieb über den Druck-
stabilisator an der Gasarmatur.
HÖCHSTLEISTUNG
Lufteinstellung
Den Stellantrieb auf maximale Öffnung einstel-
len, so dass die Luftklappen ganz geöffnet sind.
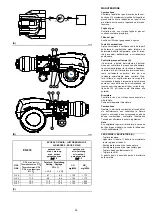
Um die Leistung zu reduzieren, die Schraube
2)(A) unter der Brenneransaugung lockern und
das Gitter 1)(A) nach und nach schließen, bis
die verlangte Leistung erhalten ist.
Die Drosselung in Ansaugung ist nur, wenn der
Brenner auf dem Maximum des Regelbereichs
in S. 16 funktioniert, nicht notwendig.
Wichtig.
Sich im manuellen Modus auf Höchstleistung
bringen und die Einstellung erst beenden,
nachdem die Drosselung in Ansaugung, der
Gasdruck und die Einstellung des Flammkopfes
durchgeführt sind.
MINDESTLEISTUNG
Die Mindestleistung ist im Regelbereich auf
Seite 16 auszuwählen.
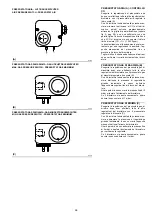
Den Wählschalter 2)(D) S.24 ’Leistungsreduzie-
rung∆ drehen und nach ’-’ gedreht halten, bis
der Stellantrieb die Luftklappe und die Gasdros-
sel auf 35° geschlossen hat (werkseitige Ein-
stellung).
Gaseinstellung
Den Gasdurchsatz am Zähler messen.
- Zur Abnahme den Nockenwinke 2)(B)S.24
mit kleinen Verstellungen reduzieren, d.h.
vom Winkel 35° auf 33° - 31°....
- Zur Erhöhung, Wählschalter ’Leistungserhö-
hung≈ 2)(D)S.24 drehen (d.h. die Gasdrossel
auf 10-15° öffnen), den Nockenwinkel
2)(B)S.24 mit kleinen Verstellungen vergrö-
ßern, d.h. vom Winkel 35° auf 37° - 39°....
Dann auf die Taste ≈-∆ drücken, bis der Stel-
lantrieb wieder die Stellung der Mindestöff-
nung erreicht und dabei den Gasdurchsatz
messen.
Lufteinstellung
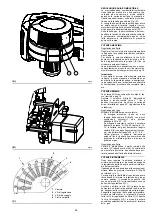
Das Anfangsprofil des Nocken 1)(C) über die
Schrauben 2) verändern. Die erste Schraube
möglichst nicht verdrehen, mit dieser wird die
Luftklappe ganz geschlossen.
ZWISCHENLEISTUNGEN
Nachdem Höchst- und Mindestleistung des
Brenners eingestellt sind, wird die Regelung der
Luft auf mehrere Zwischenpositionen des Stel-
lantriebs ausgeführt.
Der Übergang von einer Position auf die näch-
ste erfolgt, indem Wählschalter 2)(D)S.24 auf
(+) oder (-) gedrückt bleibt.
Für eine bessere Wiederholbarkeit der Einstel-
lung kann die Drehung der Nockengruppe
gestoppt werden, wenn das obere Lager, das
auf Profil 4)(C) gleitet, mit einer der Stellschrau-
ben 2)(C) gefluchtet ist.
Die gewählte Schraube 2)(C) fest- oder los-
schrauben, um den Luftdurchsatz zu erhöhen
bzw. zu verringern, so dass er dem entspre-
chenden Gasdurchsatz angepasst ist.
Nach Durchführung der Leistungseinstellungen
(Höchstleistung, Mindestleistung, Zwischen-
werte), müssen alle Stellschrauben der Luft
2)(C) mit den Sperrschrauben 3)(C) blockiert
werden, so dass mögliche Verschiebungen aus
den für Luft/Gas eingestellten Positionen verhin-
dert werden.
AIR/FUEL ADJUSTMENT
Fuel/combustion air is synchronized by means
of a servomotor that, connected to a variable-
profile cam, operates the outlet air dampers
and, by means of suitable linkage, the combus-
tion head and gas butterfly valve. See Fig. (B).
To reduce pressure loss and to have a wider
adjustment range, it is best to set the servomo-
tor to the maximum output used, as near to
maximum opening (125°) as possible.
On the gas butterfly valve, the fuel»s partial set-
ting adjustment based on required output, with
the servomotor fully open, is made by using the
pressure stabilizer on the train.
MAX
OUTPUT
Adjustment of air delivery
Set the servomotor to maximum opening so that
the air dampers are fully open.
To reduce output, loosen screw 2)(A) under the
burner»s intake and close grille 1)(A) progres-
sively until you achieve the required output.
The only time reducing intake to a partial setting
is not necessary is when the burner is working
at the top of the operating range given on page
16.
Important note.
We recommend you achieve the maximum out-
put required manually, and adjust intake to the
partial setting, define gas pressure and adjust
the combustion head before completing the set-
ting.
MIN OUTPUT
Min output must be selected within the firing rate
range shown on page 16.
Turn the "decrease output" selector 2)(D)p.24
and keep it turned towards "-" until the servomo-
tor has closed the air damper and the gas but-
terfly valve is at 35° (factory setting).
Adjusting gas delivery
Measure the gas delivery at the gas meter.
- If this value is to be reduced, decrease the
angle of cam 2)(B)p.24 slightly by proceeding
a little at a time until the angle is changed
from 35° to 33° - 31°....
- If it has to be increased, turn the "increase
output" selector 2)(D)p.24 (i.e. open the gas
butterfly valve by 10-15°), increase the cam
2)(B)p.24 angle with small successive move-
ments, i.e. take it from angle 35° to 37° -
39°....
Then press the button ≈output decrease∆ until
the servomotor is taken to the minimum open-
ing position and measure the gas delivery.
Adjustment of air delivery
Progressively adjust the starting profile of cam
1)(C) by turning the screws 2).
It is preferable not to turn the first screw since
this is used to set the air gate valve to its fully-
closed position.
INTERMEDIATE OUTPUTS
Once you have adjusted the burner's maximum
and minimum output, the next step is to adjust
air at the various intermediate servomotor
positions.
You can switch from one position to the next by
holding selector 2)(D)p.24 on the (+) or (-)
symbol.
For improved adjustment repeatability, make
sure you stop rotation of the cam assembly
when the upper bearing running on the profile
4)(C) is aligned with one of the adjusting screws
2)(C).
Tighten or loosen the preselected screw 2)(C) to
increase or decrease airflow so as to adapt it to
the corresponding gas flow.
Once output adjustments (maximum, medium
and intermediate) have been carried out, it is
important you secure all the air regulation
screws 2)(C) with the locking screws 3)(C) so as
to prevent possible shifting of air-gas setting
positions.
RÉGLAGE AIR/ COMBUSTIBLE
La synchronisation combustible/air comburant a
lieu grâce à un servomoteur relié à une came à
profil variable qui agit sur le volet d»air en refou-
lement et, à l»aide de systèmes de levier appro-
priés, sur la tête de combustion et sur la vanne
papillon du gaz. Voir Fig. (B).
Il est conseillé de régler le servomoteur le plus
près possible de l»ouverture maximale (125°),
au maximum de la puissance utilisée, pour
réduire les fuites et avoir une vaste plage de
réglage.
La division du combustible en fonction de la
puissance requise, avec le servomoteur entière-
ment ouvert, se fait sur la vanne papillon du gaz
à l»aide d»un stabilisateur de pression situé sur
la rampe.
PUISSANCE MAXIMUM
Réglage de l'air
Régler le servomoteur à l»ouverture maximale
afin que les volets d»air soient complètement
ouverts.
Pour réduire la puissance, desserrer la vis 2) (A)
qui se trouve sous l»aspiration du brûleur et fer-
mer progressivement la grille 1) (A) afin d»obte-
nir la puissance voulue.
La division en aspiration n»est nécessaire que si
le brûleur fonctionne au maximum de la plage
de travail reportée à la page 16.
Important
Il est conseillé de se mettre à la puissance maxi-
male requise en mode manuel et de ne procé-
der au réglage complet qu»après avoir défini la
division en aspiration, la pression du gaz et le
réglage de la tête de combustion.
PUISSANCE MINIMUM
La puissance minimum doit être choisie dans la
plage indiquée page 16.
Tourner le sélecteur 2 (D)p.24 ≈diminution de la
puissance∆ et le maintenir tourné vers le ≈-∆
jusqu»à ce que le servomoteur ait fermé le volet
d»air et la vanne papillon du gaz à 35° (réglage
fait en usine).
Réglage du gaz
Mesurer le débit du gaz au compteur.
- S'il faut diminuer ce débit, réduire légèrement
l'angle de la came 2)(B)p.24 par de légers
déplacements successifs, c'est-à-dire aller de
l'angle 35° à 33° - 31°....
- S'il faut l'augmenter, tourner le sélecteur
≈augmentation de la puissance∆ 2)(D)p.24
(c»est-à-dire ouvrir de 10-15° la vanne-
papillon du gaz), augmenter l»angle de la
came 2)(B)p.24 par de légers déplacements
successifs, c»est-à-dire aller de l»angle 35° à
37° - 39°....
Appuyer ensuite sur le bouton ≈diminution de
la puissance∆ afin de reporter le servomoteur
en position d»ouverture minimum et mesurer
le débit du gaz.
Réglage de l'air
Modifier en progression le profil initial de la
came 1)(C) en agissant sur les vis 2). Si possi-
ble, ne pas serrer la première vis: il s'agit de la
vis qui ferme complètement le volet de l'air.
PUISSANCES INTERMEDIAIRES
Après avoir réglé la puissance maximale et
minimale du brûleur, on peut régler l»air sur plu-
sieurs positions intermédiaires du servomoteur.
On obtient le passage d»une position à la sui-
vante en appuyant sur le sélecteur 2)(D)p.24
sans le relâcher pour le mettre sur le symbole
(+) ou (-).
Pour une meilleure répétitivité du réglage, veiller
à arrêter la rotation du groupe came quand le
roulement supérieur, qui coulisse sur le profil
4)(C), se trouve aligné avec une des vis de
réglage 2)(C).
Visser ou dévisser la vis 2)(C) choisie pour aug-
menter ou diminuer le débit d»air afin de l»adap-
ter au débit correspondant du gaz.
Après avoir effectué le réglage des puissances
(maximale, minimale et intermédiaires), il est
important de bloquer toutes les vis de réglage
de l»air 2)(C) en vissant les vis de blocage 3)(C)
afin d»éviter les déplacements possibles des
positions de réglage air √ gaz.


