


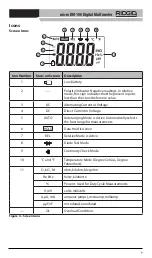


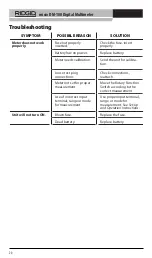


micro DM-100 Digital Multimeter
16
2. Insert the black test lead plug into the “COM” terminal and the red test lead plug into
the “Ω” terminal.
3. Touch the test probe tips across the circuit or part under test. It is good practice to
disconnect one side of the part under test so the rest of the circuit will not interfere
with the resistance reading.
4. Read the resistance in the display. The display will indicate the proper value with deci-
mal point and symbol.
5. After resistance test, the capacitive circuits must be discharged. This will help protect
against electric shock.
Diode Test
WARNING
To reduce the risk of electric shock, do not test any diode that has voltage
on it.
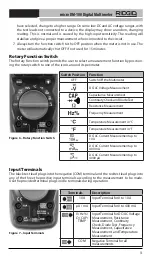
1. Set the function switch to
position.
2. Press the
button until the
symbol appears in the display.
3. Insert the black test lead plug into the “COM” terminal and the red test lead plug into
the “Ω” terminal.
4. Touch the test probe tips to the diode or semiconductor junction to test. Note the
meter reading.
5. Reverse the probe polarity by switching probe position. Note this reading.
6. The diode or junction can be evaluated as follows:
• If one reading shows a value and the other reading shows OL, the diode is good.
• If both readings show OL, the device is open.
• If both readings are very small or 0, the device is shorted.
NOTE! The value indicated in the display during the diode check is the forward voltage.
Continuity Check
WARNING
To reduce risk of electric shock, never measure continuity on circuits or
wires that have voltage on them.
1. Set the function switch to
position.
2. Insert the black test lead plug into the “COM” terminal and the red test lead plug into
the “Ω” terminal.
3. Press the
button until the
symbol appears on display screen.
4. Check meter operation by touching probe tips together. An audible signal should
sound.
5. Touch the test probe tips to the circuit or wire to check.
6. If the resistance is less than approximately 150 Ω, an audible signal will sound. The
display will also show the actual resistance.
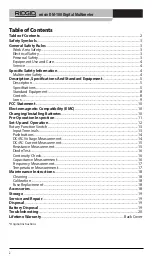
Summary of Contents for micro DM-100
Page 83: ...micro DM 100 Digital Multimeter 82 ...
Page 105: ...micro DM 100 Digitale multimeter 104 ...
Page 247: ...Multimetr cyfrowy micro DM 100 246 ...


