Ricoh SP 211 User Manual Download Page 51

Item

Description

Status

Displays the status of the IPsec policy as "Active" or "Inactive".

To configure IPsec policies, select the desired IPsec policy, and then click [Change] to open the "IPsec
Policy Settings" page. The following settings can be made on the "IPsec Policy Settings" page.
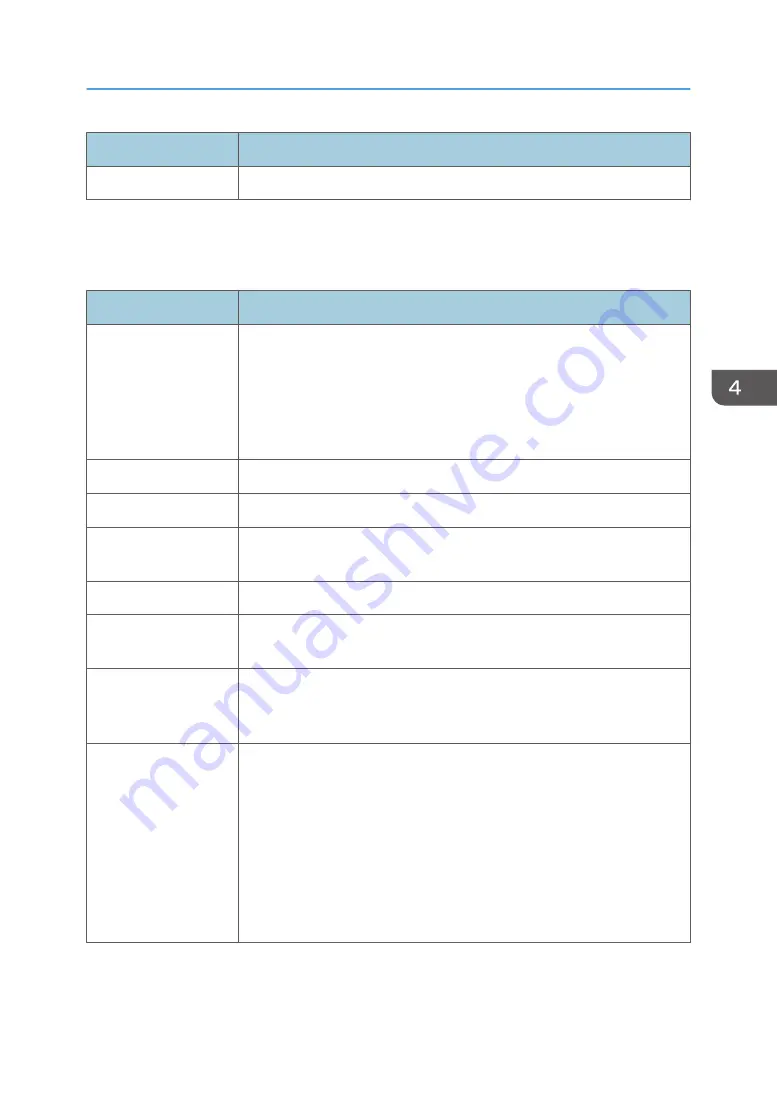
IP Policy Settings

Item

Description

No.

Specify a number between 1 and 10 for the IPsec policy. The number you
specify will determine the position of the policy in the IPsec Policy List. Policy
searching is performed according to the order of the list. If the number you
specify is already assigned to another policy, the policy you are
configuring will take the number of the earlier policy, and the earlier policy
and any subsequent policies will be renumbered accordingly.

Activity

Select whether to enable or disable the policy.

Name

Enter the name of the policy. Can contain up to 16 characters.

Address Type

Select IPv4 or IPv6 as the type of IP address to be used in IPsec
communication.

Local Address

Displays the IP address of this printer.

Remote Address

Enter the IPv4 or IPv6 address of the device with which to communicate.
Can contain up to 39 characters.

Prefix Length

Enter the prefix length of the Remote Address, using a value between 1 and
128. If this setting is left blank, "32" (IPv4) or "128" (IPv6) will be
automatically selected.

Action

Specify how the IP packets are processed from the following:

• [Allow]: IP packets are both sent and received without IPsec applied to

them.

• [Drop]: IP packets are discarded.
• [Require Security]: IPsec is applied to IP packets that are both sent and

received.

If you have selected [Require Security], you must configure [IPsec Settings]
and [IKE Settings].

Configuring the IPsec Settings

49

Summary of Contents for SP 211

Page 1: ...t use be sure to read Safety Information before using the machine Appendix Troubleshooting Maintaining the Machine Con guring the Machine Using Utilities Printing Documents Loading Paper Guide to the...

Page 2: ......

Page 3: ...figuring the IP Address Settings Using the Smart Organizing Monitor 12 Wireless LAN Setup 13 2 Loading Paper Supported Paper 17 Non Recommended Paper Types 19 Print Area 20 Loading Paper 21 Loading Pa...

Page 4: ...3 SNMP Tab 44 SMTP Tab 45 POP3 Tab 45 Wireless Tab 46 Configuring the IPsec Settings 48 IPsec Global Settings Tab 48 IPsec Policy List Tab 48 Printing Lists Reports 52 Configuring the Administrator Se...

Page 5: ...ions Do Not Match Display Positions 75 Error and Status Indicate on the Control Panel 76 Error and Status Messages Appear on Smart Organizing Monitor 77 7 Appendix Notes About the Toner 79 Moving and...

Page 6: ...al advisor Disclaimer Contents of this manual are subject to change without prior notice To the maximum extent permitted by applicable laws in no event will the manufacturer be liable for any damages...

Page 7: ...e strongly recommend you to create your own password immediately The following are the operations that can be password protected Configuring the System Settings Network Settings IPsec Settings or Admi...

Page 8: ...6...

Page 9: ...enu for configuring the WPS using the PIN code or when in PBC mode 2 key Press this key to cancel an ongoing print job You can also print the test page by switching the power on while holding this key...

Page 10: ...nces Raise this fence to prevent paper from falling off 8 Front Cover Open this cover to replace consumables or clear a paper jam 9 Bypass Tray This tray can hold one sheet of plain paper 10 Tray 1 Th...

Page 11: ...rior DCT064 1 1 Print Cartridge A replacement consumable that is required to make prints on paper For details about replacing the cartridge see page 61 Replacing the Print Cartridge Guide to Component...

Page 12: ...you can check the machine s status configure its settings and use other functions For details about how to use Smart Organizing Monitor see page 56 Using Smart Organizing Monitor Web Image Monitor You...

Page 13: ...printers automatically To search for a printer by its IP address select Search for printers by specified IP Address To select a port or specify a new port select Select a port or specify a new port I...

Page 14: ...izing Monitor Specifying settings to receive an IPv6 address automatically A DHCP server is required on the network for the machine to receive an IPv6 address automatically 1 On the Start menu click A...

Page 15: ...9 Select Enable in IPv6 10 Enter values in Manual address Prefix length and Gateway and then click OK 11 Click Close Wireless LAN Setup This section explains how to configure the wireless LAN setting...

Page 16: ...uthentication box select the authentication method 12 In the Encryption box select the encryption method If you have selected WPA2 PSK or Mix Mode WPA WPA2 in Authentication proceed to Step 17 13 In t...

Page 17: ...default access code is Admin Enter Admin if it has not been changed Case is significant 7 On the Network 1 tab set Wireless Function to Active 8 On the Wireless tab set Manual Setup to Configuration M...

Page 18: ...tors start flashing then after 30 seconds the alert indicator goes out and the power indicator lights continuously For details about how to use Smart Organizing Monitor see page 56 Using Smart Organiz...

Page 19: ...following paper sizes are supported as custom paper sizes Horiz Tray1 Approximately 100 216 mm 3 9 8 5 inches Bypass Tray Approximately 90 216 mm 3 6 8 5 inches Vert Approximately 148 356 mm 5 8 14 in...

Page 20: ...Bypass Tray 1 sheet 70 g m2 19 lb 2 Loading Paper 18...

Page 21: ...using paper printed on by other than a laser printer e g monochrome and color copiers ink jet printers etc Special paper such as thermal paper and carbon paper Paper weighing heavier or lighter than t...

Page 22: ...1 4 4 1 Print area 2 Feed direction 3 Approx 4 2 mm 0 2 inches 4 Approx 4 2 mm 0 2 inches The print area may vary depending on the paper size and printer driver settings To adjust the print position s...

Page 23: ...cify the paper size and paper type and select the paper tray in the printer driver so that the settings configured when paper is loaded can be used for printing Loading Paper into Tray 1 1 Pull Tray 1...

Page 24: ...n loading A4 or letter size paper align the paper guide to the following position DCT871 4 Fan the paper before loading it in the tray 5 Load the new paper stack print side down Make sure paper is not...

Page 25: ...es DCT049 7 Carefully push Tray 1 straight into the machine DCT011 To avoid paper jams make sure the tray is securely inserted To deliver the sheets face up open the rear cover DCT037 Extending Tray 1...

Page 26: ...nner surface and the scale are aligned You can adjust the length of the extender in three steps When using A4 or letter size paper adjust the length to the position indicated by the mark in the tray D...

Page 27: ...m size paper longer than A4 must be loaded without attaching the tray cover Loading Paper into Bypass Tray Do not load paper in the bypass tray unless the message Ready appears in Smart Organizing Mon...

Page 28: ...ust the side guides to the paper width DCT014 To deliver the sheets face up open the rear cover DCT037 Specifying Paper Type and Paper Size Using Smart Organizing Monitor The procedure in this section...

Page 29: ...desired tray and then click OK 7 Click Close Changing the custom paper size 1 On the Start menu click All Programs 2 Click Smart Organizing Monitor for SP xxx Series 3 Click Smart Organizing Monitor...

Page 30: ...2 Loading Paper 28...

Page 31: ...application If a paper jam occurs printing stops halfway Open the front cover remove the print cartridge and then remove the jammed paper If the paper cannot be removed in this way remove it by openin...

Page 32: ...side of the prints turn them over so that the blank side faces down and place them in Tray 1 Fan the paper well before loading it Portrait DCT005 Landscape DCT006 6 Press the key If the rear cover is...

Page 33: ...ect the print job you want to cancel click the Document menu and then click Cancel If you cancel a print job that has already been processed printing may continue for a few pages before being canceled...

Page 34: ...3 Printing Documents 32...

Page 35: ...be performed remotely using Web Image Monitor on a computer Displaying the machine s status or settings Configuring the machine s settings Configuring the network settings Configuring the IPsec settin...

Page 36: ...ad of the IP address The top page of Web Image Monitor appears Top page Every Web Image Monitor page is divided into the following areas DCT880 1 2 3 4 1 Menu area Clicking a menu shows its contents i...

Page 37: ...ript and cookies disabled display and operation problems may occur If you are using a proxy server configure the Web browser settings as necessary For details about the settings contact your network a...

Page 38: ...information of the machine as registered on the SNMP page Host Name Shows the host name specified in Host Name on the DNS page Status Shows the current messages on the machine s display Status Item D...

Page 39: ...hows the version of firmware installed on the machine Engine FW Version Shows the version of firmware for the machine engine Machine ID Shows the identification number of the machine Total Memory Show...

Page 40: ...ng Plain Paper Recycled Paper Thick Paper 100 to 130g m2 Thin Paper 52 to 64g m2 Bypass Tray Item Description Paper Size Select the paper size for the bypass tray from the following A4 B5 JIS A5 B6 JI...

Page 41: ...e printer driver you have installed in your computer can be used with any machine other than the one originally used for installation if the machine is of the same model If disabled you must install t...

Page 42: ...ws the name used to identify the machine on the network Network Version Shows the version of the machine s network module a part of the machine firmware Ethernet MAC Address Shows the Ethernet MAC add...

Page 43: ...eless Address Displays up to four stateless auto addresses Gateway Address Displays the machine s default gateway address Link local Address Displays the link local address of the machine The link loc...

Page 44: ...ab DNS Item Description DNS Method Select whether to specify domain name servers manually or receive DNS information from the network automatically When set to Auto Obtain DHCP Primary DNS Server Seco...

Page 45: ...ab E mail Notification 1 E mail Notification 2 Item Description Display Name Enter a sender name for notification e mail Can contain up to 32 characters E mail Address Enter the address of the recipie...

Page 46: ...of a management host Can contain up to 64 characters Community Item Description Get Community Enter the community name to use for authentication of Get requests Can contain up to 32 characters Trap C...

Page 47: ...rver Can contain up to 32 characters Password Enter the password for logging in to the SMTP server Can contain up to 32 characters Device E mail Address Enter the machine s e mail address This address...

Page 48: ...dress Communication Mode Displays the communication mode that the machine is connecting in SSID Displays the SSID of the access point that the machine is connected to Channel Displays the channel info...

Page 49: ...cted for Encryption select 64 bits or 128 bits for the length of the encryption key WEP Transmit Key ID Select an ID number to identify each WEP key in case multiple WEP connections are configured WEP...

Page 50: ...IPsec from the following DHCPv4 DHCPv6 SNMP mDNS NetBIOS UDP Port 53550 All ICMP Bypass Select whether to apply IPsec to ICMP packets IPv4 and IPv6 from the following Active All ICMP packets will be b...

Page 51: ...ingly Activity Select whether to enable or disable the policy Name Enter the name of the policy Can contain up to 16 characters Address Type Select IPv4 or IPv6 as the type of IP address to be used in...

Page 52: ...hm for AH Specify the authentication algorithm to be applied when AH or ESP AH is selected for Security Protocol from the following MD5 SHA1 Encryption Algorithm for ESP Specify the encryption algorit...

Page 53: ...lgorithm from the following MD5 SHA1 IKE Life Time Specify the life time of the ISAKMP SA as a time period Enter a number of seconds IKE Diffie Hellman Group Select the IKE Diffie Hellman Group to be...

Page 54: ...est Page Prints a test page for checking the printing condition PCL Font List Prints the current configuration and installed PCL font list Maintenance Page Prints the maintenance page Reports cannot b...

Page 55: ...ord again to confirm Reset Settings Tab Reset Settings Item Description Reset Network Settings Select to restore settings configured under the Network Settings and Administrator Tools Reset Menu Setti...

Page 56: ...file 6 Specify a name for the file and click Save Back up IPsec Settings appears only when the administrator password is specified Restore Setting Tab When the machine is returned from repair it is im...

Page 57: ...pears Try again to restore the file completely Help Source File Setting Tab Help Source File Setting Item Description Help Source File Enter the address URL of the Help button Up to 50 alphanumeric ch...

Page 58: ...emaining Level 1 to 5 Almost Empty and Empty Input Tray You can check the following information about the input trays Input Tray Status Paper Size Paper Type Displays the type of the paper loaded into...

Page 59: ...selected click Connect Printer and then select the machine s model 4 On the User Tools tab click Printer Configuration 5 Enter the access code The default access code is Admin 6 Change the settings if...

Page 60: ...ce settings including the timeout setting and protocol settings Checking or making TCP IP settings Checking or making SMTP and SNMP settings Checking or making Alert settings Wireless LAN Settings tab...

Page 61: ...ge or maintenance page By updating the firmware you can resolve problems or add a number of new functions For details about updating the firmware see the Firmware Update Guide The Firmware Update Guid...

Page 62: ...4 Configuring the Machine Using Utilities 60...

Page 63: ...cturer shall not be responsible for any damage or expense that might result from the use of parts other than genuine parts from the manufacturer with your office products 1 Open the front cover and th...

Page 64: ...nt cartridge in horizontally and then slowly push it in all the way Finally push the cartridge down until it clicks into place DCT026 6 Carefully push up the front cover until it closes 5 Maintaining...

Page 65: ...dry wipe the area and allow it to dry To avoid deformation discoloration or cracking do not use volatile chemicals such as benzine and thinner or spray insecticide on the machine If there is dust or g...

Page 66: ...loth to wipe the inside of the machine toward and away from yourself DCT040 Wipe carefully so as not to touch any protrusions inside the machine 4 Slide the print cartridge in horizontally and then sl...

Page 67: ...inserted into the wall outlet Make sure that the wall outlet is not defective by connecting another working device Pages are not printed The USB cable or network cable is not connected correctly Reco...

Page 68: ...st the paper guides to remove the gaps Avoid printing on both sides of paper when printing images that contain large areas of solid color which consume a lot of toner Use supported types of paper See...

Page 69: ...he gaps Removing Printing Jams Jammed paper may be covered in toner Be careful not to get toner on your hands or clothes Toner on prints made immediately after clearing a paper jam may be insufficient...

Page 70: ...ay 1 back in until it stops 3 Open the front cover and then carefully lower it DCT027 4 Carefully pull out the print cartridge horizontally holding its center DCT024 Do not shake the removed print car...

Page 71: ...and then slowly push it in all the way Finally push the cartridge down until it clicks into place DCT026 7 Carefully push up the front cover until it closes DCT028 If the error display continues to a...

Page 72: ...carefully DCT015 2 Close the bypass tray 3 Follow Steps 3 to 7 in Removing Jammed Paper from Tray 1 If the error display continues to appear perform the procedure described in Opening the Rear Cover t...

Page 73: ...g cover DCT035 3 Push the levers on the sides down with your thumbs DCT036 4 Remove the jammed paper carefully DCT068 5 Push the levers on the sides up with your thumbs 6 Close the fusing cover Paper...

Page 74: ...7 Close the rear cover DCT023 6 Troubleshooting 72...

Page 75: ...e machine See page 17 Supported Paper The paper type setting is incorrect Make sure that the paper type setting of the printer driver matches the type of paper loaded See page 17 Supported Paper A non...

Page 76: ...volume High volume data such as graphics heavy documents take longer to process Wait for a while To speed up printing reduce the printing resolution using the printer driver The whole printout is blu...

Page 77: ...rinted page differs from the position displayed on the computer screen the cause may be one of the following Possible Cause Solution Page layout settings are not configured properly Check that the pag...

Page 78: ...tridge is empty Set the print cartridge again correctly Load paper into the tray Flashing On A paper jam has occurred in the machine Use Web Image Monitor or Smart Organizing Monitor to determine wher...

Page 79: ...is not set properly or no paper loaded Check the indicated tray Tray 1 has run out of paper The bypass tray has run out of paper Load paper into Tray 1 See page 21 Loading Paper Load paper into the by...

Page 80: ...s see the printer driver Help Waste Toner full No printing is available Open the indicated cover and then replace Print Cartridge The waste toner bottle is full Replace the print cartridge Unit Not De...

Page 81: ...ut the Toner Proper operation cannot be guaranteed if any third party toner is used Depending on printing conditions there are cases where the printer cannot print the number of sheets indicated in th...

Page 82: ...heck the following points The power switch is turned off The power cord is unplugged from the wall outlet All other cables are unplugged from the machine 2 Lift the machine using the inset grips on bo...

Page 83: ...rtridge replacement we recommend you purchase and store extra print cartridges The actual number of printable pages varies depending on the image volume and density number of pages printed at a time p...

Page 84: ...71 4 101 2 Executive A5 A6 B6 16K 197 273 mm 16K 195 270 mm 16K 184 260 mm Custom Paper Size The following paper sizes are supported as custom paper sizes Width Tray1 Approximately 100 216 mm 3 9 8 5...

Page 85: ...aver mode 2 3 4 W Machine dimensions Width Depth Height 402 360 165 mm 15 8 14 2 6 5 inches Weight machine body with consumables Approximately 7 2 kg 16 lb or less Printer Function Specifications Prin...

Page 86: ...Wi Fi Printer language PCL 7 Appendix 84...

Page 87: ...rer 9 Internet Explorer 10 Internet Explorer 11 The proper names of the Windows operating systems are as follows The product names of Windows XP are as follows Microsoft Windows XP Professional Micros...

Page 88: ...Server 2008 Standard Microsoft Windows Server 2008 Enterprise The product names of Windows Server 2008 R2 are as follows Microsoft Windows Server 2008 R2 Foundation Microsoft Windows Server 2008 R2 St...

Page 89: ...erior 9 Introduction 4 IP address 5 12 IPsec global settings 48 IPsec policy settings 48 IPsec settings 48 IPv6 configuration 41 J Job cancel 30 L Language 35 Legal prohibition 4 Lists 52 Loading pape...

Page 90: ...atus indicate 76 Status information 36 Status messages 77 Supported paper 17 System information 36 56 System settings 38 T Toner 36 79 Top page 34 Trademarks 85 Tray 1 21 Tray paper settings 38 Troubl...

Page 91: ...2014...

Page 92: ...M215 8631 TW EN...

Reviews: