background image

Items for Specifying Scan Settings

107

6

E

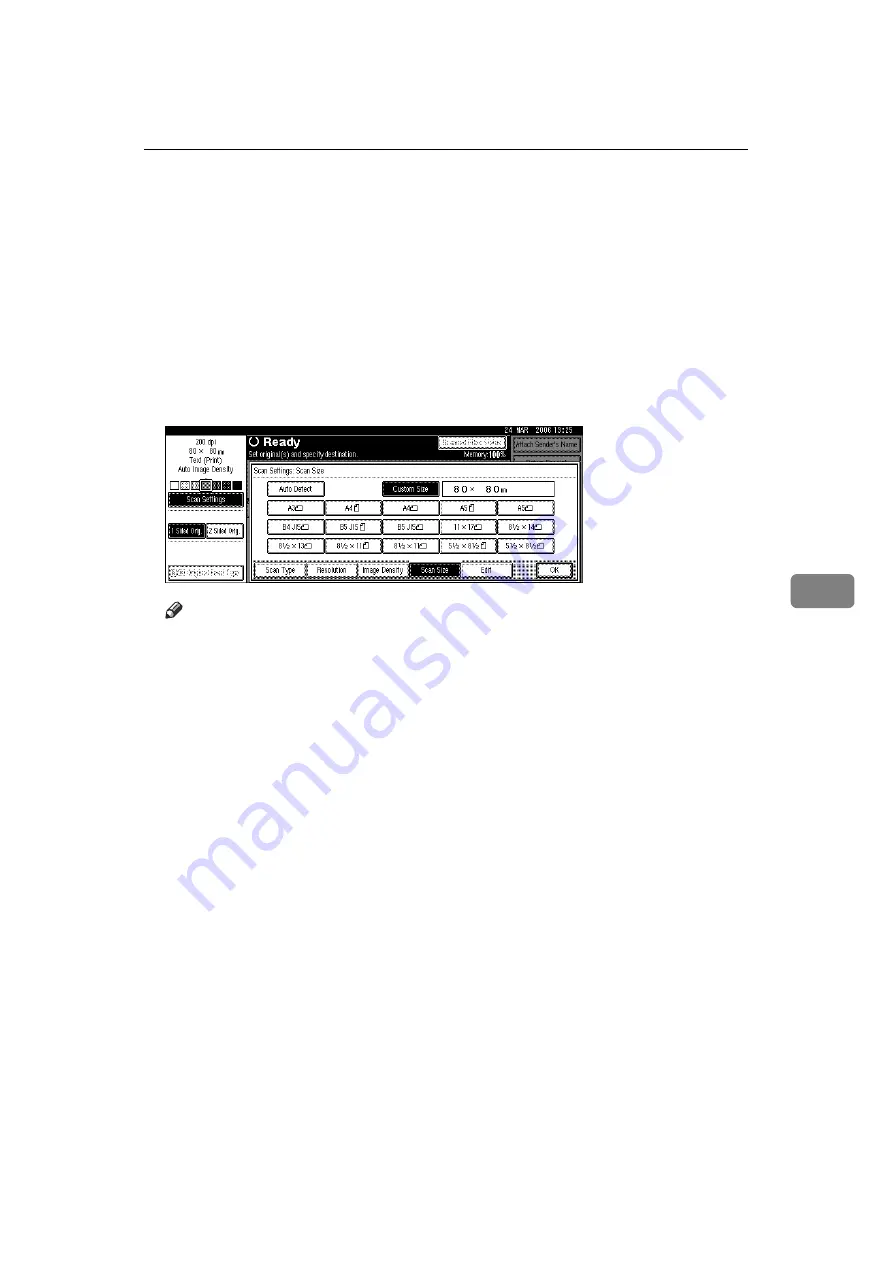
Specify Start Position (X2 and Y2) using the number keys, and then press
the 

{

q

}

 key.

For example, set X2 to 30 mm and Y2 to 20 mm.

F

Specify Scan Area (X3 and Y3) using the number keys, and then press the

{

q

}

 key.

For example, set X3 and Y3 to 80 mm.

G

Press 

[

OK

]

.

H

Check Scan Area (X3 and Y3) displayed in the 

[

Custom Size

]

 field, and then

press 

[

OK

]

.

Note

To scan an original that is smaller than 140 mm, make settings as though
you were scanning a section of an original that is larger than 140 mm.

Summary of Contents for MP 2590

Page 1: ...For safe and correct use be sure to read the Safety Information in About This Machine before using the machine Sending Scan Files by E mail Sending Scan Files by Scan to Folder Storing Files Using the...

Page 2: ...for direct indirect special incidental or consequential damages as a result of handling or oper ating the machine Notes Some illustrations in this manual might be slightly different from the machine...

Page 3: ...s and Address Book procedures such as register ing fax numbers e mail addresses and user codes Also refer to this manual for explanations on how to connect the machine Troubleshooting Provides a guide...

Page 4: ...Guide Quick Reference Scanner Guide PostScript3 Supplement UNIX Supplement Manuals for DeskTopBinder Lite DeskTopBinder Lite Setup Guide DeskTopBinder Introduction Guide Auto Document Link Guide Note...

Page 5: ...er from the List 24 Using a Registration Number to Specify a Sender Name 25 Selecting the Sender by Searching the Machine s Address Book 26 Specifying the E mail Subject 27 Specifying the E mail Messa...

Page 6: ...ing Files 77 Outline of Scan File Delivery 77 Preparing to Deliver a File 78 Installing DeskTopBinder Lite from the Supplied CD ROM 79 Network Delivery Scanner Screen 80 Basic Operation for Delivering...

Page 7: ...lling a Program 126 Changing a Registered Program 127 Deleting a Program 128 Changing the Registered Program Name 128 Scan Settings When Using Twain Scanner 130 Setting Original Orientation on the TWA...

Page 8: ...vi...

Page 9: ...ead these notes They can be found in the Safety Information section of About This Machine Indicates points to pay attention to when using the machine and explanations of likely causes of paper misfeed...

Page 10: ...tWare server For details see chapter 2 Sending Scan Files by Scan to Folder Delivering scan files using the delivery server For details see chapter 4 Delivering Scan Files Scanning originals using the...

Page 11: ...Delivery Scanner Screen Reference p 11 E mail Screen p 37 Scan to Folder Screen p 64 List of Stored Files p 80 Network Delivery Scanner Screen Confirmation Displays This section explains the two conf...

Page 12: ...4 Number of destinations Displays the number of specified destina tions Scanned Files Status This section explains items that are displayed and how to display the Scanned Files Status screen Use the...

Page 13: ...is dis played Other destinations appear as X X in dicates the number of destinations 4 Sender Displays the sender name 5 File Name Displays the stored file name of files that are simultaneously sent...

Page 14: ...ter scanning the originals with Au tomatic Document Feeder ADF This function is not available unless ADF is installed Original Setting Set whether originals are one sided or two sided as the default S...

Page 15: ...mail destination list or the folder destination list Select Title Select the titles for e mail and Scan to Folder destina tions and group destinations Selected titles appear in the e mail and Scan to...

Page 16: ...scanner journal The scanner journal is then deleted Delete Scanner Journal Allows you to delete the scanner journal without printing it Max E mail Size Select whether or not to limit the size of e mai...

Page 17: ...r You need to have an access to an e mail server that supports SMTP Simple Mail Transfer Protocol to send scan files by e mail However it is not essential to have an e mail server inside the LAN where...

Page 18: ...work Guide Items to set up in System Settings vary depending on the network environ ment For more information about network settings see General Settings Guide For more information about Scanner Featu...

Page 19: ...me time 3 E mail icon Indicates that the E mail screen is dis played 4 Registration No Press this key to specify the destination using a 5 digit registration number 5 Manual Input To specify destinati...

Page 20: ...solution image density or scan size For details see Various Scan Settings E If necessary press 1 Sided Orig or 2 Sided Orig to scan one or both sides of the originals For details see Setting for Scann...

Page 21: ...s E mail Address as the default sender name This lets you send e mail without entering any thing for Attach Sender s Name For details see General Settings Guide Depending on the security setting the l...

Page 22: ...tting for Scanning Sides of Originals p 112 Setting of Original Feed Type p 122 Setting File Type and File Name p 16 Specifying E mail Destinations p 28 Specifying the E mail Message p 27 Specifying t...

Page 23: ...he E mail screen as follows A Press B Press Switch Destination List C Press E mail D Press Exit The e mail screen or Scan to Folder screen appears E If the Scan to Folder screen appears press The E ma...

Page 24: ...n select destinations Selecting the Destination from the Machine s Address Book This section explains how to select the destination from the machine s address book Important To use this function you m...

Page 25: ...ion field at the top of the screen If the target destination does not appear take one of the following steps Display the destination by selecting its initial letter from the title Display the destinat...

Page 26: ...To enter 00003 Press the 3 and then press the q key Searching the machine s address book for the destination and selecting it This section explains how to search the machine s address book for the des...

Page 27: ...ess Manually This section explains how to enter an e mail address manually A Press Manual Input The soft keyboard appears For information about how to enter characters see About This Machine B Enter t...

Page 28: ...DAP Server You can search the LDAP server for an address and then specify that address as an e mail destination Important This function requires an LDAP server to be running on the network Under Syste...

Page 29: ...ard appears Enter a text string according to the search criteria If you search by Name the LDAP server s settings determine whether the search is by surname or first name Consult your administrator Th...

Page 30: ...ly one e mail address will be displayed as the search result Usually the address that was registered first on the LDAP server is the address that is displayed By pressing Search Criteria the following...

Page 31: ...the destination you want to register B Press ProgDest C Press Names and then specify the name and other information to be regis tered For details about specifying the information to be registered see...

Page 32: ...General Settings Guide In System Settings you can specify the Administrator s E mail Address as the default sender name This lets you send e mail without specifying the sender For details see General...

Page 33: ...n numbers specified by users in the ma chine s address book A Press Attach Sender s Name B Using the number keys enter the five digit registration number assigned to the required destination folder If...

Page 34: ...h Sender s Name B Press C To search by user name press User Dest Name To search by e mail address press E mail Address The soft keyboard appears You can also search by combining User Dest Name and E m...

Page 35: ...lained as an example here A Press Subject Message B Press Attach Subject C Select the subject Urgent D Press Manual Input The soft keyboard appears E Enter the subject New product appearance F Press O...

Page 36: ...Select the e mail message from the list Enter the message directly Selecting a Message from the List You can select a message from the list Important The messages that can be selected from the list mu...

Page 37: ...ct Message B Press E mail Message C Press Manual Input The soft keyboard appears D Enter the message E Press OK three times Note For details about entering the text see About This Machine For details...

Page 38: ...settings and then send the e mail For details about sending a file by e mail see Basic Operation for Sending Scan Files by E mail Note Depending on the security setting Access Privileges may appear i...

Page 39: ...see Basic Operation for Sending Scan Files by E mail An e mail similar to the following will be sent to the destination E In the e mail destination click the URL Web Image Monitor starts F View delet...

Page 40: ...ail 32 1 You can send the URL by e mail and simultaneously send it by Scan to Folder In this case the file is sent to the Scan to Folder destination not the URL Reference p 12 Basic Operation for Send...

Page 41: ...les by Scan to Folder This section outlines the function for sending scan files by Scan to Folder Sending files to shared folders 1 This machine You can send scan files to shared net work folders To s...

Page 42: ...rovides file transfer services among computers on the same network Transferred files are stored on this server It is essential to have the FTP server inside the LAN WAN where this machine belongs It i...

Page 43: ...er To download files a computer must be running the NetWare client and be logged onto the server Preparation for Sending by Scan to Folder This section describes the preparations and settings for send...

Page 44: ...sing SMB is available only under a NetBIOS over TCP IP environment Sending files using SMB is not available under a NetBEUI environment Even when settings made with the control panel Web Image Monitor...

Page 45: ...a file simultaneously by both Scan to Fold er and e mail 3 Scan to Folder icon Shows that the Scan to Folder screen is displayed 4 Registration No Press to specify a destination using a five digit reg...

Page 46: ...as scan type resolution image density or scan size For details see Various Scan Settings E If necessary press 1 Sided Orig or 2 Sided Orig to scan one or both sides of the originals For details see Se...

Page 47: ...ey the ini tial scanner screen switches to the Check Modes screen You can use the Check Modes screen to check the settings such as destinations For details see Check Modes To cancel scanning press the...

Page 48: ...he Scan to Folder screen as follows A Press B Press Switch Destination List C Press E mail D Press Exit The e mail screen or the scan to folder screen appears E If the e mail screen appears press The...

Page 49: ...ect the destination from the machine s address book Important To use this function you must register the destinations in System Settings in advance For details see General Settings Guide You can selec...

Page 50: ...the destination by selecting its initial letter from the title Display the destination by pressing U or T Note Depending on the security setting some destinations may not appear in the destination lis...

Page 51: ...B To search by destination name press Search by Dest Name To search by path press Search by Folder Name The soft keyboard appears You can also search by combining Search by Dest Name and Search by Fol...

Page 52: ...er over the network by any of the following methods Enter the path to the destination directly Specify the path by browsing the network for the destination Entering the path to the destination manuall...

Page 53: ...r name and password If you change the protocol after entering the path name user name or password a confirmation message appears Computer and shared folder names containing more than 12 characters can...

Page 54: ...ify the path A Press Enter Destination B Press SMB C Press Browse Network Domains or workgroups on the network appear D Select the domain or workgroup in which the destination folder is located E Sele...

Page 55: ...r entering the path name user name or password a confirmation message appears Computer and shared folder names containing more than 12 characters cannot be displayed Up to 100 computers or shared fold...

Page 56: ...nput on the right side of the server name field The soft keyboard appears D Enter a server name Instead of specifying the destination using its path you can also use its IP ad dress E Press OK F Press...

Page 57: ...and then press Exit N Press OK Note If you change the protocol after entering the path name user name or password a confirmation message appears The connection test may take time You may not be able...

Page 58: ...ver by any of the following methods Enter the destination path of the NetWare server directly Specify the path by browsing to the destination on the NetWare server Entering the destination path of the...

Page 59: ...object If the user name is user and the name of the Context is context the user name will be user context H If a password is specified for the logon user enter it Press Manual Input for Password to d...

Page 60: ...older in an NDS tree or on a NetWare Bindery server A Press Enter Destination B Press NCP C Select the connection type Press NDS to specify a folder in the NDS tree Press Bindery to specify a folder o...

Page 61: ...server requires authentica tion a login screen appears Enter a user name and password for logging on to the NDS tree or NetWare Bindery server If you log on to the NDS tree enter a user name and then...

Page 62: ...cified by browsing the network to the machine s address book A In the destination field display the destination you want to register B Press ProgDest C Press Names and then specify the name and other...

Page 63: ...ation for a Stored File D Press OK E Specify the destination make any other necessary settings and then send the file For details about sending a file by Scan to Folder see Basic Operations When Using...

Page 64: ...Sending Scan Files by Scan to Folder 56 2 Reference p 61 Specifying File Information for a Stored File p 38 Basic Operations When Using Scan to Folder p 69 Sending a Stored File...

Page 65: ...g passwords Scan file stored in the machine may be lost if some kind of failure occurs We advise against using the hard disk to store important files The supplier shall not be responsible for any dama...

Page 66: ...ontrol panel Print the files from a client computer after receiving them on the computer You can also store a file and simultaneously send it For details see Simulta neous Storage and Sending by E mai...

Page 67: ...on image density or scan size For details see Various Scan Settings D If necessary press 1 Sided Orig or 2 Sided Orig to scan one or both sides of the originals For details see Setting for Scanning Si...

Page 68: ...s Storage and Sending by E mail Si multaneous Storage and Sending by Scan to Folder and Simultaneous Storage and Delivery If a destination or sender has been selected you cannot press Store Only To ca...

Page 69: ...file Specifying a User Name You can specify a user name for the stored file A Press Store File The Store File screen appears B Press User Name C Press the user name you want to specify The user names...

Page 70: ...le A stored file is allocated a name starting with SCAN followed by a 4 digit number Example SCAN0001 You can change this file name A Press Store File The Store File screen appears B Press File Name T...

Page 71: ...a password you can ensure that only the people who know the password can view the file A Press Store File The Store File screen appears B Press Password C Using the number keys enter a four to eight...

Page 72: ...how the list of stored files is displayed To display the list of stored files press Select Stored File on the initial scanner screen The function items displayed serve as selector keys You can select...

Page 73: ...name or password 5 List of stored files Displays the list of stored files If the file is not displayed press UPrev or TNext to scroll through the list 6 Manage Delete File Press to perform operations...

Page 74: ...le name Searching by user name You can search for a stored file by its user name A Press Select Stored File B Press Search by User Name C Select the user name to be used for the search The user names...

Page 75: ...Select Stored File B Press Search by File Name The soft keyboard appears C Enter the file name It is necessary to distinguish between uppercase and lowercase letters For information about how to enter...

Page 76: ...related manuals For details about installing DeskTopBinder Lite see Installing DeskTop Binder Lite from the Supplied CD ROM Reference p 79 Installing DeskTopBinder Lite from the Supplied CD ROM Using...

Page 77: ...ethod select Send URL Link This method is useful when network restrictions prevent you sending at tachments To send an attached file by e mail Under Scanner Features Stored File E mail Method select S...

Page 78: ...g Scan to Folder or Basic Operation for Delivering Files F Press the Start key The stored file will be sent Note If you select a password protected stored file a screen for entering the password appea...

Page 79: ...Select Stored File The list of stored files appears B Press Manage Delete File C Select the file you want to delete If you select a password protected stored file a screen for entering the pass word a...

Page 80: ...le You can change information for a stored file such as User Name File Name and Password Note Information for files waiting for being sent cannot be changed Changing a user name You can change the use...

Page 81: ...er name was changed as necessary and press Exit Note Using Web Image Monitor or DeskTopBinder you can also change the user name of a file stored in the machine from the client computer For de tails ab...

Page 82: ...d appears To select the file enter the correct password and then press OK D Press Change File Name E Change the file name For information about how to enter characters see About This Machine F Press O...

Page 83: ...containing the file information you want to change If you select a password protected stored file a screen for entering the pass word appears To select the file enter the correct password and then pr...

Page 84: ...ng Web Image Monitor or DeskTopBinder you can also change the password of a file stored in the machine from the client computer For de tails about Web Image Monitor see Web Image Monitor Help For deta...

Page 85: ...end scan files to the delivery server 2 Delivery server Install the ScanRouter delivery software on this computer to use it as the delivery server After receiving a scan file the delivery server deliv...

Page 86: ...ngs For details see General Settings Guide Specify the machine s IP address and subnet mask In Effective Protocol enable TCP IP Set Delivery Option to On C If necessary change settings in Send Setting...

Page 87: ...ner Driver Font Manager and Utili ties CD ROM into the CD ROM drive The installer is automatically started B Click DeskTopBinder Lite The DeskTopBinder Lite Setup dialog box appears For the subsequent...

Page 88: ...4 Manual Input To send a file by e mail via the delivery server to a destination not registered in the delivery server s Destination List press this key to display the soft key board Then use the sof...

Page 89: ...ils see Switching to the Network Delivery Scanner Screen C Place originals D If necessary press Scan Settings to specify scanner settings such as scan type resolution image density or scan size For de...

Page 90: ...il via delivery server An e mail is sent to the sender selected in step H notifying him her that the recipient has read his her e mail To specify this setting press Re turn Receipt To enable the Retur...

Page 91: ...gs p 110 Setting for Scanning Sides of Originals p 112 Setting of Original Feed Type p 85 Specifying Delivery Destinations p 88 Specifying the Sender p 91 Specifying the Subject of the E mail to Be Tr...

Page 92: ...e net work delivery scanner screen A Press B Press Switch Destination List C Press Delivery Server D Press Exit The network delivery scanner screen appears Note You cannot switch from the E mail scree...

Page 93: ...ing in the delivery server Note Depending on the security settings certain destinations may not be dis played Selecting a destination from the Destination List From the destination list select a desti...

Page 94: ...Router delivery software A Press Registration No B Using the number keys enter the three digit registration number and then press the q key You can also enter a registration number of fewer than three...

Page 95: ...o search by comment press Search by Comment The soft keyboard appears You can also search by combining Search by Dest Name and Search by Com ment D Enter the beginning of the destination name To searc...

Page 96: ...s Select the sender from the sender list Select the sender by entering the registration number Select the sender by searching the delivery server s Destination List Selecting a Sender from the Sender...

Page 97: ...ls about how to set Short IDs see the manuals sup plied with the ScanRouter delivery software A Press Attach Sender s Name B Using the number keys enter the three digit registration number assigned to...

Page 98: ...s User Dest Name To search by comment press Search by Comment The soft keyboard appears You can also search by combining User Dest Name and Search by Comment D Enter the beginning of the sender s name...

Page 99: ...bject you can select it from the list enter it directly or combine selecting and entering it The procedure to specify the subject name Urgent New product appearance is explained as an example here Imp...

Page 100: ...any other necessary settings and then send the file For details about delivering a file see Basic Operation for Delivering Files Note Depending on the security setting Access Privileges may appear in...

Page 101: ...er which is on the supplied CD ROM For details about installing the TWAIN driver see Installing the TWAIN Driver from the Supplied CD ROM To use the network TWAIN scanner a TWAIN compliant application...

Page 102: ...nd then sends the scan file over the network to the client computer 2 Client Computer Specifies the scanner settings and con trols the scanner using an application such as DeskTopBinder Lite that sup...

Page 103: ...f you have connected the machine to the network using an Ethernet cable make the following settings For details see General Settings Guide Specify the machine s IP address and subnet mask In Effective...

Page 104: ...ts Follow the instructions Note Before you start the installation check the system requirements for the TWAIN driver For details about the system requirements see Software Supplied on CD ROM You can i...

Page 105: ...OK F Place originals G On the File menu point to Add Document and then click Scan to display the Scanner Control dialog box A dialog box that is used to control a scanner using the TWAIN driver is re...

Page 106: ...he connected scanner appears in the title bar of the Scanner Control dialog box If there is more than one scanner of the same model on the network make sure you have selected the correct scanner If yo...

Page 107: ...s This section describes various scan settings Specifying Scan Settings This section explains how to make Scan settings A Press Scan Settings B Specify scan type resolution scan size and other setting...

Page 108: ...two value Creates scanned images suitable for printing Photo Originals containing photographs and other pictures two value Creates scanned images suitable for printing Gray Scale Originals containing...

Page 109: ...scanning origi nals of the same width but different length such as A3 A4 or B4 B5 using the original position setting and size If you select Mixed Sizes under Original Feed Type the machine detects t...

Page 110: ...an original measure its dimensions on the surface of the original and enter them under Original Size X1 and Y1 and Scan Area X3 and Y3 The example below explains scanning an original of the following...

Page 111: ...ition X2 and Y2 to 0 mm and then press the q key For example set X2 and Y2 to 0 mm and press the q key F Specify Scan Area X3 and Y3 using the number keys and then press the q key For example set X3 t...

Page 112: ...original that is larger than 140 mm For example to scan a CD label on the exposure glass specify a size according to the chart below For details about scanning procedures see Setting pro cedure of cus...

Page 113: ...nd Y3 on the surface of the original and then enter those values in the same order Measuring methods differ depending on the original s orientation and the position it is set in Examples 1 to 3 below...

Page 114: ...for scanning the R area of the original A Press Scan Settings B Press Scan Size C Press Custom Size D Specify Original Size X1 and Y1 using the number keys and then press the q key For example set X1...

Page 115: ...o 20 mm F Specify Scan Area X3 and Y3 using the number keys and then press the q key For example set X3 and Y3 to 80 mm G Press OK H Check Scan Area X3 and Y3 displayed in the Custom Size field and th...

Page 116: ...Type Placing an original Place originals face up in the ADF face down on the exposure glass Original Orientation is Original Orientation is Reference p 112 Setting of Original Feed Type Placing an ori...

Page 117: ...e borders of the scanned original according to the specified width If you select Same Width you can specify in mm a uniform width for dele tion all around the original top bottom left and right sides...

Page 118: ...This section explains the settings for scanning only one side of originals A Press 1 Sided Orig Two sided original This section explains the settings for scanning both sides of originals A Press 2 Si...

Page 119: ...last original is blank in Last Page select 1 Side or 2 Sides To skip the last page select 1 Side To scan the last page as blank page select 2 Sides D Press OK Note If you selected Divide the setting m...

Page 120: ...n Batch SADF mixed sizes divide and stamp by pressing Original Feed Type Original Orientation This section explains how to correctly display the top bottom orientation of scanned originals on a client...

Page 121: ...ginals are normally rectangular or horizontally long However the table above uses squares to make original orientation easier to understand Even if the actual shape of the original is different the co...

Page 122: ...change the mode using Switch to Batch under Scanner Features For details about Switch to Batch see General Settings Guide If you select Batch scanning starts as soon as you place the additional origi...

Page 123: ...anning starts as soon as you place additional origi nals in the ADF However in the following cases you must press the Start key to start scanning additional originals After scanning additional origina...

Page 124: ...nning a batch of originals that are the same width but differ ent length A Press Original Feed Type B Press Mixed Sizes C Press OK Note The following combinations of original sizes are available A3L A...

Page 125: ...hen Divide C Press Change and then use the number keys to enter the number of pages you want to divide the job into sets of D Press the q key E If necessary press Division Check When you select Divisi...

Page 126: ...ided original Stamp This section explains the procedure for stamping on originals scanned using the ADF If you select Stamp a circle mark is stamped on originals that are scanned using the ADF On two...

Page 127: ...Stamp C Press OK Note Last pages are stamped even if you selected not to scan the last page Stamping may continue if scanning is interrupted depending on the cause of interruption Replace the stamp ca...

Page 128: ...ee Setting File Type and File Name A Press Original Feed Type B Select Batch or SADF To scan originals using the exposure glass select Batch To scan originals us ing the ADF select SADF For details ab...

Page 129: ...Orig Exposure Glass see General Settings Guide If under Scanner Features Set Wait Time is set for Wait Time for Next Orig Exposure Glass or Wait Time for Next Original s SADF place additional orig in...

Page 130: ...For de tails see the manuals supplied with the ScanRouter delivery software Files are stored in TIFF or JPEG format If Store Only is selected for Store File file type cannot be specified If Send Stor...

Page 131: ...at contain the date and time of scanning and a four digit page number An underscore is inserted between the date and time and the four digit page number Example For a file scanned in single page TIFF...

Page 132: ...Various Scan Settings 124 6 B Press File Name The soft keyboard appears C Enter a file name D Press OK twice...

Page 133: ...scan settings 1 sid ed 2 sided original Top to Top Top to Bottom Last Page Divide Original Feed Type File Type Batch SADF and Stamp Registering Frequently Used Setting To register frequently used set...

Page 134: ...nitial screen reappears after a mo ment Recalling a Program To recall settings registered in a program and use them for scanning A Press the Program key B Press B Recall C Press the number of the prog...

Page 135: ...se settings you changed or the number of a different program in which you want to register the changed settings H If you select a program that is already registered a confirmation message appears To o...

Page 136: ...number of the program you want to delete D Press Yes The program is deleted and the initial screen reappears after a moment Changing the Registered Program Name To change the name of a registered pro...

Page 137: ...Programs 129 6 D Enter a new program name A program name can be entered using up to 40 characters E Press OK The new program name appears briefly and then the initial screen reappears...

Page 138: ...WAIN Scanner Operation B In the Original Scan Method list select the place where the original is placed C In the Orig Orientn list select or D In the Orientation list select or E If an original is pla...

Page 139: ...als of different sizes are scanned differently When Scanning Originals of Mixed Sizes Using TWAIN Scanner This section explains the differences between scanning mixed size originals us ing the TWAIN s...

Page 140: ...Various Scan Settings 132 6...

Page 141: ...e resolution dpi is set the smaller the area that can be scanned Conversely the larger the scan area the lower the resolution that can be set The relationship between the scanning resolution and the s...

Page 142: ...t Text OCR Text Photo or Photo is selected for Scan Type All combinations up to A3 297 432 mm 11 17 inches and 600 dpi can be scanned If Gray Scale is selected for Scan Type The originals can be scann...

Page 143: ...you are using as a network TWAIN scanner directly see the TWAIN driver Help If Binary Text or Binary Photo is selected in Col Grad The originals can be scanned using combinations marked with in the t...

Page 144: ...g combinations marked with in the table if Original Orientation is L Note Enter size A7 74 mm 105 mm directly 100 dpi 200 dpi 300 dpi 400 dpi 500 dpi 600 dpi 700 dpi 800 dpi 900 dpi 1000 dpi 1100 dpi...

Page 145: ...ff TIFF When you set Compression Gray Scale to On under Scanner Features if you specify Gray Scale in Scan Type under Scan Settings you cannot select mul ti page TIFF as the file type Files are stored...

Page 146: ...the Shift key pressed until the computer finishes reading from the CD ROM If Cancel is pressed during installation the installation of all the software thereafter will be stopped If cancelled reinstal...

Page 147: ...er Lite manuals or DeskTopBinder Lite Help File path DeskTopBinder Lite is stored in the following folder on the CD ROM provid ed with this machine UTILITY DESKV2 System requirements Computer hardware...

Page 148: ...Function Palette allows you to use DeskTopBinder functions such as Scan using TWAIN scanner or Print without starting DeskTopBinder To use these functions from Function Palette you must first configu...

Page 149: ...mail sending function settings Item Maximum value Comments Number of subject line charac ters 128 alphanumeric charac ters Number of e mail message characters 80 alphanumeric charac ters This is the...

Page 150: ...name charac ters on FTP 64 alphanumeric charac ters Number of password charac ters on FTP 64 alphanumeric charac ters Number of path name charac ters on NCP 128 alphanumeric charac ters Number of use...

Page 151: ...lphanumeric charac ters On the control panel the first 16 characters are displayed When viewing the stored files from a client computer using Desk TopBinder all the entered char acters can be viewed N...

Page 152: ...ered directly from text Number of e mail address char acters 128 alphanumeric charac ters Number of addresses you can specify at the same time 500 addresses You can specify 65 destinations by direct e...

Page 153: ...10BASE T or 100BASE TX IEEE 802 11b wireless LAN optional Maximum scan size A3 DLT 297 432 mm Scan sizes automatically detectable from the exposure glass A3L B4L A4K A4L B5K B5L 8 1 2 13 L Scan sizes...

Page 154: ...ery server 77 85 DeskTopBinder Lite 68 77 79 139 Destination delivery 85 e mail 16 scan to folder 41 Destination list 17 42 Destination list settings 6 Display confirmation displays 3 Display panel 3...

Page 155: ...1 Scan Type 100 134 Screen e mail 11 network delivery scanner 80 Scan to Folder 37 stored files 64 Search by comment 86 Searching by file name 67 Searching by user name 66 90 Searching the delivery se...

Page 156: ...mail 141 simultaneous transmission 142 TWAIN Driver 96 97 138 TWAIN scanner 93 94 97 130 131 135 setting original orientation 130 Two sided original 110 U URL 31 User name 61 72 User Tools Counter 6...

Page 157: ...ights to those marks The product name of Windows 95 is Microsoft Windows 95 The product name of Windows 98 is Microsoft Windows 98 The product name of Windows Me is Microsoft Windows Millennium Editio...

Page 158: ...Operating Instructions Scanner Reference GB GB AE AE D313 6600...

Reviews: