


8.
Press the [ ] or [ ] key to select [Open system], and then press the [Next] key.
9.
Press the [ ] or [ ] key to select [None] or one of the WEP settings, and then press the
[Next] key.
10.
Enter the encryption key and ID using the number keys, and then press the [Connect] key.
• The ID is used for identifying the encryption key. You can register four encryption keys (ID 1 to
4).
11.
Press [Yes] key.
Wait for a while. If “"Connected"” appears, the settings are complete.
IPv6 Automatic Settings
This section explains how to set the machine to receive an IPv6 address automatically.
• A router with DHCP function or a DHCP server is required.
1.
Connect the printer to the router or the hub using the Ethernet cable.
2.
Turn on the machine.
3.
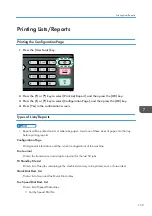
Press the [User Tools] key.
4.
Press the [ ] or [ ] key to select [Network Settings], and then press the [OK] key.
5.
Press the [ ] or [ ] key to select [IPv6 Configuration], and then press the [OK] key.
6.
Press the [ ] or [ ] key to select [DHCP], and then press the [OK] key.
7.
Press the [ ] or [ ] key to select [Active], and then press the [OK] key.
8.
Press the [User Tools] key to return to the initial screen.
9.
If you are requested to restart the machine, turn off the machine, and then turn it back on.
IPv6 Manual Settings
This section explains how to assign the machine's IPv6 address manually.
1.
Connect the printer to the router or the hub using the Ethernet cable.
2.
Turn on the machine.
3.
Press the [User Tools] key.
4.
Press the [ ] or [ ] key to select [Network Settings], and then press the [OK] key.
5.
Press the [ ] or [ ] key to select [IPv6 Configuration], and then press the [OK] key.
6.
Press the [ ] or [ ] key to select [DHCP], and then press the [OK] key.
7. Configuring the Machine Using the Control Panel
164
Summary of Contents for Aficio SP 320 Series
Page 2: ......
Page 20: ...18...
Page 64: ...3 Printing Documents 62...
Page 68: ...2 Press the Clear Stop key CVW105 4 Copying Originals 66...
Page 82: ...4 Copying Originals 80...
Page 172: ...Dup Comb Copy 7 Configuring the Machine Using the Control Panel 170...
Page 242: ...10 Troubleshooting 240...
Page 268: ...MEMO 266...
Page 269: ...MEMO 267...
Page 270: ...MEMO 268 GB GB EN US EN AU M156 8602...
Page 271: ...2013...
Page 272: ...M156 8602 AU EN US EN GB EN...


