background image

1.

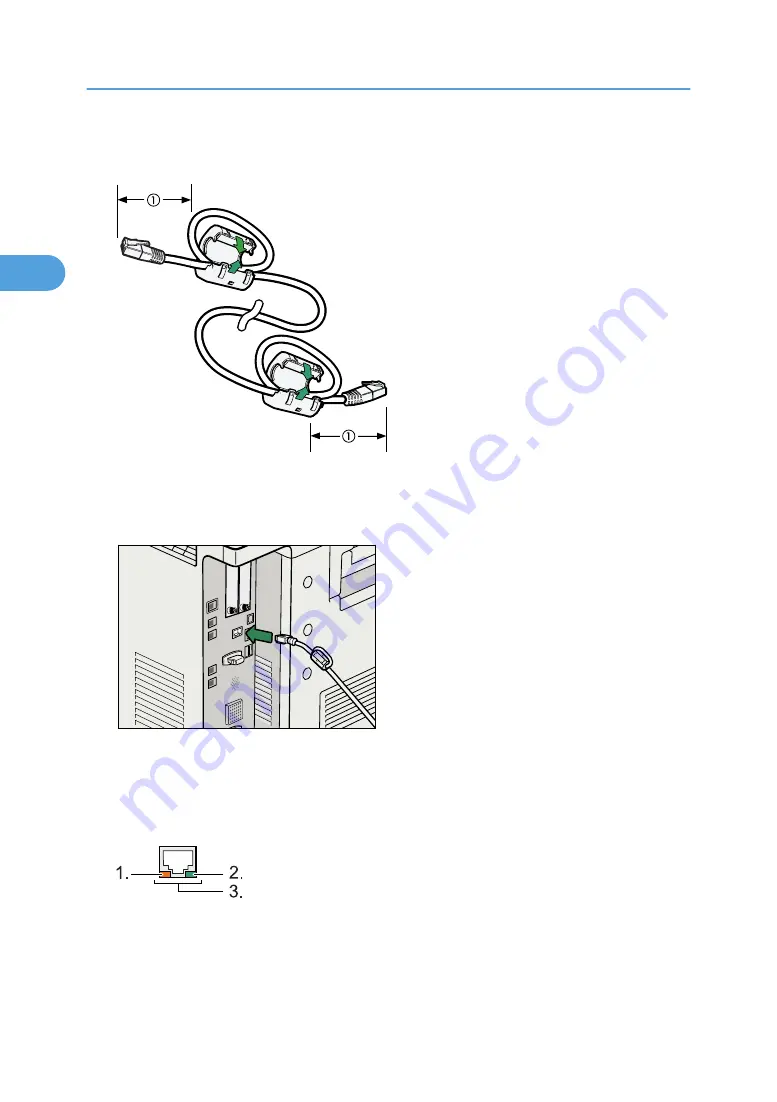
Make a loop at both ends of the Ethernet interface cable 5 cm (2.1 inch) (1) from the end,
and install the included core.

BAX007S

2.

Make sure the main power switch of the machine is off.

3.

Connect the Ethernet interface cable to the Gigabit Ethernet port.

BHI013S

4.

Connect the other end of the Ethernet interface cable to a network connection device such
as a hub.

5.

Turn on the main power switch of the machine.

BAX008S

1. Indicator (yellow)

When 100BASE-TX is operating, the LED is lit yellow. When 10BASE-T is operating, it is turned off.

2. Connecting the Machine

70

2

Summary of Contents for Aficio MP C2800

Page 1: ...simile Scanner Functions Special Operations under Windows Appendix 1 2 3 4 5 6 7 Read this manual carefully before you use this machine and keep it handy for future reference For safe and correct use be sure to read the Safety Information in About This Machine before using the machine Network and System Settings Guide Operating Instructions ...

Page 2: ......

Page 3: ... 17 Quitting User Tools 18 1 System Settings General Features 19 Output Tray Settings Type 1 and 2 21 Output Tray Settings Type 3 and 4 22 Tray Paper Settings 24 Timer Settings 31 Interface Settings 33 Network 33 Parallel Interface 36 Wireless LAN 37 Print List 39 File Transfer 41 Administrator Tools 48 Programming the LDAP server 58 Programming the LDAP server 58 Changing the LDAP server 62 Delet...

Page 4: ...LAN 76 Network Settings Required to Use Internet Fax 78 Ethernet 78 Wireless LAN 80 Network Settings Required to Use E mail Function 82 Ethernet 82 Wireless LAN 83 Network Settings Required to Use Scan to Folder Function 86 Ethernet 86 Wireless LAN 87 Network Settings Required to Use the Network Delivery Scanner 89 Ethernet 89 Wireless LAN 90 Network Settings Required to Use WSD Scanner 92 Etherne...

Page 5: ...5 5 1 or 6 6 5 Environment 117 Setting Up as a Remote Printer NetWare 3 x 119 Setting Up as a Remote Printer NetWare 4 x 5 5 1 6 6 5 121 4 Monitoring and Configuring the Printer Using Web Image Monitor 125 Displaying Top Page 126 When User Authentication is Set 127 About Menu and Mode 128 Access in the Administrator Mode 130 List of Setting Items 130 Displaying Web Image Monitor Help 137 Using Sma...

Page 6: ... 156 Printer Status Notification by E Mail 158 Setting the Account for E mail Notification 160 Mail Authentication 160 Auto E mail Notification 161 On demand E mail Notification 162 Format of On demand E mail Messages 163 Remote Maintenance by telnet 164 Using telnet 164 access 165 appletalk 166 authfree 166 autonet 167 bonjour 168 btconfig 169 devicename 169 dhcp 170 dhcp6 171 diprint 171 dns 172...

Page 7: ...t 184 show 187 slp 187 smb 187 snmp 188 sntp 191 spoolsw 192 ssdp 193 ssh 193 status 194 syslog 194 upnp 194 web 194 wiconfig 195 wins 199 wsmfp 200 8021x 201 SNMP 204 Getting Printer Information over the Network 206 Current Printer Status 206 Printer configuration 215 Understanding the Displayed Information 217 5 ...

Page 8: ...243 Managing users and machine usage 243 Registering Names 245 Registering Names 245 Changing a Registered Name 246 Deleting a Registered Name 247 Authentication Information 249 Registering a User Code 249 Changing a User Code 251 Deleting a User Code 252 Displaying the Counter for Each User 254 Printing the Counter for Each User 254 Printing the Counter for All Users 255 Clearing the Number of Pr...

Page 9: ...gistering a Group 293 Registering Names to a Group 294 Adding a Group to Another Group 296 Displaying Names Registered in a Group 297 Removing a Name from a Group 298 Deleting a Group Within Another Group 299 Changing a Group Name 300 Deleting a Group 302 Registering a Protection Code 303 Registering a Protection Code to a Single User 303 Registering a Protection Code to a Group User 304 Registeri...

Page 10: ...S Function 324 Updating 324 DNS servers targeted for operation 325 DHCP servers targeted for operation 325 Setting the dynamic DNS function 325 Precautions 327 Connecting a Dial Up Router to a Network 327 NetWare Printing 328 When the IEEE 802 11 Interface Unit is Installed 330 Configuring IEEE 802 1X 331 Installing a Site Certificate 331 Installing Device Certificate 332 Setting Items of IEEE 802...

Page 11: ...SASL 342 MD4 343 MD5 343 Samba Ver 3 0 4 343 RSA BSAFE 344 Open SSL 344 Open SSH 346 Open LDAP 350 Heimdal 351 IPSTM print language emulations 351 Trademarks 352 INDEX 355 9 ...

Page 12: ...de for resolving common usage related problems Copy and Document Server Reference Explains Copier and Document Server functions and operations Also refer to this manual for explanations on how to place originals Facsimile Reference Explains Facsimile functions and operations Printer Reference Explains Printer functions and operations Scanner Reference Explains Scanner functions and operations Netw...

Page 13: ...criptions of functions and settings that might not be available on this machine Other manuals Quick Reference Copy Guide Quick Reference Printer Guide Quick Reference Fax Guide Quick Reference Scanner Guide Manuals for DeskTopBinder Lite DeskTopBinder Lite Setup Guide DeskTopBinder Introduction Guide Auto Document Link Guide Manuals provided are specific to machine types The following software pro...

Page 14: ...es as a result of handling or operating the machine For good copy quality the supplier recommends that you use genuine toner from the supplier The supplier shall not be responsible for any damage or expense that might result from the use of parts other than genuine parts from the supplier with your office products 12 ...

Page 15: ...nd instructions on resolving user errors This symbol is located at the end of sections It indicates where you can find further relevant information Indicates the names of keys that appear on the machine s display panel Indicates the names of keys on the machine s control panel Names of Major Options Major options of this machine are referred to as follows in this manual Large capacity tray LCT Not...

Page 16: ... which country you are in certain units may be optional For details please contact your local dealer This machine comes in four models which vary in copy print speed To ascertain which model you have see Machine Types About This Machine About IP Address In this manual IP address covers both IPv4 and IPv6 environments Read the instructions that are relevant to the environment you are using 14 ...

Page 17: ...hecks passports driver s licenses The preceding list is meant as a guide only and is not inclusive We assume no responsibility for its completeness or accuracy If you have any questions concerning the legality of copying or printing certain items consult with your legal advisor This machine is equipped with a function that prevents making counterfeit bank bills Due to this function the original im...

Page 18: ... kgf will damage the display panel To display the following screen press the User Tools Counter key to display the User Tools menu and then press System Settings Using the System Settings menu screen as an example this section explains how to use the machine s display panel BHJ001S 1 The menu tabs for various settings appear To display the setting you want to specify or change press the appropriat...

Page 19: ...ngs of User Tools If Administrator Authentication Management is specified contact your administrator 1 Press the User Tools Counter key BHJ401S 2 Press System Settings 3 Select the user tool you want to change 4 Change settings by following instructions on the display and then press OK To cancel changes made to settings and return to the initial display press the User Tools Counter key For details...

Page 20: ... p 19 System Settings Quitting User Tools This section describes how to quit the settings of User Tools 1 Press the User Tools Counter key BHJ401S You can also quit User Tools by pressing Exit 18 ...

Page 21: ...ls Counter key 2 Press System Settings 3 Check that General Features is selected 4 Press Program Change Delete User Text 5 Check that Program Change is selected 6 Select the user text you want to change To program new user text press Not Programmed 7 Enter the user text and then press OK Enter the user text using up to 80 characters 8 Press Exit 9 Press the User Tools Counter key Delete 1 Press th...

Page 22: ...ng is Copier Print Priority Print Priority is given to the mode selected The default setting is Display Mode Function Reset Timer You can set the length of time the machine waits before changing modes when using the multi access function This is useful if you are making many copies and have to change settings for each copy If you set a longer reset period you can prevent interruption from other fu...

Page 23: ... On you can specify a display time between 10 and 999 seconds Key Repeat You can enable or disable repetition of an operation if a key on the screen or control panel is pressed continuously The default setting is Normal p 17 Accessing User Tools Output Tray Settings Type 1 and 2 You cannot interrupt the current stapling job even if a stapling job is specified by a different function When the optio...

Page 24: ...ngs Type 3 and 4 You cannot interrupt the current stapling job even if a stapling job is specified by a different function When the optional finisher is installed and stapling or shift sorting is specified the job will be delivered to the finisher shift tray regardless of the output tray specified 1 System Settings 22 1 ...

Page 25: ...4 3 4 3 4 1 2 3 BHJ016S 1 Internal Tray 1 2 Internal Tray 2 3 Finisher Upper Tray 4 Finisher Shift Tray General Features 23 1 ...

Page 26: ...switches to LCT if the LCT is installed Printer Bypass Paper Size Specify the size of the paper in the bypass tray when printing data from the computer The paper sizes you can set for bypass tray are as follows Auto Detect A3 A4 A4 A5 A5 A6 B4 JIS B5 JIS B5 JIS B6 JIS C5 Env C6 Env DL Env 12 18 11 17 81 2 14 81 2 13 81 2 11 81 2 11 81 4 13 8 13 71 4 101 2 71 4 101 2 51 2 81 2 41 8 91 2 37 8 71 2 C...

Page 27: ...re installed are as follows Auto Detect A3 A4 A4 A5 B4 JIS B5 JIS B5 JIS 11 17 11 15 10 14 81 2 14 81 2 13 81 2 11 81 2 11 81 4 14 81 4 13 8 13 8 10 71 4 101 2 71 4 101 2 8K 16K 16K The default setting is Auto Detect Youcanspecifyacustomsizeofbetween182 0 297 0mm 7 17 11 69in vertically andbetween 148 0 432 0 mm 5 83 17 00 in horizontally If you need the paper size contact your service representat...

Page 28: ...aper sizes and thickness see Recommended Paper Sizes and Types About This Machine For details about the recommended conditions for using thick paper see Thick Paper About This Machine Paper Type Tray 1 Sets the display so you can see what type of paper is loaded in the paper tray 1 The print function uses this information to automatically select the paper tray The paper types you can set for the p...

Page 29: ...per Coated Paper Gloss The paper thicknesses you can set for the paper tray 2 are as follows Plain Paper 60 0 90 0 g m2 Middle Thick 91 0 105 0 g m2 Thick Paper 1 106 0 169 0 g m2 Thick Paper 2 170 0 220 0 g m2 Thick Paper 3 221 0 256 0 g m2 The default setting for Paper Type is No Display The default setting for Paper Thickness is Plain Paper The default setting for Apply Duplex is Yes The defaul...

Page 30: ...y Auto Paper Select Apply Auto Paper Select can only be selected for the copier function if No Display and Recycled Paper are selected If No is selected Apply Auto Paper Select is not valid For details about the relations between possible paper sizes and thickness see Recommended Paper Sizes and Types About This Machine For details about the recommended conditions for using thick paper see Thick P...

Page 31: ...This menu appears only when the LCT is installed The print function uses this information to automatically select the paper tray The paper types you can set for the LCT are as follows No Display Recycled Paper Colour Paper Letterhead Preprinted Paper Bond Paper Cardstock Special Paper 1 Special Paper 2 Special Paper 3 Coated Paper Coated Paper Gloss The paper thicknesses you can set for the LCT ar...

Page 32: ...n or slip sheet function is selected When Full Time is selected the front cover sheet tray is always displayed Slip Sheet Tray You can specify and display the paper tray that is used for setting slip sheets You can also specify the display timing and copy method for two sided copying The default setting is Off When At Mode Selected is selected slip sheet tray settings only appear when the cover fu...

Page 33: ...er specify the time to elapse before Auto Off The default setting is 60 min The time can be set from 1 to 240 minutes using the number keys Auto Off may not work when error messages appear Energy Saver Timer Set the amount of time the machine waits before switching to lower power mode after copying has finished or the last operation is performed The time can be set from 1 to 240 minutes using the ...

Page 34: ...uto Reset Timer scanner Specify the time to elapse before the scanner function resets If Off is selected the machine will not automatically switch to the user code entry screen The time can be set from 10 to 999 seconds using the number keys The default setting is On 60 second s Set Date Set the date for the copier s internal clock using the number keys To change between year month and day press a...

Page 35: ...s also appears IPv4 Gateway Address A gateway is a connection or interchange point between two networks Specify the gateway address for the router or host computer used as a gateway The default setting is 0 0 0 0 Machine IPv6 Address Displays the machine s IPv6 network address Link local Address The machine s specified link local address appears Manual Configuration Address The machine s manually ...

Page 36: ...ess as xxx xxx xxx xxx x indicates a number If DHCP is in use specify the Scope ID Enter a Scope ID using up to 31 characters Effective Protocol Select the Protocol to use in the network The default setting for IPv4 is Active The default setting for IPv6 is Inactive The default setting for NetWare is Inactive The default setting for SMB is Active The default setting for AppleTalk is Active NCP Del...

Page 37: ...ting is Auto Select Select a speed that matches your network environment Auto Select should usually be selected 10Mbps Half Duplex 10Mbps Full Duplex 100Mbps Half Duplex 100Mbps Full Duplex Auto Select 10Mbps Half Duplex 10Mbps Full Duplex 100Mbps Half Duplex 100Mbps Full Duplex Auto Select IEEE 802 1X Authentication for Ethernet Specify IEEE 802 1X authentication for Ethernet The default setting ...

Page 38: ...Pv4 address is used for the specified equipment Permit SNMPv3 Communication Set the encrypted communication of SNMPv3 The default setting is Encryption Cleartext If you select to Encryption Only you need to set an encryption password for the machine Permit SSL TLS Communication Set the encrypted communication of SSL TLS The default setting is Ciphertext Priority If you set to Ciphertext Only you n...

Page 39: ...idirectional Communication Sets the printer s response mode to a status acquisition request when using a parallel interface If you experience problems using another manufacturer s machine set this to Off The default setting is On When set to Off the bidirectional communication function will be disabled and the printer driver will not be installed under Windows Auto Detect function Signal Control S...

Page 40: ...MHz 36 40 44 and 48 channels IEEE 802 11b g Wireless LAN Frequency range 2412 2462 MHz 1 11 channels The default setting is 11 The channel in use might differ depending on the country Security Method Specifies the encryption of the wireless LAN The default setting is Off If you select WEP always enter WEP key If you select WPA specify the encryption and authentication methods Specify WPA when Comm...

Page 41: ...ignal When using in infrastructure mode you can check the machine s radio wave status using the control panel Radio wave status is displayed when you press Wireless LAN Signal Restore Factory Defaults You can return the wireless LAN settings to their defaults p 17 Accessing User Tools p 331 Configuring IEEE 802 1X Print List This section describes how to print the configuration page You can check ...

Page 42: ...ress Print List 5 Press the Start key The configuration page is printed 6 Press Exit 7 Press the User Tools Counter key You can also exit by pressing Exit on the User Tools main menu p 17 Accessing User Tools 1 System Settings 40 1 ...

Page 43: ...received via the different lines This setting is displayed when the ScanRouter delivery software is using the delivery function Setting per Line Line 1 3 E mail IP Fax The default setting is Do not Deliver The lines appear according to the operating environment RX File Delivery Specifies whether or not received fax documents are sent to the ScanRouter delivery software for each fax line The defaul...

Page 44: ... DIGEST MD5 When sending e mail to an SMTP server you can enhance the SMTP server security level using authentication that requires entering the user name and password If the SMTP server requires authentication set SMTP Authentication to On and then specify the user name password and encryption Enter the user name and password to be set for the Administrator s e mail address when using Internet Fa...

Page 45: ...e POP server authentication before sending e mail via the SMTP server set POP before SMTP to On E mail is sent to the SMTP server after the time specified for Wait Time after Authent has elapsed If you select On enter server name in POP3 IMAP4 Settings Also check POP3 port number in E mail Communication Port Reception Protocol Specify the Reception Protocol for receiving Internet Fax The default s...

Page 46: ... appear in the From box If you have specified the user name and e mail address in SMTP Authentication make sure to specify this setting Enter up to 128 characters On e mailed scanned documents if Auto Specify Sender Name is Off specify the sender E mail Communication Port Specify the port numbers for receiving Internet faxes The specified POP3 port number is used for POP before SMTP The default se...

Page 47: ...Change Delete E mail Message 6 Check that Program Change is selected 7 Press Not Programmed To change the registered e mail message select the e mail message to change 8 Press Change under the Name 9 Enter a name and then press OK Enter the name using up to 20 characters 10 Press Edit To start a new line press OK to return to the e mail message screen and then press Next in Select Line to Edit 11 ...

Page 48: ...tor s e mail address will appear in the From box Off If you select Off the specified e mail address will appear in the From box but you cannot send e mail without specifying the sender s e mail address Under the fax function you cannot send e mail if the specified sender s e mail address is not registered in the machine s address book Fax E mail Account Specify e mail address user name and passwor...

Page 49: ...ts a maximum number of times a scan file is resent to the delivery server or mail server The default setting is On 3 time s If On is selected the number of times can be set from 1 to 99 This setting is for the scanner function This setting is not valid for the WSD scanner function p 17 Accessing User Tools File Transfer 47 1 ...

Page 50: ...r a user code and specify the functions available to each user code You can also register user names and passwords to be used when sending e mail sending files to folders or accessing an LDAP server Protection You can register a protection code Fax Dest You can register a fax number international TX mode fax header label insertion IP Fax destination and protocol E mail You can register an e mail a...

Page 51: ...he Address Book into a group Delete You can delete a group from the Address Book You can register up to 100 groups You can also register and manage groups in the Address Book using Web Image Monitor or SmartDeviceMonitor for Admin Use SmartDeviceMonitor for Admin provided with the printer scanner unit Address Book Change Order Changes the order of registered names You can rearrange the order of it...

Page 52: ...oved to the selected position and the user key currently at the selected position is moved forward or backward If you move the selected user key forward the user key currently at the selected position is moved backward If you move the selected user key backward the user key currently at the selected position is moved forward 1 System Settings 50 1 ...

Page 53: ...le 3 order Print Group Dial List Prints the group Address Book 1 Press the User Tools Counter key 2 Press System Settings 3 Press Administrator Tools 4 Press Print Address Book Destination List 5 Select the print format 6 To print the list on two sided pages select Print on 2 Sides 7 Press the Start key The list prints out Address Book Edit Title You can edit the title to easily find a user 1 Pres...

Page 54: ...estore the backup copy from the external storage Restore data overwrites Address Book data stored on the machine and clears the counter of each registered user of the machine Back Up You can back up the machine s address book to external storage Restore You can restore the backup copy of the address book from external storage Format You can format the external storage Obtain Media Info The free sp...

Page 55: ...ue for all the users Print Counter List per User Prints the counter value for each user Clear Counter List per User Resets the counter value for each user Select All on the Page Select all the users on the page User Authentication Management User Code Auth Using User Code Authentication you can limit the available functions and supervise their use When using User Code Authentication register the u...

Page 56: ...nt to manage with the key counter Copier Full Colour Black White Single Colour Two colour Printer Colour Black White Other Functions Document Server Facsimile Scanner External Charge Unit Management For details about this function consult your administrator Enhanced External Charge Unit Management For details about this function consult your administrator Extended Security Specify whether or not t...

Page 57: ... mail destinations in the LDAP server Address Book directly This function is possible when sending scan files by e mail using the scanner or fax function Name Server Name Search Base Port Number Use Secure Connection SSL Authentication User name Password Realm name Search Conditions Search Options To start an LDAP search make sure that the items listed below are set For other items check your envi...

Page 58: ...econds When set to Level 2 the machine consumes less power than when set to Level 1 The default setting is Level 1 Firmware Version You can check the version of the software installed in this machine Network Security Level For details about this function consult your administrator Auto Erase Memory Setting For details about this function consult your administrator Erase All Memory For details abou...

Page 59: ...terface selecting On for this option eliminates the need for additional installation of the driver to the PC Machine Data Encryption Settings For details about this function consult your administrator p 17 Accessing User Tools p 58 Programming the LDAP server p 64 Programming the Realm Administrator Tools 57 1 ...

Page 60: ...he Realm Name If Digest Authentication or Cleartext Authentication is selected be sure to set the User Name and Password To use the LDAP server in Administrator Tools select On under LDAP Search The LDAP version 2 0 does not support Digest Authentication To select Kerberos Authentication a realm must be registered in advance Programming the LDAP server This section describes how to program the LDA...

Page 61: ...se SSL to communicate with the LDAP server For SSL to function the LDAP server must support SSL If you set SSL to On the port number automatically changes to 636 If you do not enable SSL security problems may occur To enable SSL you must use the machine s settings For details consult your network administrator 17 Press Next 18 Select the authentication method To make a search request to the LDAP s...

Page 62: ...h search 20 Enter the user name and then press OK Procedures for the user name setting differ depending on server environment Check your server environment before making the setting Example Domain Name User Name User Name Domain Name CN Name OU Department Name DC Server Name 21 Press Change under Password 22 Enter the password and then press OK The user name and password are required for administr...

Page 63: ...ing for e mail addresses and then press OK The attribute value may change depending on the server environment Check that the attribute value complies with your server environment before setting it You can leave items blank but you cannot leave attributes blank when searching for e mail addresses from the LDAP server Address Book 29 Press Next 30 Press Change under Attribute 31 Enter the attribute ...

Page 64: ... to change the programmed LDAP server 1 Press the User Tools Counter key 2 Press System Settings 3 Press Administrator Tools 4 Press Next twice 5 Press Program Change Delete LDAP Server 6 Check that Program Change is selected 7 Select the LDAP server you want to change 8 Change the settings as necessary 9 Press OK after changing each item 10 Press Exit 11 Press the User Tools Counter key Deleting ...

Page 65: ... Settings 3 Press Administrator Tools 4 Press Next twice 5 Press Program Change Delete LDAP Server 6 Press Delete 7 Select the LDAP server you want to delete 8 Press Yes 9 Press Exit 10 Press the User Tools Counter key Programming the LDAP server 63 1 ...

Page 66: ...d After confirming the network environment specify the necessary items You can register up to 5 realms Programming the Realm This section describes how to program the Realm 1 Press the User Tools Counter key 2 Press System Settings 3 Press Administrator Tools 4 Press Next twice 5 Press the Program Change Delete Realm 6 Check that Program Change is selected 7 Press Not Programmed 1 System Settings ...

Page 67: ...rs 12 Press Change under Domain Name 13 Enter the domain name and then press OK Enter the domain name or host name You can enter a domain name using up to 64 characters 14 Press OK 15 Press Exit 16 Press the User Tools Counter key Changing the Realm This section describes how to change the programmed Realm 1 Press the User Tools Counter key 2 Press System Settings 3 Press Administrator Tools 4 Pre...

Page 68: ...name press Change under Domain Name 13 Enter the domain name and then press OK You can enter a domain name using up to 64 characters 14 Press OK 15 Press Exit 16 Press the User Tools Counter key Deleting the Realm This section describes how to delete the programmed Realm 1 Press the User Tools Counter key 2 Press System Settings 3 Press Administrator Tools 4 Press Next twice 5 Press Program Change...

Page 69: ...lled When the Gigabit Ethernet interface board optional is installed 1 IEEE 1284 port optional Port for connecting the IEEE 1284 interface cable 2 USB2 0 port Port for connecting the USB2 0 interface cable 3 10BASE T 100BASE TX port Port for connecting the 100BASE TX or 10BASE T cable 4 USB Host Interface Port for connecting the USB interface cable Use this to connect a digital camera or similar d...

Page 70: ...tegory type 5 or more 1 A ferrite core for the Ethernet interface cable is supplied with this machine Make a loop in the cable about 5 cm 2 1 inch 1 from the machine end of the cable Attach the ferrite core BBM011S 2 Make sure the main power switch of the machine is off 3 Connect the Ethernet interface cable to the 10BASE T 100BASE TX port BHI014S 4 Connect the other end of the Ethernet interface ...

Page 71: ...etails about installing the printer driver see Preparing the Machine Printer Reference Connecting to the Gigabit Ethernet Interface This section describes how to connect the Ethernet interface cable to the Gigabit Ethernet port If the main power switch is on turn it off Use the following Ethernet cables When using 100BASE TX 10BASE T Unshielded Twisted Pair Cable UTP or Shielded Twisted Pair Cable...

Page 72: ...off 3 Connect the Ethernet interface cable to the Gigabit Ethernet port BHI013S 4 Connect the other end of the Ethernet interface cable to a network connection device such as a hub 5 Turn on the main power switch of the machine BAX008S 1 Indicator yellow When 100BASE TX is operating the LED is lit yellow When 10BASE T is operating it is turned off 2 Connecting the Machine 70 2 ...

Page 73: ... for connections to a host computer and or peripheral in order to meet emission limits 1 Connect the USB2 0 interface cable to the USB2 0 port BHI012S 2 Connect the other end to the USB2 0 port on the host computer This machine does not come with a USB interface cable Make sure you purchase the appropriate cable for the machine and your computer The USB2 0 interface board is supported by Windows 2...

Page 74: ...r consult your sales or service representative 4 Connect the other end of the cable into the interface connector on the host computer Check the shape of the connector to the computer Connect the cable firmly 5 Turn on the main power switch of the machine 6 Turn on the host computer When using Windows 2000 XP Vista and Windows Server 2003 2003 R2 a printer driver installation screen might appear wh...

Page 75: ... This section describes how to setup wireless LAN interface Set up wireless LAN according to the following procedure BBM002S Select 802 11Ad hocMode whenconnectingWindowsXPasawirelessLANclientusingWindows XP standard driver or utilities or when not using the infrastructure mode When 802 11 Ad hoc Mode is selected in Communication mode select the channel for Ad hoc Channel Set a channel that matche...

Page 76: ...A2 For details about how to specify wireless LAN settings from the control panel on the machine see Interface Settings p 33 Interface Settings p 331 Configuring IEEE 802 1X Checking the Signal This section describes how to check the machine s radio wave status When using in infrastructure mode you can check the machine s radio wave status using the control panel 1 Press the User Tools Counter key ...

Page 77: ...Address As required Interface Settings Network Machine IPv6 Address As required Interface Settings Network IPv6 Gateway Address As required Interface Settings Network IPv6 Stateless Address Autoconfiguration As required Interface Settings Network DNS Configuration As required Interface Settings Network DDNS Configuration As required Interface Settings Network IPsec As required Interface Settings N...

Page 78: ...to use is set to Active LAN Type is displayed when the wireless LAN board is installed If Ethernet and wireless LAN are both connected the selected interface has priority p 33 Interface Settings Wireless LAN This section lists the settings required for using the printer or LAN Fax function with a wireless LAN connection For details about how to specify the settings see Interface Settings Menu User...

Page 79: ...ary Interface Settings Network Permit SNMPv3 Communication As required Interface Settings Network Permit SSL TLS Communication As required Interface Settings Network Host Name As required Interface Settings Network Machine Name As required Interface Settings Wireless LAN Communication Mode Necessary Interface Settings Wireless LAN Ad hoc Channel As required Interface Settings Wireless LAN SSID Set...

Page 80: ... Network Machine IPv6 Address As required Interface Settings Network IPv6 Gateway Address As required Interface Settings Network IPv6 Stateless Address Autoconfiguration As required Interface Settings Network DNS Configuration As required Interface Settings Network DDNS Configuration As required Interface Settings Network IPsec As required Interface Settings Network Domain Name As required Interfa...

Page 81: ...l Message As required File Transfer Fax E mail Account Necessary For the Effective Protocol setting check that the protocol you want to use is set to Active LAN Type is displayed when the wireless LAN interface board is installed If both Ethernet and wireless LAN are connected the selected interface takes precedence SMTP Server and Fax E mail Account must be specified in order to send Internet Fax...

Page 82: ... DNS Configuration As required Interface Settings Network DDNS Configuration As required Interface Settings Network IPsec As required Interface Settings Network Domain Name As required Interface Settings Network WINS Configuration As required Interface Settings Network Effective Protocol Necessary Interface Settings Network LAN Type Necessary Interface Settings Network Permit SNMPv3 Communication ...

Page 83: ...ocol setting check that the protocol you want to use is set to Active Wireless LAN and LAN Type are displayed when the wireless LAN interface board is installed If both Ethernet and wireless LAN are connected the selected interface takes precedence SMTP Server and Fax E mail Account must be specified in order to send Internet Fax When POP before SMTP is set to On you must also make settings for Re...

Page 84: ...ss Necessary Interface Settings Network Machine IPv6 Address As required Interface Settings Network IPv6 Gateway Address As required Interface Settings Network IPv6 Stateless Address Autoconfiguration As required Interface Settings Network DNS Configuration As required Interface Settings Network DDNS Configuration As required Interface Settings Network IPsec As required Interface Settings Network ...

Page 85: ...te E mail Message As required File Transfer Scanner Resend Interval Time As required File Transfer Number of Scanner Resends As required For the Effective Protocol setting check that the protocol you want to use is set to Active LAN Type is displayed when the wireless LAN interface board is installed If both Ethernet and wireless LAN are connected the selected interface takes precedence When POP b...

Page 86: ...ngs Network Domain Name As required Interface Settings Network WINS Configuration As required Interface Settings Network Effective Protocol Necessary Interface Settings Network LAN Type Necessary Interface Settings Network Permit SNMPv3 Communication As required Interface Settings Network Permit SSL TLS Communication As required Interface Settings Network Host Name As required Interface Settings W...

Page 87: ...required For the Effective Protocol setting check that the protocol you want to use is set to Active LAN Type is displayed when the wireless LAN interface board is installed If both Ethernet and wireless LAN are connected the selected interface takes precedence When POP before SMTP is set to On you must also make settings for Reception Protocol and POP3 IMAP4 Settings When setting POP before SMTP ...

Page 88: ...ss Necessary Interface Settings Network Machine IPv6 Address As required Interface Settings Network IPv6 Gateway Address As required Interface Settings Network IPv6 Stateless Address Autoconfiguration As required Interface Settings Network DNS Configuration As required Interface Settings Network DDNS Configuration As required Interface Settings Network IPsec As required Interface Settings Network ...

Page 89: ...he selected interface takes precedence p 33 Interface Settings p 41 File Transfer Wireless LAN This section lists the settings required for sending files with an Wireless LAN connection For details about how to specify the settings see Interface Settings and File Transfer Menu User Tool Setting Requirements Interface Settings Network Machine IPv4 Address Necessary Interface Settings Network IPv4 G...

Page 90: ...mmunication Mode Necessary Interface Settings Wireless LAN SSID Setting As required Interface Settings Wireless LAN Ad hoc Channel As required Interface Settings Wireless LAN Security Method As required File Transfer Default User Name Password Send As required File Transfer Scanner Resend Interval Time As required File Transfer Number of Scanner Resends As required For the Effective Protocol setti...

Page 91: ...dress As required Interface Settings Network Machine IPv6 Address As required Interface Settings Network IPv6 Gateway Address As required Interface Settings Network IPv6 Stateless Address Autoconfiguration As required Interface Settings Network DNS Configuration As required Interface Settings Network DDNS Configuration As required Interface Settings Network IPsec As required Interface Settings Net...

Page 92: ...alled If both Ethernet and wireless LAN are connected the selected interface takes precedence If Delivery Option is set to On check that IPv4 Address is specified p 33 Interface Settings p 41 File Transfer Wireless LAN This section lists the settings required for delivering data to the network with an wireless LAN connection For details about how to specify the settings see Interface Settings and ...

Page 93: ...ode Necessary Interface Settings Wireless LAN SSID Setting As required Interface Settings Wireless LAN Ad hoc Channel As required Interface Settings Wireless LAN Security Method As required File Transfer Delivery Option Necessary File Transfer Fax RX File Transmission As required File Transfer Scanner Resend Interval Time As required File Transfer Number of Scanner Resends As required For the Effe...

Page 94: ...IPv6 Address As required Interface Settings Network IPv6 Gateway Address As required Interface Settings Network IPv6 Stateless Address Autoconfiguration As required Interface Settings Network DNS Configuration As required Interface Settings Network DDNS Configuration As required Interface Settings Network IPsec As required Interface Settings Network Domain Name As required Interface Settings Netwo...

Page 95: ...are both connected the selected interface has priority p 33 Interface Settings Wireless LAN This section lists the settings required for using WSD Scanner function with a wireless LAN connection For details about how to specify the settings see Interface Settings Menu User Tool Setting Requirements Interface Settings Network Machine IPv4 Address Necessary Interface Settings Network IPv4 Gateway Ad...

Page 96: ...3 Communication As required Interface Settings Network Permit SSL TLS Communication As required Interface Settings Network Host Name As required Interface Settings Network Machine Name As required Interface Settings Wireless LAN Communication Mode Necessary Interface Settings Wireless LAN Ad hoc Channel As required Interface Settings Wireless LAN SSID Setting As required Interface Settings Wireles...

Page 97: ...nterface Settings Network DNS Configuration As required Interface Settings Network DDNS Configuration As required Interface Settings Network IPsec As required Interface Settings Network Domain Name As required Interface Settings Network WINS Configuration As required Interface Settings Network Effective Protocol Necessary Interface Settings Network Ethernet Speed As required Interface Settings Net...

Page 98: ...Interface Settings Network DNS Configuration As required Interface Settings Network DDNS Configuration As required Interface Settings Network IPsec As required Interface Settings Network Domain Name As required Interface Settings Network WINS Configuration As required Interface Settings Network Effective Protocol Necessary Interface Settings Network LAN Type Necessary Interface Settings Network Pe...

Page 99: ... set to Active Wireless LAN and LAN Type are displayed when the wireless LAN interface board is installed When both Ethernet and wireless LAN are connected the selected interface takes precedence p 33 Interface Settings Network Settings Required to Use Network TWAIN Scanner 97 2 ...

Page 100: ...rk IPv4 Gateway Address As required Interface Settings Network Machine IPv6 Address As required Interface Settings Network IPv6 Gateway Address As required Interface Settings Network IPv6 Stateless Address Autoconfiguration As required Interface Settings Network DNS Configuration As required Interface Settings Network DDNS Configuration As required Interface Settings Network IPsec As required Inte...

Page 101: ... LAN connection For details about how to specify the settings see Interface Settings Menu User Tool Setting Requirements Interface Settings Network Machine IPv4 Address Necessary Interface Settings Network IPv4 Gateway Address As required Interface Settings Network Machine IPv6 Address As required Interface Settings Network IPv6 Gateway Address As required Interface Settings Network IPv6 Stateless...

Page 102: ...Wireless LAN SSID Setting As required Interface Settings Wireless LAN Ad hoc Channel As required Interface Settings Wireless LAN Security Method As required Interface Settings Wireless LAN Transmission Speed As required For the Effective Protocol setting check that the protocol you want to use is set to Active Wireless LAN and LAN Type are displayed when the wireless LAN interface board is install...

Page 103: ...nterface settings using utilities Change settings by using Web Image Monitor SmartDeviceMonitor for Admin and telnet Network Machine IPv4 Address Auto Obtain DHCP Web Image Monitor Can be used for specifying the setting SmartDeviceMonitor for Admin Can be used for specifying the setting telnet Can be used for specifying the setting Network Machine IPv4 Address Specify IPv4 Address Web Image Monito...

Page 104: ... Auto Obtain DHCP Web Image Monitor Can be used for specifying the setting SmartDeviceMonitor for Admin Cannot be used for specifying the setting telnet Can be used for specifying the setting Network DNS Configuration Specify DNS Server 1 3 Web Image Monitor Can be used for specifying the setting SmartDeviceMonitor for Admin Cannot be used for specifying the setting telnet Can be used for specifyi...

Page 105: ...ed for specifying the setting telnet Can be used for specifying the setting Network WINS Configuration Off Web Image Monitor Can be used for specifying the setting SmartDeviceMonitor for Admin Cannot be used for specifying the setting telnet Can be used for specifying the setting Network Effective Protocol IPv4 Web Image Monitor Can be used for specifying the setting SmartDeviceMonitor for Admin Y...

Page 106: ...viceMonitor for Admin Can be used for specifying the setting telnet Cannot be used for specifying the setting Network NCP Delivery Protocol IPX Only Web Image Monitor Can be used for specifying the setting SmartDeviceMonitor for Admin Can be used for specifying the setting telnet Cannot be used for specifying the setting Network NCP Delivery Protocol TCP IP Only Web Image Monitor Can be used for s...

Page 107: ...t be used for specifying the setting telnet Can be used for specifying the setting Network SMB Work Group Web Image Monitor Can be used for specifying the setting SmartDeviceMonitor for Admin Cannot be used for specifying the setting telnet Can be used for specifying the setting Network Ethernet Speed Web Image Monitor Cannot be used for specifying the setting SmartDeviceMonitor for Admin Cannot b...

Page 108: ...for specifying the setting telnet Can be used for specifying the setting Network Permit SSL TLS Communication Ciphertext Only Web Image Monitor Can be used for specifying the setting SmartDeviceMonitor for Admin Cannot be used for specifying the setting telnet Cannot be used for specifying the setting Network Permit SSL TLS Communication Ciphertext Priority Web Image Monitor Can be used for specif...

Page 109: ...DeviceMonitor for Admin Cannot be used for specifying the setting telnet Can be used for specifying the setting Wireless LAN Ad hoc Channel Web Image Monitor Can be used for specifying the setting SmartDeviceMonitor for Admin Cannot be used for specifying the setting telnet Can be used for specifying the setting Wireless LAN Security Method Web Image Monitor Can be used for specifying the setting ...

Page 110: ...d for specifying the setting telnet Cannot be used for specifying the setting File Transfer Reception Protocol SMTP Web Image Monitor Can be used for specifying the setting SmartDeviceMonitor for Admin Cannot be used for specifying the setting telnet Cannot be used for specifying the setting File Transfer POP3 IMAP4 Settings Web Image Monitor Can be used for specifying the setting SmartDeviceMonit...

Page 111: ...sword Send Web Image Monitor Can be used for specifying the setting SmartDeviceMonitor for Admin Cannot be used for specifying the setting telnet Cannot be used for specifying the setting File Transfer Fax E mail Account Web Image Monitor Can be used for specifying the setting SmartDeviceMonitor for Admin Cannot be used for specifying the setting telnet Cannot be used for specifying the setting Fi...

Page 112: ...lephone line use a snap in modular type connector Make sure the connector is the correct type before you start BHJ019S 1 G3 interface unit connector 2 External telephone connector 3 Extra G3 interface unit connector Connecting the Telephone Line Type 3 and 4 To connect the machine to a telephone line use a snap in modular type connector Make sure the connector is the correct type before you start ...

Page 113: ...his function is not available in some regions Connecting the Optional Handset or an External Telephone You can connect the optional handset or an external telephone to the machine You can use it for telephone calls Whenyouusetheoptionalhandsetoranexternaltelephonewiththe OnHookDial keyfortelephone calls you can not talk with the other party without pressing the On Hook Dial key after talking off t...

Page 114: ...intheappropriateposition TT ToneDialing orDP PulseDialing Adjusting the handset bell volume Ringer x BHJ311S Adjust the handset ringer volume using the volume switch Some external telephones may not be connected or may suffer reduced functionality 2 Connecting the Machine 112 2 ...

Page 115: ... or Printers and Faxes window you need Printer Management access authentication under Windows Vista Full Control access authentication Log on to the file server as an Administrator or member of the PowerUsers group 1 Open the Printers and Faxes window from the Start menu The Printers and Faxes window appears 2 Click the icon of the machine you want to use On the File menu click Properties The prin...

Page 116: ...ment is already prepared for normal NetWare running the printing service setting The procedure is explained with the following example settings File server s name CAREE Print server s name PSERV Printer s name R PRN Queue name R QUEUE Using SmartDeviceMonitor for Admin TousethemachineinaNetWareenvironment useSmartDeviceMonitorforAdmintosettheNetWare printing environment Printers listed by SmartDev...

Page 117: ...ile server is searched for This item is mandatory Use up to 47 characters NDS Tree To enable NDS mode enter the name of the NDS tree you want to log on to Use up to 32 alphanumeric characters NDS Context Name To enable NDS mode enter the print server context Use up to 127 characters Operation Mode Specify whether to use the interface board as a print server or a remote printer Remote Printer No Th...

Page 118: ... see Security Reference which is the administrator s manual p 125 Using Web Image Monitor Setting Up as a Print Server NetWare 4 x 5 5 1 6 6 5 Follow the procedure below to connect the machine as a print server using NetWare 4 x NetWare 5 5 1 or NetWare 6 6 5 When using the printer as a print server in NetWare 4 x NetWare 5 5 1 or NetWare 6 6 5 set it to the NDS mode When using NetWare 5 5 1 or Ne...

Page 119: ...6 5 Environment Follow the procedure below to connect the machine as a print server in a pure IP environment of NetWare 5 5 1 or NetWare 6 6 5 When creating a queued print server in a pure IP environment of NetWare 5 5 1 or NetWare 6 6 5 create a print queue on the file server using NetWare Administrator This printer is not available as a remote printer for use in a pure IP environment To use the ...

Page 120: ...ck Print Server and then click OK For NetWare 5 click Print Server Non NDPS 19 In the Print Server Name box enter the print server name Use the same print server name specified using SmartDeviceMonitor for Admin 20 Select the Define additional properties check box and then click Create 21 Click Assignments and then click Add in the Assignments area 22 In the Available objects box click the queue y...

Page 121: ...al p 125 Using Web Image Monitor Setting Up as a Remote Printer NetWare 3 x Follow the procedure below to use the machine as a remote printer under NetWare 3 x Setting up using PCONSOLE 1 Enter PCONSOLE from the command prompt F PCONSOLE 2 Create a print queue When using the existing print queue go to the procedure for creating a printer 3 From the Available Options menu select Print Queue Informa...

Page 122: ...elect the printer created 19 Press the Insert key to select a queue serviced by the printer You can select several queues 20 Follow the instructions on the screen to make other necessary settings Following these steps check that the queues are assigned 21 Press the Esc key until Exit appears and then select Yes to exit PCONSOLE 22 Start the print server by entering the following from the console o...

Page 123: ...ow to use the printer as a remote printer under NetWare 4 x 5 5 1 and 6 6 5 To use the printer as a remote printer under NetWare 4 x 5 5 1 6 6 5 set it to NDS mode Do not use the printer as a remote printer when Pure IP is used Setting up using NWadmin 1 From Windows start NWadmin For details about NWadmin see the NetWare manuals 2 Set up the network connection to a print queue Select the object i...

Page 124: ...server name Use the same print server name specified using SmartDeviceMonitor for Admin 19 Select the Define additional properties check box and then click Create 20 Assign the printer to the created print server Click Assignments and then click Add in the Assignments area 21 In the Available objects box click the queue you created and then click OK 22 In the Printers area click the printer you as...

Page 125: ...before restarting Web Image Monitor 6 Click Logout 7 Quit Web Image Monitor If you cannot identify the printer you want to configure check the printer name against the configuration page printed from the printer If no printer names appear in the list match the frame types of IPX SPXs for the computer and printer Use the Network dialog box of Windows to change the frame type of the computer For det...

Page 126: ...3 Using a Printer Server 124 3 ...

Page 127: ...n the Document Server Interrupting currently printing jobs Resetting the machine Managing the Address Book Making machine settings Making network protocol settings Making security settings Configuring the machine To perform the operations from Web Image Monitor TCP IP is required After the machine is configured to use TCP IP operations from Web Image Monitor become available Recommended Web browse...

Page 128: ...e SSL encryption protocol enter https machine s IP address or host name Internet Explorer must be installed on your computer Use the most recent available version We recommend Internet Explorer 6 0 or later When you are using Firefox fonts and colors may be different or tables may be out of shape When using a host name under Windows Server 2003 2003 R2 with IPv6 protocol perform host name resoluti...

Page 129: ...splay area Displays the contents of the item selected in the menu area Machine information in the display area is not automatically updated Click Refresh at the upper right in the display area to update the machine information Click the Web browser s Refresh button to refresh the entire browser screen When using a host name under Windows Server 2003 2003 R2 or Windows Vista with IPv6 protocol perf...

Page 130: ...lways click Logout About Menu and Mode There are two modes available with Web Image Monitor guest mode and administrator mode Displayed Items may differ depending on the machine type Guest Mode Intheguestmode machinestatus settings andprintjobstatuscanbeviewed butthemachinesettings cannot be changed BHJ301S 1 Home The Status Device Info Counter and Inquiry tab are displayed Details of the tab menu...

Page 131: ...es stored in the Document Server 3 Printer Print Jobs Allows you to display list of Locked Print Sample Print Hold Print and Stored Print jobs 4 Job Display all print files 5 Address Book User information can be registered displayed changed and deleted 6 Configuration Make system settings for the machine interface settings and security 7 Reset Device Click to reset the printer If a print job is be...

Page 132: ...w Web Image Monitor items that can be viewed or modified depending on the selected mode on the Web browser Select one of the following modes to log on Web Image Monitor Guest mode logged on as a user Administrator mode logged on as an administrator Home Status Menu Guest mode Administrator mode Reset Device None Modify Reset Printer Job None Modify Status Read Read Toner Read Read Input Tray Read ...

Page 133: ...overage Read Read Other Function s Read Read Inquiry Menu Guest mode Administrator mode MachineMaintenance Repair Read Read Sales Representative Read Read Document Server Document Server Guest mode Administrator mode Read Modify Read Modify Fax Received File Guest mode Administrator mode Read Modify None Printer Print Jobs Print Job List Using Web Image Monitor 131 4 ...

Page 134: ...e Job History Read Read Error Log Read Read Fax History Menu Guest mode Administrator mode Transmission Read Read Modify Reception Read Read Modify LAN Fax Read Read Document Server Menu Guest mode Administrator mode Print Job History Read Modify Read Modify Fax Remote Send History Read Modify Read Modify Scanner Remote Send History Read Modify Read Modify 4 Monitoring and Configuring the Printer ...

Page 135: ... None Read Modify E mail Read Read Modify Auto E mail Notification None Read Modify On demand E mail Notification None Read Modify File Transfer None Read Modify User Authentication Management None Read Modify Administrator Authentication Management None Read Modify Program Change Administrator None Read Modify LDAP Server None Read Modify Firmware Update None Read Modify Program Change Realm None...

Page 136: ... Settings None Read Modify Send Reception Settings None Read Modify IP Fax Settings None Read Modify IP Fax Gateway Settings None Read Modify Parameter Settings None Read Modify Scanner Menu Guest mode Administrator mode General Settings Read Read Modify Scan Settings Read Read Modify Send Settings Read Read Modify Initial Settings Read Read Modify Default Settings for Normal Screens on Device Rea...

Page 137: ...Read Read Modify SMB Read Read Modify SNMP None Read Modify SNMPv3 None Read Modify SSDP None Read Modify Bonjour Read Read Modify System Log Read Read Security Menu Guest mode Administrator mode Network Security None Read Modify Access Control None Read Modify IPP Authentication None Read Modify SSL TLS None Read Modify ssh None Read Modify Site Certificate None Read Modify Device Certificate Non...

Page 138: ...oxy Server None Read Modify Webpage Menu Guest mode Administrator mode Webpage Read Modify Read Modify Extended Feature Settings Menu Guest mode Administrator mode Startup Setting None Read Modify Extended Feature Info None Read Install None Read Modify Uninstall None Read Modify Change Allocation None Read Modify Administrator Tools None Read Modify Copy Extended Features None Read Modify Copy Ca...

Page 139: ...ontents of Help appear By clicking the Help icon in the display area Help for the setting items in the display area appears Downloading Help 1 In the OS list select the operating system 2 In the Language list select the language 3 Click Download 4 Download Help by following the instructions on the screen 5 Store the downloaded compressed file in a given location and then decompress the file To cre...

Page 140: ...LP For example if you saved the file to a Web server and the URL of the index file is http a b c d HELP EN index html enter http a b c d HELP 5 Click OK If you save the Help files on your hard disk you must access them directly you cannot link to them using the Help button 4 Monitoring and Configuring the Printer 138 4 ...

Page 141: ...ient for Windows NT 2000 XP Vista Available operations The following functions are available Limits settings done from the control panel and disables changes made to certain items Enables selection of paper type loaded in the machine Switches to and comes out of Energy Saver mode Checks information about printing paper quantity etc Simultaneously monitors multiple printers When there are many prin...

Page 142: ...M into the CD ROM drive The installer starts 3 Select an interface language and then click OK The following languages are available Czech Danish German English Spanish French Italian Hungarian Dutch Norwegian Polish Portuguese Finnish Swedish Chinese Simple and Chinese Traditional 4 Click SmartDeviceMonitor for Admin 5 Click Next The software license agreement appears in the License Agreement dial...

Page 143: ...nge 4 On the Tools menu click NIB Setup Tool A Web browser opens and the window for entering the login user name and password for the Web Image Monitor administrator appears NIB Setup Tool starts Click Web browser and then click OK 5 Enter the login user name and password and then click Login For details about the login user name and password consult your network administrator 6 Configure settings...

Page 144: ...em A Web browser opens and the window for entering the login user name and password for the Web Image Monitor administrator appears 5 Enter the login user name and password and then click Login For details about the user name and password consult your network administrator The System page of Web Image Monitor appears 6 On the Protect Printer Display Panel select Level 1 or Level 2 7 Click OK 8 Cli...

Page 145: ...s 5 Enter the login user name and password and then click Login For details about the login user name and password consult your network administrator The Paper page appears Select a paper type in the Paper Type list for each tray Enter required setting items 6 Click Logout 7 Quit Web Image Monitor 8 Quit SmartDeviceMonitor for Admin For details about login user names and passwords see Security Ref...

Page 146: ...b browser opens and the window for entering the login user mane and password for the Web Image Monitor administrator appears 5 Enter the user name and password and then click Login For details about the user name and password consult your network administrator User Management Tool starts For details about login user names and passwords see Security Reference which is the administrator s manual For...

Page 147: ...as a csv file 1 Start SmartDeviceMonitor for Admin User Management Tool 2 Click the User Counter Information tab of User Management Tool 3 On the File menu click Export User Statistics List 4 Specify the save location and file name and then click Save 5 Click Exit on the File menu to quit User Management Tool Resetting the number of pages printed to 0 Follow the procedure below to reset the number...

Page 148: ...ters 5 Select the check box of the items you want to reset and then click OK A confirmation message appears 6 Click OK The count for the selected paper type becomes 0 and Modified is displayed for Status 7 On the Edit menu click Apply Settings Changes are applied to information on the User Counter Information tab 4 Monitoring and Configuring the Printer 146 4 ...

Page 149: ...ant to restrict 4 On the Edit menu of User Management Tool click Restrict Access To Device 5 Select the check box of the functions you want to restrict 6 Click OK A confirmation message appears 7 Click Yes The settings are applied 8 Click Exit on the File menu to quit User Management Tool Setting Applicable Functions to New Users Follow the procedure below to add new users and set functions applic...

Page 150: ...w user If the check boxes are unavailable there is no restriction to use that function 6 Click OK The user is added and New is displayed for Status 7 On the Edit menu click Apply Settings The settings are applied 8 Click Exit on the File menu to quit User Management Tool For details about setting restrictions see SmartDeviceMonitor for Admin Help 4 Monitoring and Configuring the Printer 148 4 ...

Page 151: ...make settings for all machines in the selected group select no machine 4 Click the Group menu point to Energy Save Mode Set Individually and then click On To select all the machines in the group select Set By Group To disable Energy Save mode click Off 5 Quit SmartDeviceMonitor for Admin For details about the setting for Energy Saver mode see SmartDeviceMonitor for Admin Help Setting a Password Fo...

Page 152: ... consult your network administrator 6 Click Configuration 7 Click Program Change Administrator on the Device Settings area and then change the settings 8 Click OK 9 Click Logout 10 Quit Web Image Monitor 11 Quit SmartDeviceMonitor for Admin For details about login user names and passwords see Security Reference which is the administrator s manual Checking the Machine Status Follow the procedure be...

Page 153: ...ames and comments of the machine 1 Start SmartDeviceMonitor for Admin 2 On the Group menu point to Search Device and then click IPv4 IPX SPX or IPv4 SNMPv3 A list of machines using the selected protocol appears Select the protocol of the machine whose configuration you want to change If you are using IPv4 SNMPv3 enter the user authentication 3 Select a machine in the list and then click NIB Setup ...

Page 154: ...achine whose configuration you want to change If you are using IPv4 SNMPv3 enter the user authentication 3 Select a machine in the list and then click Load Fax Journal on the Tools menu A Web browser opens and the window for entering the login user name and password for the Web Image Monitor administrator appears 4 Enter the login user name and password and then click Login For details about the l...

Page 155: ... user name and password and then click Login For details about the login user name and password consult your network administrator Spool Printing Job List appears in the Web Image Monitor 5 Click Logout 6 Quit Web Image Monitor 7 Quit SmartDeviceMonitor for Admin To display Spool Printing Job List Spool Printing must be set to Active on Web Image Monitor in advance To delete the Spool Printing Job...

Page 156: ...ol on the Tools menu The dialog box for entering the login user name and password appears 4 Enter the login user name and password and then click OK For details about the login user name and password consult your network administrator Address Management Tool starts Make the necessary settings 5 Click Exit 6 Quit SmartDeviceMonitor for Admin For details see Address Management Tool Help For details ...

Page 157: ...rties and then click Monitor Device Settings The SmartDeviceMonitor for Client Options dialog box appears 2 On the Printers Folder tab select the machine you want to monitor and then select the To Be Monitored check box in the Monitoring Information Settings area To display the machine status on the task bar you must first select the To be Monitored check box and then select the Displayed on Task ...

Page 158: ...onitor for Client cannot access the network printer and times out it will stop sending the print job In this case you should cancel the paused status from the print queue window SmartDeviceMonitor for Client will resume access to the network printer You can delete the print job from the print queue window but canceling a print job printed by the network printer might cause the next job sent from a...

Page 159: ...ommended If the Security Alert dialog box appears when accessing the machine using IPP to create or configure an IPP port or when printing install the certificate To select the certificate store location when using Certificate Import Wizard click Place all certificates in the following store and then click Local Computer under Trusted Root Certification Authorities For details about SSL settings c...

Page 160: ...e mail application s Help The e mail notification functions you can set are as follows Auto e mail notification Information including the machine status is automatically sent by e mail Before enabling this function register a receiving e mail address On demand e mail notification Information including the machine status is sent by e mail when a request from the administrator is received The inform...

Page 161: ...ary items You can also perform mail authentication for the POP server Items in the POP3 IMAP4 column Configure the POP3 or IMAP4 server Check your mailing environment and then specify the necessary items Items in the E mail Communication Port column Configure the port to be used for access to the mail server Items in the Fax E Mail Account column Specify these items if you want to use on demand e ...

Page 162: ...5 Click Logout 6 Close Web Image Monitor Only user names and e mail addresses that are not already specified as e mail notification recipients can be specified Mail Authentication You can configure mail authentication to prevent illegal use of the mail server SMTP Authentication Specify SMTP authentication When mail is sent to the SMTP server authentication is performed using the SMTP AUTH protoco...

Page 163: ... Settings area 3 Make the following settings in POP before SMTP column POP before SMTP Enable or disable POP before SMTP POP E mail Address Enter the e mail address POP User Name Enter the POP account name POP Password To set or change the POP password Timeout setting after POP Auth Enter the time available before connecting to the SMTP server after logging on to the POP server 4 Click OK 5 Click ...

Page 164: ...n on the Device Settings area The dialog box for making notification settings appears 3 Make the following settings Notification Subject Enter a text string to be added to the subject line of return e mails Notification Message You can set this according to your needs for example the machine s location service representative contact information Restriction to Device Status Info Select whether or n...

Page 165: ...cription Subject Referred to as Subject Enter requeststatus From Referred to as From Specify a valid mail address The device information will be sent to the address specified here A mail message must be within 1 MB in size E mail may be incomplete if sent immediately after power on The subject is not case sensitive Any text written in the e mail body is ignored Printer Status Notification by E Mai...

Page 166: ...work administrator For user authentication enter a login user name and password For user code authentication enter a user code in User Name 3 Enter a command 4 Quit telnet msh logout The configuration message about saving the changes appears 5 Enter yes to save the changes and then press the Enter key If you do not want to save the changes enter no and then press the Enter key To make further chan...

Page 167: ...DB8 200 msh access 1 range6 2001 DB8 100 2001 DB8 200 IPv6 access mask configuration msh access ID mask6 base address prefixlen Example to specify accessible IPv6 addresses to 2001 DB8 32 msh access 1 mask6 2001 DB8 32 Access control initialization msh access flush Use the flush command to restore the default settings so that all access ranges become 0 0 0 0 for IPv4 and for IPv6 You can specify e...

Page 168: ...0 means inactive The default is 2 Changing PAP timeout configuration msh appletalk ptimeout value 0 Timeout value becomes effective msh appletalk ptimeout value 0 Timeout value becomes ineffective authfree Use the authfree command to view and configure AuthFree parameters View settings The following command displays the current AuthFree settings msh authfree If print job authentication exclusion i...

Page 169: ... means active and off means inactive Current interface priority configuration display msh autonet priority Interface priority configuration msh autonet priority interface_name You can give interface s AutoNet parameter priority Priority settings are available when multiple interfaces are installed wlan can be specified only when the IEEE 802 11 interface is installed Interface Interface configured...

Page 170: ...aracter string current setting is displayed Setting order of priority for each protocol msh bonjour diprint 0 99 msh bonjour lpr 0 99 msh bonjour ipp 0 99 You can specify the order of priority for diprint lpr and ipp Smaller numbers indicate higher priority IP TTL setting msh bonjour ip ttl 1 255 You can specify the IP TTL the number of routers a packet can pass through The default is 255 Resettin...

Page 171: ...PP SSL Printing is set to ssl the IPP port number will appear as 443 and IPP SSL printing can be performed with higher security If IPP SSL Printing is set to ipp the IPP port number will appear as 631 Port 631 is the port for normal IPP printing btconfig Use the btconfig command to make Bluetooth settings View settings Bluetooth settings are displayed msh btconfig Mode settings You can set the Blu...

Page 172: ...name are obtained from DHCP be sure to click on wlan can be specified only when the IEEE 802 11 interface is installed Interface name Interface configured ether Ethernet interface wlan IEEE 802 11 interface Current interface priority configuration display msh dhcp priority Interface priority configuration msh dhcp priority interface_name You can select which interface has DHCP parameter priority P...

Page 173: ...Pv6 settings msh dhcp6 DHCPv6 lite configuration and display msh dhcp6 interface_name lite on off Viewing and specifying DNS server address selection obtained from the dhcpv6 server user specified value msh dhcp6 dnsaddr dhco static DUID DHCP unique ID deletion and display msh dhcp6 duid clear Viewing and specifying the time required to re obtain the parameter obtained from dhcpv6 msh dhcp6 ooptio...

Page 174: ...urrent connections msh diprint conn multi single The above command specifies the number of concurrent diprint connections Specify multi for multiple connections or single for a single connection The default is multi dns Use the dns command to configure or display DNS Domain Name System settings View settings The following command displays current DNS settings msh dns IPv4 DNS server configuration ...

Page 175: ...an IEEE 802 11 interface Specifying the record overlap operation msh dns overlap update add You can specify operations performed when records overlap update To delete old records and register new records add To add new records and store the old records When CNAME overlaps it is always changed irrespective of settings CNAME registration msh dns cname on off You can specify whether to register CNAME...

Page 176: ...name settings You can configure the Ethernet interface or IEEE 802 11 interface View settings The following command displays the current domain name msh domainname Interface domain configuration msh domainname interface_name Setting the Domain Name msh domainname interface_name name domain name A domain name can be entered using up to 63 alphanumeric characters The Ethernet interface and IEEE 802 ...

Page 177: ...e the hostname command to change the printer name View settings msh hostname IPv4 Configuration msh hostname interface_name printer_name Enter the printer name using up to 63 alphanumeric characters You cannot use a printer name beginning RNP in either upper or lower case The Ethernet interface and IEEE 802 11 interface will have the same printer name wlan can be specified only when the IEEE 802 1...

Page 178: ... IEEE 802 11 Interface The following explains how to configure an IPv4 address 192 168 15 16 on Ethernet interface msh ifconfig ether 192 168 15 16 IPv6 configuration msh ifconfig ether inet6 interface_name printer_name The following explains how to configure a IPv6 address to 2001 DB8 100 with prefix length 64 on the Ethernet interface msh ifconfig ether inet6 2001 DB8 100 64 Netmask configuratio...

Page 179: ...playprinterinformationsuchaspapertray outputtray andprinterlanguage Printer information display msh info p 217 Understanding the Displayed Information ipp Use the ipp command to view and configure IPP settings Viewing settings The following command displays the current IPP settings msh ipp IPP timeout configuration Specify how many seconds the computer waits before canceling an interrupted print j...

Page 180: ...lays the current IPsec settings msh ipsec For details about displayed contents see Security Reference ipv6 Use the ipv6 command to display and configure IPv6 settings View Setting msh ipv6 IPv6 stateless address msh ipv6 stateless on off If on is selected IPv6 requests information required for maintaining stateful connection to the router for as long as the printer power is turned on This setting ...

Page 181: ...ent the print job If LPR is disabled you can also delete print jobs sent from IP addresses other than that of the host Printer Error Detection Function lpr prnerrchk on off The default is off If you set this to on the printer stops receiving data and will wait until the error is resolved before continuing processing a job netware Use the netware command to view and configure the NetWare settings s...

Page 182: ... character string SAP interval msh netware sap_interval 0 3600 It can be entered between 0 and 3600 seconds Setting login mode for file server msh netware login server Setting login mode for NDS tree msh netware login tree Setting login mode for NDS tree name msh netware tree NDS tree name File transfer protocol msh netware trans ipv4pri ipxpri ipv4 ipx If you do not specify the protocol the curre...

Page 183: ...lphanumeric characters s are case sensitive For example R is not the same as r pathmtu Use the pathmtu command to display and configure the PathMTU Discovery service function View settings msh pathmtu Configuration msh pathmtu on off The default is on If the MTU size of the sent data is larger than the router s MTU the router will declare it impassable and communication will fail If this happens s...

Page 184: ...pecify host net the host setting is automatically selected Adding IPv4 Routing Table msh route add host net destination gateway Adds a host or network route to destination and a gateway address to gateway in the table Specify the IPv4 address to destination and gateway If you do not specify host net the host setting is selected automatically You cannot specify 0 0 0 0 as the destination address Se...

Page 185: ...ecify the IPv6 address to destination and gateway Display information about a specified IPv6 route information msh route get6 destination Specify the IPv6 address to destination and gateway Enabling disabling a specified IPv6 destination msh route active6 destination prefixlen 1 128 on off Route initialization msh route flush The maximum number of IPv4 routing tables is 16 The maximum number of IP...

Page 186: ...following command displays protocol information active inactive msh set ipv4 msh set ipv6 msh set ipsec msh set appletalk msh set netware msh set smb msh set protocol When protocol is specified information about TCP IP AppleTalk NetWare and SMB appears msh set lpr msh set lpr6 msh set ftp msh set ftp6 msh set rsh msh set rsh6 msh set diprint msh set diprint6 msh set web msh set snmp msh set ssl ms...

Page 187: ... you cannot use remote access after logging off If you did this by mistake you can use the control panel to enable remote access via IPv4 Disabling IPv4 also disables lpr ftp rsh diprint web snmp ssl ipp http bonjour wsdev and sftp msh set ipv6 up down If you disable IPv6 you cannot use remote access after logging off If you did this by mistake you can use the control panel to enable remote access...

Page 188: ...tion by enabling it msh set nrs up down msh set rfu up down msh set rfu6 up down msh set ipp up down msh set ipp6 up down msh set http up down msh set http6 up down msh set bonjour up down msh set bonjour6 up down msh set ssh up down msh set ssdp up down msh set nbt up down msh set sftp up down msh set sftp6 up down msh set wsdev up down msh set wsdev6 up down If wsdev and wsdev6 are enabled simul...

Page 189: ...cket The default value of TTL is 1 A search is executed only within a local segment If the router does not support multicast the settings are not available even if the TTL value is increased The acceptable TTL value is between 1 and 255 smb Use the smb command to configure or delete the computer or workgroup name for SMB Computer name settings msh smb comp computer name Set computer name using up ...

Page 190: ...ty name View settings msh snmp Default access settings 1 is as follows Community name public IPv4 address 0 0 0 0 IPv6 address IPX address 00000000 000000000000 Access type read only Effective Protocol IPv4 IPv6 IPX Default access settings 2 is as follows Community name admin IPv4 address 0 0 0 0 IPv6 address IPX address 00000000 000000000000 Access type read write Effective Protocol IPv4 IPv6 IPX...

Page 191: ...ead read only write read and write trap user is notified of trapmessages Protocol configuration Use the following command to set protocols active or inactive If you set a protocol inactive all access settings for that protocol are disabled msh snmp ipv4 ipv6 ipx on off Specify ipv4 for IPv4 ipv6 for IPv6 or ipx for IPX SPX on means active and off means inactive All protocols cannot be turned off c...

Page 192: ...ng sysLocation msh snmp clear location sysContact setting msh snmp contact Deleting sysContact msh snmp clear contact SNMP v1v2 function configuration msh snmp v1v2 on off Specify on to enable and off to disable SNMP v3 function configuration msh snmp v3 on off Specify on to enable and off to disable SNMP TRAP configuration msh snmp trap v1 v2 v3 on off Specify on to enable and off to disable Remo...

Page 193: ...t on plain text communication becomes impossible only encrypted communication is possible Encrypted communication means an encrypted password is set on the machine sntp The printer clock can be synchronized with a NTP server clock using Simple Network Time Protocol SNTP Use the sntp command to change SNTP settings View settings msh sntp NTP IPv4 server address configuration You can specify the IPv...

Page 194: ...r spoolsw Use the spoolsw command to view and configure Job Spool settings You can only specify diprint trap lpr ipp ftp sftp wsd printer and smb TCP IP protocol The spoolsw command for configuring Job Spool settings is available only when the optional hard disk is installed View settings The Job Spool setting appears msh spoolsw Job Spool setting msh spoolsw spool on off Specify on to enable Job ...

Page 195: ...ew settings msh ssh Data compression communication settings msh ssh compression on off The default is on SSH SFTP communication port setting msh ssh port 22 1024 65535 The default is 22 SSH SFTP communication timeout setting msh ssh timeout 0 65535 The default is 300 SSH SFTP communication login timeout setting msh ssh logintimeout 0 65535 The default is 300 Setting an open key for SSH SFTP msh ss...

Page 196: ...n only be used with SFTP status Use the status command to display the printer status view messages msh status syslog Use the syslog command to display the information stored in the printer s system log View message msh syslog upnp Use the upnp command to display and configure the universal plug and play Public URL display msh upnp url Public URL configuration msh upnp url string Enter the URL stri...

Page 197: ...h web ID name Name you want to display Specify 1 or 2 for ID the corresponding number to the link name Resetting URL names registered as link destinations msh web ID clear name Specify 1 or 2 for ID as the number corresponding to the link name Help URL Configuration You can set URLs linked by clicking on Web Image Monitor msh web help http Help URL or IP address help Resetting Help URL msh web cle...

Page 198: ...ult is 11 key key value val 1 2 3 4 You can specify the WEP key when entering in hexadecimal With a 64 bit WEP you can use 10 digit hexadecimals Witha128 bitWEP youcanuse 26 digit hexadecimals Up to four WEP keys can be registered Specify the number to be registered with val When a WEP is specified by key the WEP specified by key phrase is overwritten To use this function set the same key number a...

Page 199: ...epauth open shared You can set an authorization mode when using WEP The specified value and authorized mode are as follows open open system authorized default shared shared key authorized rate security none wep wpa You can specify the security mode none No encryption default wep WEP encryption wpa WPA encryption wpaenc tkip ccmp YoucanspecifyWPAencryptionkeywhenusing WPA encryption tkip TKIP ccmp ...

Page 200: ...ap mschapv2 pap or md5 If you select PEAP you can select mschapv2 or tls username character string You can specify the login user name for the Radius server Usable characters ASCII 0x20 0x7e 31 bytes The default is blank username2 character string You can specify the phase 2 username for EAP TTLS PEAP phase 2 authentication Usable characters ASCII 0x20 0x7e 31 bytes The default is blank domain cha...

Page 201: ...nd all Returns the selected setting to its default value If you specify all all settings will be restored to their default values miccheck on off You can enable or disable the MIC check function The default setting is On enabled If you specify Off you cannot perform MIC checks We recommend you specify On for the MIC check function when using this machine wins Use the wins command to configure WINS...

Page 202: ...tBIOS over TCP IP Scope ID Selection You can specify the NBT scope ID msh wins interface_name scope scope ID The scope ID can be entered using up to 31 alphanumeric characters Be sure to specify the interface wlan can be specified only when the IEEE 802 11 interface is installed Interface name Interface configured Ether Ethernet interface Wlan IEEE 802 11 interface wsmfp Use the wsmfp command to v...

Page 203: ...5535 The default is 900 seconds WSD Scanner TCP port configuration msh wsmfp scnport port_number The Default is 53002 Comment initialization msh wsmfp clear comments Location initialization msh wsmfp clear location Presentation URL initialization msh wsmfp clear url 8021x Use 8021x commands to display IEEE 802 1x related information View settings msh 8021x Configuration msh 8021x parameter Paramet...

Page 204: ...e characters ASCII 0x20 0x7e 31 bytes The default is blank Username2 character string You can specify the phase 2 username for EAP TTLS PEAP phase 2 authentication Usable characters ASCII 0x20 0x7e 31 bytes The default is blank domain character string You can specify the login domain name for the Radius server The characters you can enter are ASCII 0x20 0x7e 31 bytes but not or The default is blan...

Page 205: ...ver ID and subdomain of the certificate server Usable characters ASCII 0x20 0x7e 128 bytes The default is blank claer a each command all Returns the selected setting to its default value If you specify all all settings will be restored to their default values However IEEE 802 1x Auth status enable or disable for Ethernet and wireless LAN will not be initialized Remote Maintenance by telnet 203 4 ...

Page 206: ...ected computer accordingly using SNMP Setup Tool For details see SNMP Setup Tool Help Thedefaultcommunitynamesare public and admin YoucangetMIBinformationusingthesecommunity names Start SNMP Setup Tool Windows 2000 Click the Start button Point to SmartDeviceMonitor for Admin on the Programs menu Click SNMP Setup Tool Windows XP Vista Windows Server 2003 2003 R2 Click the Start button Point to Smar...

Page 207: ...tResourceMIB IPv6 TCP MIB IPv6 UDP MIB IPv6 MIB IPv6 ICMP MIB RicohPrivateMIB SNMP FRAMEWORK MIB SNMP TARGET MIB SNMP NOTIFICATION MIB SNMP USER BASED SM MIB SNMP VIEW BASED ACM MIB PRINTER PORT MONITOR MIB SNMP 205 4 ...

Page 208: ...klet finisher is exhausted Add staples Booklet Front The staple of booklet finisher front is exhausted Adjusting The machine is initializing or calibrating Call Service Center There is a malfunction in the machine Canceled The job is reset Canceling Job The job is being reset Cannot Eject Original Through The original cannot be ejected Cannot multi install SD Card The SD card has been configured u...

Page 209: ... Job Suspended The current job is suspended Data Size Error The data size error occurred Empty Black Toner The black toner cartridge is almost empty Empty Cyan Toner The cyan toner cartridge is almost empty Empty Magenta Toner The magenta toner cartridge is almost empty Empty Yellow Toner The yellow toner cartridge is almost empty Energy Saver Mode The machine is in Energy Saver Mode Envelope Sett...

Page 210: ...n error has occurred in the USB interface Error Wireless Board An error has occurred in the wireless interface board or IEEE 802 11 interface unit Error Wireless Card Wireless card is not inserted during start up or the IEEE 802 11 interface unit or the wireless card is taken out after start up Exceed Booklet Stapling Limit The printing has exceeded the stapling limit of the booklet finisher Excee...

Page 211: ... Independent supplier Toner Toner that is not recommended is set Jobs Suspended All jobs are suspended Key Card not inserted The machine is waiting for key card to be inserted Key Card Counter not inserted The machine is waiting for key card or key counter to be inserted Key Counter not inserted The machine is waiting for key counter to be left in it Loading Toner Toner is being supplied Log Data ...

Page 212: ...is a problem with the bank motor Malfunction Output Tray There is a problem with the output tray Malfunction Punch Unit There is a problem with the punch unit Malfunction Staple Unit There is a problem with the staple unit Malfunction Tray 1 There is a problem with tray 1 Malfunction Tray 2 There is a problem with tray 2 Malfunction Tray 3 There is a problem with tray 3 Malfunction Tray 4 There is...

Page 213: ...Prepare the new development unit magenta Near Replacing Develop Unit Y Prepare the new development unit yellow Near Replacing Fusing Unit Prepare the new fusing unit Nearly Full Log Data Capacity The log is nearing data capacity Nearly Full Waste Toner Waste toner bottle is nearly full Need more Staples Stapler has almost run out of staples No Paper Interposer Tray There is no paper in interposer ...

Page 214: ... feed tray is not correctly set Not Detected Interposer Interposer unit is not correctly set Not Detected LCT Large Capacity Tray is not correctly set Not Detected Magenta Toner Magenta toner is not correctly set Not Detected PCU C The photoconductor unit cyan is not correctly set Not Detected PCU K The photoconductor unit black is not correctly set Not Detected PCU M The photoconductor unit magen...

Page 215: ...er remains in Finisher Paper Misfeed ADF The paper has jammed in Document Feeder Paper Misfeed Duplex Unit The paper has jammed in Duplex Unit Paper Misfeed Finisher The paper has jammed in Finisher Paper Misfeed Input Tray The paper has jammed in the input tray Paper Misfeed Internal Path The paper has jammed inside the machine Paper on FinisherShiftTray1 2 The paper remains in Finisher Shift Tra...

Page 216: ...Cyan It is time to replace the development unit cyan Replace Develop Unit Magenta Itistimetoreplacethedevelopmentunit magenta Replace Develop Unit Yellow Itisexchangetimeofthedevelopmentunit yellow Replace Fusing Unit It is time to replace the fusing unit Replace Int Transfer Unit It is time to replace the int transfer unit Replace PCU It is time to replace the photoconductor unit Replace PCU Colo...

Page 217: ...curred because chaptering as well as the normal paper use the same tray for printing Tray Error Duplex Printing Selected paper tray cannot be used for duplex printing Unit Left Open ADF Document feeder is opened Waiting for Job Suspension The machine is waiting for Job Suspension Warming Up The machine is warming up For details about UNIX commands see UNIX Supplement Check the error contents that ...

Page 218: ...er of the output tray Name Name of the output tray Status Current status of the output tray Normal Normal PaperExist Paper exist OverFlow Paper is full Error Other errors Printer Language Item Description No ID number of the printer language used by the printer Name Name of the printer language used in the printer Version Version of the printer language For details about UNIX commands and paramete...

Page 219: ...reparing for printing 1st 2nd 3rd 4th Waiting to be transferred to the printer Owner Print request user name Job Print request number Files The name of the document Total Size The size of the data spooled The default is 0 bytes For details about UNIX commands and parameters see UNIX Supplement Print Log Information This is a record of the most recent jobs printed Use the following command to displ...

Page 220: ...e to the ftp or rprinter command Time Time the print requested was received Time of print request reception User ID when designating Job ID on telnet Printer driver configured User ID Appears when the print request ID is specified JobName when designating Job ID on telnet Name of the document for printing Appears when the print request ID is specified For details about UNIX commands and parameters...

Page 221: ... IPv4 IPv6 IPsec NetWare SMB PictBridge Device Up Down Device Settings Parallel USB Bluetooth Ethernet interface Syslog priority NVRAM version Device name Comment Location Contact Soft switch AppleTalk AppleTalk settings Mode Net Understanding the Displayed Information 219 4 ...

Page 222: ...ription Object Type Zone TCP IP TCP IP settings Mode IPv4 Mode IPv6 ftp lpr rsh telnet diprint web http ftpc snmp ipp autonet Bonjour ssl nrs rfu nbt ssdp ssh sftp 4 Monitoring and Configuring the Printer 220 4 ...

Page 223: ...WSD Scanner rhpp IPv4 DHCP Address Netmask Broadcast Gateway IPv6 Stateless Manual Gateway DHCPv6 lite DUID DHCPv6 option lifetime IPsec Manual Mode Excluded Protocol https dns dhcp wins EncapType Understanding the Displayed Information 221 4 ...

Page 224: ...set between 1 and 5 SNTP Server Time settings Time Zone SNTP Server polling time SYSLOG server Websys settings Home page URL1 Home page link name1 Home page URL2 Home page link name2 Help page URL RHPP Port RHPP timeout NetWare EncapType RPRINTER number Print server name File server name Context name Switch 4 Monitoring and Configuring the Printer 222 4 ...

Page 225: ...AP interval time NDS Tree Name Transfer Protocol SMB SMB settings Switch Mode Direct print Notification Workgroup name Computer name Comment Share name 1 Protocol Wireless LAN Wireless LAN settings Host Name Communication Mode SSID Channel Security Understanding the Displayed Information 223 4 ...

Page 226: ...Key User name Domain name EAP Type Password Phase 2 user name Phase 2 Method TTLS Phase 2 Method PEAP Server cert Intermediate CA Server ID Sub domain MIC check DNS DNS settings IPv4 Server X X can be set between 1 and 3 Selected IPv4 DNS Server IPv6 Server X X can be set between 1 and 3 Selected IPv6 DNS Server 4 Monitoring and Configuring the Printer 224 4 ...

Page 227: ...entication WINS WINS settings ether Primary WINS Secondary WINS wlan Primary WINS Secondary WINS Bluetooth Bluetooth settings Bluetooth mode Bluetooth connection mode SSDP SSDP settings UUID Profile TTL UPnP UPnP settings URL Bonjour Bonjour settings Understanding the Displayed Information 225 4 ...

Page 228: ...Priority lpr Priority ipp IP TTL Link Local Route for Multi I F IPP Port SNMP SNMP settings SNMPv1v2 SNMPv3 protocol v1Trap v2Trap v3Trap SNMPv1v2 Remote Setting SNMPv3 Privacy ssh ssh settings Compression Port TimeOut Login TimeOut AuthFree Authfree settings 4 Monitoring and Configuring the Printer 226 4 ...

Page 229: ...B LPR lprm check host lpr prnerr chk Certificate Verification WS MFP Network Device Name Comments Location Presentation URL WSD Device TCP Port WSD Printer TCP Port WSD Printer Job Timeout WSD Scanner TCP Port MetadataVersion UUID IEEE 802 1X IEEE 802 1X settings User Name Domain name Understanding the Displayed Information 227 4 ...

Page 230: ...ion EAP Type Password Phase 2 user name Phase 2 Method TTLS Phase 2 Method PEAP Server cert Intermediate CA Server ID Sub domain Shell mode Remote maintenance tool mode 4 Monitoring and Configuring the Printer 228 4 ...

Page 231: ...e because it use the same account name as the administrator account account is unavailable The authentication password is not set up Useraccountisdisabled Thiscouldbebecausethe authentication password is not set and only the encryption account is set account is unavailable encryption is impossible Encryption is not possible and account is disabled This could be because Security option is not insta...

Page 232: ... address password An anonymous user logged in from the post IP address using the password password Attach FfileSserver file server Connection to the file server as the nearest server has been established Attach to print queue print queue name The system attached to the print queue when the print server goes online authenticating The supplicant is authenticating with the access point EAP or WPA aut...

Page 233: ...nection to the file server could not be established when the remote printer was online The file server refused the connection Check the file server s configuration Could not attach to PServer print server Connection to the print server could not be established when the remote printer was online The print server refused the connection Check the print server s configuration connection from A user lo...

Page 234: ...sinterface IEEE 802 11 SSID ssid AP MAC Address MAC address The MAC address and SSID of the access point are connected in infrastructure mode IEEE 802 11 communication mode mode Displays IEEE 802 11 communication mode IKE phase 1 mismatched authentication type local authentication type 1 remote authentication type 2 This machine s authentication type in IKE phase 1 does not match the communicating...

Page 235: ...onnect to the access point Interface name interface up The interface managed by the supplicant is enabled or is connected to the access point Interface started with IP IP address IP address IPv4 or IPv6 address has been set for the interface and is operating Interface Subnet overlap The same IP address IPv4 orIPv6 address and the subnet mask is used with other device job canceled jobid d The spool...

Page 236: ...n element in probe response rescanning There is no WPA information on the response from the SSID probe of the access point you want to use The supplicant is rescanning Open log file file name The specified log file was opened when the print server was online Printer printer name has no queue The print queue is not assigned to the printer when the print server is online Assign the print queue to th...

Page 237: ...me not defined The requested community name is not defined session IPv6 community name not defined The requested community name is not defined session IPX community name not defined The requested community name is not defined Set context to NDS contenxt name The NDS context name NDS context name has been set shutdown signal received network service rebooting The smbd service has started Smbd start...

Page 238: ... orthespecifiedSMTPserverportnumber is incorrect Check the SMTP server name port number or the SMTP server port number SMTPC failed to connect smtp server Connection to the SMTP server failed This could be because no connection to the network has been established or the network configuration is incorrect so there is no response from the SMTP server or the specified SMTP server name is incorrect or...

Page 239: ...g one print transaction Reduce images at one print transaction The print server received error error number during attempt to log in to the network Access to the network was denied Verify that the print server name and password are correct Login to the file server failed when the print server was online The print server is not registered or a password is specified Register the print server without...

Page 240: ... to finish When it finishes more HDD space will be available The print job that was being spooled when the error occurred will not be printed WSD Device started WS Device has started WSD Printer started WS Printer has started WSD Scanner started WS Scanner has started nfa process ID time date Failed to send logos to a log collection server IP address An error occurred while trying to send a log fi...

Page 241: ...The manufacturer shall not be held responsible for any damages resulting in data loss You can register and manage the following items in the Address Book Names You can register the name of the user and the key display This is the basic information required for managing users of the machine To register a fax number or e mail address in the address book you must register information such as the user...

Page 242: ...ut authorization Fax Dest You can register fax numbers line fax header and select label insertion When using IP Fax you can register the IP Fax destination and select the protocol E mail You can register e mail destinations in the Address Book 5 Registering Addresses and Users for Facsimile Scanner Functions 240 5 ...

Page 243: ...Folder You can register the protocol path name and server name SMB FTP NCP Add to Group You can put registered e mail and folder destinations into a group for easier management Address Book 241 5 ...

Page 244: ...ail and folder destinations simply by selecting the name key p 245 Registering Names Sending fax by Quick Dial Register a fax number in the Address Book so you can specify it only by selecting the fax destination shown on the fax initial display when sending a fax When label insertion is set to On the receiver s name and standard messages are printed on the fax message when it is received at the o...

Page 245: ...wn on the initial facsimile display whenever sending files using the facsimile function to a shared folder You can also connect to a shared folder by selecting the destination shown on the initial scanner display whenever sending files using the scanner function To share the folder using Windows select the SMB protocol To register the folder to the FTP server select the FTP protocol To register th...

Page 246: ... Facsimile Printer Scanner p 249 Authentication Information 5 Registering Addresses and Users for Facsimile Scanner Functions 244 5 ...

Page 247: ...n register up to 2000 names Registering Names This section describes how to register names 1 Press the User Tools Counter key 2 Press System Settings 3 Press Administrator Tools 4 Press Address Book Management 5 Check that Program Change is selected 6 Press New Program 7 Press Change on the right of the Name The name entry display appears 8 Enter the name and then press OK Registering Names 245 5 ...

Page 248: ...ect Frequent and one more page for each title 10 Press OK 11 Press Exit 12 Press the User Tools Counter key The name can be used for documents in the Document Server For details about the Document Server see Using the Document Server Copy and Document Server Reference Changing a Registered Name This section describes how to change a name 1 Press the User Tools Counter key 2 Press System Settings 5...

Page 249: ...for the classification you want to use from Select Title 10 To change the registration number press Change under Registration No 11 Enter a new registration number using the number keys and then press the key 12 Press OK 13 Press Exit 14 Press the User Tools Counter key You can search by the registered name fax number folder name e mail address or IP Fax destination Deleting a Registered Name This...

Page 250: ...ou want to delete Press the name key or enter the registered number using the number keys 7 Press Yes 8 Press Exit 9 Press the User Tools Counter key 5 Registering Addresses and Users for Facsimile Scanner Functions 248 5 ...

Page 251: ...he facsimile function is counted for each user code This allows you to check each user s usage The number of copies scanned using the scanner function is counted for each user code This allows you to check each user s usage To automatically register the printer driver user code select PC Control under Printer for the printer in User Code Authentication To use the user code set in User Tools set th...

Page 252: ...nter the registered number using the number key You can search by the registered name fax number folder name e mail address or IP Fax destination 7 Press Auth Info 8 Enter the user code using the number keys and then press the key If you make a mistake press Clear or the Clear Stop key 9 Press Next twice 5 Registering Addresses and Users for Facsimile Scanner Functions 250 5 ...

Page 253: ...igit user code To register the name see Registering Names p 245 Registering Names Changing a User Code This section describes how to change a user code Even if you change a user code the counter value will not be cleared 1 Press the User Tools Counter key 2 Press System Settings 3 Press Administrator Tools 4 Press Address Book Management Authentication Information 251 5 ...

Page 254: ... functions press Auth Info and then press Next twice 11 Press the key to select the functions to enable them Pressthekeytohighlightit andthenthefunctionisenabled Tocancelaselection pressthehighlighted key 12 Press OK 13 Press Exit 14 Press the User Tools Counter key To change the name key display and title see Registering Name p 245 Registering Names Deleting a User Code This section describes how...

Page 255: ...d number using the number keys You can search by the registered name fax number folder name e mail address or IP Fax destination 7 Press Auth Info 8 Press Change to delete the user code and then press the key 9 Press OK 10 Press Exit 11 Press the User Tools Counter key To delete a name from the Address Book entirely see Registering Name p 245 Registering Names Authentication Information 253 5 ...

Page 256: ...sage you want to print from Copier Counter Printer Counter Fax Counter or Scanner Counter Counters for individual function usage under each user code appear Printing the Counter for Each User This section describes how to print the counter for each user 1 Press the User Tools Counter key 2 Press System Settings 3 Press Administrator Tools 4 Press Display Clear Print Counter per User 5 Registering ...

Page 257: ...code and then press the key if the user code is registered 7 Select the function usage you want to print from Copier Counter Printer Counter Fax Prints Fax Transmission Scanner Counter and All Counters 8 Press Print Printing the Counter for All Users This section describes how to print the counter for all users 1 Press the User Tools Counter key Authentication Information 255 5 ...

Page 258: ...e key if the user code is registered 6 Select the function usage you want to print from Copier Counter Printer Counter Fax Prints Fax Transmission Scanner Counter and All Counters 7 Press Print Clearing the Number of Prints This section describes how to clear the counter 1 Press the User Tools Counter key 5 Registering Addresses and Users for Facsimile Scanner Functions 256 5 ...

Page 259: ...ge 7 Press Clear under Per User 8 Select the function usage you want to clear from Copier Counter Printer Counter Fax Prints Fax Transmission Scanner Counter and All Counters 9 Press OK 10 To clear the number of prints for all user codes press Clear under All Users 11 Select the function usage you want to clear from Copier Counter Printer Counter Fax Prints Fax Transmission Scanner Counter and All...

Page 260: ...d a firewall You can program the following items in a fax destination Fax number Registers the destination s fax number You can enter a fax number using up to 128 digits You must include every digit in the number SUB Code Registering a SUB Code allows you to use Confidential Transmission to send messages to the other fax machines which support a similar function called SUB Code See SUB Code Transm...

Page 261: ...m the following items in an IP Fax Destination IP Fax Register the IP Fax destination You can register the name using up to 128 characters You must make this setting when using IP Fax This setting only works if the IP Fax function has been selected SUB Code Registering a SUB Code allows you to use Confidential Transmission to send messages to the other fax machines which support a similar function...

Page 262: ...under Fax Destination 9 Enter the fax number using the number keys and then press OK 10 Specify optional settings such as SUB Code SEP Code and International TX Mode 11 Press OK 12 Press Exit 13 Press the User Tools Counter key To register the name see Registering Names When a group is registered you can also add this fax destination to the group For details about registering groups see Registerin...

Page 263: ...Check that Program Change is selected 6 Select the name whose fax destination you want to change Press the name key or enter the registered number using the number keys You can search by the registered name fax number folder name e mail address or IP Fax destination 7 Press Fax Dest 8 Change the settings 9 Press OK 10 Press Exit 11 Press the User Tools Counter key To change the name key display an...

Page 264: ...n describes how to program the SUB Code 1 Press Adv Features and then press SUB Code 2 Press Change under TX SUB Code 3 Enter the new SUB Code and then press OK 4 To change the password press Change under Password SID 5 Enter the new password and then press OK 6 Press OK To program the SEP Code This section describes how to program the SEP Code 1 Press Adv Features and then press SEP Code 2 Press ...

Page 265: ...r Fax Header 2 Select 1st Name or 2nd Name and then press OK To set label insertion This section describes how to set label insertion When Label Insertion is set to ON the receiver s name and standard messages are printed on the fax message when it is received at the other end 1 Press Change under Label Insertion 2 Press On 3 Press Change under Line 2 4 Select the new standard message or press Man...

Page 266: ... Tools Counter key 2 Press System Settings 3 Press Administrator Tools 4 Press Address Book Management 5 Check that Program Change is selected 6 Select the name whose fax destination you want to delete Press the name key or enter the registered number using the number keys You can search by the registered name fax number folder name e mail address or IP Fax destination 7 Press Fax Dest 8 Press Cha...

Page 267: ...section describes how to register an IP Fax Destination 1 Press the User Tools Counter key 2 Press System Settings 3 Press Administrator Tools 4 Press Address Book Management 5 Check that Program Change is selected 6 Select the name whose IP Fax destination you want to register Press the name key or enter the registered number using the number keys 7 Press Fax Dest Fax Destination 265 5 ...

Page 268: ... Press the User Tools Counter key To register the name see Registering Names p 245 Registering Names Changing a Registered IP Fax Destination This section describes how to change an IP Fax Destination 1 Press the User Tools Counter key 2 Press System Settings 3 Press Administrator Tools 5 Registering Addresses and Users for Facsimile Scanner Functions 266 5 ...

Page 269: ...new destination and then press OK 10 Press OK 11 Press Exit 12 Press the User Tools Counter key To change the name key display and title see Registering Names p 245 Registering Names To change the IP Fax Destination This section describes how to change a registered IP Fax destination 1 Press Change under Use Name as 2 Enter the new destination and then press OK To change the protocol This section ...

Page 270: ... press SEP Code 2 Press Change under RX SEP Code 3 Enter a SEP Code using the number keys and then press OK 4 To enter a password press Change under Password PWD 5 Enter a password using the number keys and then press OK 6 Press OK To set the International TX Mode This section describes how to set the International TX Mode 1 Press Change under International TX Mode 2 Select Off or On and then pres...

Page 271: ...ess OK 6 Press OK 7 Press Change under Line 3 8 Select the new standard message and then press OK 9 Press OK To change the name key display and title see Registering Names p 245 Registering Names Deleting a Registered IP Fax Destination This section describes how to delete a registered IP Fax destination If you delete a destination that is a specified delivery destination messages to its registere...

Page 272: ...keys You can search by the registered name fax number folder name e mail address or IP Fax destination 7 Press Fax Dest 8 Press Change under Fax Destination 9 Press Delete All and then press OK 10 Press OK 11 Press Exit 12 Press the User Tools Counter key To change the name key display and title see Registering Names p 245 Registering Names 5 Registering Addresses and Users for Facsimile Scanner F...

Page 273: ...ode on the sender address to prevent unauthorized access You can select an e mail address from an LDAP server and then register it in the Address Book See Sending Scan Files by E mail Scanner Reference You can set the machine to send a Transmission Result Report by e mail whenever a transmission is sent See Facsimile Reference Registering an E mail Destination This section describes how to registe...

Page 274: ...s display on the scanner function screen If Internet Fax Destination Only is specified registered e mail addresses only appear in the internet fax display on the fax function screen 12 If you want to use Internet fax specify whether or not to use Send via SMTP Server 13 Press OK 14 Press Exit 15 Press the User Tools Counter key You can enter up to 128 characters for the e mail address To register ...

Page 275: ... Change is selected 6 Select the name whose e mail address you want to change Press the name key or enter the registered number using the number keys You can search by the registered name fax number folder name e mail address or IP Fax destination 7 Press E mail 8 Press Change under E mail Address 9 Enter the e mail address and then press OK 10 Press OK 11 Press Exit 12 Press the User Tools Counte...

Page 276: ... is selected 6 Select the name whose e mail address you want to delete Press the name key or enter the registered number using the number keys You can search by the registered name fax number folder name e mail address or IP Fax destination 7 Press E mail 8 Press Change under E mail Address 9 Press Delete All and then press OK 10 Press OK 11 Press Exit 12 Press the User Tools Counter key To delete...

Page 277: ... p 245 Registering Names E mail Destination 275 5 ...

Page 278: ...ls about protocols server names and folder levels consult your network administrator You can prevent unauthorized users from accessing folders from the machine See Registering a Protection Code You can only select either SMB FTP or NCP If you change protocol after finishing your settings all previous entries are cleared p 303 Registering a Protection Code Registering an SMB Folder This section des...

Page 279: ...that you have specified in Default User Name Password Send of File Transfer settings applies 9 Press Change under Login User Name 10 Enter the login user name and then press OK 11 Press Change under Login Password 12 Enter the password and then press OK 13 Enter the password again to confirm and then press OK 14 Press Folder 15 Press SMB To specify a folder you can either enter the path manually o...

Page 280: ...s If User Authentication is specified contact your administrator p 245 Registering Names Locating the SMB folder manually This section describes how to locate the SMB folder manually 1 Press Change under Path 2 Enter the path where the folder is located 3 Press OK If the format of the entered path is not correct a message appears Press Exit and then enter the path again Enter the path using this f...

Page 281: ...you try to access a folder by browsing the network If you have not specified folder authentication or if an incorrect user name or password has been entered for folder authentication the login screen appears 1 Enter the login user name and then press OK Enter the login user name specified for folder authentication 2 Enter the password and then press OK The path to the selected folder appears If a ...

Page 282: ...you want to change When specifying a folder enter the path directly or select it by referencing the network For more information see Locating the SMB folder manually and Locating the SMB folder using Browse Network 9 Press Connection Test to check the path is set correctly 10 Press Exit 11 Press OK 12 Press Exit 13 Press the User Tools Counter key To change the name key display and title see Regis...

Page 283: ...ete the registered SMB folder 1 Press the User Tools Counter key 2 Press System Settings 3 Press Administrator Tools 4 Press Address Book Management 5 Check that Program Change is selected 6 Select the name whose folder you want to delete Press the name key or enter the registered number using the number keys You can search by the registered name fax number folder name e mail address or IP Fax des...

Page 284: ... Registering an FTP Folder This section describes how to register an FTP folder 1 Press the User Tools Counter key 2 Press System Settings 3 Press Administrator Tools 4 Press Address Book Management 5 Check that Program Change is selected 6 Select the name whose folder you want to register You can search by the registered name fax number folder name e mail address or IP Fax destination 5 Registeri...

Page 285: ... 11 Press Change under Login Password 12 Enter the password and then press OK 13 Enter the password again to confirm and then press OK 14 Press Folder 15 Press FTP 16 Press Change under Server Name 17 Enter the server name and then press OK 18 Press Change under Path 19 Enter the path and then press OK You can enter an absolute path using this format user home username or a relative path using thi...

Page 286: ... Exit 26 Press the User Tools Counter key To register the name see Registering Names You can enter up to 191 characters for the user name You can enter up to 128 characters for the password You can enter a server name using up to 64 characters If User Authentication is specified contact your administrator p 41 File Transfer p 245 Registering Names Changing an FTP folder This section describes how ...

Page 287: ...ion 7 Press Folder 8 Select the items you want to change 9 Press Connection Test to check the path is set correctly 10 Press Exit 11 Press OK 12 Press Exit 13 Press the User Tools Counter key To change the name key display and title see Registering Names p 245 Registering Names Changing the protocol This section describes how to change the protocol 1 Press SMB or NCP A confirmation message appears...

Page 288: ...Deleting an FTP folder This section describes how to delete the registered FTP folder 1 Press the User Tools Counter key 2 Press System Settings 3 Press Administrator Tools 4 Press Address Book Management 5 Check that Program Change is selected 6 Select the name whose folder you want to delete Press the name key or enter the registered number using the number keys You can search by the registered ...

Page 289: ...g an NCP folder This section describes how to register an NCP folder 1 Press the User Tools Counter key 2 Press System Settings 3 Press Administrator Tools 4 Press Address Book Management 5 Check that Program Change is selected 6 Press the name you want to register or enter the registered number using the number keys You can search by the registered name fax number folder name e mail address or IP...

Page 290: ... and then press OK 13 Enter the password again to confirm and then press OK 14 Press Folder 15 Press NCP 16 Select Connection Type If you want to specify a folder in an NDS tree press NDS If you want to specify a folder on a NetWare server press Bindery If you have set Connection Type to NDS enter the user name followed by the name of the context where the user object is located If the user name i...

Page 291: ...Names Locating the NCP folder manually This section describes how to locate the NCP folder manually 1 Press Change under Path 2 Enter the path where the folder is located 3 Press OK 4 Press Connection Test to check the path is set correctly 5 Press Exit If you set Connection Type to NDS and if the NDS tree name is tree the name of the context including the volume is context the volume name is volu...

Page 292: ... folders you are allowed to access appear in Browse Network If the languages used on the machine and the destination you want to view differ the items in the list may not appear correctly Up to 100 items can be displayed in the list Changing an NCP registered folder This section describes how to change the registered NCP folder 1 Press the User Tools Counter key 2 Press System Settings 3 Press Adm...

Page 293: ...ually or locate the folder by browsing the network 10 Press Connection Test to check the path is set correctly 11 Press Exit 12 Press OK 13 Press Exit 14 Press the User Tools Counter key To change the name key display and title see Registering Names p 245 Registering Names Changing the protocol This section describes how to change the protocol 1 Press SMB or FTP 2 A confirmation message appears Pr...

Page 294: ...lete Press the name key or enter the registered number using the number keys You can search by the registered name fax number folder name e mail address or IP Fax destination 7 Press Folder 8 Press the protocol which is not currently selected A confirmation message appears 9 Press Yes 10 Press OK 11 Press Exit 12 Press the User Tools Counter key To delete a name entirely see Registering Names p 24...

Page 295: ...egistered The maximum number of destinations registerable to a group is 100 You can set a protection code to prevent unauthorized access to the folders registered in a group For details see Registering a Protection Code p 303 Registering a Protection Code Registering a Group This section describes how to register a group 1 Press the User Tools Counter key 2 Press System Settings 3 Press Administra...

Page 296: ...equent and one more page for each title 10 When you want to change the key display press Change under Key Display 11 Enter the key display and then press OK 12 Press OK 13 Press Exit 14 Press the User Tools Counter key Registering Names to a Group This section describes how to register names to a registered group You can put names that have been registered in the Address Book into a group When reg...

Page 297: ...up Press the name key or enter the registered number using the number keys You can search by the registered name fax number folder name e mail address or IP Fax destination 7 Press Add to Group 8 Select a group to which you want to add the name The group key that you have selected becomes highlighted and the name is added to it Registering Names to a Group 295 5 ...

Page 298: ... Address Book Program Change Delete Group 5 Check that Program Change is selected 6 Select the group that you want to put into another group Press the group key or enter the registered number using the number keys You can search by the registered name fax number folder name e mail address or IP Fax destination 7 Press Add to Group 8 Select the group to which you want to add 5 Registering Addresses...

Page 299: ... a group You can check the names or groups registered in each group 1 Press the User Tools Counter key 2 Press System Settings 3 Press Administrator Tools 4 Press Address Book Program Change Delete Group 5 Check that Program Change is selected 6 Select the group where the members you want to check is registered You can search by the registered name fax number folder name e mail address or IP Fax d...

Page 300: ...s Counter key 2 Press System Settings 3 Press Administrator Tools 4 Press Address Book Management 5 Check that Program Change is selected 6 Select the name to remove from a group Press the name key or enter the registered number using the number keys You can search by the registered name fax number folder name e mail address or IP Fax destination 7 Press Add to Group 5 Registering Addresses and Us...

Page 301: ...nd the name is removed from it 9 Press OK 10 Press Exit 11 Press the User Tools Counter key Deleting a Group Within Another Group This section describes how to delete a group within another group 1 Press the User Tools Counter key 2 Press System Settings Registering Names to a Group 299 5 ...

Page 302: ...d name fax number folder name e mail address or IP Fax destination 7 Press Add to Group The keys of groups in which the group is registered appear highlighted 8 Select the group that you want to delete from The group key is deselected and the group is deleted from it 9 Press OK 10 Press Exit 11 Press the User Tools Counter key Changing a Group Name This section describes how to change a group name...

Page 303: ...l address or IP Fax destination 7 To change the group name and key display press Change under Group Name or Key Display 8 Enter the new group name or key display and then press OK 9 To change the title press the title key under Select Title 10 To change the registration number press Change under Registration No 11 Enter the new registration number using the number keys 12 Press the key 13 Press OK...

Page 304: ...or Tools 4 Press Address Book Program Change Delete Group 5 Press Delete 6 Press a group key you want to delete You can search by the registered name fax number folder name e mail address or IP Fax destination 7 Press Yes 8 Press Exit 9 Press the User Tools Counter key 5 Registering Addresses and Users for Facsimile Scanner Functions 302 5 ...

Page 305: ...vent misuse of sender s names Registering a Protection Code to a Single User This section describes how to register a Protection code to a single user 1 Press the User Tools Counter key 2 Press System Settings 3 Press Administrator Tools 4 Press Address Book Management 5 Check that Program Change is selected 6 Select the name whose protection code you want to register You can search by the registe...

Page 306: ...12 Press Exit 13 Press the User Tools Counter key Specify a protection code of up to eight digits You can also specify Protection without specifying a protection code To change the protection code settings repeat step 3 to 11 Registering a Protection Code to a Group User This section describes how to register a Protection Code to a Group User 1 Press the User Tools Counter key 5 Registering Addres...

Page 307: ...name e mail address or IP Fax destination 7 Press Protection 8 Press Folder Destination under Protection Object 9 Press Change under Protection Code 10 Enter a protection code using the number keys and then press the key 11 Press OK 12 Press Exit 13 Press the User Tools Counter key Specify a protection code of up to eight digits You can also specify Protection without specifying a protection code ...

Page 308: ...ion the User Name and Password that you have specified in SMTP Authentication of File Transfer settings applies For details see File Transfer 1 Press the User Tools Counter key 2 Press System Settings 3 Press Administrator Tools 4 Press Address Book Management 5 Check that Program Change is selected 6 Press the name you want to register or enter the registered number using the number keys You can ...

Page 309: ...POP before SMTP Authentication you can enter up to 63 characters You can enter up to 128 characters for the password To change the SMTP Authentication settings repeat step 3 to 14 p 41 File Transfer p 245 Registering Names LDAP Authentication This section describes how to register LDAP Authentication For each user registered in the Address Book you can register a login user name and login password...

Page 310: ... that Program Change is selected 6 Press the name you want to register or enter the registered number using he number keys You can search by the registered name fax number folder name e mail address or IP Fax destination 7 Press Auth Info and then press Next 8 Press Specify Other Auth Info under LDAP Authentication 9 Press Change under Login User Name 10 Enter the login user name and then press OK...

Page 311: ...ey To register the name see Registering Names You can enter up to 128 characters for the user name You can enter up to 128 characters for the password To change the LDAP Authentication settings repeat step 3 to 14 p 58 Programming the LDAP server p 245 Registering Names Registering SMTP and LDAP Authentication 309 5 ...

Page 312: ...5 Registering Addresses and Users for Facsimile Scanner Functions 310 5 ...

Page 313: ...onment about TCP IP including IP addresses TCP IP of the printer is set as default 2 Install a TCP IP in Windows to set up the network environment Consult the network administrator for the local setting information 3 To print under Windows 2000 XP Vista Windows Server 2003 2003 R2 install Printing service for UNIX as the network application p 321 Using DHCP Using a Host Name Instead of an IPv4 Add...

Page 314: ...ter s host name and NP is replaced by comments Insert a space or tab between 2001 DB 100 and host between host and NP respectively using one line for this format 3 Save the file When using a host name under Windows Server 2003 2003 R2 with IPv6 protocol perform host name resolution using an exrernal DNS server The host file cannot be used Printing Commands The following explains printing operation...

Page 315: ...st to print a PostScript file named file 1 located in the C PRINT directory the command line is as follows c lpr Shost Pfiletype RPS ol C PRINT file1 Printing from the virtual printer C lpr S printer s IP address P virtual printer name ol path name file name For details about the virtual printer configuration see Using the Virtual Printer Printer Reference rcp First register the printer s host nam...

Page 316: ...rmulate the printer s IP address or the host name of the hosts file printer as an argument and use the ftp command ftp printer s IP address 2 Enter the user name and password and then press the Enter key For details about the user name and password consult your network administrator User Password When user authentication is set enter a login user name and password 3 When printing a binary file set...

Page 317: ...Image Monitor to create an open key For details see Web Image Monitor help If personal authentication Basic Windows LDAP or Integrated Server Authentication is enabled only authenticated users users authenticated by login user name and password can log on For mput command and can be used as wild cards in file names When printing a binary file in ASCII mode print may not come out correctly For deta...

Page 318: ...tional communications Restrictions on BIP For BIP connection a module including PostScript 3 must be installed in the machine Only one Bluetooth adaptor or Bluetooth equipped computer can be connected via BIP Only JPEG images can be printed using BIP User codes are disabled for BIP You cannot print if print functions are restricted Some printers do not support BIP Instructions in this manual relat...

Page 319: ... searching for other available Bluetooth printers 5 Click No I will not connect and then click Next 6 Click Install from a list or specific location Advanced and then click Next 7 Insert the CD ROM provided with this machine into your computer s CD ROM drive select the Search removable media floppy CD ROM check box and then click Next 8 If the Hardware Installation window appears click Continue 9 ...

Page 320: ...select is a Bluetooth printer 6 Insert the CD ROM provided with this machine into your computer s CD ROM drive and then click Browse my computer for driver software advanced on the Found New Hardware display 7 In the Found New Hardware window select the printer driver you want to use and then click Next The printer driver installation starts 8 If the Windows Security window appears click Install t...

Page 321: ... Presentation Server 3 0 Citrix Presentation Server 4 0 Windows server 2003 2003 R2 MetaFrame XP 1 0 FR3 MetaFrame Presentation Server 3 0 Citrix Presentation Server 4 0 Supported Printer Drivers When Windows Terminal Service is operating PCL drivers PostScript 3 RPCS drivers Some RPCS printer driver functions do not work if Windows Terminal Service is installed Limitations The following limitatio...

Page 322: ...tored in the server after the equipment is disconnected The settings for optional equipment will be restored to its defaults each time the client computer logs on to the server When printing a large number of bitmap images or using the server in a WAN environment over dial up lines such as ISDN printing may not be possible or errors may occur depending on data transfer rates When using MetaFrame X...

Page 323: ... line charges This is because your computer connects to the ISDN line whenever a packet is transferred from the printer If there is more than one DHCP server use the same setting for all servers The machine operates using data from the DHCP server that responds first DHCP servers can operate in an IPv6 environment but they cannot be configured to allocate IPv6 addresses or obtain host names Using ...

Page 324: ...s Using Web Image Monitor 1 Start a Web browser 2 Enter http machine s IP address or host name in the address bar to access the printer whose settings you want to change Top Page of Web Image Monitor appears 3 Click Login The dialog box for entering the user name and password appears 4 Enter the user name and password and then click Login Contact your administrator for information about the settin...

Page 325: ...Use the wins command to make the setting with telnet p 164 Remote Maintenance by telnet Configuring the WINS Server 323 7 ...

Page 326: ...with the host name CNAME will not be registered For DHCPv4 settings As a substitute for the printer the DHCP server updates the record and one of the following occurs When the printer acquires the IP address from the DHCP server the DHCP server updates the A and PTR records When the printer acquires the IP address from the DHCP server the printer updates the A record and the DHCP server updates th...

Page 327: ...ith standard Windows 2000 Server Windows Server 2003 2003 R2 features BIND 8 2 3 or higher DNS servers with standard NetWare 5 or a higher version features For IPv6 setting Microsoft DNS servers with standard Windows Server 2003 2003 R2 features BIND 9 2 3 or higher DHCP servers targeted for operation As a substitute for the printer DHCP servers capable of updating the A record and PTR record are ...

Page 328: ... For details see Using telnet p 164 Remote Maintenance by telnet 7 Appendix 326 7 ...

Page 329: ...instead Configuring the router Filter packets so they do not pass over the dial up router The MAC address of the filtering printer is printed on the printer configuration page For more information about configuring the printer if the router cannot be configured see the following instructions Configuring the printer with NetWare 1 Following the setup method described earlier in this manual configur...

Page 330: ...ter will dial and go online whenever a connection to the delivery server is made Telephone charges may be incurred When connected to a computer that uses dial up access Do not install the ScanRouter delivery software on a computer which uses dial up access WhenusingtheScanRouterdeliverysoftware DeskTopBinder AutoDocumentLink oraTWAIN driver on a computer with dial up access a dial up connection ma...

Page 331: ...rver 2003 2003 R2 clear the Enable banner check box on the NetWare Settings tab in the printer properties dialog box Printing after resetting the machine After resetting the remote printer the connection from the print server will be cut off for about 30 40 seconds before re connecting Depending on the NetWare specification print jobs may be accepted but they will not be printed during this interv...

Page 332: ...e exposure glass cover and the Auto Document Feeder ADF do not knock the antennas If the network area provides poor radio environment Where radio wave conditions are bad the network may not function due to interrupted or failed connections When checking the wireless LAN signal and the access point follow the procedure below to improve the situation Position the access point nearer to the machine C...

Page 333: ...e SSL For details about setting SSL configuration see Protection Using Encryption Security Reference To set IEEE 802 1X you must use Web Image Monitor Installing a Site Certificate 1 Access the authentication server and obtain the CA certificate Methods of obtaining certificates differ according to the operating system you are using 2 Log on to Web Image Monitor in the administrator mode 3 Click C...

Page 334: ...vice Certificate window and then click Install 11 Using a text editor open the CA signified certificate downloaded in step 11 and then copy over all the text 12 In the Install Certificate window paste all the text copied into the CA signified certificate 13 Click OK 14 Updating appears Wait for about one or two minutes and then click OK 15 Check that the Device Certificate shows Installed 16 Click...

Page 335: ...d then enter the user name set in the RADIUS server Select CHAP MSCHAP MSCHAPv2 PAP or MD5 in Phase 2 Method Certain methods might not be available depending on the RADIUS server you want to use Make the following settings according to the operating system you are using Select On or Off in Authenticate Server Certificate Select On or Off in Trust Intermediate Certificate Authority Enter the host n...

Page 336: ...domain name in Domain Name 6 Select EAP Type Configurations differ according to the EAP Type EAP TLS Make the following settings according to the operating system you are using Select On or Off in Authenticate Server Certificate Select On or Off in Trust Intermediate Certificate Authority Enter the host name of the RADIUS server on Server ID LEAP Click Change in Password and then enter the passwor...

Page 337: ... on Server ID 7 Click OK 8 Click Configuration and then click Wireless LAN Settings in the Interface area 9 Select Wireless LAN in LAN Type 10 Select Infrastructure Mode in Communication Mode 11 Enter the alphanumeric characters a z A Z or 0 9 in SSID according to the access point you want to use 12 Select WPA in Security Method 13 Select TKIP or CCMP AES in WPA Encryption Method according to the ...

Page 338: ...rame type EthernetII IEEE 802 2 IEEE 802 3 SNAP Printer LAN Fax TCP IP IPv4 IPv6 LPR RSH RCP DIPRINT FTP IPP IPP SSL IPX SPX NetWare AppleTalk SMB WSD Printer Internet Fax TCP IP IPv4 IPv6 SMTP SMTP C POP3 IMAP4 Network Scanner TCP IP IPv4 IPv6 RSH FTP FTP C 7 Appendix 336 7 ...

Page 339: ...TP C POP3 SMB NCP Document Server TCP IP IPv4 IPv6 FTP FTP C HTTP HTTPS Management Function TCP IP IPv4 IPv6 RSH RCP FTP FTP C SNMP SNMP C HTTP HTTPS TELNET mshell NBT DHCP DNS DNS C LDAP Specifications 337 7 ...

Page 340: ...nder Windows XP Windows Server 2003 2003 R2 use the Standard IPP port To use IPP under Windows 2000 use SmartDeviceMonitor for Client AppleTalk can be used when the PostScript 3 module is installed Under Windows Vista WSD Printer WSD Scanner uses the WSD Port 7 Appendix 338 7 ...

Page 341: ...nished to do so subject to the following conditions The above copyright notice and this permission notice shall be included in all copies or substantial portions of the Software THE SOFTWARE IS PROVIDED AS IS WITHOUT WARRANTY OF ANY KIND EXPRESS OR IMPLIED INCLUDING BUT NOT LIMITED TO THE WARRANTIES OF MERCHANTABILITY FITNESS FOR A PARTICULAR PURPOSE AND NONINFRINGEMENT IN NO EVENT SHALL THE AUTHO...

Page 342: ... ANY DIRECT INDIRECT INCIDENTAL SPECIAL EXEMPLARY OR CONSEQUENTIAL DAMAGES INCLUDING BUT NOT LIMITED TO PROCUREMENT OF SUBSTITUTE GOODS OR SERVICES LOSS OF USE DATA OR PROFITS OR BUSINESS INTERRUPTION HOWEVER CAUSED AND ON ANY THEORY OF LIABILITY WHETHER IN CONTRACT STRICT LIABILITY OR TORT INCLUDING NEGLIGENCE OR OTHERWISE ARISING IN ANY WAY OUT OF THE USE OF THIS SOFTWARE EVEN IF ADVISED OF THE ...

Page 343: ...Ginger Alliance Ltd All Rights Reserved a The application software installed on this product includes the Sablotron software Version 0 82 hereinafter Sablotron 0 82 with modifications made by the product manufacturer The original code of the Sablotron 0 82 is provided by Ginger Alliance Ltd the initial developer and the modified code of the Sablotron 0 82 has been derived from such original code p...

Page 344: ...ote products derived from this software without prior written permission For permission or any other legal details please contact Office of Technology Transfer Carnegie Mellon University 5000 Forbes Avenue Pittsburgh PA 15213 3890 412 268 4387 fax 412 268 7395 tech transfer andrew cmu edu 4 Redistributions of any form whatsoever must retain the following acknowledgment This product includes softwa...

Page 345: ...ftware or this function License is also granted to make and use derivative works provided that such works are identified as derived from the RSA Data Security Inc MD5 Message Digest Algorithm in all material mentioning or referencing the derived work RSA Data Security Inc makes no representations concerning either the merchantability of this software or the suitability of this software for any par...

Page 346: ...edistributions of source code must retain the above copyright notice this list of conditions and the following disclaimer 2 Redistributions in binary form must reproduce the above copyright notice this list of conditions and the following disclaimer in the documentation and or other materials provided with the distribution 3 All advertising materials mentioning features or use of this software mus...

Page 347: ...com The implementation was written so as to conform with Netscapes SSL This library is free for commercial and non commercial use as long as the following conditions are aheared to The following conditions apply to all code found in this distribution be it the RC4 RSA lhash DES etc code not just the SSL code The SSL documentation included with this distribution is covered by the same copyright ter...

Page 348: ...mponents of this software fall under are as follows First we will summarize and say that all components are under a BSD licence or a licence more free than that OpenSSH contains no GPL code 1 Copyright c 1995 Tatu Ylonen ylo cs hut fi Espoo Finland All rights reserved As far as I am concerned the code I have written for this software can be used freely for any purpose Any derived versions of this ...

Page 349: ...OUT WARRANTY OF ANY KIND EITHER EXPRESSED OR IMPLIED INCLUDING BUT NOT LIMITED TO THE IMPLIED WARRANTIES OF MERCHANTABILITY AND FITNESS FOR A PARTICULAR PURPOSE THE ENTIRE RISK AS TO THE QUALITY AND PERFORMANCE OF THE PROGRAM IS WITH YOU SHOULD THE PROGRAM PROVE DEFECTIVE YOU ASSUME THE COST OF ALL NECESSARY SERVICING REPAIR OR CORRECTION IN NO EVENT UNLESS REQUIRED BY APPLICABLE LAW OR AGREED TO ...

Page 350: ... documentation and or other materials provided with the distribution 3 Neither the name of the University nor the names of its contributors may be used to endorse or promote products derived from this software without specific prior written permission THIS SOFTWARE IS PROVIDED BY THE REGENTS AND CONTRIBUTORS AS IS AND ANY EXPRESS OR IMPLIED WARRANTIES INCLUDING BUT NOT LIMITED TO THE IMPLIED WARRA...

Page 351: ...EQUENTIAL DAMAGES INCLUDING BUT NOT LIMITED TO PROCUREMENT OF SUBSTITUTE GOODS OR SERVICES LOSS OF USE DATA OR PROFITS OR BUSINESS INTERRUPTION HOWEVER CAUSED AND ON ANY THEORY OF LIABILITY WHETHER IN CONTRACT STRICT LIABILITY OR TORT INCLUDING NEGLIGENCE OR OTHERWISE ARISING IN ANY WAY OUT OF THE USE OF THIS SOFTWARE EVEN IF ADVISED OF THE POSSIBILITY OF SUCH DAMAGE 5 Portable OpenSSH contains th...

Page 352: ...ication are permitted provided that the following conditions are met 1 Redistributions in source form must retain copyright statements and notices 2 Redistributions in binary form must reproduce applicable copyright statements and notices this list of conditions and the following disclaimer in the documentation and or other materials provided with the distribution and 3 Redistributions must contai...

Page 353: ...bove copyright notice this list of conditions and the following disclaimer in the documentation and or other materials provided with the distribution 3 Neither the name of the Institute nor the names of its contributors may be used to endorse or promote products derived from this software without specific prior written permission THIS SOFTWARE IS PROVIDED BY THE INSTITUTE AND CONTRIBUTORS AS IS AN...

Page 354: ...rks of Novell Inc PCL is a registered trademark of Hewlett Packard Company The Bluetooth word mark and logos are registered trademarks owned by Bluetooth SIG Inc and any use of such marks by Ricoh Company Ltd is under license UNIX is a registered trademark in the United States and other countries licensed exclusively through X Open Company Limited Other product names used herein are for identifica...

Page 355: ...on Microsoft Windows Server 2003 Enterprise Edition Microsoft Windows Server 2003 Web Edition Microsoft Windows Server 2003 Datacenter Edition The product names of Windows Server 2003 R2 are as follows Microsoft Windows Server 2003 R2 Standard Edition Microsoft Windows Server 2003 R2 Enterprise Edition Microsoft Windows Server 2003 R2 Datacenter Edition Trademarks 353 7 ...

Page 356: ...7 Appendix 354 7 ...

Page 357: ...ettings 57 network security level 56 print address book destination list 51 program change administrator 54 program change delete LDAP server 55 program change delete realm 55 transfer log setting 56 user authentication management 53 Authentication 306 LDAP 307 SMTP 306 Auto off timer type 1 and 2 31 type 3 and 4 31 AutoNet 321 B Bluetooth 316 adding a printer 316 supported profiles 316 C Copyrigh...

Page 358: ...6 registering 282 G General features 19 copy count display 20 function priority 20 function reset timer 20 key repeat 21 output copier 20 output document server 20 output facsimile 21 output printer 21 panel key sound 20 Print Priority 20 program change delete user text 19 warm up beeper 20 Gigabit ethernet interface 69 Group 293 add a group to another group 296 changing name 300 deleting 302 dele...

Page 359: ...S versions 319 N NCP folder Browse Network 290 changing 290 deleting 292 locating 289 protocol 291 registering 287 NetWare 114 banner page 329 form feed 328 printing 328 printing after resetting 329 NetWare 3 x 115 119 NetWare 4 x 116 121 NetWare 5 116 117 121 NetWare 5 1 116 117 121 NetWare 6 116 117 121 NetWare 6 5 116 117 121 Network 33 DDNS configuration 34 DNS configuration 33 domain name 34 ...

Page 360: ...pr 312 other cases 312 rcp 312 setup 311 sftp 312 Print job information ftp 217 info 217 rcp 217 rsh 217 sftp 217 Print List 39 Print log information ftp 217 prnlog 217 rcp 217 rsh 217 sftp 217 Print server NetWare 4 x 116 NetWare 5 116 NetWare 5 1 116 NetWare 6 116 NetWare 6 5 116 Print Server NetWare 3 x 115 Printer bypass paper size 24 Printer configuration ftp 215 info 215 rcp 215 rsh 215 sftp...

Page 361: ...143 password 149 spool print 153 user management tool 143 SmartDeviceMonitor for Client 155 IPP 156 machine status 156 monitoring printers 155 SMB folder Browse Network 278 changing 279 deleting 281 locating 278 login screen 279 protocol 280 registering 276 SNMP 204 Specifications 336 Symbols 13 System log 229 System log information ftp 229 rcp 229 rsh 229 sftp 229 syslog 229 System settings admin...

Page 362: ... 28 slip sheet tray 30 tray paper size 24 25 Tray paper size LCT 25 tray 1 24 tray 2 25 tray 3 LCT 25 tray 3 lower paper tray 25 tray 4 lower paper tray 25 TWAIN scanner 95 ethernet 95 wireless LAN 96 U USB interface 71 User code 249 changing 251 deleting 252 registering 249 User information 245 chaging a name 246 deleting a name 247 registering names 245 User management tool add new user 147 expo...

Page 363: ...e Monitor 322 Wireless LAN 330 ad hoc channel 38 communication mode 38 restore factory defaults 39 security method 38 SSID settings 38 wierless LAN signal 39 Wireless LAN interface checking the signal 74 connecting 72 setup procedure 73 WSD scanner 92 ethernet 92 wireless LAN 93 361 ...

Page 364: ...MEMO 362 ...

Page 365: ...MEMO 363 ...

Page 366: ...MEMO 364 AE AE D029 7703 ...

Page 367: ...Copyright 2008 ...

Page 368: ...s Network and System Settings Guide D029 7703 AE AE Type for MP C4000 MP C4000 Aficio MP C4000 Type for MP C3300 MP C3300 Aficio MP C3300 Type for MP C2800 MP C2800 Aficio MP C2800 Type for MP C5000 MP C5000 Aficio MP C5000 ...

Reviews: