background image

User Tools (Copier/Document Server Features)

100

5

General Features 

5

/

5

Clear Bypass Mode

Set this function to whether or not
the settings of the Bypass Tray are
cleared, when the machine is
turned on, reset, or modes are
cleared.

Colour Mode Priority

You can select the priority of the
colour mode.

Two-Colour Mode Priority

Set this function to whether or not
to prioritize “Red & Black” or
“Two-colour” when using the
“Two-colour” modes.

Auto Image Density Priority

Set this function to whether or not
use Automatic Density, when the
machine is turned on, reset, or
modes are cleared.

Note

When using the Auto Colour
Select function, the settings of
Full Colour/Two-colour will be
effective.

Reproduction Ratio 

1

/

2

Shortcut R/E 

You can register up to three fre-
quently used Reduce/Enlarge ra-
t i o s   o t h e r   t h a n   t h e   f i x e d
Reduce/Enlarge ratio and have
them shown on the initial display.
You can also change the registered
Reduce/Enlarge ratios.
If no Reduce/Enlarge ratio has
been set when selecting 

[

Shortcut

R/E 1

]

[

Shortcut R/E 2

]

, or 

[

Shortcut

R / E   3

]

, en t er th e d esire d Re -

duce/Enlarge ratio using the
number keys.

Enlarge 1-5

You can customize the enlarge-
ment ratios available when you
press 

[

Reduce/Enlarge

]

 followed by

[

Enlarge

]

.

Priority Setting: Enlarge 

You can set the ratio with priority
when 

[

Reduce/Enlarge

]

 is pressed,

followed by 

[

Enlarge

]

.

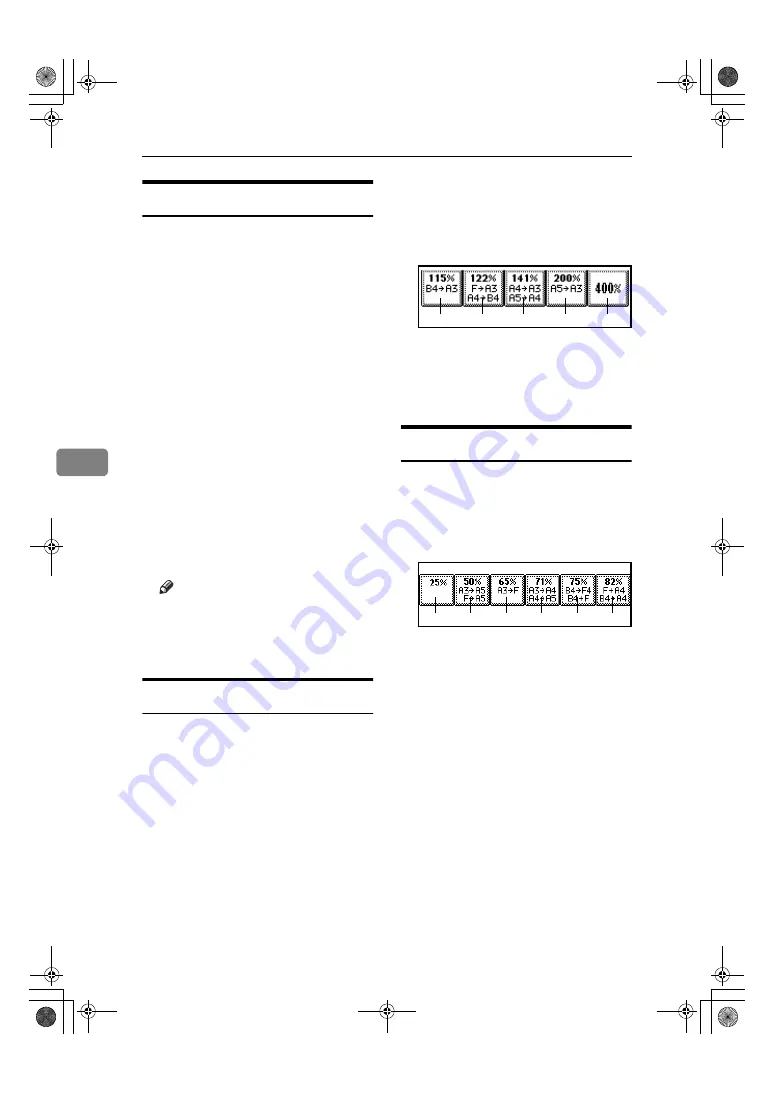
Reproduction Ratio 

2

/

2

Reduce 1-6

You can customize the reduction
ratios available when you press

[

Reduce/Enlarge

]

 followed by 

[

Re-

duce

]

.

Priority Setting: Reduce 

You can set the ratio with priority
when 

[

Reduce/Enlarge

]

 is pressed,

followed by 

[

Reduce

]

.

Ratio for Create Margin 

You can set a Reduce/Enlarge ra-
tio when registering "Create Mar-
gin" in a Shortcut Key.

R/E Priority 

Specifies which tab is given priori-
ty on the display panel when 

[

Re-

duce/Enlarge

]

 is pressed.

Enlarge1

Enlarge2

Enlarge3

Enlarge4

Enlarge5

Reduce1 Reduce2 Reduce3 Reduce4 Reduce5 Reduce6

UranosC1-AEcopy_F1_FM.book  Page 100  Friday, July 26, 2002  1:06 PM

Summary of Contents for Aficio 1224C

Page 1: ...S A RICOH CORPORATION 5 Dedrick Place West Caldwell New Jersey 07006 Phone 1 973 882 2000 The Netherlands RICOH EUROPE B V Groenelaan 3 1186 AA Amstelveen Phone 31 0 20 5474111 United Kingdom RICOH UK LTD Ricoh House 1 Plane Tree Crescent Feltham Middlesex TW13 7HG Phone 44 0 20 8261 4000 Germany RICOH DEUTSCHLAND GmbH Mergenthalerallee 38 40 65760 Eschborn Phone 49 0 6196 9060 France RICOH FRANCE...

Page 2: ...ing Use of controls or adjustment or performance of procedures other than those specified in this manual might result in hazardous radiation exposure Notes The model names of the machines do not appear in the following pages Check the type of your ma chine before reading this manual For details P 3 Machine Types Type 1 Aficio 1224C Type 2 Aficio 1232C Certain types might not be available in some c...

Page 3: ...iginal is in colour Copies in the designated colour Colour Copies using 2 registered colours Black Red Copies the red part of the original in red and copies all other areas in black and white 2 Colour Copy p 25 Single Colour Copy p 25 Full Colour Copy p 25 Black White Copy p 25 Colour Copying p 25 Yellow Beige Orange Red Light green Cyan Pink Magenta Green Marine blue Blue Purple Registered colour...

Page 4: ...mp p 61 Date Stamp p 64 Page Numbering p 66 Stamping on Copies p 60 Copies by changing a specific colour in the original to another colour Convert Colours p 26 Copies by deleting a specific colour in the original Erase Specified Colour p 27 Copies by adding a colour to the whole page Colour Background p 27 GCMO026e UranosC1 AEcopy_F1_FM book Page ii Friday July 26 2002 1 06 PM ...

Page 5: ...our tone of copies Adjust Colour p 73 Colour Balance p 74 Adjusting Images p 76 Adjusts the outline of the image Adjusts the background density of the image Sharp Soft p 76 Background Density p 76 Adjusts the shades of the image Adjust U C R p 77 Text Photo Sensitivity p 77 A C S Sensitivity p 106 Colour Sensitivity p 106 Contrast p 76 Other Adjustments p 77 Soft Sharp Low High Light Dark Make yel...

Page 6: ... sided 1 Page p 49 1 sided 16 Pages 2 sided 1 Page p 49 The functions available may vary according to the options installed For details p 4 Functions that Require Options 1 sided 2 Pages 2 sided 1 Page p 46 2 sided 1 Page 2 sided 1 Page p 46 2 sided 8 Pages 2 sided 1 Page p 50 Front Back Bound Originals 2 sided Pages p 51 Bound Originals 2 sided Pages p 51 GCMO024e UranosC1 AEcopy_F1_FM book Page ...

Page 7: ... sided 1 Page 1 sided 4 Pages 1 sided 1 Page 2 sided 2 Pages 1 sided 1 Page 1 sided 8 Pages 1 sided 1 Page 2 sided 4 Pages 1 sided 1 Page 2 sided Page 1 sided 2 Pages p 46 Bound Originals 2 sided Pages p 51 Bound Originals 1 sided Pages p 51 Copying Originals Such as Books Copying onto Envelopes p 22 Front Back Bound Originals 2 sided Pages p 51 GCMO025e UranosC1 AEcopy_F1_FM book Page v Friday Ju...

Page 8: ...s on the Exposure Glass 13 Placing Originals in the Document Feeder 13 2 Copying Basic Procedure 17 Auto Start 18 Interrupt Copy 18 Original Beeper 18 Job Preset 19 Copying from the Bypass Tray 20 When Copying on the Back Side of Paper 23 Making A3 11 17 Full Bleed Copies 24 Colour Functions 25 Selecting a Colour Mode 25 Convert Colours 26 Erase Colour 27 Colour Background 27 Copy Functions 29 Adj...

Page 9: ...lance 74 Colour Balance Program 74 Image Adjustment 76 Auto Colour Calibration 77 User Colour 79 Adjusting Colours Based on the Selected Colour 79 Mixing Colours Manually with the Number Keys 81 Deleting User Colours 81 Sampling the User Colours 81 Programs 82 Storing a Program 82 Deleting a Program 83 Recalling a Program 83 4 Troubleshooting If Your Machine Does Not Operate as You Want 85 When a ...

Page 10: ...eneral Features 1 5 98 General Features 2 5 99 General Features 3 5 99 General Features 4 5 99 General Features 5 5 100 Reproduction Ratio 1 2 100 Reproduction Ratio 2 2 100 Edit 1 2 101 Edit 2 2 101 Stamp 103 Input Output 105 Adjust Colour Image 106 6 Specifications Combination Chart 107 Supplementary Informations 108 INDEX 116 UranosC1 AEcopy_F1_FM book Page viii Friday July 26 2002 1 06 PM ...

Page 11: ...er s licenses The color copy samples in this book may differ slightly from the actual copies due to printing effects The color on each Color key may differ slightly from that of the actual copy This machine is equipped with a function that prevents making counterfeit bank bills Due to this function the original images similar to bank bills may not be copied properly UranosC1 AEcopy_F1_FM book Page...

Page 12: ...f which are included in the Safety Information section in the General Settings Guide WARNINGS and CAUTIONS are notes for your safety Important If this instruction is not followed paper might be misfeed originals might be damaged or data might be lost Be sure to read this Preparation This symbol indicates the prior knowledge or preparations required before op erating Note This symbol indicates prec...

Page 13: ...l you have see the inside front cover of this manual Type 1 Type 2 Copy speed Single Colour 24 copies minute A4K 81 2 11 K 32 copies minute A4K 81 2 11 K Copy speed Full Colour 8 copies minute A4K 81 2 11 K 10 copies minute A4K 81 2 11 K UranosC1 AEcopy_F1_FM book Page 3 Friday July 26 2002 1 06 PM ...

Page 14: ...g from the Bypass Tray 1 Sided 2 Sided Duplex 2 Sided 2 Sided Duplex 2 Sided 1 Sided Duplex 1 Sided 4 8 16 pages 2 Sided Combine 2 Sided 2 4 8 pages 2 Sided Combine Book 2 Sided Series Front Back 2 Sided Series Shift Sort Shift Stack Staple Options Document Feeder ADF 500 Sheet Finisher 1000 Sheet Finisher Shift Sort Tray Duplex Unit Bypass Tray UranosC1 AEcopy_F1_FM book Page 4 Friday July 26 200...

Page 15: ... image quality is adjusted the lamp in the Adjust Program Color key is lit 5 Colour Circle Refer to this when adjusting colours p 73 Colour Adjustment 6 Display panel Shows operation status error messages and function menus 7 Check Modes key Press to check the entered copy job set tings 8 Program key Press to select the program mode p 82 Programs 9 Clear Modes key Press to clear the previously ent...

Page 16: ...ired number of copies and data for selected modes 19 Colour Selection Key Use these key to switch colour functions p 25 Colour Functions Auto Color Selection Full Color B W Single Color Two color 20 Function keys Function Status indicator These keys switch display to the operat ing screen of each functions Follow the instructions displayed by switching be tween screen with the function keys These ...

Page 17: ...ese originals on the expo sure glass instead Originals other than those specified in p 7 Sizes and Weights of Recom mended Originals Stapled or clipped originals Perforated or torn originals Curled folded or creased originals Where Original Is Placed Original Size Original Weight Exposure glass Up to A3 Document feeder 1 sided originals A3L A5KL 40 128g m2 2 sided originals A3L A5KL 52 105g m2 Whe...

Page 18: ...t is written with a pencil or a similar tool Sizes Detectable by the Auto Paper Select Metric version Detectable size Undetectable size Inch version Detectable size Undetectable size Size A3L L L L B4L L L L A4K K K K L L L L B5K K K K L L L L A5K K K K L L L L 11 17 L L L L 81 2 14 L L L L 81 2 11 K K K K L L L L 51 2 81 2 K K K KL L L L 81 2 13 L L L L Location of the original Exposure glass Doc...

Page 19: ... other projecting parts Transparent originals such as OHP transparencies or translucent paper Dark originals with a lot of text and drawings Originals which partially contain a solid image Originals which have solid images at their edges A3 A3 A4 Horizontal size Vertical size Reference position Maximum Scanning area A3 297x420mm 11 x17 279x432mm CP01AEE UranosC1 AEcopy_F1_FM book Page 9 Friday Jul...

Page 20: ... originals in the document feeder or on the exposure glass margins of a few millimeters on all four sides of the original might not be copied 1 0 4 mm 0 0 16 2 0 4 mm 0 0 16 3 0 4 mm 0 0 16 4 2 6 mm 0 08 0 24 UranosC1 AEcopy_F1_FM book Page 10 Friday July 26 2002 1 06 PM ...

Page 21: ...terhead paper punched paper or copied paper might not be printed correctly depending on how the originals and paper are placed Set Letterhead setting in system settings and then place the original and paper as shown below p 106 Letterhead Setting UranosC1 AEcopy_F1_FM book Page 11 Friday July 26 2002 1 06 PM ...

Page 22: ... the copy im age by 90 Use this function when you want to copy onto A3K B4K 81 2 14 81 2 13 or 11 17 K pa per A A A A Press Special Original B B B B Select the original orientation Standard Orientation A Make sure that is select ed 90 Turn When you want to copy A3K B4K 81 2 14 81 2 13 or 11 17 K size originals place your original in the landscape orienta tion and then press The ma chine rotates th...

Page 23: ...C Lower the exposure glass cover or document feeder Placing Originals in the Document Feeder Settings should be made in the fol lowing situations When placing originals one by one p 15 SADF mode When placing originals consisting of more than 50 pages p 14 Batch mode When copying originals of various sizes p 15 Mixed Size mode When placing custom size originals p 16 Placing Custom Size Orig inals N...

Page 24: ...op ies an original including more than 50 pages as one document even if it is placed on the document feeder in parts A A A A Press Special Original B B B B Select Batch and then press OK Note When Batch is not displayed change the settings in p 105 Switch to Batch SADF C C C C Place the first part of the original then press the Start key D D D D After the first part of the original has been fed pl...

Page 25: ...ace the next page The second and subsequent pages will be fed automatically without pressing the Start key Mixed Size mode When you place different size origi nals which have the same width in the document feeder at the same time the machine automatically checks the size of the originals and makes cop ies Note When placing originals of different sizes in the document feeder and making copies witho...

Page 26: ... the size of the originals Note Paper that has a vertical length of 105 297 mm 4 2 11 6 and a horizontal length of 128 432 mm 5 1 17 0 can be placed with this function A A A A Press Special Original B B B B Press Custm Size Origi C C C C Enter the horizontal size of the original with the Number keys and then press Note If you make a mistake press Clear or the Clear Stop key and then enter the valu...

Page 27: ...erence p 12 Placing Originals E E E E Set your desired settings Reference Please refer to each functions F F F F Enter the number of copies re quired with the number keys Note The maximum copy quantity that can be set is 100 G G G G Press the Start key The machine starts copying Note When you place originals on the exposure glass press the key after all originals are scanned Copies are delivered f...

Page 28: ...s D Press the Interrupt key again The Interrupt indicator goes off E When the display prompts you set the remaining origi nals again before interrupting F Press the Start key Note The interrupt copy job set tings will be restored and the machine will continue copy ing from where it left off When the machine keeps copying A Place the originals you wish to copy B Press the Start key The machine stop...

Page 29: ...A Press Next Job when Copying is shown B B B B Set up the next copy job C C C C Place the originals in the docu ment feeder and then press the Start key All originals are scanned D D D D Press To Printing Returns to the initial copy display After the current copy job the next job starts automatically Note You can switch the display to the current copy job by pressing To Printing You can switch the...

Page 30: ... the paper may be come wrinkled may not be fed into the machine or may cause pa per jams Note If you do not use the standard size copy paper or if you use special pa per you should input vertical and horizontal dimensions p 16 Placing Custom Size Originals The sizes that you can input are as follows The machine can automatically de tect the following sizes as standard size copy paper When copying ...

Page 31: ... 2 11 L Fan paper to get air between the sheets and avoid a multi sheet feed When copying onto envelopes p 22 When copying onto en velopes C C C C Select the type and size of the pa per When copying onto standard size paper A Press the key B Press Select Size C Select the paper size D Press OK When copying onto custom size paper Note Paper will be automatically de livered to the internal tray A Pr...

Page 32: ... inals with the bottom line insert ed in the document feeder When loading envelopes be sure to unfold the flaps and po sition them opposite to the pa per feed direction Reference For more information about supported size of envelop see General Settings Guide Recommended Paper Sizes and Types A Press the key B Select the paper size and then select Thick Paper for the paper type C Press OK D D D D P...

Page 33: ...nt Orientation of Originals and Paper Pay close attention to the placement orientation of paper and originals Top to top Top to Bottom A A A A Open the Bypass Tray and then adjust the guides to the paper size B B B B Gently insert the copied paper with the copied side face down the non copied side face up un til the beeper sounds C C C C Press the key and then select the paper size D D D D In Spec...

Page 34: ...ackground e g cata logues 1 A3 11 17 size Original 2 In standard copy mode margins appear on copies 3 12 18 Full Bleed Copy 4 Cut around the margins to pro duce a full image Note This function can be used with 12 18 paper When A3 11 17 full bleed copying is made the original image is copied onto the center UranosC1 AEcopy_F1_FM book Page 24 Friday July 26 2002 1 06 PM ...

Page 35: ...nd purple uses 2 toner colours to copy Two Colour Copy Two Colour Copy Normal Copies black and other parts in two specified colours Note You can select from basic col ours registered colours Two Colour Copy Red black Copies the red part in red and all the other parts in black or white Note When the width of the colour is set to Wider colours close to orange and purple will be recognized as red Thi...

Page 36: ...our to be con verted can be adjusted in 5 levels If the colour width is set to Wid er and red has been specified col ours which are close to magenta or orange will also be converted The colour width can be adjusted in the User Tools p 106 Colour Sensitivity A A A A Press the Full Color key B B B B Press Edit Colour Creation C C C C Press Colour Creation D D D D Press Convert Colour E E E E Select ...

Page 37: ...eation B B B B Press Colour Creation C C C C Press Erase Colour D D D D Select the colour to be erased Note You can cancel the selection by pressing the selected highlight ed key You can erase 4 colours at once E E E E Press OK after selecting all the colours to be deleted F F F F Set the originals and then press the Start key Colour Background Copies by adding a colour in the whole page Note Sinc...

Page 38: ...Selecting from the User Colour A Press User Colour B Select a registered colour and then press OK E E E E Set the original and then press the Start key UranosC1 AEcopy_F1_FM book Page 28 Friday July 26 2002 1 06 PM ...

Page 39: ...with a dirty background such as news papers You can adjust the fore ground density while leaving the background unchanged Auto image density A A A A Make sure that Auto Image Density is selected Manual image density A A A A Press Auto Image Density to cancel it B B B B Press Lighter or Darker to adjust the image density Combined auto and manual image density A A A A Make sure that Auto Image Densi...

Page 40: ... paper e g maga zines Copied Photo Use when copying copies or originals generated by print ers Map Scanning with settings suitable for Map originals Others is dis played when Original Type Dis play copy document server box initial settings has been set to Display Pale Select this mode for originals that have lighter lines written in pencil or for faint copied slips The faint lines will be clearly ...

Page 41: ...be used with Auto Paper Select when copying at a ratio of 100 Metric version Inch version Only the paper trays set to No display or Recycled paper in Paper Type and also set to Yes in Apply Auto Paper Select can be selected in Auto Pa per Select mode Paper Size Settings in the General Settings Guide Where Original Is Placed Paper Size and Direction Exposure glass A3L B4L A4KL B5KL 81 2 13 L Docume...

Page 42: ...al Settings Guide Manual Paper Select A A A A Select the paper tray bypass tray or large capacity tray LCT The indicator corresponding to the selected paper tray is highlighted Reference p 20 Copying from the Bypass Tray When the paper type keys are not displayed A Press Auto Paper Select B Select the type of paper UranosC1 AEcopy_F1_FM book Page 32 Friday July 26 2002 1 06 PM ...

Page 43: ... Copy Paper p 36 Auto Re duce Enlarge You cannot use the Rotated Copy function when enlarging onto A3 B4 or 11 17 81 2 14 size paper In this case place your original in the L direc tion You cannot use the Rotated Copy function when Left 2 or Top 2 is selected for stapling when using the 1000 sheet finisher p 43 Staple You cannot use the Rotate Copy function if the Staple function is selected when ...

Page 44: ...on the document feeder Reference Related Initial Settings p 99 Copy Function Key F1 F5 p 100 R E Priority Note When making reduced copies from A3 or B4 originals to A4 OHP trans parencies set the OHP transparen cies in tray 1 in the K direction and use the Auto Reduce Enlarge function p 36 Auto Re duce Enlarge A A A A Press Reduce Enlarge Note To select a preset ratio on the in itial display press...

Page 45: ...te Margin displayed on the initial display B If you do not wish to combine it with the Reduce Enlarge function place your originals and then press the Start key Zoom You can change the reproduction ra tio in 1 steps Note You can select a preset ratio which is near the desired ratio then ad just the ratio with n n n n or o o o o A A A A Press Reduce Enlarge B B B B Enter the ratio To select the rat...

Page 46: ...sizes you select Note You cannot use the bypass tray with this function When using Auto Reduce En large see the following table for the original sizes and directions you can use Metric version Inch version Reference p 9 Sizes difficult to detect A A A A Press Auto Reduce Enlarge B B B B Select the paper tray C C C C Set the original then press the Start key Where Original Is Placed Original Size a...

Page 47: ...ength of the copy with the number keys and then press Note To change the length after pressing select Original or Copy and enter the desired length F F F F Press OK G G G G Press OK H H H H Place your original and then press the Start key Directional Magnification Copies can be reduced or enlarged at different reproduction ratios horizon tally and vertically a Horizontal ratio b Vertical ratio Not...

Page 48: ...adjust the ratio with n n n n or o o o o D Press Vertical E Adjust the ratio with n n n n or o o o o F Press OK D D D D Press OK E E E E Place your originals and then press the Start key Directional Size Magnification mm The suitable reproduction ratios will be automatically selected when you enter the horizontal and vertical lengths of the original and copy im age you require 1 Horizontal origina...

Page 49: ...er the new value H H H H Press OK I I I I Press OK J J J J Place your originals and then press the Start key Sort The machine can scan your originals into memory and automatically sort the copies Reference Related Initial Settings p 106 Select Stack Function p 105 Memory Full Auto Scan Restart p 105 Rotate Sort Auto Paper Continue p 98 Auto Tray Switching Sort Copies are assembled as sets in se qu...

Page 50: ... that you can differentiate each set or job If the shift sort tray is installed it provides this function by slid ing from side to side A A A A Press Sort or Rotate Sort When a finisher is not installed When the 500 Sheet Finisher is installed When the 1000 Sheet Finisher is installed Note When the optional finisher is in stalled use the User Tools to display Rotate Sort p 106 Select Stack Functio...

Page 51: ...r you specified minus one for the proof copy Note If you press Suspend after checking the results return to step A to adjust the copy set tings as necessary You can change the settings for Staple Duplex Copy Orientation Stamp Margin Adjust and Cover Slip Sheet However de pending on the combination of functions you may not be able to change some settings Changing the Number of Sets You can change t...

Page 52: ...sliding from side to side A A A A Press Stack B B B B Enter the number of copies with the number keys C C C C Place your originals then press the Start key Note When placing an original on the exposure glass start with the first page to be copied When placing an original in the docu ment feeder ADF set so that the last page is on the bottom When placing an original on the exposure glass or in the ...

Page 53: ...eder ADF in the orientation in which they can be read normally When placing the original on the exposure glass keep the same orientation but set the original facing downwards When there is copy paper that is identical in size and orientation to your original the staple positions are as follows 500 Sheet Finisher Note Original images are not rotated Original location Stapling position Exposure glas...

Page 54: ...inisher 1 Not available for paper size larger than A4 Original location Stapling position Exposure glass Document Feeder Top K L Bottom K L Left 2 K 1 L Top 2 K L 1 UraC1copy_AE_Chapter 2 Page 44 Wednesday July 31 2002 1 45 PM ...

Page 55: ...r the number of copy sets with the number keys C C C C Place your originals then press the Start key Note When placing an original on the exposure glass start with the first page to be copied When placing an original in the document feeder ADF set so that the last page is on the bottom When placing an original on the exposure glass or in the document feeder ADF using batch mode press the key after...

Page 56: ...lex copying is 64 105g m2 17 28 lb Original Direction and Completed Copies The resulting copy image will differ according to the direction in which you place your original widthwise K or lengthwise L 1 The table shows the orientation of im ages on the front and back of copies not the direction of delivery Reference Related Initial Settings p 101 Front Margin Left Right p 101 Back Margin Left Right...

Page 57: ...nt feeder ADF set so that the last page should be on the bottom When placing an original on the exposure glass or in the docu ment feeder ADF using batch mode press the key after all the originals have been scanned Originals and Copy Direction You can select the orientation Top to Top Top to Bottom Note You can change the default orien tation with the User Tools p 99 Copy Orientation in Duplex Mod...

Page 58: ...o 2 sided originals to one side of a sheet 2 Sided 4 Pages Combine 1 Side Copies four 2 sided originals to one side of a sheet Orientation of the Original and Image Position of Combine Open to Left R Originals Open to Top S Originals Placing Originals Originals Placed in the Document Feeder Originals read from left to right Originals read from top to bottom Reference Related Initial Settings p 101...

Page 59: ...ages Combine 2 Side Copies four 1 sided originals to one sheet with two pages per side 1 Sided 8 Pages Combine 2 Side Copies eight 1 sided originals to one sheet with four pages per side 1 Front 2 Back 1 Sided 16 Pages Combine 2 Side Copies sixteen 1 sided originals to one sheet with eight pages per side 1 Front 2 Back 2 Sided 4 Pages Combine 2 Side Copies two 2 sided originals to one sheet with t...

Page 60: ...Combine p 101 Copy Order in Com bine p 103 Separation Line in Combine A A A A Press Dup Combine Series B B B B Press 1 Sided 2 Sided for Orig inal and then press Combine 2 Side for Copy Reference p 47 Originals and Copy Di rection C C C C Select the number of originals to combine and then press OK D D D D Select the paper E E E E Press OK F F F F Place your originals and then press the Start key G...

Page 61: ... inal as it is onto both sides of a sheet Note See the following table for orig inal and copy paper sizes when using a 100 ratio You can use this function only when you are making a copy from the Exposure Glass Metric version Inch version 1 2 1 2 1 2 1 2 Original Paper for 1 sided copy Paper for 2 sided copy A3L A4K 2 sheets A4K 1 sheets 2 sided B4L B5K 2 sheets B5K 1 sheets 2 sided A4L A5K 2 shee...

Page 62: ... Area Repeat Repeatedly copies a specified por tion of the image Decide the base point of the area specify the length and the width and then specify the location of the area Reference Related Initial Settings p 102 Double Copies Sepa ration Line Whole Area Repeat Note The number of repeated images depends on the original size copy paper size and reproduction ratio See the following table Original ...

Page 63: ...ase point X1 Y1 and its length and width X2 Y2 Note You can set any value in the range of X1 0 412mm 0 8 16 2 X2 20 432mm 0 8 17 Y1 0 277mm 0 8 10 8 and Y2 20 297mm 0 8 11 6 B B B B Select the size of the copy paper and the reproduction ratio C C C C Press Edit Colour Creation D D D D Press Edit Image E E E E Press Image Repeat F F F F Press Specified Area G G G G Enter the length of X1 with the n...

Page 64: ... C C C C Press Double Copies D D D D Press OK E E E E Press OK F F F F Select the paper G G G G Place your originals and then press the Start key Centering You can make copies with the image moved to the center of the copy paper Note You cannot use the bypass tray with this function The original sizes and directions for centering are listed below Metric version Original Size and Direction Copy Pap...

Page 65: ...nd invert ed to complimentary colours If the Single Color key is selected copy images are copied in white and specified colours If Two colour normal is selected the white part of the original be comes black and the black part be comes white and the coloured part is copied with the specified colour If Red Black is selected the white part of the original becomes black and the black part becomes whit...

Page 66: ...ion B B B B Press Edit Image C C C C Press Mirror Image D D D D Press OK E E E E Place the original then press the Start key Margin Adjustment You can shift the image to the left right top or bottom to make a bind ing margin Reference Related Initial Settings p 101 Front Margin Left Right p 101 Back Margin Left Right p 101 Front Margin Top Bot tom p 101 Back Margin Top Bot tom p 101 1 Sided 2 Side...

Page 67: ...for the back side pages Press and when setting the left and right margins and and when set ting the top and bottom margins Then press OK Note Margin on the back side of the page is valid only when Duplex or Duplex of Combine is select ed F F F F Press OK G G G G Press OK H H H H Place your originals and then press the Start key Erase This function erases the center and or all four sides of the ori...

Page 68: ...n the orig inal orientation and the erased part is as follows 1 Erased part 2 2 99mm Border Erase A A A A Press Edit Colour Creation B B B B Press Erase Margin Adj C C C C Press Erase D D D D Set the erase border width Selecting Same Width A Press Same Width B Set an erase border width with n n n n and o o o o Note To change the value entered press n n n n and o o o o to set the new value C Press ...

Page 69: ...ress OK G G G G Place your originals and then press the Start key Center Border Erase A A A A Press Edit Colour Creation B B B B Press Erase Margin Adj C C C C Press Erase D D D D Press Centre Border E E E E Set the border to be erased Selecting Same Width A Press Same Width B Press Centre and then set the erase center width with n n n n and o o o o C Press Border and then set the erase border wid...

Page 70: ...Y For Your Info PRE LIMINARY For Internal Use Only CONFIDENTIAL DRAFT Stamp Position and Original Direction Note You cannot use the bypass tray with this function Only one message can be stamped at a time When you select Full Colour the Full Colour counter starts from 1 The default stamp colour is red Reference p 103 Stamp Language p 103 Stamp Position p 103 Stamp Format p 103 Stamp Colour A A A A...

Page 71: ...riginals and then press the Start key Changing the stamp colour A A A A Press Stamp Colour B B B B Select the stamp colour then press OK Changing the stamp position size and density A A A A Press Change B B B B Select the position for print size and density then press OK User Stamp Copies with the registered stamp Note Full colour originals can only be read in single colour Stamp position and orig...

Page 72: ...To change the stamp posi tion G G G G After making all settings press OK H H H H Press OK I I I I Set the original then press the Start key Changing the stamp colour A A A A Press Stamp Colour B B B B Select the stamp colour then press OK To change the stamp position A A A A Press Change B B B B Select the desired position and then press OK To program the user stamp Note The range of stamp images ...

Page 73: ... J J Enter the horizontal size of the stamp with the number keys and then press Note You can enter sizes within the horizontal range of 10 432mm 1 0 17 0 and the vertical range of 10 297mm 1 0 11 7 However if the area ex ceeds the maximum value 5 000mm2 7 75 inch2 it is cor rected to within the acceptable range automatically K K K K Press Vertical and then enter the vertical size in the same way a...

Page 74: ...G Press Delete then press the stamp number 1 4 you want to delete H H H H Select Delete I I I I Press Exit The display returns to the main menu of the Copier Document Server Features J J J J Press Exit Exits the settings and will become ready to copy Date Stamp You can select from the following styles You can select from the following styles MM DD YYYY MM DD YYYY DD MM YYYY DD MM YYYY YYYY MM DD S...

Page 75: ...nt and position of the date to be stamped p 65 Changing the stamp colour p 65 To change the style of date E E E E After all the settings are complete press OK F F F F Press OK G G G G Set the original then press the Start key Changing the stamp colour A A A A Press Stamp Colour B B B B Select the stamp colour then press OK To change the style of date A A A A Press Change Format B B B B Select the ...

Page 76: ... 1 2 1 n Stamp position and original orientation Note You cannot use the bypass tray with this function The default stamp colour is black Reference Related Initial Settings p 104 Font p 104 Size p 105 Superimpose p 104 Stamp Format p 104 Duplex Back Page Stamping Position p 105 Stamp Position p 105 Stamp on Designated Slip Sheet p 105 Stamp Colour GCSTMP8E UranosC1 AEcopy_F1_FM book Page 66 Friday...

Page 77: ...press OK Changing the stamp position A A A A Press Change B B B B Select the desired position and then press OK Specify the first printing page and start number If you selected P1 P2 1 2 P 1 P 2 1 2 Note Below explains the example when P1 P2 is selected The steps are the same for other cases A A A A Press the right Change B B B B Press First Printing Page and then enter the original sheet number f...

Page 78: ...e number from which to start numbering with the number keys and then press the key E E E E Press Last Number and then enter the page number at which to stop numbering with the number keys then press the key Proceed to step F when not chang ing Note If you wish to print onto the last page press to the end The last number is the last page number to print For example if the Total Pages is 10 pages if...

Page 79: ...age designation is com plete press OK G G G G Press OK Covers Using this function you can add cov er sheets or designate certain pages to be copied on slip sheets Preparation Before selecting this function set the tray for the front cover paper General Settings Guide Cover Sheet Tray Note The cover sheet should be the same size and direction as the copy pa per You cannot set the copy paper in the ...

Page 80: ... then press OK E E E E Place your originals in the docu ment feeder and then press the Start key Slip Sheets Every time the originals page chang es a slip sheet is inserted This func tion can be used to insert a slip sheet automatically between each OHP transparency copied or used as a stack function You can also copy onto the inserted slip sheets Preparation Before selecting this function specify...

Page 81: ...nted as copies A A A A Press Cover Slip Sheet B B B B Press Slip Sheet C C C C Select Copy or Blank and then press OK D D D D Select the paper tray which con tains the sheet paper to copy the originals E E E E Place your originals and then press the Start key 2 2 2 1 2 1 1 1 2 2 2 1 1 1 UranosC1 AEcopy_F1_FM book Page 71 Friday July 26 2002 1 06 PM ...

Page 82: ...rmation about settings and changes see the General Settings Guide Reference Refer to the General Settings Guide A A A A Press Store File B B B B Enter a file name user name or password if necessary C C C C Place your originals Reference For more information on the types of originals that can be placed and how to place them p 12 Placing Originals D D D D Make the scanning settings for the original ...

Page 83: ... A A A Press the Adjust Program Color key B B B B Press Adjust Colour The colour circle is displayed C C C C Select the colours you want to ad just You can select up to 3 colours D D D D Adjust the colour tastes using or Note Refer to the colour circle on the control panel E E E E Press OK Note The indicator of the Adjust Pro gram Color key will light up when adjusting the colour The adjusted sett...

Page 84: ...hen Auto Clear has been performed when the Clear Modes key has been pressed or when the power has been turned off Colour Balance Program You can also store the colour balance setting in memory and recall it when you want to use it Note You can store up to 3 contents If you want to change the regis tered settings register them one more time In this case the previ ously registered contents will be c...

Page 85: ...key B B B B Make sure that Colour Balance is selected and then press Program Colour Balance C C C C Make sure that Recall has been selected and then select the pro gram number registered by the colour balance to be used D D D D Press OK E E E E Place your originals and then press the Start key Note After copying has been com pleted either performing the Auto Clear function or pressing the Clear Mo...

Page 86: ...ound Density can each be adjusted however their adjust ments can affect the level of oth er adjustment functions When adjusting the image qual ity the indicator of the Ad just Program Color key will light up The adjusted settings will be de leted and the initial values will be reset when Auto Clear has been performed when the Clear Modes key has been pressed or when the power has been turned off A...

Page 87: ... C Press OK Auto Colour Calibration If a certain colour is strong or the col our of the copy differs from the origi nal adjust the yellow magenta cyan and black balance Note If D Toner is almost empty is shown on the display panel the test pattern cannot be printed A A A A Press the User Tools Counter key B B B B Press Maintenance C C C C Press Auto Colour Calibration D D D D Press Start on the Co...

Page 88: ...y When the optional document feeder ADF is installed make sure to set the test pattern on the exposure glass and then 2 or 3 white sheets same size as the test pattern above the test pat tern Returning to the previous setting Note Previous Setting means to re turn to the previous status be fore any changes A Press Previous Setting in the Auto Colour Calibration Copier Function B Press Yes The sett...

Page 89: ...cted to 255 When copying using user colours the fine shades might vary de pending on the condition of the machine In order to correctly reproduce originals the values which have been input are corrected inside the machine and copies are made us ing the best suitable values There fore there might be slight colour differences when copying using Text and when using Photo Up to 15 colours can be regis...

Page 90: ...t ages using n n n n or o o o o Using With Number keys A Press With Number keys B Input the density in percentag es using the number keys and then press Note If you want to use n n n n or o o o o press With n n n n o o o o If you enter the wrong densi ty press Clear or the Clear Stop key and then re enter the correct density Repeat step B if you want to specify the density of multi ple colours Whe...

Page 91: ...he names of each colour and then press OK Note Repeat steps E to G if you want to specify the density of multi ple colours H H H H Press Exit Deleting User Colours Note You can not delete colours regis tered in the program or registered colours that are currently being used A A A A Press the Adjust Program Color key B B B B Press User Colour C C C C Press Delete D D D D Select the number of the us...

Page 92: ... cleared by turn ing the power off or by pressing the Clear Modes key They are canceled only when you delete or overwrite them with another pro gram A A A A Edit the copy settings so that all functions you want to store in this program are selected B B B B Press the Program key C C C C Press Register D D D D Press the program number you want to store Note Program numbers with m al ready have setti...

Page 93: ... F of Storing a Pro gram Note When it is overwritten the pre vious program is erased Deleting a Program A A A A Press the Program key B B B B Press Delete C C C C Press the program number you want to delete D D D D Press Yes The program is deleted and the screen returns to the initial copy display Recalling a Program A A A A Press the Program key B B B B Press Recall C C C C Press the program numb...

Page 94: ...Colour Adjustment Program 84 3 UranosC1 AEcopy_F1_FM book Page 84 Friday July 26 2002 1 06 PM ...

Page 95: ...s the copy paper Check paper size Improper paper size is set If you press the Start key copy will start onto the selected paper Rotate Sort is not available with this image size A size of paper for which Rotate Sort is not available is selected Select the proper paper size p 39 Sort It is over stapling capacity The number of sheets per set is over the staple capac ity Check the stapler capacity p ...

Page 96: ...ent Server func tion is in use To cancel the job in process press Exit and then press the Document Server key Next press the Clear Stop key When the message Stop was pressed Stop storing appears press Stop Problem Cause Action UranosC1 AEcopy_F1_FM book Page 86 Friday July 26 2002 1 06 PM ...

Page 97: ...g copies The exposure glass or doc ument feeder is dirty Clean them General Settings Guide Copies are too light The image density is too light Adjust the copy density p 29 Adjusting Copy Image Density The paper size is not ap propriate Use the recommended paper Note A light copy may result when you use damp or rough grain pa per Toner cartridge is almost empty Add toner General Settings Guide Part...

Page 98: ...ges are divided into two blocks The memory became full in the middle of sorting and the pages were delivered in two blocks You can interrupt copying when the memory becomes full p 105 Memory Full Auto Scan Restart In Double Copies mode parts of the original image are not copied Combination of original and copy paper is not cor rect Select A3L for A4 K originals and A4 for A5 originals In Border Ce...

Page 99: ...age should be on the bottom If you place an original on the expo sure glass start with the first page to be copied When Duplex copy is made Top Bottom even though Left Right is se lected You placed the originals in the wrong direction Place the originals in the correct ori entation p 12 Original Orienta tion Paper does not output dur ing printing with stapling When you stop printing while using th...

Page 100: ...t to copy scanned originals Do not remove remaining originals Note Copying will stop and this message will be displayed when the memory is full The scanned original exceeds the number of pages that can be stored in memory Press Print to copy scanned originals and clear the scan ning data Press Clear Memory to clear the scanning data and not copy Press Resume to scan and copy remaining originals St...

Page 101: ... Photo B W Single Colour Text Photo Original Photo Type Priority Text Photo Printed Photo Photo Printed Photo Auto Tray Switching Without image rotation General Features 2 5 p 99 General Features 2 5 Duplex Mode Priority 1 Sided 1 Sided metric 1 Sided 2 Sided inch Copy Orientation in Duplex Mode Top to Top Original Orientation in Duplex Mode Top to Top Change Initial Mode Standard Max Copy Quantit...

Page 102: ...ided Com bine 8 originals F4 Off F5 Create Margin General Features 4 5 p 99 General Features 4 5 Document Server Storage Key F1 F5 F1 2 Sided Original Top to Top F2 1 Sided 1 Sided Com bine F3 1 Sided 1 Sided Com bine 4 originals F4 1 Sided 1 Sided Com bine 8 originals F5 Create Margin General Features 5 5 p 100 General Features 5 5 Clear Bypass Mode Clear Colour Mode Priority Black White Two Colo...

Page 103: ...large 1 121 Enlarge 2 129 Enlarge 3 155 Enlarge 4 200 Enlarge 5 400 Priority Setting Enlarge Metric version 141 Inch version 155 Reproduction Ratio 2 2 p 100 Reproduction Ratio 2 2 Reduce 1 6 Metric version Reduce 1 25 Reduce 2 50 Reduce 3 65 Reduce 4 71 Reduce 5 75 Reduce 6 82 Inch version Reduce 1 25 Reduce 2 50 Reduce 3 65 Reduce 4 73 Reduce 5 78 Reduce 6 85 Priority Setting Reduce Metric versi...

Page 104: ...Width Metric version 10mm Inch version 0 4 Erase Original Shadow in Combine Yes Erase Center Width Metric version 10mm Inch version 0 4 Edit 2 2 p 101 Edit 2 2 Front Cover Copy in Combine Combine Copy Order in Combine From left to right Image Repeat Separation Line None Double Copies Separation Line None Separation Line in Combine None Stamp p 103 Stamp Preset Stamp Stamp Priority Copy Stamp Langu...

Page 105: ...ight Margin 1 0 Stamp Format 1 4 All Pages Stamp Colours 1 4 Black Date Stamp Format DD MM YYYY Font Font 1 Stamp Position Metric version Position Top left Top Margin 8mm Right Margin 32mm Inch version Position Top left Top Margin 0 3 Right Margin 0 8 Stamp Setting All Pages Size Auto Superimpose No Stamp Colour Black User Tools Item Names Default Settings UranosC1 AEcopy_F1_FM book Page 95 Friday...

Page 106: ...rgin P1 1 5 P 1 1 0 5 1 1 1 0 3 Left Right Margin P1 1 5 P 1 1 0 5 1 1 1 0 0 Superimpose No Stamp Colour Black Input Output p 105 Input Output Switch to Batch Batch SADF Auto Reset 5 seconds Rotate Sort Auto Paper Continue No Auto Sort No Memory Full Auto Scan Restart No Select Stack Function Stack Letterhead Setting No Adjust Colour Image p 106 Adjust Colour Image Background Density of ADS Full C...

Page 107: ...t the access code input screen is dis played when changing the ini tial settings Operate by entering the registered access code beforehand For access code see Key Operator Tools in the General Settings Guide B B B B Press Copier Document Server Fea tures The Copier Document Server Fea tures menu appears C C C C Select the menu you want to set Setting screen for each menu will be displayed Referenc...

Page 108: ... When you select Text Photo or Photo in Original Type Priori ty you can change the settings of the selected original type Auto Tray Switching If you load paper of the same size in two or more trays the machine automatically shifts to the other tray when the first tray in use runs out of paper when Auto Paper Se lect Priority is ON This function is called Auto Tray Switching This setting specifies ...

Page 109: ...o remove origi nals after copying Note If the Panel Tone of the User Tools System Settings setting is OFF the beeper does not sound irrespective of the Tone Original remains setting Panel Tone in the General Settings Guide Job End Call You can choose whether or not the beeper sounds when copying is complete Note If the Panel Tone of the User Tools System Settings settings is ON the machine beeps t...

Page 110: ... You can also change the registered Reduce Enlarge ratios If no Reduce Enlarge ratio has been set when selecting Shortcut R E 1 Shortcut R E 2 or Shortcut R E 3 enter the desired Re duce Enlarge ratio using the number keys Enlarge 1 5 You can customize the enlarge ment ratios available when you press Reduce Enlarge followed by Enlarge Priority Setting Enlarge You can set the ratio with priority wh...

Page 111: ...margins on the back side 1 Sided 2 Sided Auto Margin TtoB In 1 sided 2 sided Duplex mode you can specify the margins on the back side Erase Border Width You can specify the width of the erased border margins in this func tion Erase Original Shadow in Combine In Combine Copy mode you can specify whether to erase a 3mm 0 1 bounding margin around all four edges of each original Erase Center Width You...

Page 112: ... not be dis played as the width of the sepa ration line when specifying solid or broken lines Double Copies Separation Line You can select a separation line in Double Copy mode from None Solid Broken A Broken B or Crop Marks None Solid Broken A Broken B Crop Marks Note Separation lines cannot be spec ified when None is selected In Black White printing will be done in black in Single Colour printin...

Page 113: ...et Stamp 1 4 4 4 Stamp Priority You can select the stamp type that is given priority when Preset Stamp is pressed Stamp Language You can select the language of the message that is printed in Stamp mode Stamp Position You can set the position at which the stamp is printed Press the arrow keys to adjust the position Stamp Format You can adjust the size density and print page for the stamp Size You c...

Page 114: ...amp font Stamp Position You can set the position at which the stamp is printed Press the arrow keys to adjust the position Stamp Setting You can select whether the date is printed on the first page or all pag es Size You can set the Date Stamp size Superimpose You can select whether the Date Stamp is printed in white when it overlaps black parts of the image This function is valid when in Black Wh...

Page 115: ...F Auto Reset When you set one original at a time in the document feeder the Auto Feed indicator lights for a selected time after an original is fed to show that the document feeder is ready for another original You can ad just this time from 3 seconds to 99 in 1 second increments Rotate Sort Auto Paper Continue You can specify whether to contin ue copying when the paper of the required orientation...

Page 116: ...per or 2 sided paper Adjust Colour Image Background Density of ADS Full Col our Two colour The background density is adjust ed to skip the texture and copy You can adjust the background density up to 5 levels when in Full Colour or Two colour Colour Sensitivity You can adjust the tone of red in Two colour Red Black the colour specified to convert in Col our Convert and the colour speci fied for Er...

Page 117: ...stment Positive Negative Centering Center Erase Border Erase Mirror Erase Colour Convert Colour Colour Background Preset Stamp User Stamp Date Stamp Page Numbering Front Cover Front Back Cover Slip Sheet Sort Rotate Sort Stack Staple Store File 1 Combination is not available when the copied content is 2 sided 2 Combination is not available when using Rotate Sort 3 Combination with covers is not po...

Page 118: ...one of 12 preset ratios 5 enlargement ratios 7 reduction ra tios You can select a ratio regardless of the size of an original or copy paper With some ratios parts of the image might not be copied or margins will appear on copies Copies can be reduced or enlarged as follows Metric version Ratio Original Copy paper size 400 enlarge area by 16 200 enlarge area by 4 A5 A3 141 enlarge area by 2 A4 A3 A...

Page 119: ...o that you can specify are 25 400 When entering a percentage ratio you can specify any value in the permit ted range regardless of the size of the original or copy paper However de pending on the setting and other conditions part of the image may not be copied or margins will appear on copies When entering a size in mm if the calculated ratio is over the maximum or under the minimum ratio it is ad...

Page 120: ...per Size and Direction Paper Ca pacity and Weight Internal tray A4KL B5KL A5KL B6L A6L 81 2 11 KL 71 4 101 2 KL 51 2 81 2 KL 16KKL 500 sheets 1 80g m2 20 lb A3L B4L 11 17 L 81 2 14 L 8 13 L 81 2 13 L 81 4 13 L 12 18 L 8KL 250 sheets 2 80g m2 20 lb 37 8 71 2 K 41 8 91 2 K C5 EnvK C6 EnvL DL EnvK Internal tray 2 1 bin tray A3L B4L A4KL B5KL A5KL B6L A6L 11 17 L 81 2 14 L 81 2 11 KL 71 4 101 2 KL 51 ...

Page 121: ...es will be delivered to the shift tray without stapling When the number of sheets for one set is over the stapler capacity When memory reaches 0 during copying 500 Sheet Finisher A4KL B5KL 3 A5K 3 81 2 11 KL 51 2 81 2 K 3 71 4 101 2 KL 3 16KKL 3 500 sheets 80g m2 20 lb A3L B4L 11 17 L 81 2 14 L 8 13 L 81 4 13 L 81 2 13 L 8KL 250 sheets 80g m2 20 lb 1000 Sheet Finisher Finisher proof tray A4KL B5KL...

Page 122: ... the original image is rotated the staple orientation changes by 90 The maximum original image size that can be rotated is as follows When Left 2 or Top 2 is selected the following settings are useful to rotate images appropriately Auto Reduce Enlarge or Auto Paper Select With image rotation in Auto Tray Switching of User Tools Duplex The following paper sizes can be duplexed A3L B4L A4KL B5KL A5K...

Page 123: ...an specify are 25 400 A separation line between originals can be printed with the User Tools p 103 Separation Line in Combine If the direction of originals is different from that of the copy paper the ma chine will automatically rotate the image by 90 to make copies properly If the number of originals placed is less than the number specified for com bining the last page is left blank as shown in t...

Page 124: ...ng on the paper size if you change the stamp size parts of the stamp might not be printed Date Stamp When using the Combine mode the date stamp is printed as follows Where Original Is Set Paper Size and Orientation Exposure glass A3L B4L A4KL B5KL 81 2 13 L Document feeder A3L B4L A4KL B5KL A5KL 81 2 13 L Where Original Is Set Paper Size and Orientation Exposure glass 11 17 L 81 2 14 L 81 2 11 KL ...

Page 125: ...2 or 1 n 2 n style the page numbers on the back of the copy paper are printed as follows 1 Front 2 Back Front Cover Front Back Cover Front and back covers are 2 sided copied depending on the settings made in the Display Time in the Cover Sheet Tray of the User Tools System Settings If the Display Time is selected to the At Mode selected set tings made in the Cover Sheet Tray has the priority If th...

Page 126: ...y 29 image density priority 92 paper select 31 paper select priority 91 reduce enlarge 36 start 18 tray switching 98 Auto colour calibration 77 Auto paper select 32 B Background density of ADS Full Colour Two colour 106 Basic procedure 17 Batch mode 14 Black white copy 25 Border erase 58 C Center border erase 59 Center erase 59 Change stamp position 62 65 style of date 65 Changing number of sets 4...

Page 127: ...ize paper 21 Covers Front 69 front back 70 Create margin mode 35 D Date stamp 104 change position 65 change style 65 changing colour 65 colour 105 font 104 position 105 position and original orientation 64 size 104 stamp format 104 superimpose 105 Deleting program 83 registered contents 75 user colours 81 user stamp 64 Direction fixed paper 11 Display panel 5 Document server 72 E Edit 94 101 1 sid...

Page 128: ...77 Image repeat specified area repeat 53 whole area repeat 52 Indicators 5 Input Output 96 105 auto sort 105 letterhead setting 106 memory full auto scan restart 105 rotate sort auto paper continue 105 SADF auto reset 105 select stack function 106 switch to batch SADF 105 Interrupt key 5 K Key Adjust Program Color 5 check modes 5 clear modes 5 clear stop 6 energy saver 5 interrupt 5 program 5 samp...

Page 129: ...00 priority setting reduce 100 ratio for create margin 100 reduce 100 R E priority 100 shortcut R E 100 Rotated copy 33 S SADF mode 15 Sample copy 41 Sample copy key 6 Sampling user colours 81 Screen contrast knob 5 Selecting colour mode 25 copy paper 31 original type setting 30 Series copies book 1 sided 51 book 2 sided 51 front back 2 sided 51 sharp key 6 Single colour copy 25 Size 104 Sizes det...

Page 130: ...xt 30 Text Photo 30 Tone original remains 99 Troubleshooting 85 memory is full 90 you cannot make clear copies 87 you cannot make copies as you want 88 your machine does not operate as you want 85 Two colour copy 25 Types of duplex copies iv U User colour 79 User stamp 104 changing colour 62 changing position 62 colours 104 delete 64 format 104 position 104 position and original orientation 61 pro...

Reviews: