Page
33
/
45
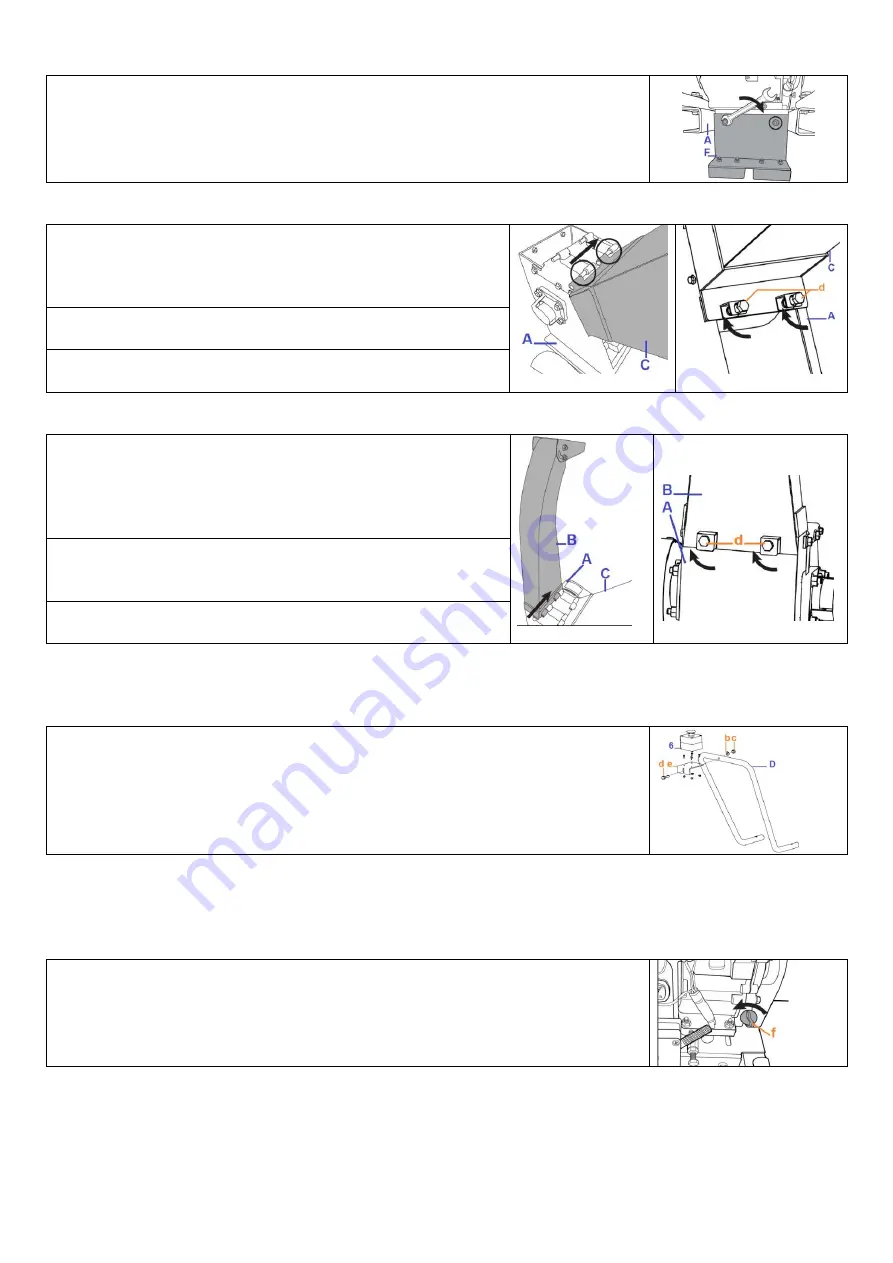
4.3.3- Foot Mounting Bracket
Align the holes of the foot mounting bracket (F) with the holes in the base frame
(A).
Use fasteners (G), to secure in place (two bolts & nuts).
Using a 12mm spanner to securely tighten both nuts.
4.3.4- Hopper
1. Place the hopper (C) in position on the base frame (A) above
the cutting blades opening.
Slide it across so that the pins of the frame engage the hinges
on the hopper (C).
2. On the lower side of the hopper, align the two holes of the
hopper frame with the holes of the main frame (A).
3. Tighten the two bolts (d), safely with the 13mm wrench
clockwise.
4.3.5- Discharge chute
1. Place the discharge chute (B) in position on the rear of the
base frame (A).
Slide it across so that the pins of the frame engage the hinges
on the discharge chute (B).
2. Check the lower side of discharge chute (B), so that the two
holes are aligned with the holes in the frame.
3. Tighten the two bolts (d) safely with the 13mm wrench
clockwise.
IMPORTANT!
Ensure the hopper (C) and discharge chute (B) are fitted and secured with bolts
4.3.6- Emergency stop button
1. Mount switch box (6) on the support plate (e) with provided screws.
2. Mount support plate (e) on the handle (D) with provided fasteners (d-bolt;
b-washer; c-nut)
4.4- Adding Oil
Note: The wood chipper is shipped without oil and must be filled before starting.
Oil tank capacity: for mod. 196cc: 600ml, for mod. 389cc: 1100ml.
1. Be sure to check that the wood chipper is on a flat levelled surface with the
engine stopped.
2. Remove the oil filler cap (f) and wipe the dipstick with a clean rag.
Check the oil level by inserting the dipstick in the filler hole without screwing it in
and then removing it again.
Summary of Contents for Ribiland PRBVB196TH
Page 45: ...Page 45 45...


