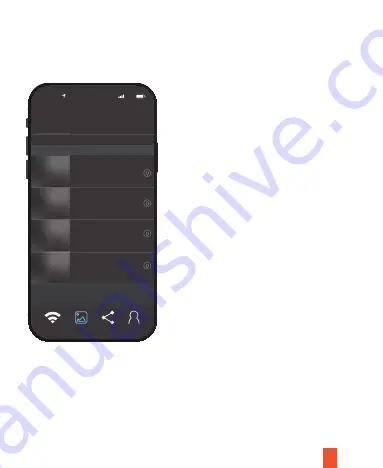
background image

23

4.


Click the 

Saved 

button on the bottom to check the video files and pictures. You 

may simply click the file to play it online or download it to your mobile phone as 
shown in the picture:

13/09/2020

20200913165525_000049…

13/09/2020  16:55:48  33.03 MB

20200913165525_000049…

13/09/2020  16:55:48  33.03 MB

20200913165525_000049…

13/09/2020  16:55:48  33.03 MB

20200913165525_000049…

13/09/2020  16:55:48  33.03 MB

LTE

10:44

Videos

Pictures

Connect

Saved

Shared

Profile

Summary of Contents for S1 Pro

Page 1: ...S1 Pro User Manual The information in this manual is subject to change without notice www rexingusa com ...

Page 2: ...V If a charge voltage greater than 12V is found contact your dealer or our service center to replace it with an applicable charger An OEM charger must be used Parking Monitor Do not enable this function during driving When it is enabled repeated start stop recording may affect the integrity of your video Do not install the device within the range that could be impacted by airbag or in a location t...

Page 3: ... be expose to an overheat environment such as direct sunlight or flame Never remove strike or squeeze the battery or put it in fire Stop using the battery if it is ballooned warped leaking or shows any other visible signs of damage Warning ...

Page 4: ...it please contact us You can reach us via Our support team will respond you as soon as possible https www facebook com rexingusa https www instagram com rexingdashcam https www rexingusa com support registration 3 Overview Thank you for choosing REXING Check us out here Facebook Instagram Site Product Support care rexingusa com 877 740 8004 ...

Page 5: ...al is subject to change without notice www rexingusa com 1 3 2 4 5 6 7 8 1 Rexing S1 Pro Dash Camera 2 Rear Camera with Extension Cable 20ft 3 Free Smart Hardwire Kit 4 GPS Logger 5 3M Adhesive Mount 6 USB Computer Cable 7 Cable Management Tool 8 Quick Start Guide 4 ...

Page 6: ...Table of Contents Camera Overview Installation Basic Operations Mobile Connection GPS Player Product Specifications 6 9 12 20 27 30 General Troubleshooting 31 Warranty and Support 32 5 ...

Page 7: ...6 Power Cord Connection Port 7 Rearview Camera Connection Port 8 Reset Pinhole GPS Socket USB 5V Socket Smart Hardwire Kit Socket Rearview Camera Socket IR light Cabin Camera Front Camera 6 7 8 1 2 3 4 5 Note GPS is an optional feature needs to connect to the included GPS Logger The S1 Pro does not support memory expansion ...

Page 8: ... 3 The button is defined for page up in menu setup and playback mode 4 During playback press the button shortly to play fast rewind Record Up MIC Button 1 Press this button to start the device Depress it for 3 seconds to power off the device 2 In power on state press the button shortly to turn off on screen backlight Power Button 1 This button is defined for page down in menu setup and playback mo...

Page 9: ...tton to switch Wi Fi on off 4 In photography mode or playback mode press the button to take a picture or play back a file OK Button Power charging port USB data cable port USB Port Power cable connection port Power Port Rearview Camera Connection Port Rearview Camera Connection Port If the system crashes use a pin to reset the system Reset Pinhole 8 ...

Page 10: ...ce to the cigarette lighter through the car charger 9 Installation The charger extension cable can be wired along the edge of the windshield during installation The optional rearview camera should be mounted on the rear windshield of the car Pay attention to its orientation during installation It can be wired against or above the interior s headliner Plug the rearview camera connector into its rea...

Page 11: ...earview Camera Wire Routing Illustration as shown below Optimum Installation Location Power Cable Wiring Location 10 Connected to rearview camera Connected to reversing light A B Installation Instructions ...

Page 12: ...by using the on board charger power supply Make sure the device is good condition prior to installation Please contact our service center in case of any questions 11 Connect the dash cam to the car charger after installation Starting the car engine will start the device Due to unstable voltages caused by starting the car engine a voltage fluctuation in some vehicles may be especially obvious If a ...

Page 13: ... setting the device s system time Video Resolution FHDP30 FHDP30 FHDP30 HDP30 Note Main Interface System Setup I Open the Setup Menu Select Record on the main menu Press the OK Button to start pause video recording of the device or press the Record Button to pause start video recording II Video Mode Setup Basic Operations Wifi Record Playback Parking Power Volt Settings 1 Loop Recording 1 2 or 3 m...

Page 14: ...3 1 0 2 3 1 3 0 0 1 3 2 3 1 0 4 3 5 3 6 DVR Audio Off On 7 Date Stamp Off On To obtain a valid date and time record to be used as evidence for a car accident please set the correct time and date before using the device Note Select Record on the main menu Press the OK Button to start pause video recording of the device or press the Record Button to pause start video recording III System Menu Setup ...

Page 15: ...evice will keep recording as normal 3 Key Tone Off On 4 Language Setup English French German Spanish Italian Portuguese Simplified Chinese Japanese Traditional Chinese and Russian 5 Frequency 50HZ 60HZ 6 IR Light Mode Auto On Off 7 Default Setup Cancel Confirm When Confirm is selected customer settings will be changed and the system will be restored to its default values 8 Version Determine the cu...

Page 16: ...e OK Button to save your setup selections and return to the previous menu Press the Menu Button to exit setup when complete 1 Picture Taking Method Single Shot 2s Timer 5s Timer 10s Timer 2 Resolution 12M 4032 x 3024 10M 3648 x 2736 8M 3264 x 2448 5M 2592 x 1944 3M 2048 x 1536 VGA 640 x 480 3 Continuous Capture Off On When continuous capture is enabled 3 pictures are taken consecutively 4 Picture ...

Page 17: ...up menu options The following operations are available II Playback When browsing files video files are presented with an icon on screen Press the OK Button to play the video and quickly press it again to stop playback 16 8 ISO Auto 100 200 400 9 Exposure Compensation 5 3 4 3 1 0 2 3 1 3 0 0 1 3 2 3 1 0 4 3 5 3 10 Anti Shock Off On 11 Quick Preview Off 2s 5s After taking a picture time setting will...

Page 18: ... and save unprotected files A locked file cannot be overwritten Lock Remove the protective feature of a protected file Simply delete the file once it is unlocked When using the USB cable to connect with a computer the UP and DOWN buttons can be used to select options in the pop up menu Use the OK button to confirm your selection Unlock 17 1 Mass Storage Can be used to play a file in the device or ...

Page 19: ...he device when the car engine is turned off for parking For example 11 8V means that the device automatically switches off when the detected vehicle battery voltage drops to less than 11 8V II Monitoring Mode In the monitoring mode menu setup on the main page when a smart hardwire connection is detected turning on the parking monitor will enable modes Super Night Scene and Time Lapse video monitor...

Page 20: ...y in parking monitoring mode is recorded at sixty frames per minute This function allows for clearer video during low light or night conditions 3 Parking Monitor In parking mode when a shock impact is detected recording will start and last for 1 minute Monitoring duration options include 12h 24h 48h Note 19 Wifi Record Playback Parking Power Volt Settings M OK M OK Time Lapse video monitoring Park...

Page 21: ...o a mobile phone via Wi Fi it can be controlled through the Mobile App 1 Please go to RexingUSA website and download the app for Android or Apple iOS systems Mobile Connection Basic Operations 20 I Download the Rexing Connect App ...

Page 22: ... is necessary to access Wi Fi setup Find network and input the password Later connections require no password input III Wi Fi Connection App Store 10 44 Allow Rexing Connect to use your location Don t Allow Allow While Using Ap Allow Once If you don t allow it you won t be able to show your location in the shared activity Please click OK to allow access Precise on Connect Saved Shared Profile ...

Page 23: ...d SSID E89_ Input the password for your connection The default password for the device is 12345678 3 Click Connect to complete your connection When successful a connection is established between the mobile phone and camera the Wi Fi icon on the device s screen will turn from white to green To view the camera record images simply return to the app Connect Saved Shared Profile M OK 4K Video Resoluti...

Page 24: ...or download it to your mobile phone as shown in the picture 13 09 2020 20200913165525_000049 13 09 2020 16 55 48 33 03 MB 20200913165525_000049 13 09 2020 16 55 48 33 03 MB 20200913165525_000049 13 09 2020 16 55 48 33 03 MB 20200913165525_000049 13 09 2020 16 55 48 33 03 MB LTE 10 44 Videos Pictures Connect Saved Shared Profile ...

Page 25: ...Stop Change View Switching to Photo Mode 12 56 20 To begin a new setup use the Settings menu shown below press this button to pause the recording before beginning a new setup Note IV App Overview 1 Press the Record Stop button to pause start recording ...

Page 26: ...picture Wi Fi Password Settings Audio Recording Date Stamp Loop Recording 1MIN LOW G sensor Sensitivity Format the memory card Video Resolution Firmware version T501AA 96663 4689 201 Reset to default settins LTE 10 44 This setting determines how force is needed to trigger an automatic file lock FHD 1080 P30 ...

Page 27: ...r product Note 26 3 Click the Photo button on the bottom to review photos 4 Click the Change View button on the top to toggle between camera views from the front camera cabin camera and rearview camera 5 Click the button Switch to Photo Mode in the middle to take a picture in real time 6 Click the button Record Stop on the top to quickly stop start the video and audio recordings ...

Page 28: ... and the back side of GPS module applied with double sided adhesive tape facing inward or downward so as to ensure an effective satellite signal reception as shown in the picture I Install a GPS Module Installation Instructions Power supply wiring location Optimum Instalation Location Optimum location for GPS module Optimum location for GPS module ...

Page 29: ...ktop Double click to use it as shown below II Installation and Operation of GPS Player LUCKY PLAYER setup en LUCKY p l a y e r ADD REMOVE N 0 0 0 00 E 0 0 0 00 Max Speed 0km h Average Speed 0km h km h Total Distance 0km h Y 0 00 X 0 00 Z 0 00 LUCKY p l a y e r Lucky Player LUCKY p l a y e r Map Archive Auto Picture In Picture Help View Map 00 00 00 LUCKY p l a y e r Map To assist ensure security p...

Page 30: ...e to the player window The computer is connected to the Internet while the video is being played The player shows a map with GPS tracking information while driving as shown below ADD ADD REMOVE N 0 0 0 00 E 0 0 0 00 Max Speed 58 km h Average Speed 20 km h km h Total Distance 0 7km h Y 0 00 X 0 00 Z 0 00 LUCKY p l a y e r Lucky Player LUCKY p l a y e r Map Archive Auto Picture In Picture Help View ...

Page 31: ...uct Note 30 Product Specifications Built in SDRAM Built in Speaker Built in MIC 3 0 TFT Display 1080P 1080P 1080P Video Resolution Support 1 2 and 3 minutes Loop Recording Yes Parking Monitor Yes G Sensor H 264 Video format JPG Picture format 4 F 150 F Operating Temperature DC 5V 1500mA Input Current ...

Page 32: ...ate Plug in the charger to charge the battery Plug in the card If the card is not recognized unplug and plug it in again or clean any debris substances from the card contacts or back up data and format the card Delete unnecessary files or format the card after backup MicroSD card is not inserted or recognized by the device MicroSD card is full MicroSD card contains images taken by another vehicle ...

Page 33: ...egarding your product please do not hesitate to contact us at care rexingusa com or call us at 877 740 8004 Queries are typically answered within 12 24 hours Support Rexing is firmly committed to always improving our products services and user experience If you have any thoughts on how we can do even better we welcome your constructive feedback and suggestions Your opinion matters Connect with us ...

Page 34: ... part 15 of the FCC Rules Operation is subject to the following two conditions 1 This device may not cause harmful interference and 2 this device must accept any interference received including interference that may cause undesired operation ...

Reviews: