Revo RE16DVR2 Setup Manual Download Page 26

24                                                                                                                                                  V1.0 


 Description

: Enter the DVR name to use in the REVO Mobile program. 

 Use DVRNS

: If the DVR uses the EZLink function, enable the 

Use DVRNS

 option.  

You can set up the information for the DVRNS server by tapping the 

Settings

 button 

in the default menu. 

 Address

Watch Port

Search Port

Audio Port

: Enter the IP address and port number 

of the DVR.  If the DVR uses the EZLink function, check that the 

Use DVRNS

 option 

is enabled and enter the DVR name registered on the DVRNS server instead of the IP 
address.  The name you enter should match the name set during the EZLink setup on 
the DVR. 


User ID, Password

: Enter the user ID and password.  The user ID and password you 

enter should match the user ID and password used to log on to the DVR.


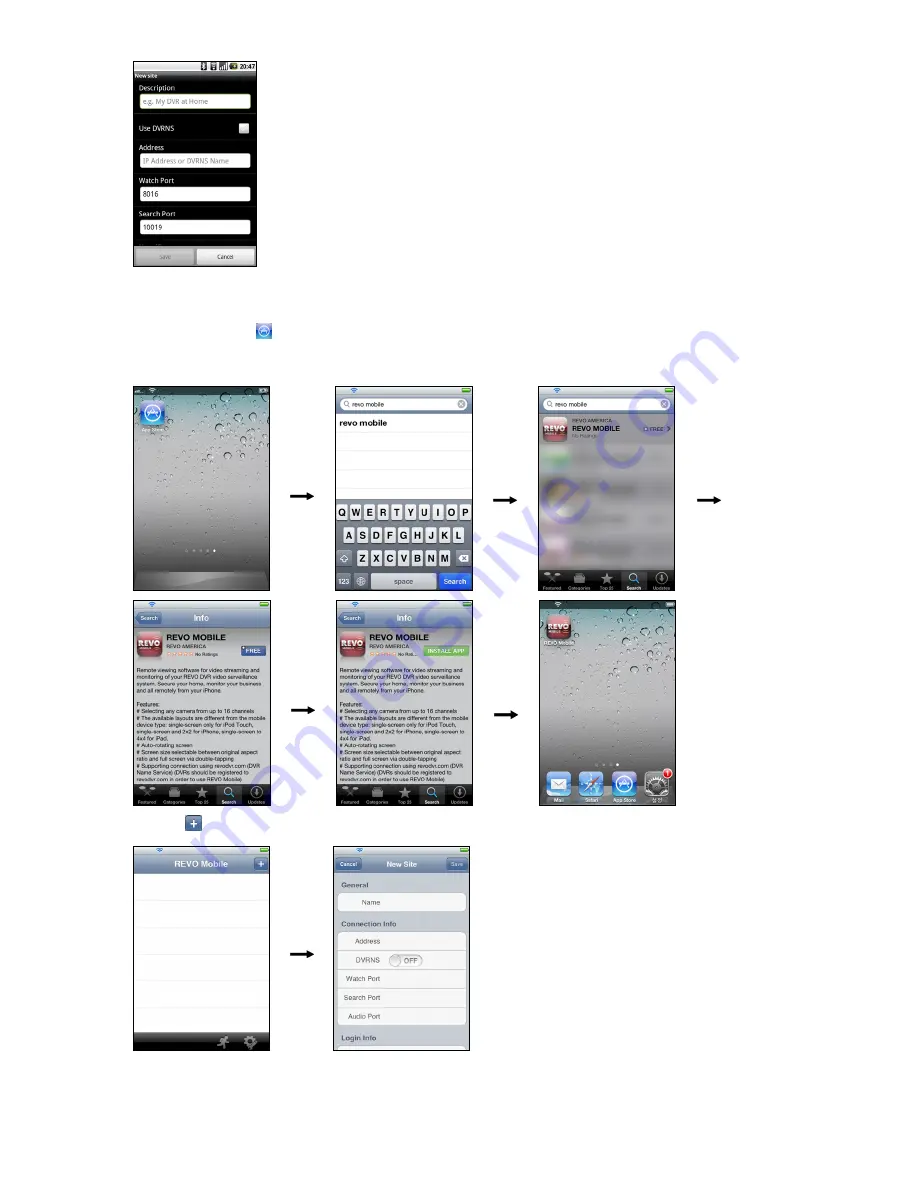
iOS-based mobile devices 

 
1.


Run the App Store   application in the device. 

2.


Enter 

REVO Mobile

 in the search field of the App Store application. 

3.


Install the REVO Mobile program and run the program. 


4.


Tap the   button and enter the DVR information to register the DVR. 


 General

: Enter the DVR name to use in the REVO 

Mobile program. 

 Connection Info

: Enter the IP address and port 

number of the DVR.  If the DVR uses the EZLink 
function, enable the 

DVRNS

 option and enter the 

DVR name registered on the DVRNS server instead 
of the IP address.  The name you enter should match 
the name set during the EZLink setup on the DVR. 


Login Info

: Enter the user ID and password set on 

the DVR.  The user ID and password you enter should 
match the user ID and password used to log on to 
the DVR.


Summary of Contents for RE16DVR2

Page 1: ......

Page 2: ......

Page 3: ...orresponding source code from us See the Open Source Guide on the software CD OpenSourceGuide OpenSourceGuide pdf Warning WARNING RISK OF ELECTRIC SHOCK DO NOT OPEN WARNING TO REDUCE THE RISK OF ELECT...

Page 4: ...our equipment dealer or local power company 9 Power Cords Operator or installer must remove power and TNV connections before handling the equipment 10 Lightning For added protection for this equipment...

Page 5: ...uipment is not compromised 22 Mechanical Loading Mounting of the equipment in the rack should be such that a hazardous condition is not caused by uneven mechanical loading 23 Circuit Overloading Consi...

Page 6: ...Input POS Interface ATM Interface Connectors Video Input Composite 16 BNC Video Loop Composite 16 BNC Auto Terminating Monitor Output HDMI 1 HDMI VGA 1 VGA SPOT Composite 1 BNC Audio In 4 RCA connect...

Page 7: ...tory Reset Switch 9 Video Out 9 Network Port 9 Power Cord Connector 9 Configuration 10 Front Panel Buttons and LEDs 10 IR Remote Control 12 Turning on the Power 12 Shutting down the System 12 Initial...

Page 8: ...6...

Page 9: ...would like to connect your video source to another device you can use the Loop BNC connectors NOTE The Loop BNC connectors are auto terminated Do NOT connect a cable to the Loop BNC unless it is conne...

Page 10: ...ally Closed or C and NO Normally Open connectors NC NO is a relay output which sinks 2A 125VAC and 1A 30VDC ARI Alarm Reset In An external signal to the Alarm Reset In can be used to reset both the Al...

Page 11: ...or use Power Cord Connector WARNING ROUTE POWER CORDS SO THAT THEY ARE NOT A TRIPPING HAZARD MAKE CERTAIN THE POWER CORD WILL NOT BE PINCHED OR ABRADED BY FURNITURE DO NOT INSTALL POWER CORDS UNDER RU...

Page 12: ...1 zooms in the screen and the button 2 zooms out the screen pressing the button 3 focuses near and button 4 focuses far and pressing the button 5 moves to the preset and button 6 saves the preset HDD...

Page 13: ...ying back at the same time MENU CAMEO Button In the Live Monitoring mode and Search mode pressing the MENU CAMEO button displays the menu icons on the right edge of the screen Pressing the button agai...

Page 14: ...me BOOKMARK Button on Remote Control When in the playback mode pressing the BOOKMARK button adds the current playback point to the bookmark list or moves to the registered bookmark point Turning on th...

Page 15: ...System Device Record Network Event Notification Camera Display System Setup Record Setup Event Setup Camera Setup General General Motion General Date Time Schedule Alarm In PTZ User Pre Event Video Lo...

Page 16: ...and select the Next button to start the selected setup wizard If you selected the Quick wizard selecting the Next button starts the Quick Setup Wizard Date Time Setup Date Set the system date and sele...

Page 17: ...lect the desired video quality profile from Higher Video Quality Priority Profile Standard Recording Profile Longer Recording Time Priority Profile Select the Finish button to finish the Quick Setup W...

Page 18: ...guration you selected Use DSL PPPoE Setup Selecting the box allows you to set up the DSL network Entering the ID and password for DSL connection is required EZLink Setup DVR Name Enter the DVR name to...

Page 19: ...account if you want to use your existing Dashboard account REVO Dashboard Setup III Enter the User ID and Password for your Dashboard account And then register the DVR you want to access by entering t...

Page 20: ...ing will allow you to select the monitor from Main Monitor and Spot Monitor Display Selecting displays the Display Menu Full Screen Selecting and choosing the camera number button displays the selecte...

Page 21: ...stem inputs and storage Searching Video While in the search mode pressing the MENU button displays the following Search menu on the right edge of the screen Pressing the MENU button again hides the me...

Page 22: ...reen Audio Selecting Audio toggles audio playback On and Off Show Hide Text In Selecting Show Text In or Hide Text In shows or hides the text in data on the screen if the video was recorded with text...

Page 23: ...ame registered on the DVRNS server Select between the REMOTE WATCH Web monitoring and REMOTE SEARCH Web search modes Entering ID and PASSWORD and clicking the LOGIN button logs in using the selected m...

Page 24: ...ter a screen appears asking you to upgrade the software In this case you are required to upgrade the software according to the instructions in the screen Insert the installation CD and install the REV...

Page 25: ...n in the device 2 Enter REVO Mobile in the search field of the Play Store Google Play application 3 Install the REVO Mobile program and run the program 4 Run the REVO Mobile program Push the Menu butt...

Page 26: ...assword you enter should match the user ID and password used to log on to the DVR iOS based mobile devices 1 Run the App Store application in the device 2 Enter REVO Mobile in the search field of the...

Reviews: