background image

33

Intera 3.2

Training and Managing Tasks

Task Gallery 

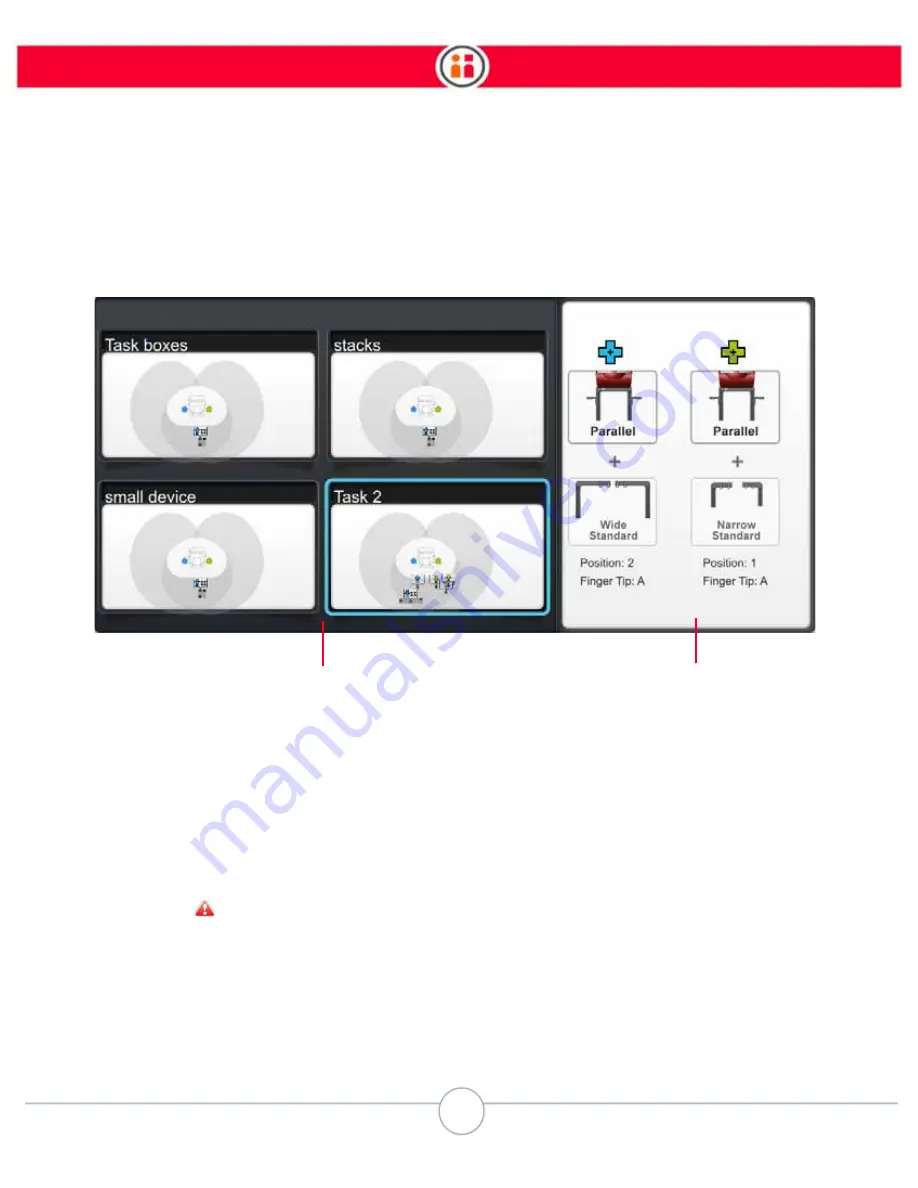
The Task Gallery is accessible from the main screen, when you select the Tasks button from the 
button bar. Use the task gallery to view the details of and select, copy, delete a trained task. You 
can also delete all the tasks on the robot from here. 

1. Displays a visual list of all saved tasks, each with the name of the task and a 

small preview image of the task map. 

Note: 

If a task name exceeds 21 characters, only the first thirteen and last thirteen 

characters of the name, separated by ellipses, will appear. On the Task Map, the task 
name will trail off on either side. 

2. Displays details about the selected task.

Gripper specifics

 - This symbol indicates a mismatch between the installed gripper and 

the one used in the viewed task. 

Note: 

The task gallery cannot be empty. If you delete all tasks, an empty task is created 

automatically. 

1

2

Summary of Contents for Baxter

Page 1: ...user guide for intera 3 2 software ...

Page 2: ...t used in industrial environments For additional information reference Baxter s Safety Documentation http www rethinkrobot ics com resources safety Baxter s maximum transit speed is now controlled to 2 meters per second 2 m s Disclaimer Every effort is made to ensure that the information in this manual is accurate This publication could include technical or typographical errors or other inaccuraci...

Page 3: ...the Screens 18 Moving the Arms 19 Grasping Objects 20 How Baxter Communicates 21 Eye Expressions 21 Attention Ring 22 Condition Ring 23 Confused Face Messages 24 Light Bulb Tips 24 Main Screen 25 Turning On Baxter 26 Training and Managing Tasks 27 Getting to Know Intera 27 Tasks Sub tasks and Actions 28 The Difference Between Vertical and Non vertical Tasks 29 The Task Map 29 Task Gallery 33 Train...

Page 4: ...o an Action Advanced Settings Screen 71 Running Tasks 74 Create a Path for Baxter 75 Paths Waypoints Poses 75 How to Create a Custom Path for Baxter 76 Best Practices Creating Waypoints 78 How to Practice a Path 78 How to Modify a Waypoint 80 How to Modify a Path includes Practice and Retrain 82 Motion Presets 89 How to Change Motion Presets at the Task Arm Level 89 How to Change the Motion Preset...

Page 5: ...arts from One Conveyor to Another 125 Putting parts into fixtures that require precision 125 Signals 127 Working with Signals 127 Internal Signals 129 Creating Signals 132 Assigning Signals 133 Maintaining and Supporting Baxter 136 Powering Down Baxter 136 Maintaining Baxter 136 Cleaning Baxter 136 Replacing the Air Filters 136 Upgrading Software 137 Supporting Baxter 137 Helping Baxter When It Is...

Page 6: ... 157 Task Element Details 159 Signals 160 TASK 160 SUBTASK 162 GRIPPING ACTIONS PICK PLACE 162 OTHER ACTIONS HOLD 164 FAQs Signals and Their Definitions 164 Appendix E Transfer Tasks from One Baxter to Another 168 How to Export Tasks from a Robot 168 How to Import Tasks to a Robot 170 Appendix F Tips Best Practices 172 Training Actions 172 Vertical and Non Vertical Tasks 172 Workspace and Robot Jo...

Page 7: ...5 Intera 3 2 Contents Appendix G Safety Mats 177 Appendix H Support Warranty 179 ...

Page 8: ...uld be calibrated see Calibrating the Arms on page 138 and its grippers attached per the instructions in the gripper kit and configured see Appendix A Configuring Grippers on page 143 before you train a Pick and Place task Otherwise Baxter s arm may pull or miss Picks when performing tasks Power On Baxter To turn Baxter on press and release the white power button on the lower left back of the robo...

Page 9: ...arm easily Release the training cuff and the arm becomes semi rigid again Note that the arm stays in the location and orientation it was in when you stopped squeezing the training cuff The location and orientation of the arm its shoulder elbow wrist and so on is called its pose THE NAVIGATOR On both of Baxter s arms and on either side of Baxter s torso is the Navigator a set of buttons and a knob ...

Page 10: ...e like the pick and place you re about to create or much more complicated involving both of Baxter s arms moving in a coordinated fashion to and from multiple pick and place locations holding a variety of poses and sending and receiving signals from other machines and devices Back Button Scroll Knob OK Button Rethink button ...

Page 11: ...oll knob to make a selection as pressing the OK button or sometimes press OK on the Navigator Generally you press the Back button on the Navigator when you want to return to the previous screen Scroll the knob to reveal the main button bar and stop scrolling when you reach the New Task icon as shown here Press OK on the Navigator Baxter displays the Task Map ...

Page 12: ...ured configure them now otherwise the gripper may not work See Appendix A Configuring Grippers on page 143 Place an object on the work surface for Baxter to grasp Remember For you to train a pick and place Baxter must have at least one arm with a properly working gripper attached If not follow the gripper kit instructions and install a gripper now If your Baxter has parallel electric grippers inst...

Page 13: ...n page 28 Still squeezing the training cuff move the arm to the location where you want Baxter to place the object then press the Grasp button again to release the object Baxter nods and releases the object The Task Map displays the icon for a Place along with sub task number and letter Reset the object to its original position select Run or Reset and watch Baxter perform the task You just trained...

Page 14: ...robot Follow the instructions to assemble the pedestal if ordered and attach Baxter to the pedestal or alternate work surface Follow the instructions included with the gripper kit to install a gripper If you misplace these documents refer to our wiki mfg rethinkrobotics com wiki Support_Resources Accessories Included accessories Power cord E stop button and 10 foot cable Optional accessories Rethi...

Page 15: ...are Front View 1 Condition ring 2 Attention ring 3 Display 4 Torso 5 Navigator one on each forearm 6 Lower front panel 7 Training cuff shown with parallel gripper 8 Training cuff shown with vacuum gripper 9 Pedestal optional 1 3 2 6 8 7 9 5 5 4 ...

Page 16: ...pport with questions about other types of grippers After installing or altering a gripper see Appendix A Configuring Grippers on page 143 to configure it Note that installation and alteration instructions ship with the gripper kit Note Custom finger lengths are supported and can be entered into the software but custom widths are not currently supported by the software 1 2 3 5 1 Navigator one on ea...

Page 17: ...15 Intera 3 2 Getting to Know Baxter ELECTRIC PARALLEL GRIPPER 1 Training cuff 2 Gripper body 3 Fingers 4 Finger positions 2 1 3 4 ...

Page 18: ...16 Intera 3 2 Getting to Know Baxter VACUUM CUP GRIPPER 1 Training cuff 2 Gripper body 3 Pneumatic tube fitting 4 Vacuum cup 4 1 2 3 ...

Page 19: ... the cuff to move the robot s arm When this switch is squeezed the blue indicator on the arm s navigator button lights up Grasp button Press to toggle a parallel gripper open or closed or a vacuum gripper on or off Action button Press to select items on the display screen Create waypoints Hold actions select copy or move actions on the task map create a new subtask add create landmarks outline a v...

Page 20: ...Knob Scroll the knob to move between on screen options Press the knob OK to select an option OK indicator light When the action button on the cuff or the OK button on the navigator is pressed the white indicator around the knob lights up Rethink button Press to display options for the current screen Training cuff indicator When the switch on the cuff is squeezed the blue indicators along the top a...

Page 21: ...uff releases the tension and resistance in the arm making it easier to manipulate With its seven degrees of freedom an incredible amount of flexibility Baxter enhances arm stability by attempting to fix its elbow in position whenever the lower arm is moved Note When the switch is pressed the blue indicator lights illuminate on the corresponding navigators on the arm and torso Training cuff switch ...

Page 22: ...e elbow By design the elbow 2 will try to maintain its current height and will spring back if you do not actively reset it While squeezing the cuff move the elbow to the desired position Continue to hold the elbow at the new location and release the cuff This will reset the elbow at the new position To grasp an object Position the gripper over the object press Grasp To release an object With an ob...

Page 23: ... Baxter also responds to touch on a navigator or a training cuff it stops moving and turns its head in the direction of contact on any of its primary touch points Eye Expressions Baxter displays one of six eye expressions in response to what it is doing or what it senses happening in its environment Neutral Concentrating Confused Surprised Sad Sleeping ...

Page 24: ...omeone has entered its space currently this only happens when a safety mat is connected and stepped on Baxter also automatically slows its movement Attention Ring The attention ring lights appear in clusters of two or three when Baxter detects movement When Baxter is confused the yellow lights in the ring appear and flash simultaneously Attention ring ...

Page 25: ...olor and Pattern What it Means Solid green Baxter is running a task Slow pulsing green Baxter is either idle or being trained by a user Solid yellow Baxter is confused and needs user assistance Slow blinking yellow Baxter is in sleep mode its motors are disabled Fast blinking red Baxter reports an error Condition ring ...

Page 26: ... of possible explanations and solutions Light Bulb Tips When you see a light bulb symbol on a screen that means there is a tip or tips on how to use that functionality Select the light bulb to display the tip These tips are available on the Modify Waypoints Screen the Advanced Screen and the Action Practice screens ...

Page 27: ...te a task Tasks opens the task gallery a visual list of existing saved tasks See Task Gallery on page 33 Settings open Baxter administration and advanced options Power open Baxter power options Sleep Restart Shutdown Lock Unlock 4 Baxter eyes Baxter uses eye expressions to communicate its current state To navigate a button bar Rotate the knob to scroll referred to as scrolling through options When...

Page 28: ...ower button on the lower left back of the robot see Back View on page 14 for the location The lights on the head turn on and the main screen appears on the Baxter display IMPORTANT Never hold the power button down to shut down Baxter Just press and release the power button ...

Page 29: ...bot is trained to perform Sub task One or more actions that may be grouped together and performed in sequence Actions A Pick a Place or a Hold Approach Point The pose that immediately precedes an action Retract Point The pose that immediately follows an action Task map A top down view of the robot s workspace often known as the work envelope Path The arm movement between two actions Waypoint A loc...

Page 30: ... Map will be labeled Pick 1A Hold 1B Hold 1C Place 1D Example of a subtask Place action with identifying labels Each arm functions independently by default and is able to learn its own unique sub tasks You can also train Baxter to coordinate sub tasks in the same location Each action has a location associated with it You can customize actions by Adding count Baxter picks or places a fixed number o...

Page 31: ...ence between vertical and non vertical tasks as of Intera software 3 is that vision search is available only for vertical Picks The camera does not operate for non vertical tasks There are no performance differences between the two types of tasks Non vertical actions are identified by a dot symbol These symbols show up on the Task Map when an action is highlighted or on the action s modify panel E...

Page 32: ... to operate within the same workspace Note The robot s arms move within a sphere defined by the center point of the shoulder axis and the full reach of the arm The actual reach of the arm at any given location is affected by the height of the robot s arm and angles of the joints Actions are therefore limited at different heights and joint angles The approach and retract distances for an Action may...

Page 33: ...and Managing Tasks THE TASK MAP LABELS 1 Baxter workspace 2 Right arm Place action 3 Right hand location 4 Right arm Pick action 5 Left arm Place action 6 Task name 7 Left hand location 8 Left arm Pick action 1 6 2 3 8 4 5 7 ...

Page 34: ...ent task Order Open the task order screen Rename Modify the name of the task On New Baxter gives tasks a default name with a numeric suffix Tip Entering a unique descriptive name will help you to more easily identify the task in the task gallery I O Open the signals gallery Landmark Open the landmark gallery See Robot Positioning System on page 109 Note Baxter automatically saves tasks as they are...

Page 35: ...ks each with the name of the task and a small preview image of the task map Note If a task name exceeds 21 characters only the first thirteen and last thirteen characters of the name separated by ellipses will appear On the Task Map the task name will trail off on either side 2 Displays details about the selected task Gripper specifics This symbol indicates a mismatch between the installed gripper...

Page 36: ... task stored If only one task exists and it is deleted Baxter will create a new empty task IMPORTANT Once the deletion is confirmed the deleted task cannot be restored Copy Create a new task based on the current one New Create a new empty task and open the task map To delete all the tasks on the robot press the Rethink button from the task gallery Baxter displays buttons that allow you to create a...

Page 37: ... using a vacuum gripper place the suction cup on top of the object 4 Press the Grasp button on the training cuff Baxter grasps the object 5 Move the arm to the location where you want to place the object 6 Press the Grasp button Baxter releases the object 7 Press Back to open the Main Button Bar then select Reset or Run to perform the task Tip If Baxter s wrist is not pointing straight down when p...

Page 38: ...n Important Note Vision only works for vertical Picks Picks are set to non vertical by default but you can take a Pick action that is already close to vertical and make it truly verti cal using the Snap to Vertical check box 1 Highlight the nearly vertical Pick on the Task Map and press OK on the Navigator Baxter displays the Pick s Modify panel 2 Scroll to the icon and press OK 3 Select the Advan...

Page 39: ...bright diffused lighting with minimal shadows Shadows in the work area including those created by the object degrade Baxter s ability to see an object So does glare from the object or the work surface In general the higher the contrast between the object and the work surface the better Although when trying to see texture on a white or light colored object you may need to lower contrast video gain ...

Page 40: ...ee Customizing the Size of a Visual Search Area on page 64 5 Select the Train button on the object learning screen and press OK Baxter moves to the Pick location briefly grabs the object to line it up with its camera then takes a series of pictures of the object from several heights A series of images of the object are displayed in order from closest to furthest view ...

Page 41: ...shooting tips on page 44 You can also adjust the camera settings See Camera Settings on page 45 7 If that doesn t work retrain the grippers Go to Settings Hardware Configure End Effectors image below Retraining the grippers is a process in which Baxter learns what the grippers look like so they can be ignored while looking for objects When retraining ensure all blue or yellow pixels are removed fr...

Page 42: ...om the vision screen press OK to select the picture that best represents the shape of the object then press the Next button Baxter takes more pictures of the object from various locations to gather more data and refine its perception of the object ...

Page 43: ...41 Intera 3 2 Training and Managing Tasks When done Baxter displays a live view of the object on the Test and Select Model screen ...

Page 44: ...figure above that is a valid alignment for gripping Baxter can pick up the object If the arrow is not straight up and or the circle is not completely yellow as in the above figure Bax ter may not be able to grip the object or it will have to turn its wrist during the Pick in order to grip the object You may play with the placement and orientation of the object at this stage in live view to see how...

Page 45: ...ommended model of the object with a star symbol Other possible models are also displayed In general you will want to use Baxter s recom mended model but advanced users or users looking for a particular type of model by which to rec ognize the object in question may want to select from the list ...

Page 46: ...und ary it considered when building the model etc 9 Select the best model The object is now trained TROUBLESHOOTING TIPS If Baxter did not locate the object or if the object is not correctly covered by the overlay try the fol lowing Adjust the lighting in the work area to improve the contrast and remove shadows around the object Change the contrast between the object and the work surface by placin...

Page 47: ...t Baxter adjust its own camera lighting settings automatically by selecting the Auto checkbox This capability is available per task per arm Note When you create a new task the current camera settings are inherited based on the previous open task How to Change the Lighting Settings for Baxter s Cameras 1 With a vertical pick highlighted on the Task Map press the Rethink button on the Navigator then...

Page 48: ...46 Intera 3 2 Training and Managing Tasks 1 Select the More Options icon 2 Select the camera settings button Baxter displays a live camera view ...

Page 49: ...ve camera image of the active camera s arm You can scroll among the slider the Auto option the Back button and the Done button If Auto is active the slider is not needed therefore it s not highlighted 1 Press OK to activate the slider 2 Scroll to move the slider left or right ...

Page 50: ...rolling to the right lets in more light This is also known as decreasing or increasing the gain respectively If you have trained an object using vision you can see in real time the effect your lighting adjust ments have on the object and on Baxter s detector the blue outline yellow circle red arrow indicators ...

Page 51: ...axter to pick a group of objects from a number of individual locations or place them in a number of individual locations e g when moving items from or into a segregated box or tray create an action group Note that just as Baxter remembers the order of individual actions that you train it to perform it will also remember the order of actions within an action group Also when you make changes to an a...

Page 52: ...rt a group Press OK 2 Scroll to and click Add on the Modify window 3 On the Task Map you ll see an icon labeled Add Move the robot s hand to the second desired location and press the action button You can also press OK but the action button is usually more convenient The added action is placed in the location 4 Repeat as many times as needed 5 When finished press the Back button Don t press OK to ...

Page 53: ... order rearrange and combine sub tasks coordinate sub tasks across arms and merge orphan Pick and Place actions into sub tasks To open the Task Order screen in the task map press the Rethink button and click Order 1 Displays a visual list of all sub tasks per arm numbered in order of execution and the corresponding Pick and Place actions including action groups within each sub task 2 Displays the ...

Page 54: ...ider variety of tasks See Motion Presets on page 89 Clear Actions Delete all the subtasks on one arm This helps you quickly retrain a task by allowing you to reset the subtasks on one arm while not affecting any signals task settings etc you have already set up While actions are cleared the following are retained signals and landmarks set up for the task task settings e g end effector settings cam...

Page 55: ...me of the selected sub task Reorder Reorder sub tasks for the selected arm You can also merge incomplete sub tasks Coordinate Order Across Arms Shift when a sub task begins on one arm in relation to a sub task on the other arm If the sub task is already coordinated this button becomes uncoordinate Combine Combine two sub tasks on one arm into one sub task The highlighted sub task moves into the su...

Page 56: ...2 Click the coordinate icon in the sub task order button bar A yellow line appears in the list of sub tasks on the other arm In this example the user wants to move the second sub task on the left green arm To name a sub task 1 From the Order screen highlight the sub task you want to name and press OK 2 Select Rename from the Sub task menu 3 Use the text wheel to create a name for the selected sub ...

Page 57: ...Tasks 3 Scroll to the right or left to move the yellow line until it appears after the sub task that the selected sub task should follow 4 Press OK After the sub tasks are coordinated a gray line appears between them to indicate the order ...

Page 58: ... sub task and Baxter will determine in which order to complete the sub tasks Baxter will combine two sub tasks next to each other on the same arm 1 Select the first sub task of the two 2 In the sub task order button bar click the combine icon The selected sub task merges with the one below it Note It is not possible to split combined sub tasks Changing Gripper Parameters Apply custom gripper setti...

Page 59: ...57 Intera 3 2 Training and Managing Tasks 3 Select the task bar at the top of the screen and press OK 4 Click the More Options icon 5 Click the End Effector Settings icon 6 Change the setting ...

Page 60: ...itially and back it off if the gripper is crushing things VACUUM CUP GRIPPER SETTINGS Blow off time sec Amount of time the vacuum gripper will blow air when releas ing an object Note that this feature requires additional plumbing Grip Detection Threshold Threshold in which the vacuum sensor detects a successful pick This setting is intended for custom vacuum cup grippers and or 3rd party vacuum cu...

Page 61: ...p Attempt Timeout sec Duration in which a vacuum end effector attempts to grip an object before stopping the attempt Change Number of Attempts to Pick an Object Baxter attempts to pick up a specific object by default twice If it misses the first time it will try again and if misses a second time Baxter will stop You can change this setting to be any number between 1 and 99 This setting also applie...

Page 62: ...60 Intera 3 2 Training and Managing Tasks 1 With the task highlighted on the Task Order screen select the advanced settings icon 2 Scroll to Attempts on the resulting menu and select it ...

Page 63: ...f stopping Baxter immediately if the object is dropped 5 Press the Return button on the Navigator to make the change for that task Note Although you can change this setting on either arm the setting applies to both arms You cannot assign different settings to each arm Further the setting applies to both drops and misses They are counted separately but the number to apply is specified once ...

Page 64: ...bject You want the task to include a count You need to adjust the entry exit height You want that part of the task to start based on a signal or send out a signal when finished Note You can only modify a Pick with the arm on which it was originally trained 1 Back Close the modify screen and return to the task map 2 Arm and action Indicates the arm being modified blue for right green for left and t...

Page 65: ...an action cannot be restored 8 Visual pick training Preview only If a Pick on the arm includes a trained object a small preview image of the object is displayed Teach Baxter to recognize an object see Training a Pick Using Vision on page 36 9 Add Features Adjust more details Add Count Specify the number of times an action should be completed Add Signal Specify which defined signal s you want to at...

Page 66: ... Modify panel for the Pick Choose Area Search and press OK 4 Place the arm at one of the corners of the search area and press the Action Button on the cuff The first point of the search area appears 5 Trace the outline of the search area by moving the arm pressing the Action Button at each corner of the search area Add as many points as necessary to complete the desired search area Note A visual s...

Page 67: ... area you define the faster Baxter is likely to perform the task Modifying a Place Action You will want to modify a Place To change a Place location To place a specific number of objects count To adjust the drop height To switch from a drop to a place or to change the drop height 1 Back Close the modify screen and return to the task map 2 Arm and action Indicates the arm being modified color coded...

Page 68: ...confirm the deletion Note Once deleted an action cannot be restored 8 Visual pick training Not applicable for a Place action hence grayed out 9 Add Features Display a sub menu where details of the Place can be adjusted specifically Add Count Specify the number of times an action should be completed Add Signal Specify which defined signal s you want to attach Add Landmark Create a landmark used by ...

Page 69: ...lignment 3 Press the action button or OK on the Navigator To copy a Place location 1 On the Modify screen click Copy The task map opens with a temporary ghost copy of the location displayed with the copy icon over it 2 Reposition the arm to drag the copy to the desired location Tip Remember to maintain correct arm pose alignment 3 Press OK on the cuff to make the copy 4 Repeat Steps 3 and 4 as man...

Page 70: ... 1 In the Modify screen click the Add Features icon 2 Click 123 3 Select the highlighted box Max Count If the count is currently unlimited click the box to un check it To make the current count unlimited click the box 4 On the count wheel scroll to the first number and press OK Repeat for each number up to a maximum of 9999 5 When all numbers are entered on the screen press OK 6 Click Done in the ...

Page 71: ...69 Intera 3 2 Training and Managing Tasks 1 Select the action on the Task Map 2 Scroll to the icon and press OK ...

Page 72: ...70 Intera 3 2 Training and Managing Tasks Baxter displays the modify screen 3 Scroll to the Modify button and press it Baxter displays the modify action screen ...

Page 73: ...to register the new pose location Note Instead of manually adjusting the pose you can also choose to more precisely nudge the pose after selecting the approach action or retract point See Nudge on page 99 for details 6 Press the back button when done You can have Baxter practice the new action by pressing the Practice button How to Make Detailed Modifications to an Action Advanced Settings Screen ...

Page 74: ...ar to the table In cases such as this use modify to adjust the magnitude and direction of Approach and Retract after setting them to 0 Go Slow Approach You can define here a point between the Approach pose and the Action pose where the arm slows down so the Action will be more precise This is also the point at which the end effector lines up with the Action Therefore if Go Slow is turned on for th...

Page 75: ... Gripper or when it arrives at the trained position whichever happens first The robot will only travel 2cm beyond the end point if it doesn t sense contact or reach the trained position This is intentional and is meant to ensure the robot doesn t inadvertently collide with other parts of the workspace Contact Electric Parallel Gripper only The robot will grip or release the part when it feels forc...

Page 76: ...define how Baxter s arm follows a path s waypoints Inherited means the preset is inherited from the task level See Motion Presets on page 89 Note When you see a light bulb symbol on the Advanced screen that means there is a tip or tips on how to use that functionality Select the light bulb to display the tip Running Tasks To run a task Click Run in the main button bar Press the Rethink button on t...

Page 77: ...m avoids hitting items in the immediate work area To accomplish this you create a path for Baxter A path is a series of waypoints or poses of Baxter s arm This illustration shows waypoints along a defined path In the middle a transit waypoint is high lighted Waypoints are poses you create along the arm s path where Baxter s arm changes in some way from its previous or next location Changes in posi...

Page 78: ...on an action s modify panel How to Create a Custom Path for Baxter To illustrate this feature we will create a Pick and a Place with a user defined or custom path 1 Create a Pick for an object 2 With the object in hand press the Action Button the round button on the cuff Baxter displays the action bar 3 Scroll to the Path icon to highlight it then press OK on the Navigator 4 Elevate the arm above ...

Page 79: ...ation of an action in this example the point at which Baxter s arm will begin moving toward the Place location On the Task Map Approach and Retract points are orange Transit points are points along the path not associated with an action They are locations that guide Baxter s arm along a path Transit points on the Task Map are displayed in yellow The waypoint closest to the Pick or Place automatica...

Page 80: ...nts in that path are deleted When you run a task notice that the arm rewinds along the path you created when it returns to the Pick location You can add a custom user defined path between poses by modifying and retraining a path That path will show up on the Task Map To do this modify a pose select the Paths icon in the Modify Path panel then select the action where the path leads Best Practices C...

Page 81: ...79 Intera 3 2 Create a Path for Baxter 2 Select the Path icon in the Modify widow and press OK on the Navigator Baxter displays the Task Map with the action and its path ...

Page 82: ...or the Pick is high lighted 4 Press the Practice button 5 Select to practice the path at either slow or full speed Slow speed is equal to approximately one half full speed Baxter practices the path Note You can grab the cuff while Baxter is in practice mode to stop the arm from moving That does not alter the waypoints in the path or any of the poses associated with the path How to Modify a Waypoin...

Page 83: ...ge its arm location and or pose and press the action button A check mark is briefly displayed and the pose for that waypoint is updated WAYPOINT PATH NOTES You can scroll through to any waypoint on the path For example you can scroll through the path one waypoint at a time Baxter s arm will move to each point in turn or you can scroll directly to the waypoint you want to modify and Baxter s arm wi...

Page 84: ... on a Modify Waypoint screen that means there is a tip or tips on how to use that functionality Select the light bulb to display the tip How to Modify a Path includes Practice and Retrain 1 With a task already created select the action where the path originates For example if the path is from a Pick to a Place scroll to the Pick ...

Page 85: ...83 Intera 3 2 Create a Path for Baxter 2 Press OK and select the Paths icon from the Modify screen Baxter displays the Task Map ...

Page 86: ... can choose to practice modify or retrain the path After making changes to a custom path you can quickly apply those changes to its return path by clicking the Apply to Return button This button is always available when returning to view a path PRACTICE Practice gives you a run through of the path as it exists now You can practice at two different speeds slow and full RETRAIN ...

Page 87: ...rent path while keeping the pick and place actions and their associated approach and retract points You can then add new waypoints to the path Retrain is also an option in the Modify Panel submenu for selected waypoints MODIFY Modify enables you to change one point at a time whether it s an action a transit point an approach or retract 1 Select Modify ...

Page 88: ...axter Baxter displays the Modify Waypoints panel 2 Select a waypoint by scrolling to it and pressing OK on the Navigator The submenu changes depending on the kind of waypoint selected and the kind of action upon which the path is based ...

Page 89: ...in Enables you to quickly modify an existing path Pressing Retrain deletes the transit way points on the current path while keeping the pick and place actions and their associated approach and retract points Add Adds waypoints to the path To add a waypoint 1 Select a path from the Task Map 2 On the screen select Modify Baxter displays the Move Pose Mode screen 3 Scroll to the waypoint on the path ...

Page 90: ...88 Intera 3 2 Create a Path for Baxter 4 Press OK to display the submenu for that waypoint 5 Select Add Baxter displays the screen in Add Waypoints Mode ...

Page 91: ...t preset This is the way Baxter has followed waypoints along its path in the past If you upgrade a task from a previous version of the software this is the preset that will be selected Explicit more precise but slower Baxter will follow the waypoints closely and in a controlled manner that is more closely and controlled than either the Balanced or Express presets This preset would be a good choice...

Page 92: ...90 Intera 3 2 Create a Path for Baxter 2 Press OK to display the menu button bar 3 Select the Motion presets icon The current or default motion preset is displayed ...

Page 93: ...ect a preset 5 Press OK How to Change the Motion Preset at the Action Level 1 Highlight the pick place or hold action on the Task Map and press OK 2 On the modify action screen select the icon 3 Select the Advanced icon on the modify screen to display the advanced action modification screen ...

Page 94: ...tion Presets icon 5 Scroll through the options 6 Press OK to select one of the presets then press Done to save it IMPORTANT NOTE ABOUT MOTION PRESETS The destination action the action to which the arm is moving along the path is where you apply the motion preset For example if you need Baxter s arm to move in a controlled deliberate fashion from a Hold to a Pick you would open the advanced screen ...

Page 95: ...ocation hold for as long as you define and then move on to its next pose Hold works with or without a part being grasped and in any pose or orientation Note Hold is not a waypoint and Baxter does not treat it as such Rather Hold is an action that takes place in a specific location How to Train Baxter to Perform a Hold To illustrate this feature we ll create a new task in which Baxter will hold up ...

Page 96: ... the Hold icon has a time feature indicator associated with it The default Hold time is zero seconds How to Modify a Hold You can modify the characteristics of a Hold action the same way you do a Pick or Place from the modify panel or the task order screen To change the duration of a Hold 1 Select the Hold icon on the Task Map and press OK on the Navigator to display the Modify screen for the Hold...

Page 97: ...95 Intera 3 2 Hold 2 Select the Add Features button to display the Add Features submenu This submenu allows you to add a signal to a Hold or modify the duration of a Hold ...

Page 98: ...ose until it receives a signal 5 Press the Back button to complete The Unlimited Hold capability gives you greater flexibility when working with tasks that require sig nals to move on from a Hold Note As of Intera 3 2 Baxter no longer displays a confused look if a ready signal is assigned to a Hold How to Create a Series of Hold Subtasks 1 Create a new task 2 Pose the arm in the location where you...

Page 99: ...checkmark at the top left of the Task Map to confirm 8 Press the Back button to complete The Task Order screen with a series of holds might look like this Note You can re order a hold into a new subtask Baxter treats hold only tasks as if there is no object in hand so you cannot specify a weight for a part If Baxter s arm is holding a part that has some weight to it the movement and performance of...

Page 100: ...98 Intera 3 2 Hold ...

Page 101: ...ation and angle where a pick place or hold action takes place You can also use this feature to nudge an action s retract and approach points if the action is non vertical You cannot nudge a vertical action s approach and retract points How to Nudge a Pose 1 Select a pick place or hold action on the Task Map Baxter displays the action s Modify panel 2 Select the icon The panel is displayed ...

Page 102: ...e location you want to change This can be the action itself or its attract or retract point if the action is non vertical The Back and Nudge buttons are displayed 5 Select Nudge Baxter moves its arm to the currently defined pose and displays the options for how the pose can be nudged ...

Page 103: ...cuff profile camera on right Training cuff profile camera in back In short when you nudge Baxter s cuff make sure the profile of the robot matches the image shown in the display YAW PITCH AND ROLL Yaw pitch and roll are terms used to describe the way in which an airplane moves about its three axes Yaw twist or oscillate nose left or right about the vertical axis running up and down the plane Pitch...

Page 104: ...ons on the next page in Nudge Just picture the orientation of Baxter s wrist as below and equate this orientation with the nose of an airplane In other words picture the front view of wrist with the gripper fingers pointed at you and the camera on the bottom as being the nose of the airplane Then yaw pitch or roll accordingly Side view Front view ...

Page 105: ...long the x axis in a line from the gripper connector to cuff camera along the y axis left and right perpendicular to the cuff camera along the z axis up and down Bottom row You can nudge the angle of the wrist around the X Y and Z axes in fractions of degrees 0 25 specifically yaw the wrist pitch the wrist roll rotate the training cuff Yaw Pitch Roll ...

Page 106: ...se for a non vertical action is highlighted If the pose is non vertical you can nudge in six degrees of freedom If vertical snap to vertical is checked there are four degrees of freedom available for nudging 6 Select from among the options then dial a distance or degree using the Navigator scroll knob You can nudge at intervals of 1 mm for translation and 25 degrees for orientation Baxter s arm mo...

Page 107: ...e to a non vertical pose You should move the arm before you enter Nudge mode While in Nudge mode you can move the arm by squeezing the training cuff and moving the arm as you normally would in zero gravity If you press the Save button after moving the arm this becomes the updated pose from which nudges are made Keep in mind that if you nudge an Action its Retract and Approach are not nudged propor...

Page 108: ...106 Intera 3 2 Nudge You cannot nudge transit waypoints You can use the Navigator on either arm when in Nudge mode ...

Page 109: ...to all of the robot s features tasks etc This feature requires a USB device formatted FAT32 with a text file with the name RethinkPass word txt Baxter will recognize this txt file only if it resides on the USB device s root directory You can create your own text file with this character string or download it directly from the Rethink Robotics FTP site Note The password file will then be provided b...

Page 110: ...108 Intera 3 2 Lock Unlock 2 Once the stick is inserted from Baxter s button bar select Sleep 3 Select Lock or Unlock depending on what state you want Baxter to be in ...

Page 111: ...s or the robot itself the loca tions where the robot expected to perform those actions get moved That would make the robot fail to perform the tasks For these reasons we have designed the Robot Positioning System feature In a new workflow using this feature an operator can quickly reregister the robot to the workspace and continue work ing without having to retrain a task or spend time trying to f...

Page 112: ...n a distance 50mm and or a rotation of 10 degrees IMPORTANT When re registering to a previously associated landmark it s very important that you do not move the arm from the original location Doing this will introduce error into the associated actions Therefore we recommend pressing the OK button on the other arm or Baxter s torso For certain tasks you may need to mechanically fix Landmarks to the...

Page 113: ...l leveled surface and that the surface is properly cleaned before placing the landmark The further away a landmark is from the actions the less precise it might be when reregistering the robot We recommend landmarks be no further than 50 cm away from the actions associated with them To allow Baxter s imaging system to see the landmark position the end effector camera approximately 20cm above the l...

Page 114: ...ould recognize the landmark and highlight it with a green outline If Baxter cannot locate the landmark as in the example below do one of the following make sure the camera is 20cm above the landmark adjust the gain to make the image brighter or darker move the landmark module so that it s closer to the center of the camera s point of view remove the end effector ...

Page 115: ...ion is displayed by the height and brightness of the vertical green bar in the middle of the screen taller and brighter stronger recognition The landmark is recognized when it is outlined in green and a message displays with the landmark s number as in the example below ...

Page 116: ...stem 3 Save the landmark by selecting Save but to avoid moving the camera press the OK button on the torso or the other arm When the landmark is saved the screen displays a checkmark and the number of the landmark as in the example below ...

Page 117: ...115 Intera 3 2 Robot Positioning System Alternate Way to Create a Landmark You can also create a landmark this way 1 Press the Rethink button 2 Select the landmark gallery icon ...

Page 118: ...116 Intera 3 2 Robot Positioning System 3 Select Create New ...

Page 119: ...e a Landmark screen as seen previously 4 Save the landmark as before using the navigator button on the torso or other arm How to Associate a Landmark to an Action 1 Select the action on the Task Map 2 Select 3 Select The Associate Action to Landmark screen displays ...

Page 120: ...ssociate multiple actions to a single Landmark This is a more efficient approach when there are multiple actions that need to be associated to Landmarks How to Reregister a Landmark After one or more of the action locations has been moved whether because the robot has been moved a fixture has been inadvertently bumped Baxter has been inadvertently bumped etc it s easy to reregister the actions usi...

Page 121: ...do not move the arm from the original location Doing this will introduce error into the associated actions To reregister a landmark 1 Press the Rethink button 2 Select the landmark gallery 3 Select the landmark to be reregistered In this case it s landmark 8 4 Select Reregister 5 Press Start The arm moves to its original location ...

Page 122: ...s originally saved If the new location of the landmark is no more than 50mm and or 10 degrees rotation from the orig inal landmark location Baxter will recognize the new location If the new location is too far off just move Baxter or the module until the green outline is displayed 6 Press Reregister ...

Page 123: ...121 Intera 3 2 Robot Positioning System The landmark is reregistered note the checkmark and the location is realigned with the original task location ...

Page 124: ... to the robot If you do need to avoid an obstacle use a series of Holds and associate those to a landmark instead of using paths to avoid the obstacle Keep the surface containing the landmark s level Pay attention to the height of the robot when reregistering The height should be the same when reregistering as it was when originally registered So for example if you unlock the casters on the pedest...

Page 125: ...Q When I relocate the robot will my custom paths be erased A No The path will remain the same but the end points i e Approach Retract will move to the new locations Q When I have Action Groups do I need to associate each action to a landmark or may I just associate the whole Action group to the landmark A If you have an Action Group and would like to associate all actions to a landmark you can jus...

Page 126: ...y table offloading parts from the table and placing them on conveyors to either side of the robot using both arms The rotary table has more than one nest where it will pick parts from The table and conveyor are on wheels and this line is constantly being moved The engi neer doesn t like to have to train the task every single time they have to move the line somewhere else SOLUTION Even though there...

Page 127: ...s four landmarks will need to be placed because each arm is independent of the other 1 Train PICK and PLACE for RIGHT arm 2 Train PICK and PLACE for LEFT arm 3 Position one landmark on each of the conveyors for each of the arms so that both arms can reach and see its respective landmarks 4 Train each ACTION to its relevant landmark Done Putting parts into fixtures that require precision TASK DESCR...

Page 128: ...126 Intera 3 2 Robot Positioning System 1 Train PICK and PLACE 2 Position one landmark on the fixture close to the actions 3 Train each ACTION to its relevant landmark Done ...

Page 129: ...oted level signals are active when true edge signals look for false to true transitions You ll notice that Baxter displays in context descriptions of each of the signals in its signal library so if you re unsure which signal you want to use in your current situation these descriptions will help In Ready level and edge Signals to Baxter that the external world is ready for it to perform an action I...

Page 130: ...o not have the Do Subtask signal associated with them Baxter will perform its task typically skipping those subtasks that have Do Subtask associated but not asserted Reset In Baxter can receive a Reset In Signal if a PLC triggers Baxter to reset its task to start at the first action This is essentially the same as stopping Baxter and pressing the reset button Returns all counts to 0 Reset Count Re...

Page 131: ...es Rather they use the existing signaling system for communication within the robot itself Internal signals enable more granular control over arm coordination with less reliance on a PLC Whereas in previous versions you could coordinate across arms at a subtask level as of 3 2 you can coordinate anywhere you can add a signal say at the start of an action during the action or the end of an action A...

Page 132: ... I O to access the signals gallery Use this screen to view available signals or add new ones When you first access the signals gallery it will be blank as in the illustration above if no signals have been created yet If signals do exist in the gallery the display will be similar to the one below ...

Page 133: ...ery 2 Displays a list of all signals defined for the current task 3 Displays the details of the selected signal Name of the signal Device name and line number Number of places the signal is added to the task Number of the type e g In Ready of signals created 1 2 3 ...

Page 134: ...e create signal icon 2 In the add signal screen click the type of signal In signal icons feature a right and down pointing arrow first and second rows below out signals all have a left and up pointing arrow third and fourth rows In the configure signal screen change the name if it is not clear to your team then reference the correct device and the line number 3 When complete click Done You can lat...

Page 135: ...l 4 Select the plus button to define a signal and its attributes 5 When finished click the Back icon on the screen SIGNALS NOTES You can easily invert the signals Baxter sends or receives by clicking on the invert signal icon in the Polarity column Pulse For more flexibility when integrating with external devices you can define the duration of a pulse for an Out signal You can set it to as much as...

Page 136: ...ut and a single output accessible through the robot s Db15 port The Reset Count policy for a Ready signal can be set to never and you can separately assign a Reset Count signal if needed READY SIGNAL CONFIGURE AS GATE OR ENABLE For pick and place actions with a Ready signal you have the option of instructing Baxter what to do if a signal that was true when Baxter started the action becomes false F...

Page 137: ...135 Intera 3 2 Signals If Gate is chosen for the signal the gate being defined as the action s approach once past the gate even if the part present signal disappears the arm will continue ...

Page 138: ...nually 3 Press the white power button on the robot pedestal The shutdown process is complete when the green and yellow lights around the head shut off Unplug the power cord from the wall outlet power source Maintaining Baxter Cleaning Baxter To clean Baxter periodically wipe it down with a clean damp cloth Replacing the Air Filters Check the Baxter air filters at least every six months and replace...

Page 139: ...Advanced Update Software 2 Insert the USB device that includes the software upgrade and wait for Baxter to recognize the device 3 Select the version of software you want to install 4 Select Yes Continue in the confirmation dialog A status screen appears as the software loads 5 When the software finishes installing restart Baxter Supporting Baxter Occasionally Baxter encounters problems that can in...

Page 140: ...ing Baxter contact your technical support representative for assistance Calibrating the Arms Calibrate the arms to troubleshoot common error messages and to help Baxter maintain its peak performance It is also recommended that calibration is performed according to the following schedule Weekly perform a Basic calibration on both arms Monthly and whenever the robot is shipped perform a Factory and ...

Page 141: ...pick and place accuracy while performing trained tasks try calibrating the arm s to fix the problem Baxter offers three types of arm calibration Basic performs a basic calibration on the arm or arms selected use as a first step in fixing the problem The process takes approximately 15 seconds per arm Factory performs a thorough calibration of all joints on the arm or arms selected use if spring cal...

Page 142: ...d into an area large enough for the arms to move freely 2 Make sure Baxter is level 3 Scroll to Main Screen Settings Advanced Calibrate Arms then select a form of calibration Basic Factory or Spring 4 Select one or both arms then press OK to begin the calibration 5 Move away from the robot and make sure all persons are clear of Baxter The selected arm moves as follows for each type of calibration ...

Page 143: ...r If after calibration Baxter still does not function correctly try retraining and running the task If the problem is not solved contact your technical support representative Troubleshooting Baxter To troubleshoot Baxter If Baxter isn t behaving as expected restart the robot then try running the task again If Baxter is having trouble accurately picking and placing objects try calibrating the arms ...

Page 144: ...e into Baxter Make sure there is at least 2 GB of available space on the device 4 Select Export Logs to USB Export The log files copy to the USB device To retrieve the files from the USB device and email them to Rethink Robotics insert the USB device into a PC copy the files from the device to the PC then attach the files to an email message and send the message to the requester Enjoy This conclud...

Page 145: ...ipper You can also attach custom or third party grippers the same as Rethink grippers essentially by entering the gripper s length and weight and then training Baxter See Configuring a Non Actuating Custom Gripper on page 147 If you change any component of a gripper such as adding extensions to a vacuum cup without detaching it go to Settings Hardware Settings Configure End Effectors to reconfigur...

Page 146: ...Settings Hardware Settings Configure End Effectors 3 If you need to install or adjust the gripper depending on where you are standing click Behind or Front Baxter automatically presents its hand to you either in front or off to the side in back Note You can also manually reposition the arm to access the gripper 4 Select Length then enter the length of the gripper based on the graphic which illustr...

Page 147: ...145 Intera 3 2 5 Click Done then select the vacuum cup s Weight icon 6 Enter the weight of the gripper and click Done 7 Click Train The gripper rotates as Baxter learns it ...

Page 148: ...side in back Note You can also manually move the arm to access the gripper Here are the weights and lengths for each component in the Baxter gripper kits 3 Select Length then enter the length of the gripper based on the graphic which illustrates where to measure 4 Click Done then select the gripper s Weight icon 5 Enter the weight of the gripper and click Done 6 Optionally click Calibrate before f...

Page 149: ...Configuration If you remove a Rethink gripper and then reattach it you do not have to go through the process of reconfiguring it if you have previously configured a gripper of the same type you are reattaching vacuum or electric After calibration for example this new feature allows you to reattach the grip per and get back to work quickly When you reattach the gripper Baxter will display the infor...

Page 150: ... arm it will feel essentially weightless and performance may also improve Note however that if you adjust the weight of a custom gripper and do not specify that change Baxter s arm performance will likely suffer Baxter can support up to five pounds 2 2 kg on each of its end arms An end effector is made up of the plate and its attachments electronic gripper or vacuum fingers NOTE The five pound lim...

Page 151: ...149 Intera 3 2 2 Scroll to the Add Features button and press OK to display the task button bar 3 Highlight the Weight icon and press OK to display the weight entry screen ...

Page 152: ...t and press OK 5 Press Done to confirm the weight 6 Press the Back button on the Navigator once to return to the Task Modify screen The weight appears in the Modify window with its own Added Features button 7 Press the Back button again to return to the Task Map ...

Page 153: ...lines for the e stop and a safety mat TABLE 1 DB15 Pinouts DB15 Pin 1 E Stop E Stop Switch 9 E Stop E Stop Switch 2 Safety Mat To 5 6 via safety mat cable 10 Safety Mat To GND 8 for safety mat 3 Safety Mat To 5 5 for safety mat 11 Safety Mat To GND 13 via safety mat cable 4 Torso 0 In Torso 0 In Ready In 12 Torso 0 In Return Torso 0 In Return Ready In Return 5 1K to 5 To 3 for safety mat 13 GND To...

Page 154: ...ted input will appear as TRUE Torso 0 Out is open when FALSE and closed current flowing when TRUE Pin 4 Torso 0 In Ready In 5v 24v Pin 12 Torso 0 In Return Ready In Return Pin 7 Torso 0 Out Done Out 5v 24v MUST BE EXTERNALLY CURRENT LIMITED Pin 15 Torso 0 Out Return Done Out Return GND 10ma MAX ...

Page 155: ...he subnet mask is 255 255 0 0 Please refer to the RTU manufacturer s instructions for assigning the IP address Note With Baxter 1 1 software Rethink Robotics qualified the Moxa ioLogik E1212 Remote Terminal Unit 2 With Baxter shut down and powered off attach the device to the Ethernet port 3 Turn on the device 4 Power Baxter on 5 Go to Settings Hardware Settings Configure Modbus ...

Page 156: ...efault or enter a descriptive name for the device maximum 16 characters Tip Create an easily recognizable name This makes it easier to identify when creating and adding signals to a task Number of Lines In and Lines Out IP Address To change the default Input and Output Base of 0 and parameters select the Advanced icon 8 Click Done to save the new device ...

Page 157: ...digital binary signals Baxter uses function code 2 Read Discrete Inputs for reads and function code 5 Write Single Coil for writes The ModBus device must be configured in SLAVE mode When using settings other than the default you must set the input and output base addresses in the Baxter configuration panel if other than 0 0 and the inputs and outputs must be digital discrete coils not registers an...

Page 158: ...era has the option to invert an input or output signal An inverted signal is simply inter preted as opposite to the default Namely a zero is considered true and a one is considered false Signal classes Intera uses two main types of signals Level the information is contained solely in the current value of the signal This represents the state of something e g whether a part is present or whether an ...

Page 159: ...ch signals can be assigned Elements include the overall task itself a subtask an action group an individual action Action Sequences are also task elements though signals cannot be attached directly to them Signal types Intera has a predefined set of signal types In order to define a signal a type must be selected it must be named and it must be associated with a particular input or output Once def...

Page 160: ...st 0 5 seconds Increment Count pulse the count for a particular task element has just changed This only hap pens if the element is successful Start pulse a task element is starting End pulse a task element is finishing Task Reset Out pulse the Task has been reset Error Out level the Task has an internal error Confusion level the Task is in a confused state Active pulse the associated hold is curre...

Page 161: ... signal type For example the Done signal is true if and only if all of the Actions are done logical AND whereas any of the pulses e g Start occur when any one of the Actions generate them logical OR ACTION SEQUENCE An Action Sequence AS consists of five lists of Actions executed in a defined order each time the AS is started The lists are 1 Zero or more Holds executed sequentially 2 One or more Pi...

Page 162: ...ype and the place to which the signal is connected Discussed below are each of the places that support signals and each of the signals they support TASK These signals are accessed in the Task Order screen For non coordinated tasks these signals can be attached separately to the task for each arm except where noted For coordinated tasks these signals are attached to the overall task INPUTS Ready le...

Page 163: ...unt has been incremented If a subtask is unable to complete because of errors then the task won t complete and this signal will not be sent If all subtasks are complete either because their count is done and has not been reset or Skip is asserted the task count will increment rapidly until a subtask starts to run In this case the Task Increment Count signal won t be particularly useful Error Out l...

Page 164: ...bout to start the sub task will be skipped A skipped subtask will increment its count and send an Increment Count signal Do Subtask level When associated signal must be asserted for subtask execu tion to occur Reset Count edge When the Reset Count pulse is detected the subtask count will be reset OUTPUTS Done level true when the subtask is done i e it has completed the number of cycles specified b...

Page 165: ... The Pick goes into an error state which leaves the count alone so Done will not be asserted This is the default 2 If the SoftFailureLimitAction attribute is set to EMPTY the count will be set to zero a sensed empty condition and as a result Done will be asserted Increment Count pulse sent when the Action has succeeded and the count has changed The pulse is sent when the Action successfully picks ...

Page 166: ... applicable Start pulse sent when the Hold is starting its approach End pulse sent when the Hold has finished its retract Active pulse When the hold is active currently holding at the hold pose the active signal will be pulsed true ACTION GROUPS When actions are in a group signals can only be attached to the action group and not to individual actions within the group When an input signal is attach...

Page 167: ...eset the count Q How do I use signaling and an external PLC to run Action Sequences out of order A There are two main approaches to using signaling to run sequences out of order using an exter nal PLC 1 Put multiple Action Sequences into single Subtask using the combine operation on the Task Order screen Use Ready signals on the Picks to choose which Action Sequence to run a Counts should be set t...

Page 168: ... first HOLD when PICK READY is not enabled A Action Sequences are defined to not start unless there is an available Pick This is to prevent the robot from getting stuck in a sequence when a better choice might come along For example a Skip signal might want to end the Subtask but that can t happen in the middle of an Action Sequence Q If two input signals become true at the same time e g Pick Read...

Page 169: ...ade which is then communi cated to and synchronized with Intera by asserting only one signal representing the required action Q Where can I get the most up to date information on signals Intera 3 1 or anything else related to Baxter Please visit our Wiki at mfg rethinkrobotics com ...

Page 170: ...factory is using multiple Baxters to perform the same task When transferring tasks to a different robot variability across robots and fiducials are not taken into account Note If you have multiple exports of tasks on the same USB stick only the most recent set of exported tasks will be imported How to Export Tasks from a Robot 1 Insert a USB device formatted as FAT32 into the USB port on Baxter 2 ...

Page 171: ...ra 3 2 5 Press OK Baxter displays its tasks All tasks are selected by default 6 To select just some of the tasks scroll to each particular task and select it or deselect it by pressing OK when it is highlighted ...

Page 172: ...ocess the import will be canceled COPIED TASKS If Baxter already had a task named Task1 in its Task Gallery the newly created name would be incremented by 1 e g Task1 1 A TROUBLESHOOTING CHECKLIST FOR IMPORTED AND EXPORTED TASKS Because the physical world of the two Baxters the Baxter from which the task was imported and the Baxter to which the copied task was exported are not identical you may ne...

Page 173: ...ferent from the original in some way In this case the operator has to tweak the layout of the workspace or the paths of Baxter s arms The lighting is different That could affect Baxter s vision See How to Change the Lighting Settings for Baxter s Cameras ...

Page 174: ...sing etc There are no performance differences between vertical and non vertical tasks However vision search is available only for vertical Picks The camera does not operate for non vertical tasks Workspace and Robot Joint Limits The ability of Baxter to perform actions at any given location is affected by the physical limits of the arms When training an action consider Each of the robot s joints h...

Page 175: ... may be in Baxter s path Think Baxter s arm path through before you create it Do a dry run by manually moving the arm before creating the waypoints Move the arm through your planned path and don t focus just on the wrist Instead take into account the entire length of the arm as you move through the path Do the joints including the shoulder and elbow ever approach their limits Does Baxter s arm as ...

Page 176: ...tion Consider finger tip thickness as it will alter grasp range There should be at least 1 cm of clearance between the part and the finger tips when the gripper is open outside grasp If object edges are on the lines of a zone choose the next position or next size fingers 3 Try different finger tips based on the shape and size of the object 4 Consider adding a limiter to give additional stability A...

Page 177: ... to have high contrast between an object and the surface Baxter cannot learn an object if it is moving during training See Training a Pick Using Vision on page 36 and Camera Settings on page 45 for more details about how to effectively train Baxter using vision Conveyors Pick actions from conveyors require object training and a visual search area Baxter cannot learn a blind moving Pick action Trac...

Page 178: ...ks When training a stack above the waist train the bottommost object in the stack and use Contact or First as the Action Control See How to Make Detailed Modifications to an Action Advanced Settings Screen on page 71 Multiple Locations When training multiple Pick or Place actions in a row always have an object in hand to increase accuracy in performance ...

Page 179: ...al block 1 Power Baxter down and remove the e stop assembly 2 Connect the terminal block connector to the DB15 connector where the e stop button was originally connected 3 Run the bare wires from the safety mat into the terminal block and wire them with appropriate jumpers as shown in the diagram on the following page To ensure full e stop support pass the e stop wiring through to the illustrated ...

Page 180: ...178 Intera 3 2 Note Unless shown as a jumper in the above diagram all other wiring is pin for pin on each connector ...

Page 181: ...problem persists contact your authorized Rethink Robotics service provider for technical support You will need to provide the model and serial number of the robot experiencing the problem These can be found on the back of the robot near the power button If the product is no longer within the warranty period the authorized Rethink Robotics service provider will provide an estimate of the technical ...

Page 182: ......

Page 183: ...Last updated April 17 2015 P N 26004 Rev C ...

Reviews: