Model MMU-1600G Series Op Man - Ver 1.07.23 - Rev 20151026DL
Page 34 of 58
4.2
FRONT PANEL DISPLAY AND PUSHBUTTONS
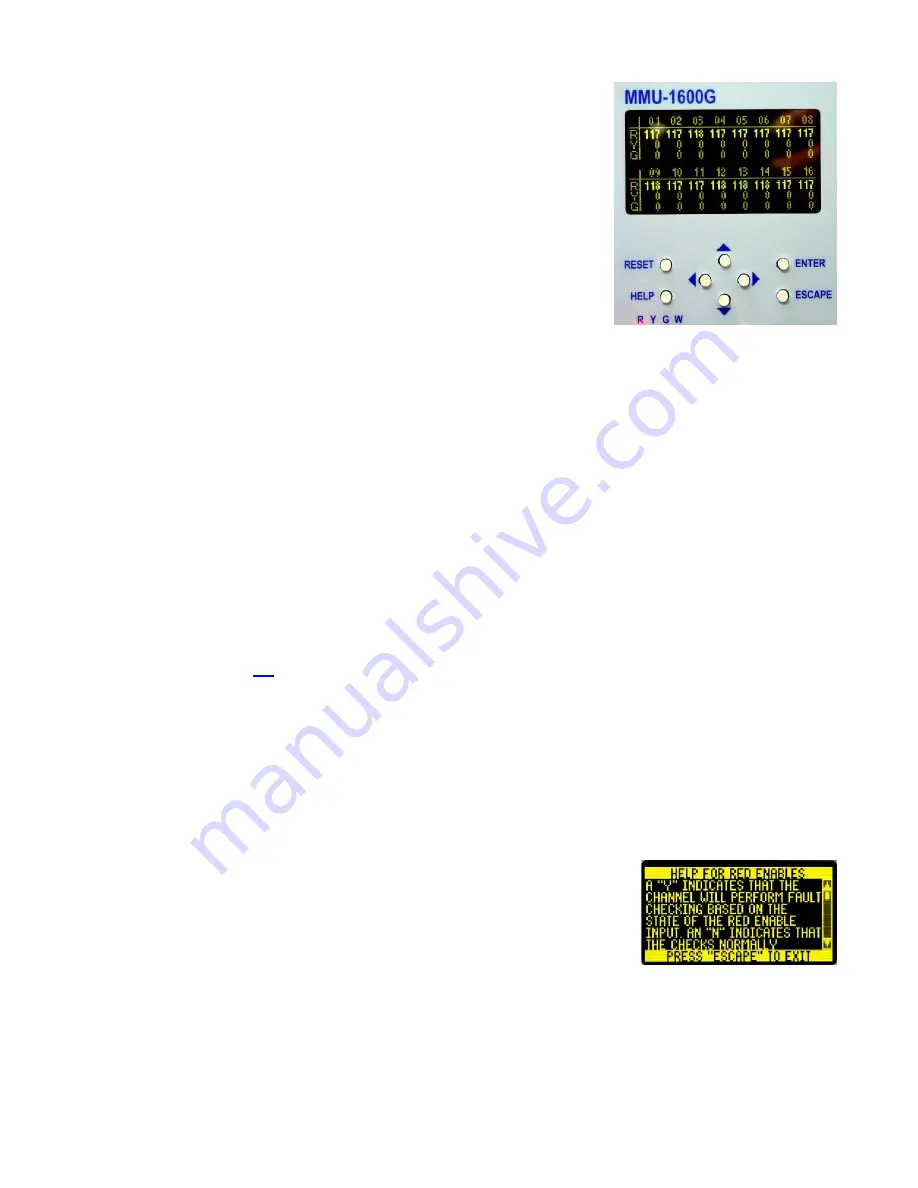
The MMU-1600G incorporates an Organic Light Emitting Diode (OLED) graphic
display that provides an indication of monitor status and programming configuration
and eight (8) momentary contact pushbutton switches that are used to select and
program monitor options and settings. The monitor does have a screen saver mode
for the display. Ten minutes after the last pushbutton press a screen saver will be
displayed. The screen will gradually fade to black over a period of 60 minutes.
Pressing any pushbutton will return the display to its display prior to the screen saver
becoming active.
Up Pushbutton – The pushbutton labeled ▲ is used to navigate through menu
selections or settings being viewed. Pressing this pushbutton while at the top of a
menu will advance the cursor to the last menu item. If the setting being viewed can
be changed, and the setting is displayed on a line consisting of more than one entry,
pressing this pushbutton will increment the setting. When at the Run Time Display,
this button will increase the front panel LED dimming level.
Down Pushbutton
– The pushbutton labeled ▼ is used to navigate through menu selections or settings being viewed.
Pressing this pushbutton while at the bottom of a menu will advance the cursor to the first menu item. If the setting being
viewed can be changed, and the setting is displayed on a line consisting of more than one entry, pressing this pushbutton will
decrement the setting. When at the Run Time Display, this button will decrease the front panel LED dimming level.
Left Pushbutton
– The pushbutton labeled ◄ is used to navigate through menu selections or settings being viewed. If the
setting being viewed can be changed, and the setting is displayed on a line consisting of more than one entry, pressing this
pushbutton will advance the cursor to the setting to the left of the current entry. If the setting being viewed can be changed,
and the setting is displayed on a line consisting of a single entry, pressing this pushbutton will decrement the setting. When
at the Run Time Display, this button will display the Configuration Shortcuts menu.
Right Pushbutton
– The pushbutton labeled ► is used to navigate through menu selections or settings being viewed. If the
setting being viewed can be changed, and the setting is displayed on a line consisting of more than one entry, pressing this
pushbutton will advance the cursor to the setting to the right of the current entry. If the setting being viewed can be changed,
and the setting is displayed on a line consisting of a single entry, pressing this pushbutton will increment the setting. When at
the Run Time Display, this button will display the Troubleshooting Shortcuts menu.
Reset Pushbutton
– The pushbutton labeled
RESET
is used to reset the monitor. When the pushbutton is pressed, all front
panel LEDs will be illuminated for 300 milliseconds to confirm the reset of the monitor. The
RESET
pushbutton is also
used to access a diagnostic display mode that allows the user to view the current line voltage, active configurations settings,
and past faults. See Section
4.9
for details.
Help Pushbutton
– The pushbutton labeled
HELP
is used to access a context sensitive help function. Pressing this
pushbutton will bring up a display screen explaining the items displayed on the screen at the time the pushbutton was
pressed.
Enter Pushbutton
– The pushbutton labeled
ENTER
has several functions. From the Run Time display it is used to access
the Main Menu. In a menu it is used to select a menu item. From a data screen it may be used to select characters to be
modified, toggle settings, or accept changes to parameters that have been modified.
Escape Pushbutton
– The pushbutton labeled
ESCAPE
is used to return to the prior screen displayed.
4.3
HELP SYSTEM
The monitor contains a very extensive, context sensitive help system that is activated by
pressing the pushbutton labeled
HELP
. The help display includes a scroll bar on the right
side where the position of the scroll button indicates your position in this help topic and
the size of the button indicates the amount of the help text that is currently displayed. Use
the up (▲) or down (▼) pushbuttons to scroll through the help topic and use the
HELP
or
ESCAPE
pushbuttons to exit the help system.
When a fault is displayed at the Run Time display, pressing the
HELP
pushbutton will display information about this type of
fault and how to troubleshoot it.


